Are you searching for a way to increase student-to-student interaction in your teaching? Would you thrill at the idea of more creative online discussions? This post describes a well-tested approach that supports strong inter-student interaction and avoids the typically mundane discussion activity. Best of all, this approach works effectively in multiple STEM disciplines, including mathematics, engineering, coding, and other problem-solving orientated subjects.
Creative Discussions
Since I always look for ways to make online discussions more engaging and meaningful for students, I like to share instructors’ creative and fun approaches. Several years ago, I wrote a blog post explaining how a math instructor engaged students, asking them to find examples of parabolas they were studying that week in their local environment and post pictures on the discussion board. It was a huge success and had students enthusiastically sharing their discoveries.
I’m currently working with an engineering instructor to develop a series of graduate-level online courses. The challenge is how to approach a series of homework activities. The assigned problems are difficult, so solving in small groups is beneficial. However, the instructor also wants to make sure that all students independently develop a firm grasp of the principles and processes, but without worry about right answers.
Enter the two-step problem solving approach. Here’s how it works:
First, students review a complex scenario-based problem, which they attempt to resolve individually. Students are assessed on accurate application of the proper processes, formulas, or steps to solve the problem, not on whether they come up with the correct answer.
In the following week, students work in 3- or 4-person teams, uploading and sharing their individual responses on the group’s private discussion board. This leads to the second step, where students review the logic and processes taken by team members. To reach agreement on the correct answer, they collaborate and discuss all the proposed approaches, actively engaging with and educating each other, citing resources that support why their approach is correct. Ultimately, each small group must interact and debate until they reach a consensus, which is submitted and graded for a correct (or not) answer.
Successful Outcomes
The engineering instructor has implemented this approach for several terms and finds it successful in several ways.
The individual first attempt minimizes the potential of a student shirking their duties or not giving their full effort to the group activity.
Being assessed on approach and application of appropriate principles eases the anxiety of getting the right answer, which minimizes the temptation to use shortcuts or unethical options.
The group discussion supports active learning and requires students to present their solution. When the student believes their answer is correct, they confidently cite evidence and reference applicable resources to explain their rationale.
Given today’s global business environment, the ability to succeed as part of a team is an essential skill to master, requiring effective communication, persuasion, and negotiation to arrive at a consensus.
Working as a team alleviates pressure and allows everyone to contribute, more or less evenly. Students must interact with peers and learn to respect and appreciate individual differences, skills, and perspectives.
Although most problems have a “right” answer, solutions often include a more nuanced response that highlights the need for some degree of subjective judgment.
Using this two-step approach has been valuable for students. It reinforces their efforts to grasp the formulas and processes related to the problem, while simultaneously providing the space to learn from their peers. And as noted earlier, this method is easily adaptable to many disciplines and subjects. If you are searching for a way to increase student-to-student interaction in your teaching, you may want to give this two-step approach a try.
We’d love to hear your feedback and comments, so please post if you want to share your experience with this or other creative approaches. Good luck!
Susan Fein, Ecampus Instructional Designer, susan.fein@oregonstate.edu
This is a guest post by Ecampus Instructional Design Intern Chandler Gianattasio.
At DePaul School for Dyslexia, I teach 5th-8th graders conceptual mathematics, ranging from basic number sense to advanced topics in Algebra 1. Through this experience, I have discovered something I had never heard of before, a learning disability commonly seen coinciding with dyslexia, called dyscalculia. Many people describe dyscalculia as “dyslexia for math.” Dyscalculia affects one’s ability to take in mathematical information, connect with and build upon prior concepts learned, discern cues for application, and accurately retrieve information. DePaul provides an alternative education for students with learning disabilities, emphasizing explicit instruction to best support their students. In this post, I will discuss the common deficits that make up dyscalculia, where it falls in the realm of disabilities, and some ways we can accommodate students with dyscalculia in higher education.
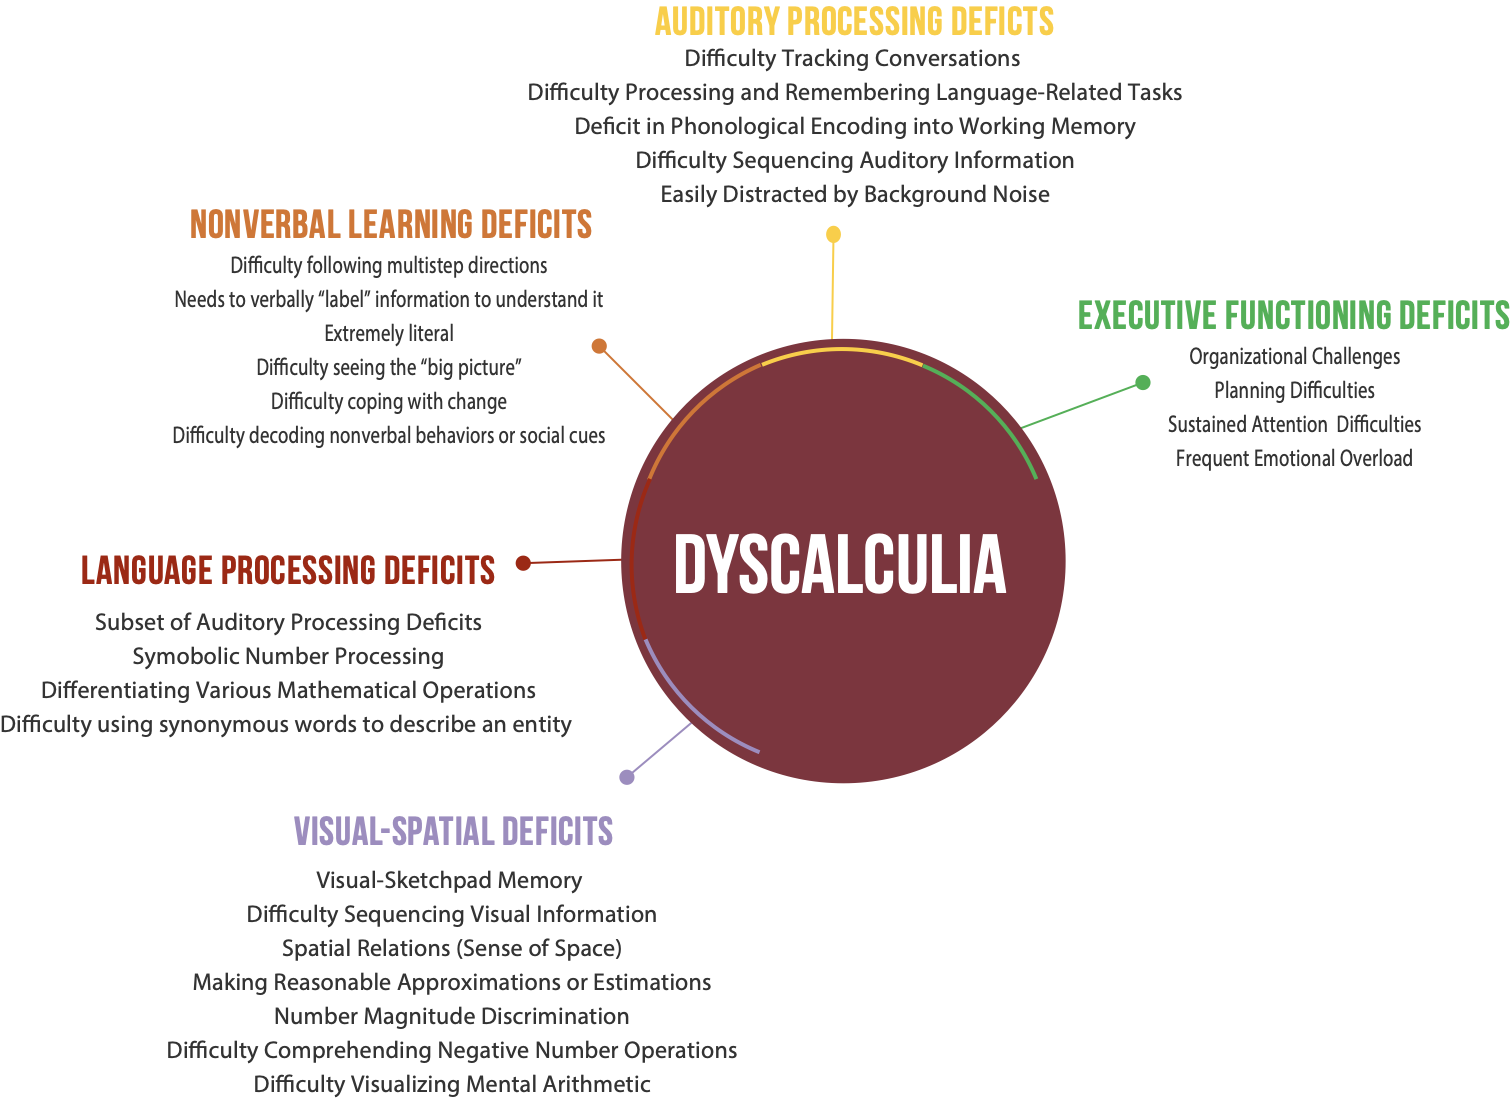
Having dyscalculia can be debilitating, making it seem nearly impossible to keep up with neuro-typical classmates, especially when your class is on a fast-paced schedule, and when you are subliminally being told that asking for extra help will make you appear like you are lazy, unintelligent, unable to help yourself, and will just be one more problem that the instructor has to resolve. In Figure 1 (seen below), I have divided deficits of dyscalculia into five categories: executive functioning deficits1, auditory processing deficits2, nonverbal learning deficits3, language processing deficits4, and visual-spatial deficits5. Each category has a set of commonly experienced difficulties below them. However, these lists of difficulties are not exhaustive.
Figure 1. “Common Challenges Faced by Learners with Dyscalculia” By Chandler Gianattasio – CC BY-NC.
Looking at some of the common symptoms of dyscalculia, you may be thinking that many of these symptoms are also found in other disabilities, such as dyslexia, autism, ADHD, and more, and you would be correct. There is a large amount of overlap amongst developmental disabilities, and each disabled individual presents with their own unique combination of symptoms and, often, coexisting disabilities. To understand where dyscalculia falls within the world of developmental disabilities, I referred to the Individuals with Disabilities Education Act (IDEA) by the Department of Education. Through IDEA, 13 distinctions of disabilities were made:
Other Health Impairment (conditions that limit a child’s strength, energy or alertness)
ADHD, EFD, NVLD
Autism Spectrum Disorder
Emotional Disturbance
Generalized Anxiety Disorder, Bipolar Personality Disorder, Obsessive-Compulsive Disorder, Major Depressive Disorder, etc.
Speech or Language Impairment
LPD
Visual Impairment (including blindness)
VPD
Deafness
Hearing Impairment
APD
Deaf-Blindness
Orthopedic Impairment
Intellectual Disability
Traumatic Brain Injury
Multiple Disabilities
From this list, you may notice that there are only three diagnoses recognized as LDs: dyslexia, a reading disability, dysgraphia, a writing disability, and dyscalculia, a mathematical disability. All three of these LDs, as well as the majority of the other disabilities, have very similar biological limitations, each with the potential for a visual-spatial deficit, language-processing deficit, nonverbal learning deficit, auditory processing deficit, and executive functioning deficit. Due to individuals within each diagnosis having their own unique combination of symptoms, some may not have deficits in each of these areas. Figure 2 represents the potential combination of deficits an individual with each of these LDs may have. For instance, if you were to draw a straight line from dyslexia to the outer edge of the figure, the various deficits intersected would be representative of the profile of one individual. This figure shows the fluidity between different diagnoses and how easily co-existing conditions occur, due to a very similar underlying makeup.
Figure 2. “Potential Combinations of Deficits Behind Each Learning Disability” By Chandler Gianattasio, CC BY-NC-SA.
Figure 3 is shown below to reiterate the significant overlap found between disabilities. Looking specifically at weaker listening skills in this study, a characteristic originally classified as an APD trait, is also a very prevalent trait in individuals with LPD, dyslexia, ADHD and other LDs.
Auditory Processing Disorder (APD), Specific Language Impairment (SLI), Learning Disorders (LD), Attention Deficit Hyperactivity Disorder (ADHD), Autism Spectrum Disorders (ASD). [Colors shown in the charts do not correlate with Figures 1 & 2].
Students struggling with executive functioning become overwhelmed often due to either external or internal stimuli. They often struggle with rejection sensitivity dysphoria, emotional dysregulation and “time blindness”. The most significant way you can support these students is by creating a safe, non-judgemental space for them to communicate with you, and encourage them to always self-advocate, no matter what. You can further support students navigating executive functioning difficulties by doing the following:
Providing easily accessible reminders of important events and assignment due dates. Time management can be a major difficulty, especially with projects over an extended period of time.
Giving lots of positive reinforcement, checking in frequently, and having regularly scheduled meetings.
Pointing out any prior knowledge that is being built upon, and have them answer any questions based on prior knowledge that they’ve mastered in class to boost their confidence and increase their motivation.
Reducing extraneous stimuli and eliminating background noise as much as possible – whether that be in their environment, on a worksheet, in a presentation, in reference material, etc.
Supporting Visual-Spatial Deficits
Students with visual-spatial deficits often struggle with creating their own visual representations of concepts being discussed, especially abstract or microscopic concepts. When navigating directions, these students also struggle with orientation – both cardinal and left versus right. This often presents when they are performing calculations with negative numbers. Most students with dyscalculia learn adding and subtracting via number lines that they manually traverse to understand the connection between operations properly. To help your students who have visual-spatial difficulties, you could offer the following:
Providing tangible manipulatives that they can touch and physically move in order to see how parts function together
This could be provided when introducing a new concept as an addition to 2D drawings or descriptions
It’s always beneficial to have manipulatives available for your students whether that’s physical objects for in-person sessions or interactive virtual manipulatives for online sessions.
Providing graph paper, templates, and/or graphic organizers can be highly beneficial to your students to organize their thoughts and break up information.
Integrating as much UDL in as possible! Presenting information in multiple formats and allowing the students to demonstrate their learning in multiple ways will allow these students to participate in class and showcase their knowledge confidently.
Supporting Auditory Processing Deficits
Students with an auditory processing deficit struggle to comprehend directions and content from listening. The most significant way you can help your students who struggle with auditory processing is by doing the following:
Speaking clearly.
Trying your best not to explain things too quickly.
Being very consistent with the terminology you use (try not to use multiple names for one entity or idea).
Checking in with students often to see if they understand what is being taught or asked of them.
Always encouraging students to ask questions as they work.
Supporting Nonverbal Learning Deficits
Students with nonverbal learning deficits are very literal and struggle to see the overall picture, especially when it comes to abstract concepts. You can support students with an NVLD by doing the following:
Creating a lot of associations and parallels between content and what they already know (common, everyday nuances) could help these individuals a lot.
Teaching concepts alongside any procedural knowledge you want them to retain will help them significantly, as they understand the “why” behind the steps.
Making sure to provide a lot of concrete examples, especially when introducing a new topic.
Structuring classes, making them as consistent and repetitive as possible. If they know what to expect and they are confident that they know how to handle it, these students will thrive.
Supporting Language Processing Deficits
Language processing deficits very commonly occur alongside auditory processing deficits. Students with this difficulty struggle with comprehending directions and content both from listening and reading. To help support these students, try the following:
Keeping language used simple and consistent.
Ensuring adequate (and modifiable if possible) background to text contrast/color.
Using 1.5+ line spacing and increased spacing between letters or symbols.
Chunking content and utilizing bullet points when possible.
Using consistent color associations with certain topics can go a long way (i.e. red for negative and blue for positive).
Starting lessons off with a graphic organizer or outline, showing how ideas fit together.
Including simple diagrams to illustrate concepts or procedures.
Highlighting keywords, numbers in word problems, or other important information you want to make sure they see.
Providing access to pre-written notes, “cheat sheets” displaying steps and formulas needed and worked-out sample problems so students can see what they are to do.
Remember that improving the learning experiences of our learners with special needs almost never comes at a cost to the “typical” learner – improving access, accessibility, and support for one improves these areas for all.
This post is the second installment in the series that describe the main characteristics, major benefits, design considerations, and practices and challenges of implementing an ungrading approach. This second blog presents the types of ungrading practices, challenges to implementation, and main takeaways derived from the book chapters and discussion with my colleagues in the Ungrading book club.
Types of Ungrading Practices
To begin, it is important to recap that the underlying concept supporting ungrading is deep, extensive, and formative feedback. This means that instructors are expected to design low-stakes formative assessments and devote substantial time and effort to craft feedback that students can use to revise their work. This section summarizes several contributions the book chapters authors made in regards to pedagogical practices, strategies, tips, and resources to adopt ungrading. Instructors can combine the ungrading practices or use them as stand-alone activities.
Approaches to Assignments
Portfolios: Students can build their portfolios with different digital tools that allow them to create personal or professional materials that are useful beyond the class (e.g., website, content curation). The critical element in a portfolio assignment is that there needs to be space for critical thinking and metacognitive work that can be shared with others. An additional element can include portfolio conferences. For these conferences, students meet with their instructors to review their course work and make annotations about their learning journey (they can also discuss their final grade).
Project-based Learning, Problem-based Learning, Inquiry-based Learning: Students work on activities that relate to their own experiences, real-life applications, and ill-structured scenarios. These activities encourage students to work with others, find solutions, investigate deeper, and apply concepts studied in the course to realistic situations.
Staged Assignments: Students work on reviewing/redoing assignments to allow them to learn from the feedback they received from their peers and/or instructor.
Minimal Grading: Use of a holistic or simplified grading schema (e.g., pass/fail, strong/satisfactory/weak).
Process Letters: An activity where students describe their learning process and how they evolve in their work in the class. This can be multimodal (e.g., presentations, reflections that combine audio, video, and text) and/or accompany major assignments.
Student-made Rubrics: Students can develop their own rubrics, which can become a learning activity in itself.
Participatory Voices: Students can contribute to course content by creating content, adding items to the syllabus, selecting the type/format of feedback they want to receive, evaluating peers, and developing an intellectual voice. Through self-evaluation and peer evaluation, students can reflect on their learning, understand the process of evaluating others, and focus on excellence and building confidence. Students are given a set of guiding questions to engage in self-and peer evaluation. At the end of the project or term, they recommend a grade for themselves and their peers.
Declaration Quiz: A quiz that asks students to select a checklist of the assignment requirements that they have completed. This can be a low-stakes assignment that helps students reflect on how they accomplished the task. Instructors can create declaration quizzes for each assignment and associate the number of points to the letter-based system.
Interaction
Peer Assessment: When students work in groups, they can evaluate each other. Students can write about their contributions to the group projects as well as their experiences with the team. This can give instructors a view of the team dynamics and activities that are not usually visible.
Grade-Free Zones: This involves reviewing major assignments and/or providing a sandbox space for students to experiment before they engage in completing formal assignments. Students can submit early assignments or portions of them for peer comments or the instructor’s early feedback.
Mastery Orientation
Mastery Learning Artifacts: Students collect learning artifacts that they have developed to demonstrate their mastery of the learning concepts based on the exemplary work and expectations provided by the instructor. Students submit these artifacts at the end of the term. In addition, students describe the areas of growth based on the instructor’s feedback (e.g., revisions).
Single-point Rubrics: This type of rubric includes criteria and fixed binary points (done = 1; not done =0). Comments can be added to either point to note the improvements to be made (in case it is not done) and to highlight the aspects that go beyond expectations. A benefit of this type of rubric is that it encourages mastery of content and keeps students’ focus away from the grade itself.
Feedback Logs: Students collect feedback and identify the areas in which they received more feedback, work out strategies to improve those areas, and reflect on the ways they are learning.
Feedback and Revisions: Students work on a series of drafts, and the instructor provides comments that students are expected to incorporate in the next revised draft. A grade can be added to the final draft.
Self-Assessment: Consider metacognitive activities that engage students in their own evaluation of learning and in dialogue with the instructor. Encourage students to develop their own standards and self-scrutiny practices.
Student Individual Plan: Students articulate goals and values for themselves about a class or a project. The instructor can help students by providing reflection guidelines and templates for developing their own goals.
Challenges to Implementation
While ungrading encourages a shift from a focus on grades to a focus on feedback and metacognitive activities for student learning and success, its implementation is not without challenges. The challenges range from local critiques to structural and how-tos.
A second challenge is the structural system of grades that prioritizes performance over learning. If the focus continues to be on how students perform in a class rather than on their learning, Kohn and Stommel argue that using an ungrading system that gets rid of grades will not be sufficient to push toward a system that creates learning spaces for critical thinking, reflection, and metacognition.
A third challenge involves the redefinition of the curriculum, innovative pedagogy, and how to assess learning. If the idea of content coverage and memorization of facts prevails, learning is treated more as information transfer –from the instructor or textbook to the students. In this transfer, students may not necessarily own their learning. Along with this is the way assessments are designed to emphasize judgment of students’ performance. If the teaching method does not allow room for real learning, ungrading will not make a difference. Thus, the convergence of changes to the curriculum, pedagogy, and assessment methods is of utmost importance.
A fourth challenge is more systemic and structural. Kohn argues that control, in many educational cases, prevents students’ choice and voice in their learning journeys. If ungrading is to have a way in educational contexts, instructors, and even administrators, will be invited to relinquish some of the control they exert over students’ performance to welcome students’ decisions related to their learning needs and interests.
A fifth challenge is a deep and widespread belief that grades reflect learning and action. There is a great concern that if grades are to be eliminated, students will not complete their assignments, need to do more work, or even skip classes. Also, instructors will have to “grade” more and be overburdened.
A final challenge is the over-reliance on rubrics that, according to Khon (foreword, p.xvii), is a system for “judging students…They offer umpteen different axes along which to make students think about their performance— often at the cost of becoming less immersed in what they’re doing.” It is not that ungrading does not provide guidance but it is important to avoid overcontrol evaluation practices. Instructors will need to analyze when and how rubrics help students focus on the learning process (and not solely on the points they get).
Takeaways
The book offered clear rationales, experiences, and strategies that instructors could consider if they feel they want to move away from the grade-focused system. In addition, as a designer, I have a better understanding and collection of resources to use during my consultations with faculty who might be looking into authentic and alternative means for assessment and grading.
Ungrading requires a reconceptualization of the curriculum, pedagogical, and assessment practices. If an alternative means of assessing student learning is to be implemented, the content, activities, and assignments need to open opportunities for students to engage in their own process of learning, reflection, and feedback. If we don’t level the playing field for students, no grading (or ungrading) system would be worth trying.
Grades are considered to be problematic because they contribute to widening the educational equity gaps. Ungrading, as a student-centered approach, can help mitigate some of the inequalities that students experience for access to successful learning. Since not all students come with the same knowledge and skills, ungrading, as a system that personalizes learning and assessments, will orient each student to focus on the feedback that they need.
Ungrading does not mean that instructors do not grade or that students have a free pass. Ungrading requires a deeper understanding of what learning means and how to design learning activities and contexts in which it can be evidenced. There is no universal magic approach to do it. If you are seriously considering moving to ungrading practices, start small, one step at a time.
Have you ventured into ungrading? If so, how did it go? What works and what does not? If not, what are your thoughts about ungrading? I’d like to invite you to share comments or experiences.
One of the principles upheld by the open pedagogy movement is that the role of the learner must be active and the tasks that they engage in must be meaningful. These are not new ideas by any stretch, but as we move toward a more open pedagogical environment, it becomes necessary to examine the types of assignments that we create and assign. How do these tasks contribute to efforts to democratize education and increase learner autonomy, engagement, and freedom? What makes an assignment open? To answer these questions, this post will explore the relationship between open pedagogy and open assignments.
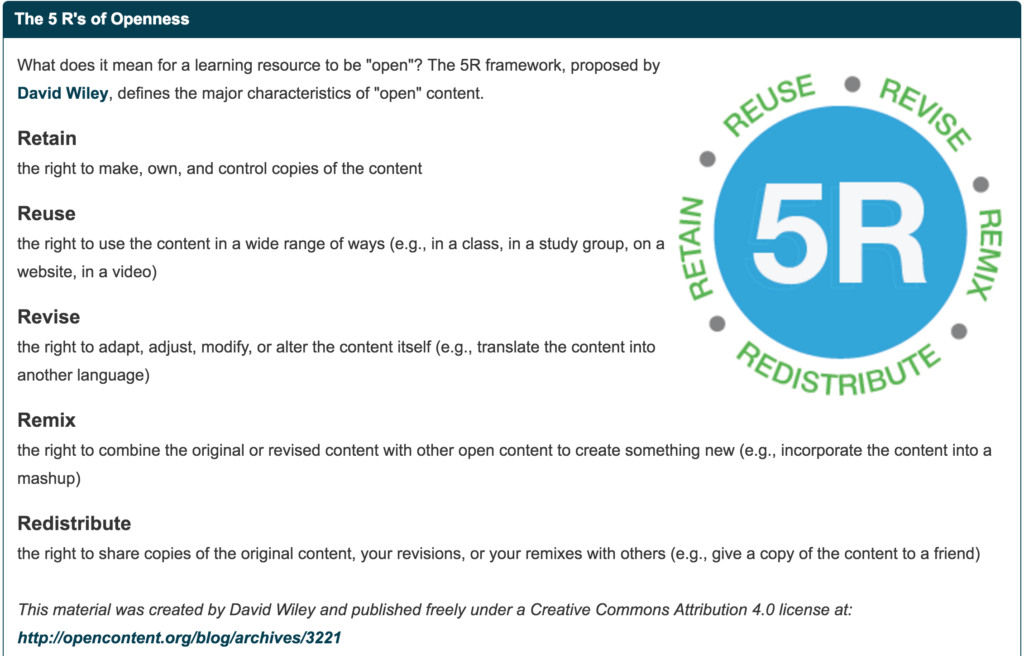
While interest in the topic of open pedagogy has steadily gained steam in the roughly 50 years since its inception, definitions of and familiarity with the concept of today’s open pedagogy vary among educational practitioners. Some discussions focus on the expansion of the use of these resources. You might be hard-pressed to find an instructor who hasn’t at least reused open content (See 5R framework of Open Content) or encountered such materials as a student. Other conversations emphasize the remix and revise aspect of open content and pedagogical practices, and the number of faculty-created Open Educational Resources (OERs) intended to replace the traditional textbook is ever increasing. Still others have turned their attention to implementation of open pedagogical practices that put students in the role of content creators rather than passive beneficiaries of innovations in open content. In our efforts to create tasks that accomplish this shift in the role of the learner, we must first ask what the value of the task is for the student, peers, and the larger community, and what life will such a task have after its completion. To answer these questions, we can look to the non-disposable assignment (NDA).
Non-Disposable Assignments (NDAs)
To define the characteristics of this type of assignment, it is helpful to first define what we mean by “disposable” assignment. It is safe to say that we are all familiar with these types of assignments: typically they include one-off or busy work tasks designed to be filed away and forgotten as soon as completed and graded. In his article What is Open Pedagogy (2013), David Wiley described the disposable assignment in this way:
These are assignments that students complain about doing and faculty complain about grading. They’re assignments that add no value to the world – after a student spends three hours creating it, a teacher spends 30 minutes grading it, and then the student throws it away. Not only do these assignments add no value to the world, they actually suck value out of the world.
Online learning within the confines of a learning management system (LMS) is particularly ripe for these types of assignments. In fact, one could argue they are designed for this type of task. In an online course, instructors create and post the assignment, students complete it, instructors grade it, the course ends, student work is deleted, the course is rolled over, and the next crop of students begins the cycle again. The work is designed to be contained within the LMS for the duration of a course, not to be shared with a broader audience of students or colleagues.
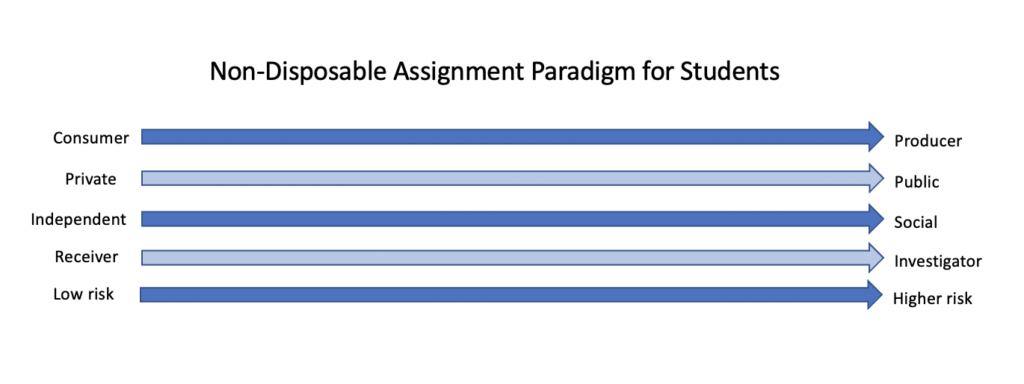
As an alternative to the disposable assignment in favor of more meaningful tasks, Wiley coined the term Non-Disposable Assignment. The NDA (also referred to as a renewable assignment), in contrast to its binworthy counterpart, is an assignment that “adds value to the world.” Later definitions, no doubt influenced by the growing open pedagogy movement and the promotion of the use of OER materials, go further and hold that an NDA ought to produce a resource that is openly published so that “others can find, use, and if desired, repurpose or update the work,” (Jhangiani, 2015; Wiley, 2013; Wiley et al., 2017; Wiley & Hilton, 2018). Such assignments put the learner in the role of creator and impact or benefit an audience beyond the instructor and student. Because the premise of the NDA is that it can not only be shared widely, but also revised and reused without permission by both instructors and students, the content should be openly licensed. Considering the role of learners as authors of the content, they should have a say in determining the type of open license appropriate for their work.
In the article A Conceptual Framework for Non-Disposable Assignments: Inspiring Implementation, Innovation, and Research, Seraphine et al (2019)provide a set of principles NDAs must adhere to. The Five Principles are summarized as follows:
NDAs fundamentally involve information collaboration and exchange.
As forms of responsive and responsible pedagogy, NDAs involve communication throughout and opportunities for revision, creativity, modifying key terms and objectives, etc.
While NDAs might not necessarily involve communal assembly, the resulting product or practice must always be shared outside the teacher-student dyad, creating opportunities for communal access of the NDA as an information resource
NDAs produce learning through cooperative critique.
Because they are not exams or isolated writing assignments, NDAs involve innovation as a fundamental concept.
Benefits and Value of NDAs
Apart from their ability to reach a broad audience, NDAs increase student motivation, engagement and autonomy resulting in improved achievement of learning outcomes. (Ariely, Kamenica, & Prelec, 2008; Chalofsky & Krishna, 2009; Pink, 2011). While this claim may be at least in part anecdotal, it follows that when students know that their work may be used by peers, faculty, and colleagues across their field in the future, investment in the quality of their work increases. Non-disposable assignments and authentic assessments have the potential to add value in other areas by:
promoting community engagement.
fostering innovation.
interrogating and dismantling systems of oppression by centering experiences of historically marginalized groups.
providing opportunities for culturally rich content (inject identity, student influence over content).
cultivating information literacy skills.
increasing accessibility to educational resources.
helping students communicate in writing to a general audience.
offering opportunities to collaborate with peers around the world.
increasing self-regulated learning and autonomy.
Despite their numerous benefits, NDAs are not without challenges and risks. For example, some students may be resistant to the exposure and the vulnerability inherent in creating open content for broad use. In such cases, instructors must provide alternative assignments or options not to share. Because student-generated content requires substantial metacognitive skills, instructors must ensure that NDAs involve significant scaffolding at multiples stages in the learning process (Zimmerman, 1990; Zimmerman, 2002). Furthermore, the open nature of student-generated content presents a quality control challenge that instructors must anticipate and address by providing multiple opportunities for revision and peer review.
NDA Design and Students as Producers
Implementing assignments that have the potential for broad impact beyond the typical instructor-student dyad can seem daunting. After all, conceptualizing and creating tasks that effectively revise the role of student from a passive one to actual content creators is no small feat. However, it is important to remember that the scope can vary widely. Indeed a well-crafted discussion between two students might form the basis for a renewable assignment. Other examples may include experiential connections such as student-generated podcasts; the production of flyers, guidelines, or materials for local community organizations; or even collaboratively created and maintained global resources such as wikis like the Chemistry Library. Whatever the scope, NDAs can—and arguably should—be iterative allowing for innovation and adaptation to various contexts.
With the role of the student as producer in mind and an understanding of the potential pitfalls that an open assignment might present, faculty can then turn to the conventional principles of backward design to develop meaningful student learning experiences that add value for learners and their peers while also promoting community engagement.
Instructors should consider the role of students as they develop non-disposable assignments to put students in the role of content creators. Source: The Non-Disposable Assignment: Enhancing Personalised Learning – Session 1 Slideshare, CC Attribution-ShareAlike
Ashlee M. C. Foster, MSEd | Instructional Design Specialist | Oregon State University Ecampus
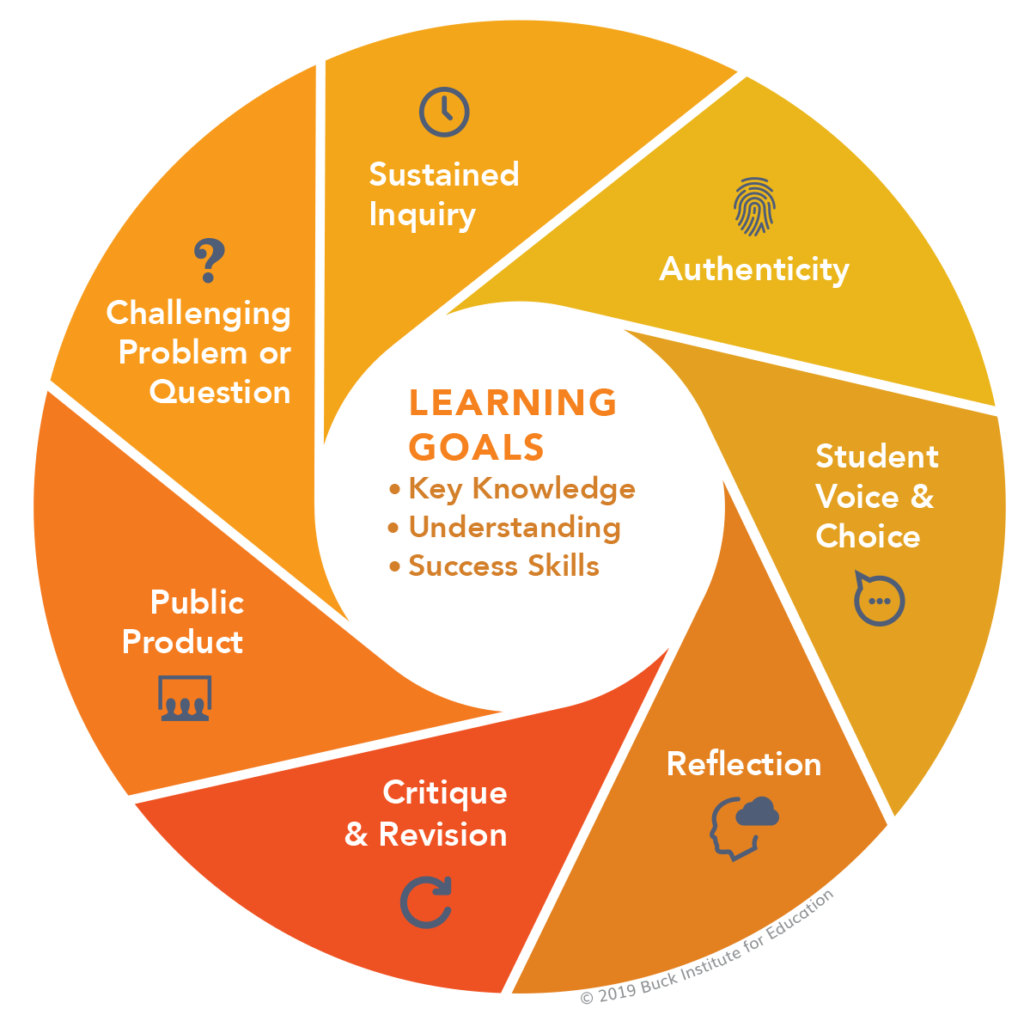
Whether a pedagogical approach is affirmed by research and/or practical evidence intentional design and effective deployment of pedagogical strategies are essential. We will begin with an exploration of evidence-based design components, which build upon the characteristics of Project-based Learning (PjBL), as discussed in Project-based Learning (Part 1) – Architecture for Authenticity.
Getting Started
Begin with the end in mind. Take a moment to establish the outcomes, goals, and real-world connections that will underpin the project. Consider using the following elements as your guide.
Identify the Course Learning Outcomes (CLO) students should be able to demonstrate upon successful completion of the course
Identify the intended project outcomes and the alignment to the course learning outcomes
Identify skills students will practice and master while engaging with the project
Articulate the purpose of the project within the contexts of the course, academic program, field of study, and profession
Articulate authentic connections between the project, across academic disciplines, and professional practice
Connect the project to an authentic purpose that extends beyond the confines of the course
Course Design Elements
Next, reflect on how you can design your project to incorporate most of the following PjBL core design elements.
Initially, consider creating an opportunity for students to self-select a challenge. This can be anything from finding a solution to existing problems, a remedy for historical barriers, answers for disciplinary relevant questions, or asking new questions. Whatever the challenge may be, a best practice is to contextualize it within a real-world context. Affirm student voice and choice by explicitly sharing how the project connects to the academic discipline, professional field of practice, and real issues by providing feedback. Lastly, help students to see how they can connect the challenge to themselves.
Authentic Product
Development of an artifact that is relevant, timely, impactful, and piques personal interest help to bridge the concepts to the real world. To effectively create an artifact that produces a public good, students should engage in an iterative process that includes: planning, prototyping, seeking and applying feedback from diverse stakeholders (i.e., public, target audience, instructor, peers, Subject Matter Expert), personal reflection, and revisions. To determine whether your project is authentic, consider whether the product(s) create a lasting and meaningful impact beyond the classroom. Examples of authentic products could include a business plan to innovate an existing accessibility tool, a podcast to share about (DEI) Diversity Equity and Inclusion practices or to generate oral histories (i.e., audio interviews) of underrepresented populations.
Sustained Inquiry
Incorporation of formal and informal opportunities for students to question, research, gather information, conduct analysis, apply new knowledge, generate additional inquiries, and highlight evidence is key to the design. These opportunities should be integrated into the architecture of the project, but the actions should be student-driven. This strategy will help promote knowledge construction.
Student Autonomy
Create varied opportunities for students to make their own choices, both collectively and individually. Student-driven choice can extend to such elements as question development, selection of public a product, identification of target audiences, establishment of collaboration protocols, application of knowledge and feedback, and prototype revision methods. Doing so situates students as the diver of their own learning process and creates space for students to hone their metacognitive skills (i.e., self-regulation, monitoring, and self-directed learning).
Reflection
Due to its roots in constructivism, reflection is commonly used in PjBL. Reflection is used as a strategy to foster deep learning, personal ownership of learning, assimilation of new knowledge, integration of lived experiences, effective inquiry, assessment of quality, and the navigation of challenges. While serving as a guide on the side, consider integrating activities to foster ongoing reflection of critical questions. Such questions may include:
What is known?
What needs to be known?
What evidence exists?
Will the product have an impact on the world outside of the course? How?
Do I/we bring any personal biases to the project which impacts the design of the product?
Does the design of the product represent the diversity of the target audiences?
What works or does not work? Why?
How can the product be improved? What is the rationale behind the recommended changes?
How can the quality and efficacy of the product be tested?
Does the project extend on what the academic domain and professional field have established? If not, how can the project be modified to contribute additional knowledge or insights?
How does the project connect to my life, my lived experiences, and that of others?
How will the project help me to develop my professional skills?
An example of a PjBL reflective activity is a design journal. Design journals can include text, visualization, and media elements. Each entry can be structured to cover the following: knowledge gained, ideas, sustained inquiry (i.e., questions, additional research needed), the rationale for product changes, and next steps.
Critique & Revision
Integrating activities, such as a design journal, provides students the opportunity to actively critique, revise, and obtain feedback throughout the duration of the project. There is a multitude of scenarios that may call for critique. Students may find their initial idea to be too broad or specific. The original line of inquiry may have been faulty. One may find the product does not generate the intended public good or service. Therefore, revising the goal and creating a new product may be necessary. Alternatively, situations can arise where students learn of a product’s unintended harm, so a new prototype may need to be created. The goal is to create a course climate that is psychologically safe enough to encourage iteration.
Success Tips
Please note that these best practices and design elements offer a framework. Your course is unique. There is an unending list of potential factors that can impact the design of your course and project (e.g., accreditation, professional competencies, academic rigor, program outcomes, administrative expectations, etc.).
Keep in mind that you do not have to incorporate everything and the kitchen sink. Take what you can from existing literature, practitioner testimonials, industry needs, professional practices, real-world examples, and lessons learned from your own lived experiences.
Begin with small additions to your course, assess the impact of those changes, and revise as you deem appropriate.
Remember that nothing will be perfect, and there are always opportunities to improve. Design with the best fit in mind!
Looking Ahead!
You are cordially invited to revisit the Ecampus Course Development and Training Blog for Project-based Learning (Part 3) – Practical Preparation. In the final installment of this series, we will explore additional project-based learning activities, identify opportunities to integrate technology and examine actual project samples.
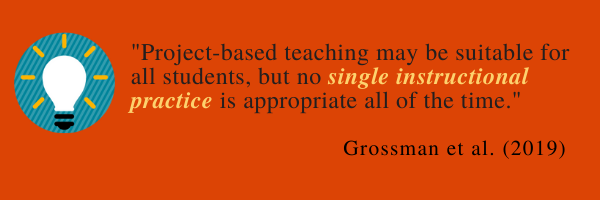
Grossman, Dean, C. G. P., Kavanagh, S. S., & Herrmann, Z. (2019). Preparing teachers for project-based teaching. Phi Delta Kappan, 100(7), 43–48.
Guo, Saab, N., Post, L. S., & Admiraal, W. (2020). A review of project-based learning in higher education: Student outcomes and measures. International Journal of Educational Research, 102, 101586.
Over the last couple of terms, I joined a series of reading sessions with instructional design colleagues to read Alfie Khon and Susan Blum’s book Ungrading. Why Rating Students Undermines Learning (and What to Do Instead) and discuss the practices and implications of this approach to reconceptualize assessment design and the place of grading. This two-part blog aims to capture the takeaways from those discussions including the main concepts, approaches, types of activities, implications, and challenges of adopting ungrading practices. This first part of the blog covers a brief overview of the concept of ungrading, its major benefits, and design considerations; and the second blog will include a summary of the types of ungrading practices and challenges to implementation ––all derived from the authors’ extensive arguments and examples. For a detailed review and summary of the book chapters, you can also check the blog Assessment Design: Ideas from Ungrading Book.
Overview of Ungrading
The concept of ungrading is sparking widespread interest only recently even though educators have been studying and using ungrading approaches for quite some time. The foundational premise of ungrading is to move away from a focus on grades that judge, rank, sort, and quantify student learning to adopting an approach that focuses on using alternative and authentic means to assess learning such as self-evaluation, reflection, student-generated questions, peer feedback, to name a few. Along with that premise is the questionable ranking that comes with grading which makes students compete with one another in an artificial way. Sorensen-Unruh (chapter 9) sees ungrading as a conversational method that facilitates the communication between instructors and students about how students perform in the class. If, as underscored by the authors, grading and the fact of assigning point values to students’ performance makes more harm than good, then, why use grading? Considering that grading is rooted in our educational systems, many of these authors conclude that it becomes inevitable to grade student learning as it is currently done today.
Several scholars and instructors consider grading to be problematic. First, grades are not good indicators of learning. Blum (chapter 3) argues that grading assumes all students are the same, does not provide accurate information about student learning gains, is consequential, adds fear and avoidance of negative consequences, and is arbitrary and instructor-led. Second, the overemphasis on grades can lead to a decrease in intrinsic motivation, students’ excessive anxiety, and the complexity of quantifying how learning happens (Stommel, chapter 1). Third, it can also decrease interest in learning, students may feel inclined for easier tasks, and critical thinking is lacking (Alfie Khon, foreword). Fourth, grading makes students be fixated more on their grades than on the process of learning, leading them to believe that grades are all that matters in school (Khon & Blum; Talbert, 2020). And finally, too much focus on grades can be detrimental to students’ mental health (Eyler, 2022). However, ungrading does not mean dismissing grades altogether. Instead, Stommel proposes creating a learning space that fosters critical thinking, reflection, and metacognition– all skills that are valuable for 21st-century education. Likewise, Alfie Khon contends that grading can be participatory since it does not require a unilateral decision, and thus, students can also propose their own grades (with the instructor’s reservation to accept them).
“Ultimately ungrading— eliminating the control-based function of grades, with all its attendant harms— means that, as long as the noxious institutional requirement to submit a final grade remains in place, whatever grade each student decides on is the grade we turn in, period.”
(Khon, 2020, p. xv)
While ungrading may be an innovative approach to assessments, it should be thought of carefully and adopted with a clear objective. Ungrading, as pointed out by Katopodis and Davison (chapter 7), needs a structure to be effective, allowing students to envision themselves as authoritative, creative, confident, and active, thus achieving a high impactful goal. As ungrading requires instructors to evolve in their approach to assessment, it does too for students who are expected to engage in a process of self-evaluation, self-assessment, and reflection. This requires engagement in metacognitive practices that many students might not be ready to embark on or don’t know how to do it. In addition, while ungrading is believed to be student-centered, it can deepen equity gaps if guideposts are entirely removed. Sorensen-Unruh (chapter 9) believes that ungrading is a matter of social justice –going beyond the expected student agency and aiming at having students exercise their voice and participate in assessment decisions.
As a whole, Blum (introduction chapter) provokes us all to rethink the nature of grading considering that students’ learning conditions vary, with many enduring inequities at many levels. Blum wants us to keep focused on how “varying assessment and feedback methods contribute to the real learning of real individual learners, rather than imposing an arbitrary method of sorting.” (p. xxii); all for the sake of healthy learning.
These are a few key points about the arguments for ungrading. While this assessment practice is taking force in higher education, there are also many critics and skeptics. The purpose of this blog is not to enter into the discussion and controversy of ungrading, but to share a few perspectives and takeaways after an intense and well-structured book club discussion. In the following section of this part-one blog, I will share considerations for designing for ungrading.
Assessment Design Considerations
The educational system requires all instructors to submit grades at the end of every term. There is dissatisfaction with the current grading practices among many instructors and students as explained at large in the book. Here is where the ungrading movement takes force to provide alternative ways to account for evidence of student learning. Riesbeck (chapter 8) argued that by implementing ungrading practices, students can focus more on the content and feedback than on the grades. The use of critique-driven learning allows for more easily quantifiable efforts, progress, and accomplishment. Each ungrading consideration is dependent on a myriad of factors that may or not apply to each instructor’s context. The bottom line in ungrading is re-envisioning the teaching and learning process, engaging students in active learning, and active self-assessment through feedback. The following are design considerations:
Decenter grading and communicate (un)grading practices
Instructors can encourage students to focus on the process of learning, instead of talking about grades, Blums says, we should talk about the purpose and goals of the activities with students. These conversations can help develop relationships with students to encourage them to own their learning and have a voice in that process. Decentering grades also involves having an ongoing conversation with students, colleagues, and administrators about assessment decisions. Although each instructor exercises their academic freedom, it is also essential to share assessment practices that work and possible changes to implement. In these conversations, it is also important to carefully use language that conveys a clear understanding of the concept and practice of ungrading to avoid confusion, anxiety, misunderstandings, and reactions that prevent its implementation. Having these kinds of conversations can help shift the mind from a grade-focused to a learning-focused approach. A key element in these conversations is to ensure that the pedagogical reason behind the adoption of ungrading practices is not only clear but well understood (and this may take time).
Set a structure for ungrading
As with other elements of exemplary course design considerations, the structure of assessment practices is necessary. Adding a structure for ungrading assignments gives students a clear objective, steps, and flow that allow them to be consistent and accountable to their own learning goals and strategies.
Reflect on pedagogical and assessment practices
Instructors are invited to examine more in-depth their grading policies, why they grade in the way they do, what they are grading, and how they grade. In many cases, the path to ungrading is a response to dissatisfaction with grading policies. Aaron Blackwelder (chapter 2) says that, over time, he turned into a gatekeeper; he lost focus and was more interested in meeting institutional and “rigor” requirements than building relationships with students. His students had turned into competitive grade seekers. He questioned what a grade really suggests and posits that grades fail to communicate learning. The fact that grading allocates a specific number or letter that can bring some negative feelings to students, can also negatively affect the potential for learning. Sackstein (chapter 4) calls for a change in mindset to identify the way in which learning can be communicated and understood beyond the traditional use of numbers and letters. While Blum also argues for assessing the entire learning experience (with portfolios, for example), Sacksatein suggests considering changes in the language of grading which can provide students with an opportunity to shift the way they feel and think about their own learning.
Teach students to view mistakes as a necessary step in the learning process
Instructors are invited to reflect on how traditional grading practices are punitive, dehumanizing, and demotivating. Gibbs (chapter 6) points out that a system that punishes students for making mistakes reinforces the notion that all learning is flawless and therefore mistakes need to be avoided. Ungrading, on the other hand, aims to implement and cement the idea that learning is a process that needs constant feedback for that learning to be consolidated. Therefore, students need to be given opportunities not only to learn from their mistakes but to act on them in an interactive way. This requires instructors to plan for assessments that include steps for review (e.g., self, peer) to help the student build their skills, and knowledge over time.
Care for students and their learning
Instructors are also invited to demonstrate more explicitly that they care and validate students’ work. Further, Gibbs (Chapter 6) argues that her teaching philosophy is better summarized by the word “freedom”, the freedom that learners have to learn and grow at their rhythm and the freedom to make mistakes and learn from them. The role of the instructor is then to be supportive in that process through feedback and empathy. Ungrading, as it is overall discussed throughout the book, does not mean that there are no assessments or grading at all. On the contrary, the assessments should focus on helping students build their knowledge and understanding in less stressful ways, allowing students to build learning habits, develop creativity, become better communicators, and connect to their lived experiences and contexts. Caring for students also involves valuing their identity as learners and what they bring into the learning environment.
Be aware that ungrading can increase student anxiety and uncertainty
It is critical that instructors who are considering ungrading be cognizant that it involves a high level of anxiety and uncertainty on the part of students. Let’s recognize that students are so used and “conditioned” to grades that they will find it confusing not to have a grade associated with each assignment in the course. Many students consider being successful if they score a perfect grade which can be overwhelming and obscure the value of learning. Instructors who adopt ungrading should explain why and how ungrading will be done in certain classes. This will add transparency to the expectations and assumptions that instructors have about students.
Implement student voice and choice supported with personalized feedback
Instructors can help students take ownership of their learning through hands-on, real-life activities that allow students to use the content they are learning in projects of their interest, conduct research, and solve problems. Students can choose their topics and projects and the instructors can guide them to narrow topics and ensure the projects are feasible within the course timeframe. Consider feedback as a formative assessment approach that enables students to make choices about their learning strategies and needs to improve their learning tasks. Sackstein (chapter 4 ) suggests teaching students to collect feedback and identify the strategies that work for different kinds of assignment revisions. This way, students can develop better strategies that move them from lower-thinking to higher-thinking processes.
Since ungrading promotes the use of student-self assessment and reflection practices, it implies that instructors will need to personalize and tailor feedback to meet students where they are. In addition, instructors can consider setting a culture of feedback (Gibbs, chapter 6) where instructors teach students to use feedback to improve their work, provide peer feedback effectively, and see the value of learning from their mistakes.
Promote peer support
Authors of several chapters in this book have posited that students are more likely to give each other better feedback in the absence of grades. This kind of feedback can allow students to help each other, learn from one another, expand their awareness of their own understanding, and develop skills for life. Peer support will also help students build their confidence and autonomy to learn from each other.
Trust students
One critical aspect of assessment is trust –trust that students do the work they are expected to do by themselves. Instructors have legitimate reasons to express their concerns and create course policies about academic integrity that lead them to adopt plagiarism systems and surveillance tools to monitor and proctor students’ work. In adopting ungrading, trust is fundamental to change the way learning and performances are assessed. It involves helping students think differently about what it means to learn. Instructors can help students evolve in their approach to learning to move away from grades to focus on their learning by including in assessments strategies for building capacity for metacognition, confidence in their skills, life-long learning goals, and owning their learning.
Ungrading does not mean instructors don’t grade and students don’t receive grades on their work. Ungrading, as posited by the authors in the Ungrading book, is a mindset to approach student learning differently. In the second part of this blog, I will share the types of ungrading practices, implications, and challenges as presented in the book.
References
Coghlan, S., Miller, T. & Paterson, J. (2021). Good Proctor or “Big Brother”? Ethics of Online Exam Supervision Technologies. Philos. Technol. 34, 1581–1606. https://doi.org/10.1007/s13347-021-00476-1
By: Ashlee M. C. Foster MSEd, Instructional Design Specialist | Oregon State University Ecampus
Did you know a pedagogical approach exists that positively impacts student academic achievement and engages them as active participants in learning? Great news…there is! Let me introduce you to the world of Project Based Learning (PBL).
What is PBL?
PBL is a student-centered pedagogical approach where students, both individually and within small groups, engage with meaningful, relevant, and authentic projects which result in a product. Oftentimes, PBL is commonly associated and/or thought to be interchangeable with Problem Based Learning. However, there is a distinction between the two. The principal focus of PBL is on the active construction of knowledge. Additionally, student autonomy, beliefs, values, and motivations are situated as a fundamental driving force of the instructional approach.
What are the characteristics of PBL?
The essence of PBL is anchored in attributes, which foster high-quality learning experiences. Direct instruction is no longer the principal mechanism for delivery. Negotiation of knowledge between the educator and the students occurs through an exchange of ideas, questioning, inquiry, considerations, and perspectives. PBL often engages students in an ongoing process consisting of investigation, collection, analysis, prototyping, testing, peer/instructor feedback, revisions, and reflection. Learner autonomy is key in that students make their own decisions about various aspects of the projects (i.e., line of inquiry, collaborative processes, application of feedback, types of revisions, solutions).
Is it effective? Prove it!
As reported by Chen and Yang (2019), a positive impact on student achievement has been observed across 20 years (i.e. 1998-2017) of PBL peer-reviewed literature. The researcher’s principal investigation was to compare traditional instruction with that of PBL. Traditional instructional delivery was found to prompt students to apply low-level cognitive processes (e.g., understand, remember). Whereas, PBL can encourage the development of (HOTS) Higher Order Thinking Skills (i.e., analysis synthesis) and metacognitive skills (i.e., regulation, monitoring, self-directed learning, evaluation, assessment). According to the meta-analysis, the aforementioned benefits were found not to be impacted by academic discipline, educational stage (undergraduate, post-baccalaureate, graduate), or geographic location. This is great news for our distance and hybrid learners!
How do I get started?
When considering PBL there are a few questions to reflect on before implementing this practice. First, ask yourself, is this a best-fit approach? Consider the academic discipline, subject content, course learning outcomes, your instructional style, student attributes, and the intended goals to answer this foundational question. A word of caution is to use PBL in a way that is relevant, authentic, and collaborative in nature. Steel clear of using projects as a shiny solution. Lastly, contextualize the project. Doing so will help students connect the project to their academic career, professional development, and personal growth. Remember to share the ‘why’!
Project Examples
Here are a few project examples to spark some ideas:
solve a problem (e.g., uninformed voting)
generate a plan (e.g., foster sustainability)
create a product (e.g., computer/mobile application, oral history interviews)
seek valid answers and recommend solutions (e.g., electing national officials)
engage with a persistent issue in a tangible way (e.g., advocating, protesting, public speech)
Do you have an example to share?
Respond in the comments if you currently use, have used, or intend to incorporate PBL in your course. Do you have any tried and true strategies for effective projects? Have you experienced any wins or challenges? Share with the community and join the discussion. Make sure to return to read Project-Based Learning (Part 2) – Mindful Design for practical implementation tips!
Grossman, Dean, C. G. P., Kavanagh, S. S., & Herrmann, Z. (2019). Preparing teachers for project-based teaching. Phi Delta Kappan, 100(7), 43–48.
Guo, Saab, N., Post, L. S., & Admiraal, W. (2020). A review of project-based learning in higher education: Student outcomes and measures. International Journal of Educational Research, 102, 101586.
The concept of the ‘right to repair’ has been on my mind recently, both as a user of tech products and as a designer of online courses. Electronics are notorious these days for their enigmatic design. The user is not trusted to make repairs or is restricted in the ways they can interact with device components. This is a choice made by manufacturers to limit access to approved vendors or repair shops. Instructional Designers have a similar choice when building courses. Do we follow a restrictive approach to modifications, or open up courses by anticipating, welcoming, and providing the resources for modifications?
Difficult by design
I recently experienced the restrictive side myself as I needed to fix an air purifier that had an unfortunate run-in with my youngest child and her colorful stickers. Apparently, the inside of the machine was not pretty enough, and the stickers were now stuck inside the machine, not quite clogging up the fan, but making a noticeable noise when the purifier was running. Realizing that I should probably remove them from the mechanism, and the partially obstructed fan, I grabbed my handy screwdriver, and rotated the cylindrical case to find where to begin.
And then I saw it – nothing. There were no screws on the outer shell. I turned it around a few more times, holding on to some hope that there was another way in – some switch to press or clasp to unhook. Nothing. The company designed the device to prevent a consumer from taking it apart. The only thing I had access to was the filter opening. No screws inside there either, and the manual had no sections on repairing the device.
I was put into a situation where I knew what I needed to do, and how to do it, but had no way of accomplishing it. If I tried to open it in a way it was not designed to be (whatever that was), I risked breaking the device even further, and voiding the warranty.
This is the situation many technology users find themselves in these days, which has led to a push for the right to repair one’s own devices.
Right to repair principles
Had the manufacturer made the air purifier with the consumer in mind, it may have been more closely aligned with right to repair principles, which are given by The Repair Association through their Policy Objectives. Some more relevant ones are currently paraphrased on the Right to repair – Wikipedia article:
the device should be constructed and designed in a manner that allows repairs to be made easily;
end users and independent repair providers should be able to access original spare parts and tools (software as well as physical tools) needed to repair the device at fair market conditions;
repairs should by design be possible and not hindered by software programming;
the repairability of a device should be clearly communicated by the manufacturer.
Applicability to Instructional Design
This whole endeavor got me thinking: What is the best choice for designers and developers who create courses and complex elements for our users? It seems that it falls into the same design philosophy choices that we see with other products like computer hardware or electronics today. For simplicity’s sake, let’s narrow it down to these two opposite choices designers have when making course components:
Modifying course elements is made difficult because the designer is either not confident in the instructor’s abilities to properly work with the design, actively discouraging changes, thus resulting in no change until the user approaches the designer(s) again.
Course elements are designed with user modifications in mind, and the user is left with sufficient instructions, access, and ability to make changes when necessary.
I prefer to use technology that closely follows the second choice, as this is more aligned with the ‘right to repair’, and results in more user-friendly practices. That is not to say that everyone would want to modify courses, but the option should be there.
Or, in other words:
It is the philosophical difference between engineering things to make them harder for the end user because you don’t trust them and documenting things to educate the end user so you know you can trust them.
Linus Sebastian, talking about the design choices of a pro-repair consumer laptop
If the previous main points of “right to repair” were to be re-written with online education in mind, how would these look? Perhaps something like this:
The course and its objects should be constructed and designed in a manner that allows edits to be made easily.
Instructors and SMEs should be able to access course components and tools needed to modify the course and its elements.
Revisions and additions should be possible and not hindered by design choices.
The Instructional Designer should clearly communicate the ability to modify the course, and how to do it.
How we could do it
What could we do as course designers to inform and empower faculty? Here are a few ideas:
General Documentation for Course Elements
By far one of the simplest ways to provide support to users is through basic documentation pages. If located on the course site itself, they can remain unpublished so learners do not see them. For those who would like more autonomy over their course structure and design, detailed documentation pages provide an excellent way to take the initiative and make the desired edits. Well-written documentation may also reduce the need for Instructional Designer support after the course is running. Plus, if you, as the designer, are worried about things breaking, you can always have a backup of all materials ready to revert pages.
Side by Side Code Blocks Tutorials
I use these all the time with fellow designers. On a Learning Management System (LMS), these function as a tutorial page where the page is split into two columns. Users can see the HTML/CSS code on the left and how it is displayed on the right. Then it’s a matter of copying the code from the code block and pasting it where they want it to go. This practice is very useful when it comes to the more advanced features of your LMS. This makes it easier to choose which element a user wants to incorporate or edit.
Side by side code tutorial blocks provide a quick way to show off how elements work, and a quick way to copy elements into other parts of the course.
Learner Journey and Alignment
If an instructor wants to change the course a few terms after it has been running, how do we achieve a similar look and feel to the one created by the Instructional Designer long after the project has been developed? Mapping the expected learner journey, and how the content aligns with learning outcomes, can help with this. For example, imagine the learner is expected to interact with a week-long module by completing the following tasks in this order:
Step A (Fulfills Learning Outcomes 1, 3. Informs Steps C and D)
Step B (Fulfills Learning Outcome 2. Informs Steps C and D)
Step C (Fulfills Learning Outcomes 3, 4)
Step D (Fulfills Learning Outcome 1, 4)
Each step may include reading or watching learning materials, completing an assignment, participating in a discussion, and so on. How would this expected behavior change if, later on, an instructor added an additional assessment between C and D? What about removing Step B entirely (which in this example would remove alignment to Learning Outcome 2 from the module). Would a learner on this new version of the course still have the required information to complete the remaining parts of the module? Would they interact with the content in the same order as initially expected (and how the course was likely designed to be completed)?
These are things Instructional Designers plan and check during the initial development which can be shared to ensure that the same methods are followed in subsequent iterations of the course.
Conclusion
Some may prefer to leave everything in the hands of an experienced Instructional Design team, and use their expertise whenever a change is required. For others who have enough technical skills to edit content, the desire to learn more, or would like more autonomy and ownership over course content, an open course design provides the same user-friendly approach that at ‘right to repair’ would have for general electronics.
References
Right to Repair, Wikipedia: https://en.wikipedia.org/wiki/Right_to_repair
Policy Objectives, The Repair Organization: https://www.repair.org/policy
Since the first post in the series appeared a few months ago, we have received plenty of feedback from other instructors who are actively engaged in online education. Some of the stories shared by them reiterate the points we discussed, and others included tips and techniques that have worked particularly well for them. Almost all of them agreed that teaching well online remains a challenging task.
“I love the notes on proactive student support … especially the notes on checking in with those who are behind. Sometimes all they need is a little empathy!”
Vic Matta, Associate Professor, College of Business, Ohio University
“I regularly incorporate each of these in my relationships with my students, to include weekly zoom “what’s up” meetings with my students. I check in on them if they’re behind on assignments…Yes, it takes effort; but my mission is to help these students find the greatness within themselves to succeed.”
To quickly recap what we have discussed in Part 1, we touched on how to employ empathy statements in communications with students, restructure and promote the office hours, provide personal feedback for students, and periodically check in with students who are behind. You may also refer to the first article here: Improving Student Engagement and Connection in Online Learning: Part I, Proactive Support.
Continuing from the first post, Part II will revolve around six specific practices that I have found particularly helpful for online teaching and learning.
Practice 1: Adopt a variety of communication methods
I provide assignment instructions and guidance using a variety of communication methods including texts, diagrams, images, and short video clips. I have learned that instructions with screenshots and videos tend to be better in explaining complicated procedures than text alone.
Video Tutorial Example: Creating a random sample using XLSTAT
Practice 2: Create a Q&A Discussion Board
I have a separate discussion on Canvas for students to address issues with the class in general (content questions, technical issues, deadlines). Instead of emailing the instructor regarding issues other students may also have questions about, students are encouraged to use this forum so that all can benefit from the questions and answers. I usually wait for a few hours for students to answer each other’s questions first before I provide mine.
When students email me questions that are a good fit for the Q&A Discussion Board, I’d respond through email first and then recommend the students submit the questions to the discussion board so that other students can learn from the questions and answers. This discussion board also creates an inviting and engaging learning environment for the students who don’t get to meet their classmates in a face-to-face setting.
Practice 3: Estimate the amount of time taken for each assignment
I was skeptical of this at first as the time taken would vary drastically for each individual. However, student feedback indicates that estimated times helped them plan for the week and set aside an appropriate amount of time. We don’t need to worry too much about making the estimates accurate for everyone as students will automatically adjust given their own work styles. A workload calculator that I have found helpful is developed by the Center for Advancement of Teaching at Wake Forest University, called the Workload Estimator 2.0.
This practice is obvious, but difficult to do when one is teaching multiple sessions with hundreds of students. For online classes, timely replies make students feel as though they are taking an in-person class with all of the built-in support and resources. I understand that we all have different teaching priorities and schedules, however, it all comes down to figuring out how to most efficiently organize our days so that we can be available to students.
Setting aside a couple of times a day for handling emails has worked quite well for me, e.g., the first thing in the morning, after noon, and before the end of the day. I try my best to respond to students’ emails within 24 hours and check my mailbox at least once every day on the weekends.
The timely replies in discussions were super helpful. It really felt as though I took this in person with all of the built-in help and support.
Student quote
Practice 5: Synchronize assignments with Canvas calendar
I have also synced all assignments and my office hours (renamed as Ask Me Anything Hours) on Canvas so that there are office hours available around when assignments are due. This proves to be incredibly convenient and useful for both students and instructors.
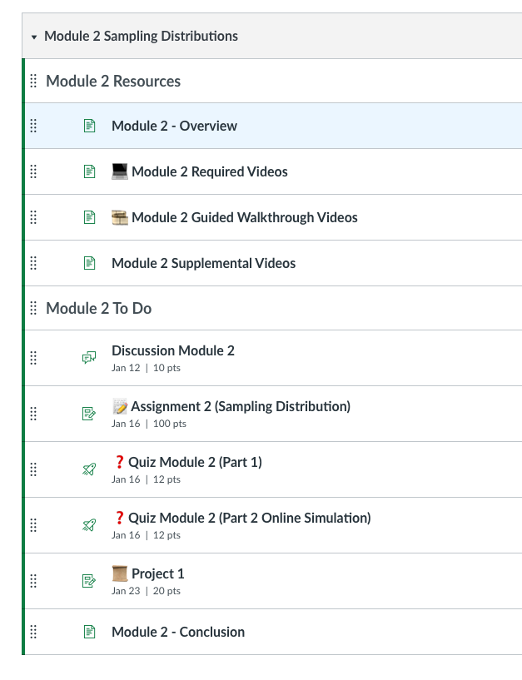
Practice 6: Reorganize course content
Here are several Canvas LMS tips that have helped in organizing the course content and saved my time. I try to organize everything in modules. Under each module, all items are split into two main components: resources and to-do lists, so students know exactly what assignments they would need to complete for each module. I also adopt a fixed set of systems for titling Canvas items. Items within modules are indented to help with organization.
Weekly agenda and announcements are also hyperlinked to guide students with the course navigation. I could not emphasize enough how much I value the internal messaging in the Canvas grade book that was briefly discussed in my previous post. This feature allows instructors to message students who haven’t submitted yet or who scored less than a certain point. Definitely a slick way to send quick emails to a target group.
Recently, I have been experimenting with a range of visual cues (e.g., emojis) to categorize course content. An example is provided below.
It’s always best to keep an open mind when trying out new teaching practices and adapt them to your individual style and subject matter.
If you have any online teaching practices that you’re fond of, please feel free to contact me at Xiaohui.Chang@oregonstate.edu as I will be very excited to hear them and test them out.
In this post I’m returning to an important topic: accessibility. In a previous blog my colleague Susan Fein explained how everyone benefits from more accessible materials and that a large number of our students have some degree of disability.
Word documents are ubiquitous in our courses, as well as for other work-related activities. If a Word document is designed for digital consumption – such as posting in the Learning Management System or on a website – it needs to comply with accessibility standards. Fortunately, Word includes excellent tools for making your file accessible! I will first go over the main accessibility features, and then show you how to implement them in the video below.
Accessibility checker: Word includes a tool that helps you check your work. It is useful but it doesn’t catch all the errors.
Structure: headings, spacing, lists: Marking these properly will let screen reader users skim the content and understand its organization easily. Structure a document in a hierarchical manner: the title should be Heading 1 (NOT the “Title” style – that one just gets read as simple text). The next major sections should be Heading 2, subsections of a Heading 2 are Heading 3, and so on. Do not skip levels. You can change the appearance of all these styles to match your aesthetic. If you wish, you can also save style sets to have them ready to use.
Images: There are two main things to take care of here: adding alt text (so screen reader users can listen to the description) and making sure that the image is in line with the text (to keep the reading order clear).
Colors: If you use colors, make sure there is enough contrast between text and background. Even people with good eyesight can struggle to read something if the contrast is not strong. In addition, remember that many people are color blind, so do not rely on color to convey essential information. For example, avoid something like “The readings in blue are very important, make sure you read them carefully! The optional resources are in green”. Use other means of signaling instead, such as bold or italics.
Links: Links need to include meaningful text rather than the URL. A screen reader will read the URL one letter at a time, which is not very helpful. In addition, descriptive links help both screen reader users and sighted users skim the document to get an idea of the content or find specific information.
Tables: Tables can cause trouble to screen reader users – do not use them for layout! Only use them for actual tabulated information. When you use tables, the main rule is to keep them simple and avoid split cells, merged cells and nested tables. Then, make sure you have a designated header row, which helps screen reader users navigate the data.
Document properties: The document needs to have a title set in its properties. This title is helpful for blind users because the screen reader announces it as the document is loaded in the program.
Save to PDF – yay or nay? Avoid turning your document into a PDF file, if the document is meant for online reading. PDFs are hard to make accessible. If you must make a PDF, start with a fully accessible Word file. It is recommended to use PDFs only when the design includes complex or unusual elements (for example special/technical fonts, musical notes etc.). If you are using a PDF because you have a complex layout, consider posting both the PDF and a simplified Word file, in case someone needs the fully accessible version.
Watch this 10-minute video that walks you through an example of making a document accessible. I’m using Microsoft 365 on Windows – if you’re using another version of Word or platform, things may look slightly different. Timestamps:
Accessibility checker – 00:38
Headings – 01:46
Lists – 04:56
Spacing – 05:27
Images – 06:16
Colors – 07:29
Links – 08:09
Tables – 08:49
Title Property – 09:33
As you can see, the process of creating accessible Word documents is straightforward. Turning this into a standard practice will greatly help people who access information electronically, with or without assistive devices. Let’s make it happen!