By: Julie Jacobs, Jana King, Dana Simionescu, Tianhong Shi

Overview

A recent scenario with our course development team challenged our existing practices with lecture media. Formerly, we had encouraged faculty to include only slides with narration in their lecture videos due to concerns about increasing learners’ cognitive load. Students voiced their hope for more instructor presence in courses, and some instructors started asking about including video of themselves inserted into their lectures. This prompted us to begin thinking about instructor presence in lecture videos more deeply: why were we discouraging faculty from including their faces in lecture videos? While our practices were informed by research-based media theory, we also recognized those theories might be outdated. 

We began to explore the latest research with the following question in mind: does visual instructor presence in lectures increase extraneous cognitive load in learners? We use the phrase “visual instructor presence” to refer to lecture videos where an instructor’s moving image is seen giving the lecture, composited together with their slides. This technique is also commonly referred to as “picture-in-picture”, as seen in the image below.

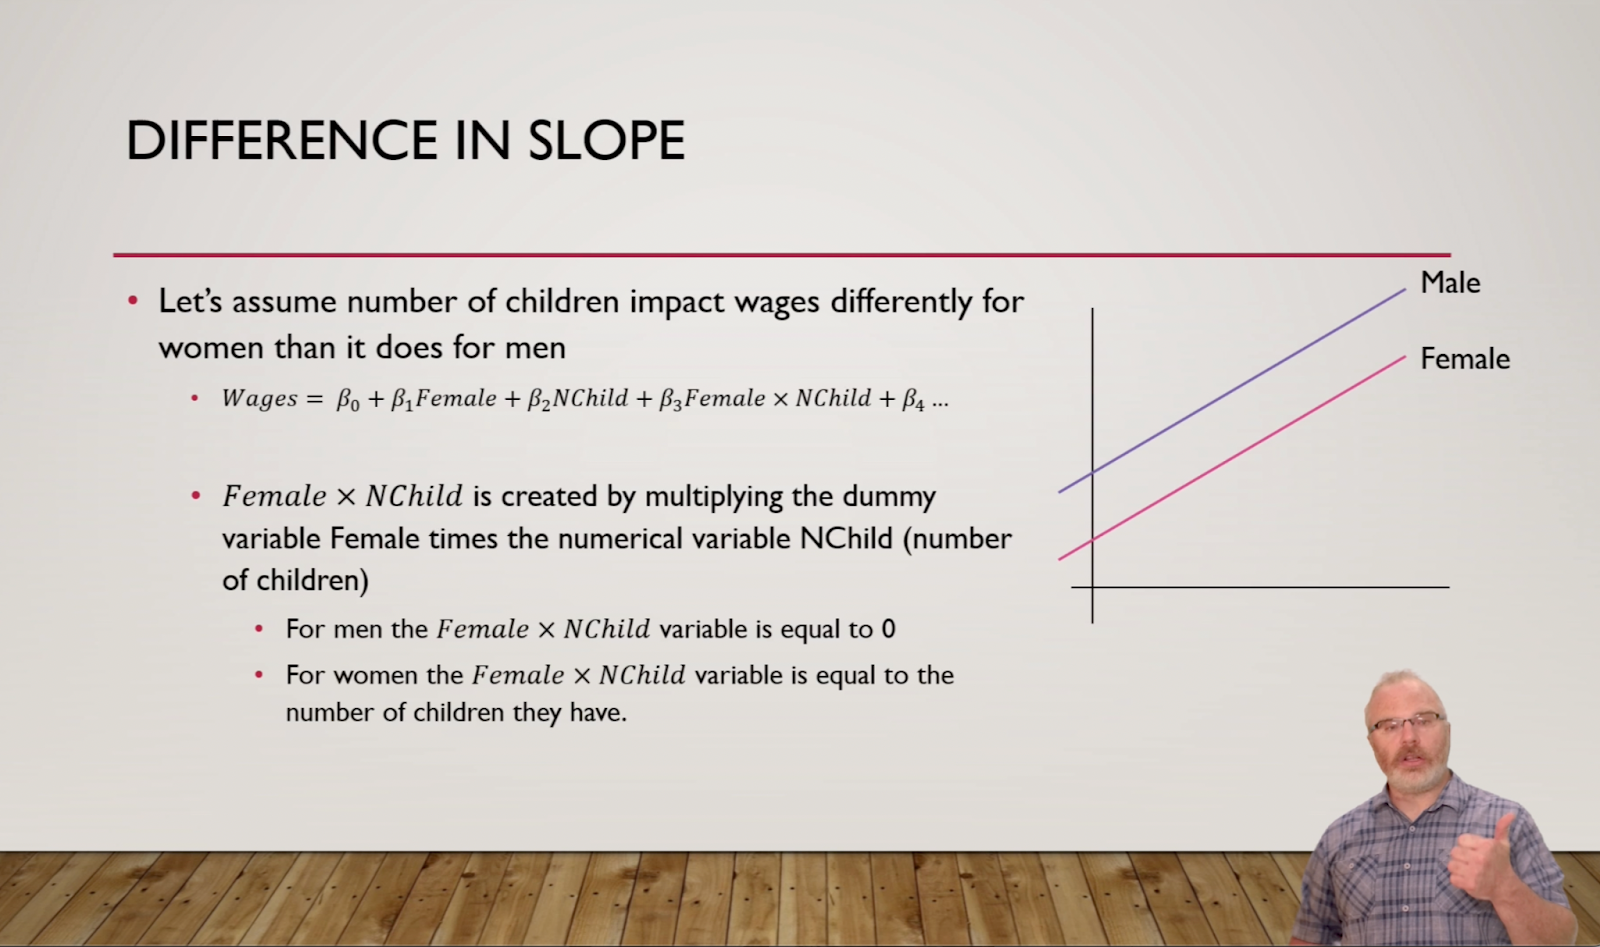
Image 1: Adam Vester, instructor in College of Business, in his lecture design for BA 375 Applied Quantitative Methods.

A task force was created to review recent research on visual instructor presence and cognitive load, specifically in lecture-type videos. Our literature review included a look at leading multimedia learning scholar Richard E. Mayer’s newest group of principles. We also reviewed more than 20 other scholarly articles, many of which were focused on learner perception, motivation & engagement, and emotion. 

Findings

According to recent work in multimedia learning, research in this area should focus on three areas, namely learning outcomes (“what works/ what does not work?”), learning characteristics (“when does it work?”), and learning process (“how does it work?”) (Mayer, 2020). Below are our conclusions from the 23 research articles we reviewed regarding instructional videos, attempting to answer the above questions of “what works”, “when does it work”, and “how does it work”.  

  1. This review of recent literature shows no evidence that visual instructor presence increases extraneous cognitive load. 
  2. Students tend to prefer lectures with visual instructor presence – they report increased satisfaction and better perceived learning, which can boost motivation and engagement. 
  3. While some studies find no difference in performance outcomes when visual instructor presence is utilized, others found increased performance outcomes with visual instructor presence. Proposed explanations: embodiment techniques such as gestures, eye contact, and body movement which fosters generative processing (the cognitive processes required for making sense of the material); social cues can help direct the learners’ attention; increased motivation (as per point 2 above) contributes to better learning. 
  4. The effects may depend on the specific type of visual instructor presence (e.g., small picture-in-picture, green-screen, or lightboard) and the characteristics of the content (complex/difficult vs simpler/easier). 

Recommendations

Based on these findings, our team has decided to remove the default discouragement of instructors wishing to use picture-in-picture in lectures. If an instructor is interested in having their visual presence in the lectures, we encourage them to discuss this option with their Instructional Designer and Lecture Media Coordinator to determine if this style is a good fit for them and their content.

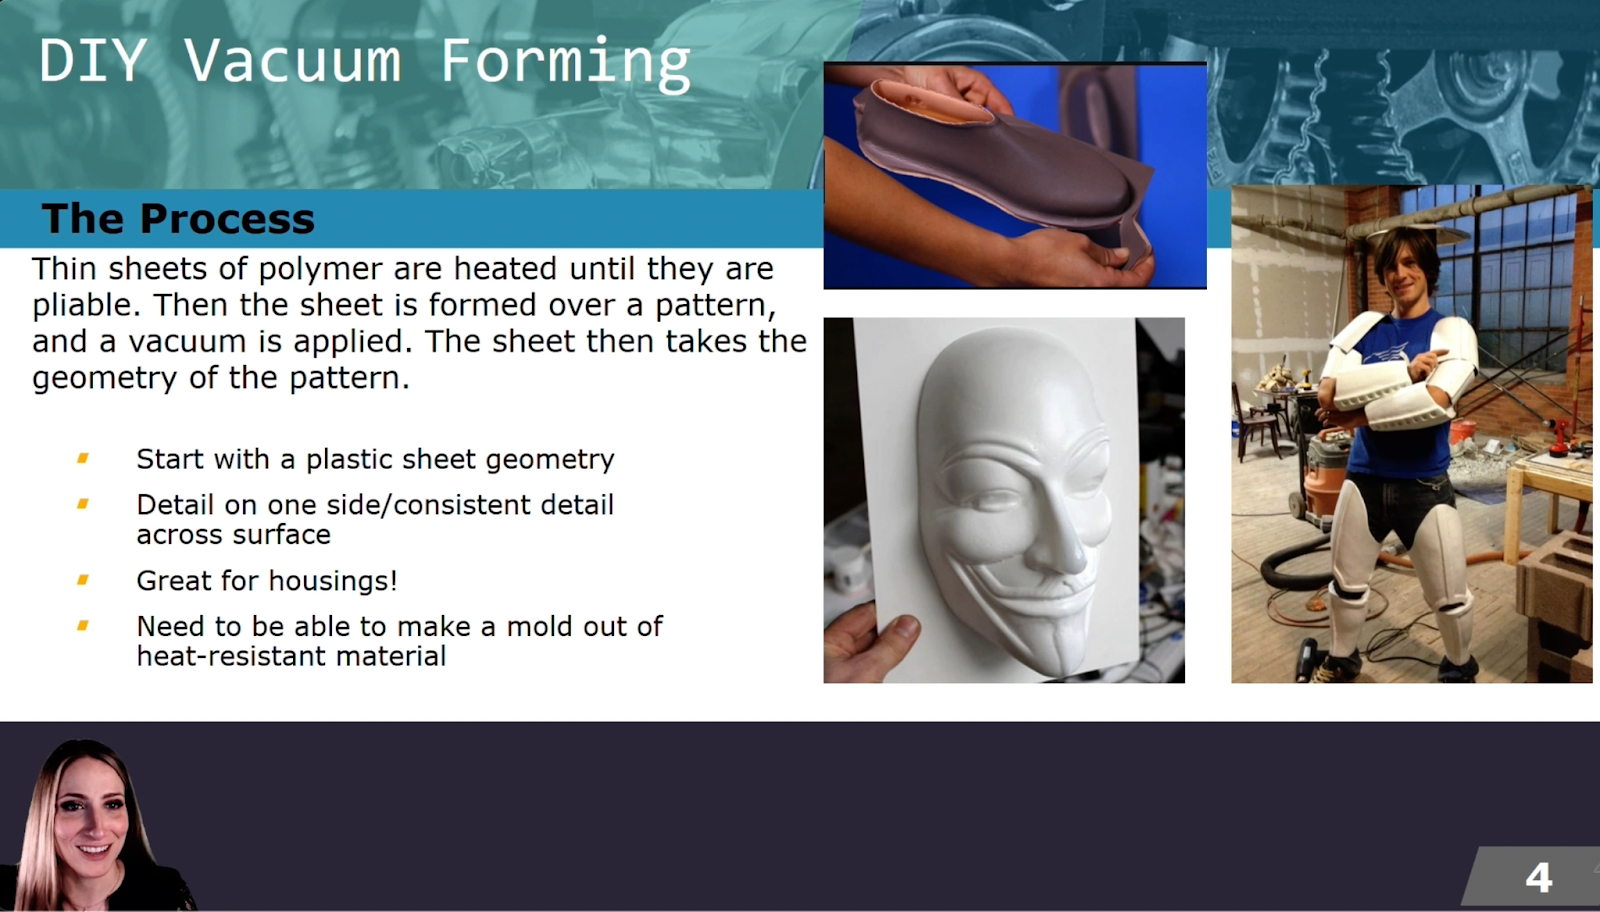
Image 2: Bryony DuPont, associate professor of Mechanical Engineering, utilizing visual instructor presence in her lecture design for ME 382 Introduction to Design.

We recommend considering the following points:

  • What is their presentation style? Do they tend to spend a lot of time talking over a slide or is there a lot of text or other action (e.g. software demo) happening in the video? If there’s a lot happening on the screen, perhaps it’s better to not put their video on top of it (the instructor video could be placed only at the beginning and/or end instead).
  • What type of content? Is it simple or more complex? For more visually complex content, a lightboard or digital notation without picture-in-picture may work better, to take advantage of the dynamic drawing principle and the gaze guidance principle. 
  • Is it a foreign language course? If so, it’s likely helpful for the learners to see the instructor’s mouth and body language. 
  • Is the instructor comfortable with being on video? If they’re not comfortable with it, it may not add value. This being said, our multimedia professionals can help make instructors more comfortable in front of the camera and coach them on a high-embodied style of lecturing. 

Since implementing these guidelines and working with an increased number of lectures with visual instructor presence, we also noticed that it works best when the instructor does not look and sound like they’re reading. Therefore, for people who like working with a script, we recommend practicing in advance so they can sound more natural and are able to enhance their presentation with embodiment techniques.

We would love to hear about your opinions or experiences with this type of video. Share them in the comments!

For a detailed summary of our findings and full citation list, please see the full Literature Review.


Part I: Role of Course Developer as Media Curator 

This post is Part I of a two-part series on video selection and use in online courses. Part I provides the reasoning behind understanding course videos selection by course developers as a curatorial process. Part II will explore video curation in practice in course development and provide a course design perspective on video presentation and management issues.

Recent Video Use Trends

In September of 2020 the enterprise video company Kaltura Inc. conducted its seventh annual State of Video in Education 2020 report. The report included responses from across the education system spectrum with higher education institutions making up 53% of all respondents (Figure 1.).

Chart showing percentages of educator sectors in response to Kaltura survey.
Figure 1. Percentage of respondents to video survey by education sector.

This report described how remote teaching-driven course changes impacted video adoption and use in education. Remote teaching and learning was the most common use of video (83% of respondents). Lecture captured as video was used by 69% of the responding institutions.

The executive summary identified a number of key insights and trends related to changes in video use in education. A select few can be seen below:

  • Use of video for remote teaching and learning grew by 28% over 2019.
  • Video use is viewed as positive. Respondents (84%) saw video as having a positive impact on student satisfaction, 73% seeing video increase student achievements and 76% believe it increased instructor satisfaction.
  • Students as creators of video increased by 13% from 2019 to 2020.
  • In higher education there was rising video use for remote teaching, lecture capture, and flipping the classroom.
  • Actual growth in the use of video for remote teaching and learning grew by 28%.
  • A majority of respondents (68%) want to continue to blend traditional teaching with today’s virtual innovations; such as video.

In some ways this is not surprising. This past year forced many instructors in higher education to convert face-to-face courses to remote instruction. Much of that transition was accomplished with synchronous sessions via ZOOM or some other video conferencing program. Live video conference sessions, if recorded, also served as a support resource for students. In response to the challenges of the past year both live and recorded video were adopted to make remote learning doable. Fully online courses do not have this live element as they are asynchronous and did not have to adapt in this way.

In asynchronous courses at Oregon State University our Ecampus course developers utilize video differently. Video is as a key media element in delivering course content to learners, promoting faculty presence, and to build depth into projects and assignments. Video content may be produced internally by course developers (e.g., instructors) and used in courses via an enterprise video system (e.g., Kaltura). Video content may also be sourced from external video-based social media sites (e.g., YouTube and Vimeo) or educational and commercial collections (e.g., Kanopy or Amazon) and via syndicated video sources (e.g., podcasts and Twitter).

Given the plethora of video available and a trend toward increased video integration into instruction the challenge to course developers is the selecting, managing, and presenting video content to support and compliment course learning outcomes. Ultimately this also becomes a course design challenge for instructional designers who must adapt to manage the integration of increasing levels of video in the course in a way that makes sense from a pedagogical perspective as well as visual design aesthetic.

Course Developers as Media Curators

What is a Curator?

The growing value of video in the experience of a course suggests that course developers (e.g., instructors) consider a new way of thinking about how video is selected, managed and presented. In essence, I am suggesting that for a given course the course developer serves as a curator of video content.

But what is curator? Should a course developer really think like a curator? How might curated media shape course development and instructional design?

In order to explore this notion of course developers as media curators a bit more I would like to share the definition of what a curator is from the American Alliance of Museum (AAM) Curators Committee (2009). The preamble to the curator core competencies of a curator defined the term curator as:

Curators are highly knowledgeable, experienced, or educated
in a discipline
relevant to the museum’s purpose or mission. 

Curators are further described as having nine core competencies and related applied skills. The competencies are:

Collection planning       Scholary Research              Exhibition Development
Collecting                        Object Research                  Education
Collection Care               Applied Research               Outreach & Advocacy

In Figure 2. we see these same foundational roles expressed by the AAM coupled with a definition of curator and description of the work of a curator. Also included is the domain of the work. Those domains are preservation, research, and communication. The global context of curation is, in this definition, a museum. The more discrete context is the exhibition, or exhibit application. Yet it is all part of a curator’s work.

Curator defined with context.
Figure 2. Definition of the term curator and select context example.

What we see in this definition in Figure 2. is the premise that curators select, gather, care for, and prepare presentations of single items that in aggregate make up a curated collection. That collection becomes a resource and object of education, outreach, advocacy and presentation.

This makes the act of curatorship a scholarly and creative practice that is deeply intentional and based upon the definitional parameters of the organization doing the work.

Course Developers – Curators of Video Collections

Now let us think about what an online course developer is and what they do. At Ecampus course developers collaborate with instructional designers to plan an online course. Instructional designers advise and take content selected by the course developer and build that content into Canvas, our learning management system.  The created courses are then shared with students. Course developers are considered content experts much like museum curators are. Let’s look at that a bit more closely.

In Figure 3. below we can see a comparison between the definitional role and duties of a museum curator and course developer. There are striking parallels between these roles. So much so that it would seem reasonable to think about what a course developer does as also a curatorial practice. A practice focused on the learning content, including video, for a given course.

Perhaps the greatest difference between these to two curatorial practices is the context of each. In asynchronous course development it is not uncommon for instructors to perform many of these same functions as museum curators but on a more discrete scale. The scope and context of their focus is obviously different.

In essence a course developer actively gathers and in may cases, creates unique course elements that form the curated media collection for a course. That collection of texts (readings), images, web resources and video is then used for education, research, and perhaps outreach with a constant eye on student access to media. Ultimately a course media collection is intended to permit the course developer to fulfill the purpose of the course and guide students in achieving the course learning outcomes.

The physical design of the course, with its media collection, is the domain of the instructional designer. The collaboration between the course developer and instructional designer are key in preparing the course as an “education exhibition” of sorts that has clear learning outcomes.

Course Video Selection: The Art of Curatorship

We began this discussion with the importance of video in online course development and design. With that in mind it is logical that video curation is an important element of course-wide media collection identification.

Video collection, cataloging, arranging and assembling for display in a course fits quite well within the parameters of curating. Any curation is also about a level of storying, opportunities for engagement, information sharing and perspective sharing (Potter, 2017). In course development these processes as applied to course media, and in particular video, have the potential to create and shape the nature, experience, and associated learning in an online course.

In making decisions about video use in online courses, a course developer would apply their knowledge and expertise to curate the selections. Clear learning outcomes provide a pedagogical and content structure to the video curation process. Once a video collection is established other decisions may come into play that reference an aesthetic for the collection. This is the art of curatorship.

The art of curatorship has been viewed as closely aligned  to a design process (Shuey, 2014) and may be guided by an interpretation of the universal visual design principles as conceptual guides to the education exhibition that is the online course. In this sense the curator is not thinking as much about the collection items per se but more about how the collection fits together to provide and support a narrative, flow, or education scaffolding for the course.

Thinking Like A Curator 

As an exercise in curatorial thinking let’s take some re-interpreted concepts of visual design and see if they help us think through how we curate not only individual videos but also a video collection. This brief list includes accompanying questions that are informed by the identified principle and may shape the curation of video. In these examples found videos are outside video sources where created videos are those made by the course developer.

  • Balance: What is the intended balance between: Created and found curated videos? Permanent video and temporary (single-use) video content?
  • Emphasis: How does found video reinforce or extend created video? Is there a particular focus or intention of video use?
  • Movement: Is there a scaffolding of curated video that matches the scaffolding of the course progression? How does the video curation contribute to that progression?
  • Pattern: Is curated content focused, more general in nature, or quite diverse in source, topic or message? 
  • Rhythm: Does video use and viewing support or promote a rhythm of engagement for the course that compliments course objectives?
  • Repetition: Are curated videos reinforcing similar ideas or concepts? Are videos used consistently for certain aspects of the course (i.e., narrated lectures)?
  • Proportion: Does the video collection time commitment fit within the time expectations for the course? What is the ideal proportion of video to text, image, and other course media?
  • Variety: Are curated videos from different content sources and types? What is the ideal balance for the course?
  • Unity: Does the video collection promote a sense of wholeness to the course? Could the video collection, on its own, communicate identifiable ideas, patterns of ideas, or a range of perspectives on a topic?
    Does video accessibility contribute to the overall course accessibility?

In working through this exercise, we begin to move beyond video collecting by subject toward a more complete analysis of video collection selection and use that includes intertwined pedagogic and aesthetic considerations. This helps create a video collection that is intentional in its item selection, organization and use.

Final Thoughts

Recent research by Kaltura Inc. indicates that video use in education is on the rise in the past year. A continued growth of access to video and ability to create video coupled with an interest in integrating video in education efforts suggests course developers have a challenging task regarding media selection and use.

This article presents the idea that course developers, whether obvious or not, are actively engaged in a curatorial process regarding media selection and use. In addition, because of the importance and prevalence of video, its curation is presented as a key element of the larger course media curation effort. Lastly, we have explored how video collections contribute to academic and aesthetic value of a course and provided some key considerations based upon extending classic visual design principles to a curatorial practice.

It is interesting that the term curation has Latin roots in the verb curare; which means to take care of. Course developers conducting intentional video curation contribute to meaningful media curation for a course. This engagement in the practice of a curator is truly a professional act of caring about the quality of course development and the impact on student learning.

In Part II of this series we will address the practice of video curation in the context of an online course and explore instructional design considerations for video use that balance and complement a sample course video collection.

References

American Alliance of Museums. (2009). Curators Committee (CurCom): Curator’s core competencies. https://www.aam-us.org/professional-networks/curators-committee/ 

Kaltura Inc. (2020) The state of video in education 2020: Insights and trends [seventh edition].
https: //corp.kaltura.com/resources/the-state-of-video-in-education-2020/

Potter, J. (2017). Curation. In K. Peppler (Ed.), The SAGE encyclopedia of out of school learning (pp. 4-6). SAGE Publications Inc., Thousand Oaks, CA.

Shuey, G. (2014, October 21). The art of content curation. RELEVANCE.
https: //www.relevance.com/the-art-of-content-curation/

Wikipedia (n.d.). Definition of term collection.
https://en.wikipedia.org/wiki/Collection_(artwork)

Wikipedia (n.d.). Definition of term curator.
https://en.wikipedia.org/wiki/Curator

Video Resources 

Special thanks for the following individuals for their contributions to this article.

  • Chris Lindberg, Instructional Design Specialist, Oregon State University, Ecampus, Corvallis, Oregon.
  • Cody Rademacher, Curator, Holocaust Museum & Cohen Education Center. Naples, Florida.
Welcome to the Webcam and Video Tips guide by Oregon State University Ecampus
This brief series of tips is meant to be a beginner’s overview for DIY home recording on webcam, with some additional options suggested if you want to take your video production even further.
Since this document may not cover every issue you encounter while acclimating to DIY video recording, we recommend contacting your school tech person for additional troubleshooting.

WHERE TO START

  • Internet Connection
    • Wired connection via ethernet cable is best
    • If wired connection is not possible, having a clear line of sight to wifi router will give the best wireless connection
    • Disconnect any wifi devices that are not in use or needed.
  • Computer Check
    • Determine if your computer meets minimum system requirements for streaming software
    • Close all non-essential programs to free up more computer resources
    • Disconnect any external monitors if you are on a laptop and it is running slowly
  • Testing Your Tech
    • Does your computer have a built in webcam or do you have a 3rd party webcam?
    • Identify where your microphone is and talk towards it
    • Test the webcam and audio settings BEFORE your first recording. 
    • Practice practice practice
      • The last recording will be better than the first
  • Making sure your voice is clear and easy to understand
    • Having a microphone helps with this
    • Smart phone earbuds have a built-in microphone that can help you with voice clarity
    • Airpods would also work when recording to an iPhone

PRESENCE AND ENVIRONMENT

  • Be aware of your environment.
    • Limit any background noise as much as possible.
    • Clean up your space and be aware of what is in the background of the video.
    • Rooms with carpets and drapes are best for audio.
    • Turn off lights and close windows that are behind you when you are recording.
    • If possible, turn on a light behind the camera.
    • Keep experimenting with lighting until you have a set up that works for you.

  • Try not to bump the desk, computer, camera, or microphone while recording.
    • Typing should also be avoided.
  • Do a test lecture and watch it.
    • See what works and what doesn’t.
    • If possible, get feedback from others
  • Practice
    • The more you practice, the more natural it will feel.
    • Run through what you want to say before you start recording.
  • Relax and be natural! Hopefully you are sharing knowledge that you are passionate about and we want that to show. (Remember that we are always our own worst critic, and your teaching team will be there to help you with constructive feedback on how to help students best enjoy and learn from these videos.)
  • Have notes in front of you while you’re recording. 
    • It is easy to get distracted or off topic, especially when you are uncomfortable.
    • Having notes in front of you while you record can help you stay on track.
    • These notes can be as vague or as detailed as you want, but avoid reading off of them directly and not looking at the camera.

DIGITAL NOTATION

GOING FURTHER WITH VIDEO PRODUCTION

  • For DIY video production, there are many ways to go about this!
    • The lowest barrier to recording on your own would be to use a smart phone attached to a tripod or other mount.
    • If you have access to a camcorder or DSLR, get out there and use it!
  • For smart phone video
    • Avoid handheld and invest in a tripod or smart phone / camera mount
    • If you have a decent internet connection for uploads, consider recording 1080p at 30fps
    • Use an external microphone whenever possible

ACCESSORIES TO CONSIDER IF RECORDING WITH A PHONE

Apps:

  • Filmic Pro – $14.99
    • Allows manual control of exposure and white balance, audio monitoring, and other useful features.

Audio:

  • Lavalier microphone – $18.99 
    • Highly recommended. Audio recorded from your phone’s microphone can be difficult to hear if you aren’t standing near the phone or if the location is noisy. 
  • Double lavalier microphone – $25.99
    • For when you have two people on camera. Both mic cable feed into the same phone, removing need to sync two audio sources. 
  • Audio cable extension – 10 ft. $9.95 or 20 ft. $15.95
    • For when you need to stand farther away from the camera.

Stabilization:

  • Selfie stick w/built-in tripod and Bluetooth remote – $23.99 (heavy duty, 51″ extended), $14.99 (27.6″ extended)
    • Terrific for self-recording in the field.
  • Combination hand grip/small tripod/tripod adapter – $8.89
    • Can be used as a hand grip for filming on-the-go or as a desktop tripod. Phone mount can be removed from the hand grip/tripod legs section, allowing you to mount your phone on most standard tripods.
  • Gimbal stabilizer – $94.99
    • Pricey, but will greatly increase the quality of your footage if you’re filming something that requires camera movement, such as a walk-and-talk interview or a field trip video.
  • Creative ways to mount a smart phone with household items:


ADD-ONS / TIPS AND TRICKS

  • If you would like to have access to a teleprompter as you record video, consider one of the following:
  • Here are some sound improvements to consider to reduce echo in your recordings.
    • Add blankets or blinds on walls to reduce echo.
    • Record in the smallest room possible.
    • Avoid rooms with hardwood floors.

Lighting for video

  • Turn a window or glass door into a soft “Key Light” by hanging a cheap, frosted shower curtain over the window. 


Authors: Jason Jones, Drew Olson, and Sammi Lukas, with special thanks to Victor Yee for technical support with the images.

The use of PowerPoint and other similar presentation software, as a visual foundation for recorded narrated lectures for use in online courses is pretty common. These slide-based presentations typically present a series of individual slides that contain titles, visuals, and descriptive text or lists of bullet points with an accompanying voice-over recording. Using this approach to online content presentation seems familiar as it is a technology enabled extension of the traditional slide-based presentations instructors have used in a live classroom lecture. But narrated lecture for online presentation has some structural differences.

Whether transitioning a classroom lecture, or creating a new narrated lecture for online use, instructors at Ecampus are also encouraged to rethink their slide-based presentations. The recommendation is to create highly focused content and keep the duration of an individual narrated lecture presentation to about 10 minutes. This means a typical 50 minute classroom lecture may transition to several online narrated slide presentations as it is distilled down to 2-3 highly focused segments. 

Including voice-over with a slide-based presentation builds instructor presence in an online course. Narrated lectures also incorporate best practices in accessibility, copyright, and visual formatting. In essence, this process takes a PowerPoint presentation, incorporates best practice elements, and adds narration. This new instructor narrated presentation becomes a multimedia learning element for their course that is delivered in video format.

Multimedia Learning Theory Redux

On the surface, all the previous work in creating a narrated lecture seems sufficient. However if we incorporate research on multimedia learning we may choose to do more with this staple of the online course; the narrated lecture.

In my previous article on the value of images in online learning I explained how online presentations that combine text, images, and titles are considered multimedia-based learning objects. Using written words with images on a PowerPoint slide with voiceover is also a form of multimedia learning. Given this it may be useful to revisit theory related to multimedia learning to see how it related to narrated lecture design. The model below illustrates how the Cognitive Theory of Multimedia Learning (Clark & Mayer , 2016) informs our understanding of multimedia-based learning.

Model of cognitive model of multimedia learning.
Figure 1. Model of the Cognitive Theory of Multimedia Learning

The model indicates that people (i.e., learners) have two channels of cognitive processing: 1) for processing visual/pictorial material and 2) one for auditory/verbal material. Additionally, humans can only process a few bits, or pieces, of information in each channel at the same time. Learner engagement with pictorial and verbal information is linked to an individual’s ability to parse information from the multimedia and ultimately integrate it with prior knowledge…creating new learning. That parsing is linked to two things: 

  1. How we structure and deliver information during the design of multimedia and 
  2. The learner’s ability to engage the information in a way that compliments learning.

Let’s stop here for a moment.

Now think about what you just did in reading the text above and looking at the illustration provided. In this instance you called upon a single information channel, the visual channel of cognitive processing, to interpret the meaning of the text description of the visual model. Was that an easy process for you?

How hard would it be for students to process similar information acquisition through one channel….vision only? With the cognitive theory of multimedia learning in mind ask yourself this…How would adding audio narration impact cognitive processing? How would that impact learning? Let’s explore these ideas in the context of narrated lecture design.

Five Guiding Multimedia Principles

In an article titled Information Design with Teaching and Learning in Mind, Rune Petterson and Maria Avgerinou (2016) identify 12 important principles teachers should take into account when designing multimedia-based learning experiences. I have organized these multimedia-based learning principles into three sections in the table below. As you read through these 12 principles it becomes clear that not all of these apply to narrated lecture design.

Listing of the 12 principles of multimedia-based learning.
Figure 2. Twelve Principles of Multimedia – Based Learning Design

Principles 1-4 address more general, or global, understandings about multimedia design and learning. Principles 5-7 address design factors directly related to combining text and images without narration in multimedia-base learning. The last five principles (i.e., 8-12) address how the spoken word is best integrated into multimedia design to be consistent with the cognitive theory of multimedia learning. Although all the principles are important to multimedia design for learning, the last five guiding multimedia principles are the most salient for narrated lecture design.

From Theory To Practice

Remember, the goal for instructors is to develop narrated lectures that enhance the multimedia-based learning experience. It is not simply to create a replication of the in-class lecture. Let’s look at the five guiding multimedia principles and how the ideas in the principles might shape how you can prepare your narrated lectures as online multimedia learning elements.

Temporal Contiguity Principle

This principle suggests that the most effective designs using narration and graphics place those two elements in temporal proximity. They are seen and heard at the same time. Seems obvious. But you must think through this principle and plan the sequencing and duration of  slides and narration accordingly. You must know what you want to say and when to say it in the context of the visual elements you have on your slides.

Modality Principle

This principle affirms that presenting words as audio narration is more impactful than written text in describing graphics on a slide. They are particularly impactful when paired with animations.

In essence this principle helps guide design that takes advantage of both channels of information processing. This also helps manage cognitive load by freeing learners from trying to interpret written text and images via the visual channel only. If you absolutely have to use text with graphics on your PowerPoint slides keep text in short phrase form to avoid extensive reading and any potential cognitive overload.

Redundancy Principle

This principle proposes addresses presenting narration and written text that says the same thing combined with images. The redundancy principles guides designers to select either narration or written text with the image on a slide for the best learning experience. Choose one method of delivering the word-based description of the image. Don’t use both. 

Once again this principle is about managing, through design, the cognitive load of the media element. There are some complex scenarios where text only is a best option…see the Control of Processing definition.

Coherence Principle

This principle simply states that adding interesting, but non-essential, visual or word content can hurt learning. Narrated lecture design should avoid placing funny phrases, decorative images, excess lines, colors and sound effects and music that does not directly relate to the learning at hand of any particular slide. 

Instructors should know what they want to say and design to maintain keep cognitive focus on that learning. We sometimes think these extra element keep attention but actually the opposite is true…they clutter and create distracting cognitive load.

Sometimes this principle is not fulfilled through good intentions. It often occurs when instructors wish to have multiple images of something on the same slide. Then they talk about each image individually in narration. It is much better design to put those extra images on a new slide and talk about it when it is the focus of the learning. This avoids visual overload and helps keep the pace of your presentation moving.

Personalization Principle

Creating a social conversation with learners softens the experience of learning via devices. It also helps build instructor presence in a lesson and the course. One of the best ways of achieving this via narration is to use a conversational tone.

Conversational tone in everyday life comes from an interaction that is authentic and casual. That is difficult to achieve in narration. Professional actors train to do this. Faculty at Ecampus are often provided with narration tips to help in this regard. Narrators are encouraged to have notes that guide their presentation but not encouraged to read a script verbatim. Not surprisingly, reading a narration is easily detected by the listener’s ear. You can personalize your narrated lectures by knowing what you want to say, practice it so you know when to say it, then just be yourself and let your personality come through.

Applying the personalization principle in design means thinking through and planning your conversation with the remote audience. Then practicing the delivery so it feels conversational. Learners will benefit from this narration design strategy.

Final Thoughts

Earlier in this article we posited that new learning is predicated upon the structure and delivery method of information to learners as well as the learner being able to engage with the provided information in a way that supports learning. In a very simple way we are saying that good design for learning presents content clearly and does not create barriers to information engagement by leaners.

Instructors are correct that it is good to focus initial narrated lecture design on the slide presentation preparation that reflect best practices in accessibility, visual formatting, copyright, and more. It is also valuable to think through the narrated lecture design in terms of cognitive load, potential barriers to learning, and how to positively impact the learner’s information processing.

The five guiding principles for narrated lectures help instructors identify ways in which they can design and intentionally use audio narration with text and images that compliments an understanding of cognitive learning theory. In doing so they create online narrated lectures that are more effective as multimedia-based learning experiences.

References

Clark, R. C., & Mayer, R. E. (2016). E-learning and the science of instruction : Proven guidelines for consumers and designers of multimedia learning. Retrieved from http://ebookcentral.proquest.com

Rune Pettersson & Maria D. Avgerinou (2016) Information design with teaching and learning in mind, Journal of Visual Literacy, 35:4, 253-267, DOI: 10.1080/1051144X.2016.1278341

The Ecampus multimedia team creates animations to bring your thoughts and words to life. In virtual reality, creating these 3D objects and animations has become incredibly easy and fast.

The old ways … of power tool juggling

Developing “multimedia” often means using small aspects of many different tools. “Media” being a means of communication and the plural of medium: a means of doing something. To create an animation for your class, we quickly run through a long list of media.

Here’s an exhaustive run through of how the process works at the moment (feel free to skip to the next section! This is detailed): You would typically type up and email over a script that I take into Google Drive to edit and comment upon. You’d record audio in one of our sound booths, and I’d take the resulting sound files into Adobe Audition to equalize levels and remove background noise(s). Then I’d grab a pencil and sketch out a quick storyboard for each sentence to suggest visuals that could emphasize your point(s). Photographs of these sketches are edited in Photoshop and injected into another file on Google Drive.

And that is just the easy preparation portion. Depending on the animation style we’re going after, I’d dive deep into obscure programs I’ve learned to use over the past few decades – like Autodesk Maya / Mudbox / MotionBuilder / Meshmixer, Adobe Illustrator / Animate / Character Animator / Fuse / Dimension, Unity3D, the Procreate iPad app, Agisoft Photoscan, MeshLab, Instant Meshes, Mixamo, etc. … Simply trying to list the most commonly used apps is exhausting (much less all the other emerging apps we investigate, or the ones we mastered that went away. I still love you HyperCard, Director, and Flash!). Phew.

However the pieces of animation are generated, we still end up spitting out thousands of images or video files that have to be lined up in Adobe After Effects / Premiere / Media Encoder to assemble the final video that we can upload to YouTube or Kaltura and send to you.

What I’m saying here is: this whole process usually takes weeks or months. Or… we can just do it all in VR in an afternoon.


The new reality… of easy bake dreams

Tvori is an amazing tool to easily puppet objects and characters around in VR. You can record audio in directly, and export 4K videos, 360 videos, or animation data for all those old programs i mentioned above. The main reason I set out to write this blog post: was to promote Tvori. It offers an all-in-one easy pathway to making your own animatons in mere minutes. This amazing program runs about 20 bucks, and unlike the other (free) VR tools I’ll mention below – Tvori isn’t backed by a major corporation (*yet). I expect to be generating much more animation work for instructors with it, and hope to be advising you all on how to use it yourselves as you step into VR through your own office computers.

I’d say Tvori offers a level of animation comparable to an “animatic” – a movie industry term for quick and dirty approximations of what the final multi-million dollar film could look like. There’s a good chance animatics will be good enough for the bulk of concepts we wish to impart to students at the university level, with the added bonus that we can generate many of them in a single term. That said, maybe you’re curious what other creative tools are emerging in VR these days?

1) Whiteboard animations are a common request at Ecampus. Oculus Quill lets us draw and animate in this cartoon style in 3D (so it’s like our current 2D drawing tools, but we can move the camera around freely at any time, zoom-in endlessly,). This free tool for Oculus Rift users was updated last month to add a ton of new useful tricks.

We’ve already made fly-bys of 3D drawings in Google Tiltbrush, but we couldn’t actually animate the drawings directly (we just started recording, and moved our head through space). But both these programs are free and worth looking into.

2) In Oculus Medium, anyone can sculpt objects in the air at high resolution with weightless clay. If you own the Oculus Rift, this is an free and amazing tool for creating 3D objects. Now we can make things extremely fast and bring them into those old programs we’ve used for years.

Google Blocks is a similar free tool to quickly make solid low-resolution objects (it’s like Google Sketchup with VR ease and benefits). Upload them to Google Poly to share with the world (a service very similar to SketchFab or Microsoft’s Remix 3D). With these sculpting tools, and repositories of free creations, it’s a snap to gather the building blocks needed to start complicated animation projects. For example, we can bring any of these sculpted objects right into Tvori…

3) Final thought: you can use Google Earth VR to walk around any location on earth, while scaling up to Godzilla height or even zooming in and out from space. The multimedia team can record what you’re seeing and pointing at, along with your narration. While this isn’t a feature of the software (yet), we have the magic means to do it for you. (And we can also go back into Google Earth Studio to make a more polished and precise version of the path you traveled).

I hope this inspires you to go get a VR headset, come by our offices and try it out, or let us don the gear for you. We look forward to making your imagination a reality for students worldwide!

Could your online course use a boost? Is it lacking the secret spice that could be the difference between students coming away feeling satisfied rather than feeling like something was missing? Maybe there is a complex topic that students are consistently having a difficult time understanding or perhaps a particular concept that begs for more than a Power Point with some bland images collected from the internet. Well, perhaps the missing ingredient is an animation!

A brief history of animation…

In 1914, cartoonist Windsor McCay wowed audiences with his short animated film. Although not the first animation ever produced, Gertie the Dinosaur broke ground by employing new techniques, such as keyframes, loops, and the use of an appealing character, all of which would become standard practice in the creation of future animations. Interestingly, Gertie the Dinosaur also featured an interactive element where McCay would appear to give commands to Gertie which she would then carry out on screen.

Fast forward to 1928 where upstart Walt Disney Studios released the animated short Steamboat Willy and introduced the world to Mickey Mouse. Steamboat Willy also marked the first use of sound integrated onto film in an animation.

The 1930’s saw a boom in animation with Warner Brothers creating  its Merrie Melodies and Looney Tunes cartoons which featured a cast of outrageous characters including Bugs Bunny and Daffy Duck and arguably some of the most enduring pop-culture references ever. I admit, the Looney Tunes were an invaluable supplement to my formal elementary school education!

Disney upped the ante in 1937 with the release of the first feature length animated film Snow White and the Seven Dwarves. With Snow White, the Disney animators ventured into uncharted territory and proved that an animated film could be both visually stunning and a legitimate medium for storytelling. It was also around this time that the Disney animators planted the seeds of what would become the 12 principles of animation, a system of principles and techniques which have endured to this day and serve as the foundation in the creation of animation and motion graphics.

In the 1940’s and 50’s Disney continued to produce classics with films like Bambi and Fantasia while  another animator, Ray Harryhausen, perfected his “Dynamation” stop motion technique and brought fantastic monsters to life alongside live actors in films like The 7th Voyage of Sinbad and Jason and the Argonauts. Meanwhile, across the Pacific Ocean the Japanese were busy developing their own unique style of animation known as anime.

In 1960, The Flintstones became the first animated prime time television series and paved the way for animated programs like The Simpsons, the longest running series of all time.

In the 1970’s, animated cartoons dominated Saturday morning television. Although the content was mostly aimed at keeping kids engaged while mom and dad slept in, the power of animation’s potential as a learning tool was being explored in the form of short interludes during the commercial breaks. Most notable, Schoolhouse Rock combined animation and music in a powerfully memorable format to teach kids topics like grammar, history, math, and science. Meanwhile, Sesame Street  featured groundbreaking animations aimed at teaching through entertainment.

In the 1980’s, the computer arrived and ultimately revolutionized the way that animation was created as well as the way it looked. It was a clunky start but by 1995, Pixar studios released the first entirely computer animated feature Toy Story and there was no looking back. The omnipresence of the internet added fuel to the fire and allowed anyone with a laptop and a story to tell to publish their ideas to the world.

So, what does all of this have to do with online learning? Well, before the pedagogical red flag goes up and you think that animation is just for kids or that it’s too frivolous to occupy space in the world of higher education, read on.

We need look no further than the media that we consume on a daily basis to see how ubiquitous animation is. From television commercials, to the prevalence of the online “explainer” video, to online apps such as Headspace, which utilizes  animations to demystify the practice of mindfulness and meditation, animation is proving to be an effective medium to deliver information and get it to stick. Why wouldn’t we want to implement this powerful and available tool in online learning?

A well-crafted animation is a multi-sensory experience that can take a complex or abstract concept and explain it in a way that is concise, understandable, and engaging to the learner. Combining audio/verbal and visual information to illustrate difficult topics allows learners to associate images with concepts and has been proven to actually increase learner understanding and retention.

Additionally, animation can be used to visualize things that would otherwise be impossible or too cost prohibitive to depict with film, text, or still images. Things such as a biological or chemical processes that are invisible to the naked eye, or the ability to look beneath the earth to witness how a plants’ roots grow and utilize nutrients, can effectively be illustrated with animation. Larger scale events like planetary orbits, the hydrologic cycle, earthquake science, or the Russian Revolution can be represented in ways that are much more effective than using still pictures with arrows and text. Does the topic require a horse, a bug, a whale, a tractor, a piece of DNA? There’s no need to worry about the exorbitant costs and time required to train, catch, dive, drive, or dissect…simply animate it!  Animated characters, human, abstract, or animals can also add visual appeal and inject humor into a lesson. Finally, and arguably most important: animations are entertaining! If the student is entertained, they are more likely to be engaged in the subject matter and if they are engaged, they are more likely to retain information.

So what’s the next step? The Ecampus Custom Team is here to help you develop your animation. We’ll start by meeting with you to determine a learning objective and to brainstorm ideas for the project. You can view examples of our work to see if a particular style sparks your interest or, if you have a specific aesthetic in mind, we will work with you to refine it. Once we have pinned down a solid direction for the project, we’ll work with you to create a script. The script will serve as the narration for the animated video and is vital as it is an opportunity to distill the content down to its most potent elements. We prefer to keep the maximum length of the animation under 5 minutes and have found this to be most effective for the learner. When the script is finalized, you will come in to one of our studios to record the voice over narration. At this point, it’s full steam ahead and our team begins production on the animation! We’ll check in with you regularly with samples and progress reports to ensure an amazing final product.

-James Roberts, media team, Oregon State University Ecampus

References:

What’s An Image’s Value?

Image of postcard with a picture is worth a thousand words written on it.

Have you ever created an online course without using images? No?

That is not surprising as images can convey emotions, ideas, and much more. Their value is often captured in an old adage: A picture is worth a thousand words.

This article will discuss the value of images in online course design and how using visuals to accompany instruction via text or narration might contribute to or detract from an online learning experience. Let’s begin.

Multimedia Learning: Images, Text, and More

Online learning is a modern form of multimedia learning. Richard Mayer (2009) described multimedia learning as that learning that integrates the use of words and pictures. In traditional classrooms these learning resources might be experienced as: 

  • Textbooks:  Text and illustrations.
  • Computer-based lessons: Narration w/animation
  • Face-to-face slide presentations: Graphics and audio.

In online learning multimedia may also include:

  • eBooks: Text and digital images 
  • Video: Text, images, animations, coupled with audio.
  • Interactives: Maps, images, and video.
  • Digital Visual Representations: Virtual worlds and 3D models.
  • Screencasts: Software demos, faculty video feedback, and more.
  • Audio: Enhanced podcasts or narrated lectures.

These two short lists, although not exhaustive, demonstrates the importance of visual elements to multimedia based learning in online courses. There are many reasons why we might include any one of these multimedia learning experiences in an online course. For our purposes we will explore a bit more the instructional value of visuals to online learning.

So, how do words and pictures work together to help shape learning? Given that this is perhaps the most common learning object used in an online course it would seem useful to understand what may be considered this simple interpretation of visual literacy for learning (Aisami, 2015).

Visual Engagement Of A Learning Object

In a recent study of how people acquire knowledge from an instructional web page Ludvik Eger (2018) used eye tracking technology to examine a simple learning object composed of a title (headline), a visual element (i.e., diagram), and a box of written text. With no audio support for the learning object in this study, participants engaged the content via visual engagement alone. Results indicated that the majority of students started their learning process at the headline or the headline and visual element. The box of information, in text form, was the third part of the learning object engaged.

Within this context eye movement analysis indicates a learning process that is dependent upon a consistent visual flow. Purposely connecting the title, visual element and information text of a learning object may best reinforce learning. By doing this the course designer/instructor becomes a sort of cognitive guide either focusing or not-focusing learning via the meaning structure of the various learning object elements. In our case we want to use visual elements to support performance and achievement of learning tasks.

Choosing Visual Elements

In order to explore the choice of visual elements in an online learning experience it is helpful to understand how we process that experience from a cognitive science perspective.

Clark and Mayer (2016) describe that cognitive science suggests knowledge construction is based upon three principles: Dual channels, limited capacity and active processing. Let’s briefly examine what these are.

Dual channels:

People have two channesl of cognitive processing 1) for processing visual/pictorial material and 2) one for auditory/verbal material. See Figure 1.  below.


Model of cognitive model of multimedia learning.
Figure 1.: Model of the Cognitive Theory of Multimedia Learning

Limited capacity:

Humans can only process a few bits of pieces of information in each channel at the same time.

Active processing:

Learning occurs as people engage in cognitive processing during learning. This may include attending to relevant material, organizing that material into a coherent structure, and integrating that material with prior knowledge.

Due to the limits on any learner’s processing capability it is paramount that we select visual images that help manage the learning process. Our goal is to limit excessive processing that clutters the learning experience, build visual support for representing the core learning process, and provide visual support that fosters deeper understanding of the learning at hand. What does this mean in practice?

Managing Processing Via Image Use

Making decisions about image selection and use is a key to managing this learning process. Understanding the meaning of images to select is also key and is really a function of literacy in one’s field and visual literacy in general (Kennedy, 2013).

In practice we can use the following guidelines to make decisions about image use in multimedia-based online learning. 

  • Control Visual Elements – Too many images on a web page or slide may force extraneous cognitive processing that does not support the instructional objective. 
  • Select Visual Elements Carefully – Images difficult to discern are likely to negatively impact learning. Think about good visual quality, emotional and intellectual message of the image, information value, and readability.
  • Use Focused Visual Elements – Target selection of visual support to those images that represent the core learning material and/or provide access to deeper understanding of that core content.

Other Image Tips

Emotional Tone: Emotional design elements (e.g., visuals) can play important roles in motivating learners and achievement of learning outcomes (Mayer, 2013).

Interest: Decorative images may boost learner interest but do not contribute to higher performance in testing (Mayer, 2013). Use decorative images prudently so they do not contribute to extraneous learning processing (Pettersson & Avgerinou, 2016).

Challenge: Making image selections that contribute to a degree of confusion may challenge learnings to dive more deeply into core learning. This is a tenuous decision in that challenge in sense making may prove to foster excessive processing.

Access: Images must be presented in a format that is viewable to users to be practical. This involves an understanding of technical features of image formats, download capability, mobile use, and universal design techniques.

Final Thoughts

It is valuable to remember that visuals communicate non verbally. They are most effectively used when carefully selected and paired with text or audio narration. Visuals appeal to the sense of sight. They have different classifications and could be pictures, symbols, signs, maps graphs, diagrams, charts, models, and photographs. Knowing their form, meaning, and application is part of being a visually literate course developer or instructional designer.

Web Resources

References

Aisami, R. S. (2015). Learning Styles and Visual Literacy for Learning and Performance. Procedia – Social and Behavioral Sciences, 176, 538-545. doi:10.1016/j.sbspro.2015.01.508

Clark, R. C., & Mayer, R. E. (2016). E-learning and the science of instruction : Proven guidelines for consumers and designers of multimedia learning. Retrieved from http://ebookcentral.proquest.com

Eger, L. (2018). How people acquire knowledge from a web page: An eye tracking study. Knowledge Management & E-Learning: An International Journal 10(3), 350-366.

Kennedy, B. (2013, November 19). What is visual literacy?. [Video file]. Retrieved from https://www.youtube.com/watch?time_continue=1&v=O39niAzuapc

Mayer, R. E. (2009). Multimedia learning (2nd ed.). New York: Cambridge University Press.

Mayer, R. E. (2014). Incorporating motivation into multimedia learning. Learning and Instruction, 29, 171-173. doi:10.1016/j.learninstruc.2013.04.003

Rune Pettersson & Maria D. Avgerinou (2016) Information design with teaching and learning in mind, Journal of Visual Literacy, 35:4, 253-267, DOI: 10.1080/1051144X.2016.1278341


Credit: Embedded image by Kelly Sikkema on Unsplash.com

If you’ve ever needed an excessive amount of photographs or diagrams to accurately describe a physical object for your class, you may benefit from a 3D model.

Standard media types, including text, photographs, illustrations, audio, video, and animation, are crucial to the online learning experience. A 3D model is essentially another media type with a lot of unique qualities.

What is a 3D model?

3D Skull with annotation

3D models, in this case, are digital representations of physical objects. 3D models generally consist of a polygon mesh and a surface texture. The polygon mesh is a “shell” comprised of the different surfaces of a 3-dimensional object. There are three main components that make up this shell: vertices (points), edges (lines), and faces (planes). For what should be clear from the previous sentence, polygon meshes are often referred to as simply “geometry.” There are a lot of other technical terms associated with polygon meshes, but in practical application, you may never need to learn them.

The surface texture, at its most basic, is an image, mapped onto the surface of the polygon mesh.

A texture can be as simple as a solid color, or as complex as a high-resolution photograph. The texture will be wrapped onto the surface of the geometry with the help of a set of instructions called UVs. UVs are a complex topic in and of themselves, so it’s good enough that you just know they exist conceptually.

These textures can have physics-based properties that interact with light to produce effects such as transparency, reflection, shadows, etc.

You’re probably thinking to yourself now, that 3D models are too complicated to be of use in your courses, but that’s not necessarily true. The composition and inner workings of 3D models are complicated, for sure, but you don’t need to be an expert to benefit from them.

Where did they come from, and how are they used?

There probably isn’t a day that goes by where you don’t experience a 3D model in some way. They are everywhere.

3D models, in digital form, have been around for decades. They have been used in industrial applications extensively. 3D models are used to generate toolpaths for small and large machines to manufacture parts more consistently than a human could ever hope to. 3D models are also used to generate toolpaths for 3D printers.

3D models are used in movies, animations, and video games. Sometimes entire worlds are created with 3D models for use in virtual and augmented reality.

Modern interfaces for computers and smartphones are awash in 3D graphics. Those graphics are rendered on the screen from 3D models!

How can they help me as an educator?

If you’re still not convinced that 3D models hold any benefit to you, I’ll explain a few ways in which they can enrich your course materials.

  1. 3D models are easily examined and manipulated without damage to physical specimen.
    • If you are involved in teaching a course with physical specimens, you are no doubt familiar with the concept of a “teaching collection.” A teaching collection is a high-turnover collection that gets handled and examined during class. Normally these collections break down quickly, so instructors are hesitant to include rare and fragile specimens. Having digital proxies for these rare and fragile specimens will allow students access to otherwise unknown information. This has even bigger benefits to distance students, as they don’t have to be anywhere near the collection to examine its contents.
  2. 3D models give students unlimited time with a specimen
    • If you have a biology lab, and the students are looking at skull morphology, there’s a distinct possibility that you would have a skull on hand to examine. If there are 30 students in the course, each student will have only a short amount of time to examine the specimen. If that same skull was scanned and made into a 3D model, each student could examine it simultaneously, for as long as they need.
  3. 3D models are easily shared
    • Many schools and universities around the world are digitizing their collections and sharing them. There is a fair amount of overlap in the models being created, but the ability to add regionally exclusive content to a global repository would be an amazing benefit to science at large. Smaller schools can have access to a greater pool of materials, and that is good for everyone.
  4. 3D models have presence
    • A 3D model is a media object. That means it can be examined, but it’s special in the way that it can be interacted with. Functionality can be built on and around a 3D model. Models can be manipulated, animated, and scaled. A photograph captures the light bouncing off of an object, that is closer to a description of the object.  A 3D model is a representation of the actual physical properties of the object, and that strikes at the nature of the object itself. This means that a 3D model can “stand in” for a real object in simulations, and the laws of physics can be applied accurately. This realistic depth and spatial presence can be very impactful to students. Much more so than a simple photograph.
  5. 3D models can be analyzed
    • Because 3D models are accurate, and because they occupy no physical space, they lend themselves to analysis techniques unavailable to the physical world. Two models can be literally laid on top of one another to highlight any differences. Measurements of structures can be taken with a few clicks. In the case of a machined part, material stress tests can be run over and over without the need to replace the part.

These are only a few of the ways that an educator could leverage 3D models. There are many more. So, if you still find 3D models interesting, you’re probably wondering how to get them, or where to look. There are a lot of places to find them, and a lot of techniques to build them yourself. I’ll outline a few.

Where do I get them?

3D models are available all over the internet, but there are a few reputable sources that you should definitely try first. Some will allow you to download models, and some will allow you to link to models on their site. Some will allow you to use the models for free, while others will require a fee. Some will have options for all of the aforementioned things.

How do I create them?

The two main ways to create 3D models are scanning and modeling.

Scanning can be prohibitively expensive, as the hardware can run from a few hundred dollars, to many thousands of dollars. But, like anything else technological, you get what you pay for. The quality is substantially better with higher-end scanners.

For something a little more consumer-grade, a technique called photogrammetry can be employed. This is a software solution that only requires you to take a large series of photographs. There is some nuance to the technique, but it can work well for those unable to spend thousands of dollars on a 3D scanner. Some examples of photogrammetry software include PhotoScan and COLMAP.

Modeling has a steep learning curve. There are many different software packages that allow you to create 3D models, and depending on your application, some will be better suited than others. If you are looking to create industrial schematics or architectural models, something likeFusion 360, AutoCad, or Solidworks might be a good choice. If you’re trying to sculpt an artistic vision, where the precise dimensions are less important, Maya, Blender, Mudbox or Zbrush may be your choice.

How to use them in your class:

There are a number of ways to use 3D models in your class. The simplest way is to link to the object on the website in which it resides. At OSU Ecampus, we use the site, SketchFab, to house our 3D scans. The source files stay with us as we create them, but we can easily upload them to SketchFab, brand them, and direct students to view them. SketchFab also allows us to add data to the model by way of written descriptions andannotations anchored to specific structures in the model.

The models hosted on SketchFab behave similarly to YouTube videos. You can embed them in your own site, and they are cross-platform compatible. They are even mobile-friendly.

As you can see, there is a lot to learn about 3D models and their application. Hopefully, I’ve broken it down into some smaller pieces that you can reasonably pursue on your own. At the very least, I hope that you have a better understanding of how powerful 3D models can be.

A big THANK YOU to Nick Harper, Multimedia Developer, Oregon State University Ecampus