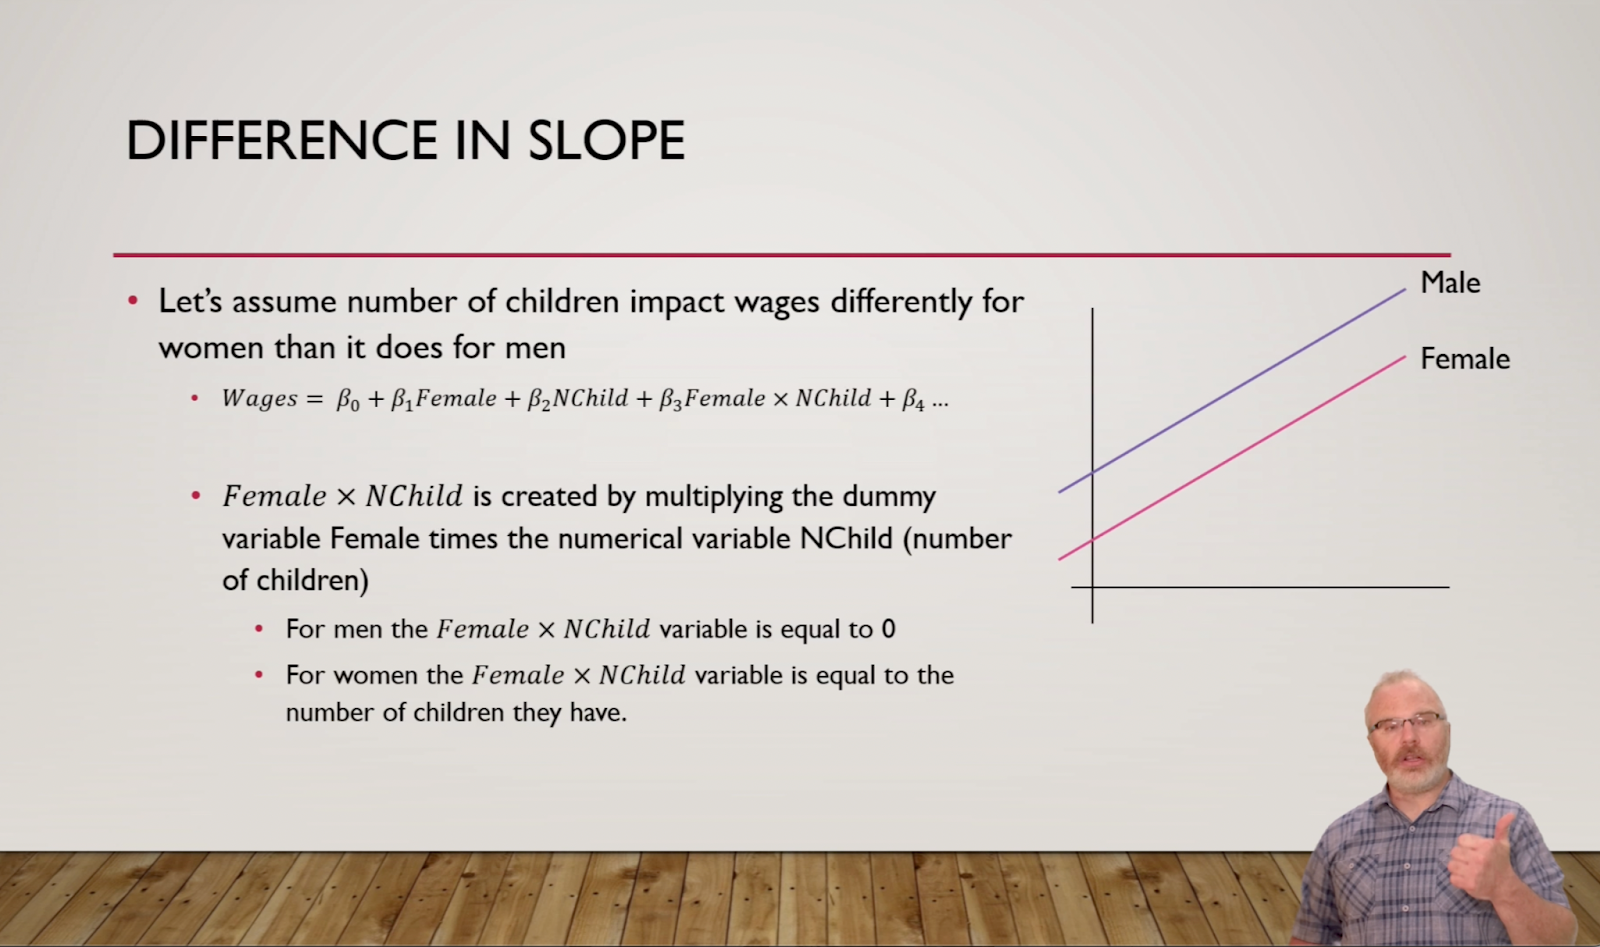
The following is a guest blog post from Aimee L. Lomeli Garcia, MLA. Aimee completed an Instructional Design internship with OSU Ecampus during the Fall of 2022.

Have you ever found yourself reading the same paragraph over and over again only to not retain any information? Or been so overwhelmed with the content you’re trying to read that you’re unable to absorb any of it? Odds are that it may not just be the content you’re trying to read; it may be the way the information is laid out. One way to help read and retain information is to make the text more readable.

Making information readable in your online course can seem overwhelming, but there are a few steps that you can take to make the content more digestible for students.

What is Readability?

First off – what is readability?  Readability is defined as “the ease in which a reader can comprehend text” (Calonia, 2020). Readability is a vital aspect to keep in mind as you design online courses. It not only makes the content of the class easier to read but increases the likelihood that students will understand the faculty’s content through lectures and discussions.  Better readability also decreases the risk of students misunderstanding the content, experiencing frustration, and increases the risk of students becoming disinterested in interacting with the course.  Though there are multiple options to make content more readable, there are five ways that you can adapt the content in your course: chunking content, using whitespace, avoiding wordiness, creating infographics, and utilizing color.

Chunking Content

What does “chunking content” mean? Chunking means breaking content into smaller chunks to make it easier to understand. This strategy originates from the field of cognitive psychology, which has proven that the human brain can “process, understand, and remember information better when broken into smaller pieces” (Moran, 2016).

Let’s demonstrate!

Below are the first two paragraphs of Harry Potter and the Sorcerer’s Stone by J.K. Rowling:

Chapter One
The Boy Who Lived
Mr. and Mrs. Dursley, of number four, Privet Drive, were proud to say that they were perfectly normal, thank you very much. They were the last people you’d expect to be involved in anything strange or mysterious because they just didn’t hold with such nonsense.

When reading through this excerpt, it’s easy for your eyes to scan through the information without comprehending it.  There are a few common methods that will help with chunking your material: make your paragraphs shorter, add space between your paragraphs, and develop clear hierarchies of text.

Utilizing these methods, let’s make this paragraph more readable:

Chapter One

The Boy Who Lived

Mr. and Mrs. Dursley, of number four, Privet Drive, were proud to say that they were perfectly normal, thank you very much. They were the last people you’d expect to be involved in anything strange or mysterious, because they just didn’t hold with such nonsense.

Using Whitespace

Whitespace is defined as “empty space between and around elements of a page” (Babich, 2017). Whitespace creates a backdrop or frame to make your content easier to read.  Like chunking information, whitespace allows the eye to find information easily.  Take these slides for example:

“Plastic Coffee Cup on Book” by Anna Shvets from Pexels

Do you notice how much easier it is to read the different types of coffee drinks on the slide that has more white space? In a study done by Wichita State University, research confirmed that increasing the amount of whitespace actually improves reading comprehension!

Avoiding Wordiness

We’ve all experienced reading material that has excessive wordiness. In a manner of speaking, “wordiness means using more words than necessary within a sentence, especially short, vague words that do not add much meaning” (Eliminating Wordiness, 2022). Unfortunately, the overuse of unnecessary words can muddle ideas and cause confusion for students.

To decrease wordiness, focus on the key points you want to convey and use an active voice instead of a passive voice. Consider the following example:

All of the students who are new to this university are required ot attend an orientatin that has been scheduled for December 1st.”

When reading this sentence, it’s difficult to decipher what the necessary information is for the reader to understand. Instead, let’s focus on the key points and use an active voice in this sentence:

“New students are required to attend orientation on December 1st.”

Here, we eliminated the unnecessary wording, allowing readers to understand the message the sentence is trying to convey.

Use Visuals

Pictures speak louder than words! Using visual media, such as infographics, pictures, videos, animations, and films, make content easier for students to understand and could decrease the amount of writing you have to do for the class! You can obtain visual media through free online resources such as Pexels, Pixabay, or Openverse or created on your own (Canva is a favorite for me).

So, instead of using this:

Cells are the building blocks of life. A cell is composed of cytoplasm, a nucleus, ribosomes, and mitochondria. Cytoplasm is made up of a jell-like structure that contains the contents of the cell. The nucleus serves as the command center and is typically the largest part of the inside of the cell. Ribosomes are tiny parts of the cell that make proteins and mitochondria are jelly-bean shaped and create energy from the food we eat.

Try this!

Labeled animal cell
Image by brgfx on Freepik

Color

Color makes a significant impact on the readability of your page. This can be easy to overlook, as we typically use the standard black font/white background combination. However, adding color to words or backgrounds can bring attention to a message you’re trying to convey. There are ways to do this successfully and ways to add color poorly.

Color choice example - difficult to read.

Looking at the red text on the first example can be challenging for someone with no vision issues. Imagine the difficulty students who have a visual impairment can have – in particular, red/green color blindness.

On the second example, having a text color that is nearly the same shade as the background can make reading the text nearly impossible. It takes effort to read the quote in the example – can you imagine reading a scholarly journal with the same formatting?

Don’t let these examples dissuade you from trying text colors and backgrounds! To verify if a color combination is readable, visit the Contrast Checker page, enter the RGB or RYB codes and the website will notify you if the color combinations are reader-friendly.

Color showing higher contrast

Conclusion

Drafting your site can be overwhelming when considering readability, but there are several steps you can take to make the course content easier to understand.

  • Chunking content helps break text into smaller pieces so content is easier for students to digest.
  • Whitespace provides empty space for your content to pop
  • Avoiding wordiness can make your content and message clearer
  • Using visuals allows you to utilize pictures, videos, infographics, and other media to convey content
  • Strategic use of color on your page can make reading the material more comfortable and less straining for all students, including those with vision impairments.

Below are links to resources and tools if you’d like to dive into more information about readability and the impact it has on the success of students of online students. Thanks for reading!

References

Babich, N. (2017, June 30). The power of whitespace. UX Planet. Retrieved November 28, 2022, from https://uxplanet.org/the-power-of-whitespace-a1a95e45f82b

Calonia, J. (2020, September 2). What is readability? Grammarly Blog. Retrieved November 28, 2022, from https://www.grammarly.com/blog/readability/

Eliminating wordiness. (2022). Hamilton College. Retrieved November 28, 2022, from https://www.hamilton.edu/academics/centers/writing/writing-resources/eliminating-wordiness

Moran, K. (2016, March 20). How chunking helps content processing. Nielsen Norman Group. Retrieved November 28, 2022, from https://www.nngroup.com/articles/chunking/

Sabo, C. (2018, June 19). Getting started guide: using infographics for teaching and learning. Learning Technologies. Retrieved November 28, 2022, from http://www.codlearningtech.org/2018/06/19/getting-started-guide-using-infographics-for-teaching-and-learning/

Wordiness. (2022). Las Positas College Reading & Writing Center. Retrieved November 28, 2022, from http://www.laspositascollege.edu/raw/wordiness.php#:~:text=Wordiness%20means%20using%20more%20words,main%20focus%20of%20the%20sentence

We begin with a ghost story.

This story may sound familiar. It begins in a space of learning. You enter as a student. You know you will be in this place for the next two or three months with other students and an instructor. But although you know you are all there in the same space, you can’t see or hear any other students. You wander alone until you discover a pre-recorded message telling you what to do. This should be reassuring, but the person in the video doesn’t look like the instructor listed on your course schedule.

“Welcome,” says the man in the video. “In this course you will learn how to apply theoretical concepts in the real world.”

You wander around the space. An announcement appears, welcoming you to the course. It includes a picture of the instructor listed on your schedule.

“So they do exist,” you think to yourself. And yet, as you look around, all the recordings you see are of someone else. This isn’t really their class, you realize. Someone else built this place. It’s unsettling to be in this space and feel like your instructor doesn’t belong here. Maybe you don’t belong here either.

Eventually, you find the one place where you can talk to other students, but even this space feels strange and isolating. There’s writing on the wall.

Please introduce yourself.

You can see writing by other students in the class, but the instructor never makes a comment. You come back to this room several times during the term to write more, as directed. You write replies to what other students have written, but it doesn’t really feel like talking. It feels like a performance, judged by the unseen, unheard instructor who exists only in writing.

The weeks go by. You listen to a disembodied voice talking over a slideshow lecture. Your instructor makes their ghostly presence known through weekly announcements and in the grades that appear on your homework. On one assignment, you see a comment in addition to the grade:

If you would like to talk to me about your grade, please make an appointment to meet during my office hours.

But you don’t. The idea of meeting your mysterious instructor is more terrifying than a bad grade.

The term ends, and the doors open for the students to leave. Even though you did well, you feel unsatisfied with the experience. You can’t wait to leave and put this strange, unsettling experience behind you. You learned what you were supposed to learn, but the instructor was a ghost; their presence an afterimage of a creator from long ago. Months later, you realize you’ve forgotten your instructor’s name, but you never forget the man in the videos.


My ghost story was partly inspired by the story I read last year about automated courses that are still using the videos created by someone who has since passed away. Sometimes it takes a true story like this to remind us that students know when an online instructor is present, and when they are absent. They know what it’s like to be taught by a ghost–even if that instructor is still living. This story was also a stark reminder to me as an instructional designer that it doesn’t matter how well-designed a course is if the students do not feel like the instructor is actually there and present with these students, while the course is running. 

What it means for an instructor to be present in an online course was challenged by the forced shift to online teaching in the early days of the pandemic lockdown. Many teachers used Zoom or other web conferencing software to meet with students during their scheduled class times, to varying degrees of success, and varying degrees of exhaustion. Suddenly, we were not in a classroom or office and neither were our students. We saw bedrooms, kitchens, living rooms, cars, parks, and parking lots. We saw parents and kids and intrusive cats. We saw a lot of camera malfunctions, heard a lot of microphone feedback, and experienced many technical difficulties.

But because this was a global crisis, there was a collective understanding that it is more important to be present than to be perfect. While online students may have already experienced the ghost in the course shell, for the first time, instructors were experiencing the other side of that ghost story. Previously embodied in a physical classroom, they were now reduced to digital images, speaking into the void of black boxes; ghosts of their former selves. They found the experience just as eerie as their students. And just like a ghost who struggles to get a message to their loved ones from beyond the grave, a lot of instructors struggled to find a way to reach their students from beyond the classroom.

In the early days of lockdown, a colleague of mine asked for help with one of his online course videos. He always recorded his video announcements the same way he recorded his lectures: inside his office, wearing a suit, looking very formal and professional. This time he wanted to do something different. He wanted to show his students that he was also feeling the strain of lockdown, and that they were all in this lockdown together. An avid walker himself, he decided that he wanted to encourage his students to go for a walk outside, and then show himself walking outside.

“How can I do that?” he asked. 

He had no idea how to make a video that did that, because he’d never seen anyone make a video like that–and no one to teach him.

“Go for a walk,” I told him. “Record a video on your phone while you’re walking and send it to me–I’ll do the rest.”

That experience led me to think about how students engage with video content that is formal and compare that to how they interact with content that is informal. Instructors can tap into what makes some of the best internet content these days–authenticity and informality–if they know how. Video is the easiest and most successful way to create authentic presence and build a sense of community with the students taking the course, and it only requires using one technology that most people use every day: a smart phone.

As an instructional designer, I want to enable and empower the faculty I work with, and that includes providing resources and support to prepare them to deliver their course as well assist with the design. I can find many articles written for educators about how to create home recording studios for professional-looking lecture videos, but I have yet to find an article that explicitly focuses on advising faculty how to make informal videos for course delivery purposes that goes beyond the theoretical to the practical, so I decided to write one. 

I’m going to focus on TikTok as the model for these videos not because I think faculty should be on TikTok, but because TikTok changed the game for authentic video engagement. Like many of my generation, I’m not on TikTok, and I needed my younger Gen Z friends to explain it to me. (PBS just premiered a documentary on TikTok as explained by Gen Z, so I am clearly not alone in this). But what I do understand, and what I think faculty can bring to their course videos, is the importance of the creator-viewer dynamic popularized by TikTok. 

What goes viral on TikTok tends to encapsulate a mood, and not require any particular technical expertise to create–like the video by the guy who recorded himself on his skateboard, sipping cranberry juice while listening to Fleetwood Mac. That kind of realness is increasingly important in a digital age where there’s a growing disconnect between “brand” and “authenticity.” It’s why corporations like Wal-Mart have moved from brand partnerships with well-known influencers on Instagram to creating their own “influencer” platform where they will pay for “real” testimonials of their products, and NBCUniversal just announced a initiative with TikTok stars to create television shows.

So how can instructional designers, media producers, and instructors tap into this zeitgeist? How do you prove to your students that you’re not a ghost lurking in the course shell? Good design for videos is often invisible–just like good design in an online course–because we experience them as a whole and they have a cumulative effect. But by looking at examples, we can identify specific elements that are associated with TikTok videos that are visually distinct from traditional videos. They also serve a different purpose, and that purpose can be supplemental to a traditional video. I’ve separated out eight individual elements in the two video examples where the design decision has a different effect on the audience. 

Design Element

YouTube

TikTok

Purpose

Educational/entertainment Announcement/call to action

Orientation

Horizontal (optimal for viewing on a television or desktop browser) Vertical (optimal for recording and viewing on a phone)

Setting

In a studio On location

Lighting Source

Stage/studio overhead Hand-held ring light

Camera Angles

Medium, multiple shots from multiple camera angles Medium, close up, extreme close up, one continuous shot

Wardrobe

“Formal” “Casual”

Audience

Speaking to a group Speaking to an individual 

Length

15 minutes 1 minute

There’s one additional element that is important to understanding why TikTok creates an immediacy with the viewer even beyond the timeliness of the video. TikTok videos are both ephemeral (in the sense that social media platforms are themselves ephemeral and therefore so is the content) and time-specific (in the sense that the content is only relevant until the event takes place). This time-specific framing and call to community is what makes the video feel so immediate and inclusive. Instructors often try to connect with students in this way through announcements or discussion boards, but it is far more difficult to try to accomplish with those tools. Video, because it is visual, and because it is such a large part of students’ daily lives, is able to make that connection far more easily.

And now the moment you’ve all been waiting for: here are some strategies for how to create a video with TikTok vibes using existing pre-scripted announcements. 

  • Record your video on your phone. You do not need to have the latest iPhone or Pixel with a 4k camera. Remember that amateur videos are better than professional-looking videos in creating the “person to person” connection. Your students don’t all have the latest phone, and so they don’t expect you to either. There are a couple of different ways to get video from your phone to your online course. At Oregon State, we use Kaltura to host videos, and you can either upload a video from your phone directly to Kaltura, or record your video using the Zoom app on your phone, which will automatically upload to Kaltura. 
  • Keep it current. Students want to feel like their instructors are existing at the same moment in time as they are and are in a specific location–even if it’s not in the same location as they are. You can comment on the weather or changing of the seasons. And don’t hesitate to go outside! Nothing signifies real time than the weather, and think of the impact of a term-long video sequence in front of a tree as it goes from green summer, to red fall, and finally bare winter. If there are events happening on OSU’s campus, or holidays, those are also good opportunities to connect with students at a specific time.
  • Keep it short. Most of the video content students consume on social media platforms is under 5 minutes. Any longer than that and you risk losing their attention. Keeping the videos short reinforces their purpose as timely, especially if they see a new video every week.
  • Make students feel “seen.” You might comment on work that has been received, or point to meaningful discussion board posts they might have missed. You might address a question that a student brought up during office hours or by email. Students value this kind of acknowledgement, even if they are not one of the students being acknowledged. Even the tone you use in recording to the video can create that relationship between speaker and audience. Talk to the camera as if it is a person, and not just a recording device. Students want to feel like you are talking to them, not at them. 
  • Change the way they see you–visually. If all of your videos in your class are studio productions or voiceover slideshows, your students have only one idea of what you are like. Move locations. If your students only see you behind a desk or in the studio, find another location. If you can find a location that relates to the week’s topic, fantastic, but even going to your living room or kitchen will be a welcome change. Change your wardrobe. Go casual. If your formal lecture videos have you in a suit and tie in a library, dress down in a fleece or t-shirt and go outside the office–or even outdoors! (climate YMMV). Even being in a kitchen, living room, or patio will create an informality that feels authentic.

I was recently assigned to be the Instructional Designer for an introductory programming course here at OSU. While working with the instructor, I was happy to see his inventiveness in assessment design. As one example, the instructor created an assignment to introduce loops, a block of code in a computer program that repeats while a condition is true. Here’s how he described the assignment to the students:

Your assignment is to simulate the progression of a zombie epidemic as it spreads through Portland, Oregon, beginning in the year 2001 (which was about the time that zombies became unnervingly popular). This assignment will test whether you can use loops when translating from a problem to a computational solution.

(Scaffidi, 2019)

I was excited about the design possibilities this introduced to a usually dry topic. Zombies! I built the page in our LMS, Canvas, and was excited to review it with him.

“Isn’t this fun?” I asked, showing him the assignment page I had created:

Zombie epidemic programming assignment introduction

“I guess so,” he said, “is there any research to indicate that decorative graphics support learning?” he asked me. I guess that’s fair to ask, even if it was a bit of a buzzkill.

I had no idea if including cool pictures was a research-based best practice in online course design. While I really wanted it to be true and felt like it should be true, I could not immediately cite peer-reviewed studies that supported the use of zombie images to improve learner engagement; I had never seen such research. But, I was determined to look before our next meeting.

The instructor’s research challenge led me to discover Research Rabbit. Research Rabbit is a relatively new online platform that helps users find academic research. Research Rabbit has users organize found research into collections. As articles are added to a collection, Research Rabbit helps identify related research.

Without realizing how much time I was exploring, four hours quickly passed in which I was wholly engrossed in the search to justify including a zombie picture in one assignment for one instructor. Below, I will share a few of the features that enamored me with Research Rabbit and why I continue to use it regularly.

Why I love Research Rabbit

Visualization of Search Results

Rather than combing through reference lists at the bottom of a paper, you can quickly view any works cited by a paper you have selected or change views and get a list of articles that have cited the selected document. Those results are presented in a list view, a network view, or on a timeline.

A Tool for Discovery

Research Rabbit starts generating suggested additions as soon as you add a paper to a collection. The more papers you add, the more accurate these recommendations become. It works somewhat like personalized Netflix or Spotify recommendations (ResearchRabbit, n.d.), helping you discover research you may not have been aware of in this same area of study.

Using their discovery functionality, you can identify clusters of researchers (those that have published together or frequently cite each other’s work). You can also use the “Earlier Work” option to see when research on a particular topic may have started and identify foundational papers in the field. Looking for “Later Work” helps you find the latest research and stay current on your research topic.

Free Forever

The Research Rabbit founders explain their reasoning for keeping their tool Free Forever as follows:

Why? It’s simple, really.

Researchers commit years of time, energy, and more to advance human knowledge. Our job is to help you discover work that is relevant, not to sell your work back to you.

(Research Rabbit FAQ)

Research Rabbit Syncs Collections to Zotero

I would have lost a lot of enthusiasm for Research Rabbit if I had to manually add each new paper to my Zotero collection. But Research Rabbit integrates with Zotero, and automatically syncs any designated collections. If you use a different reference tool, you can also export Research Rabbit collections in common bibliographic formats.

A Tool for Sharing and Collaboration

Once you have created a collection, you can invite other researchers to view or edit a collection based on the permissions you set. Collaborators can also add comments to individual items. Research Rabbit also gives you an opportunity to create public collections that can be shared with a custom link.

How to Explore Research Rabbit on Your Own

The feature set of Research Rabbit is beautifully demoed on the Research Rabbit website. From there, you can explore how to visualize papers, discover author networks, and start building collections. There is also a growing list of introductory and instructional videos by the academic community online.

So What Happened with the Zombies?

You can review some of the research yourself by checking out my Research Rabbit Collection of Articles on Visual Design in Online Learning.  Much to my delight, after conducting my (4-hour) search, I did find some research-based evidence that aesthetics improved engagement and recall (Deanna Grant-Smith et al., 2019). Many of the studies, however, also suggested that visuals in online courses should also have some instructional function and help communicate ideas to avoid cognitive overload (Rademacher, 2019).

Maybe next time, I’ll suggest embedding this:

A flowchart of a conditional loop feature Zombie images.
Zombie Images by Freepik

References

Deanna Grant-Smith, Timothy Donnet, James Macaulay, Renee Chapman, & Renee Anne Chapman. (2019). Principles and practices for enhanced visual design in virtual learning environments: Do looks matter in student engagement? https://doi.org/10.4018/978-1-5225-5769-2.ch005

Rademacher, C. (2019, May 13). Value of Images in Online Learning. Ecampus Course Development & Training. http://blogs.oregonstate.edu/inspire/2019/05/13/the-value-of-images-in-online-learning/

Research Rabbit FAQ. (n.d.). [Online tool]. Research Rabbit. Retrieved October 3, 2022, from https://researchrabbit.notion.site/Welcome-to-the-FAQ-c33b4a61e453431482015e27e8af40d5

ResearchRabbit. (n.d.). ResearchRabbit. Retrieved October 4, 2022, from https://www.researchrabbit.ai

Scaffidi, C. (2019). CS 201: Computer Programming for Non-CS Majors.

Copyright, Creative Commons, Public Domain, Fair Use… what are they and how to use them correctly? You might be a course creator in need of images to use in your materials. Or you could be an author wondering how best to share your work. This post features a brief interactive lesson on these concepts, along with recommended resources that you can explore to learn more.

You can navigate the lesson by answering the prompts or by using the menu. Click on the image below to get started!

The Educator's Guide to Copyright - Begin

Do you have any other resources that you found particularly helpful? Share them with us!

Part I: Role of Course Developer as Media Curator 

This post is Part I of a two-part series on video selection and use in online courses. Part I provides the reasoning behind understanding course videos selection by course developers as a curatorial process. Part II will explore video curation in practice in course development and provide a course design perspective on video presentation and management issues.

Recent Video Use Trends

In September of 2020 the enterprise video company Kaltura Inc. conducted its seventh annual State of Video in Education 2020 report. The report included responses from across the education system spectrum with higher education institutions making up 53% of all respondents (Figure 1.).

Chart showing percentages of educator sectors in response to Kaltura survey.
Figure 1. Percentage of respondents to video survey by education sector.

This report described how remote teaching-driven course changes impacted video adoption and use in education. Remote teaching and learning was the most common use of video (83% of respondents). Lecture captured as video was used by 69% of the responding institutions.

The executive summary identified a number of key insights and trends related to changes in video use in education. A select few can be seen below:

  • Use of video for remote teaching and learning grew by 28% over 2019.
  • Video use is viewed as positive. Respondents (84%) saw video as having a positive impact on student satisfaction, 73% seeing video increase student achievements and 76% believe it increased instructor satisfaction.
  • Students as creators of video increased by 13% from 2019 to 2020.
  • In higher education there was rising video use for remote teaching, lecture capture, and flipping the classroom.
  • Actual growth in the use of video for remote teaching and learning grew by 28%.
  • A majority of respondents (68%) want to continue to blend traditional teaching with today’s virtual innovations; such as video.

In some ways this is not surprising. This past year forced many instructors in higher education to convert face-to-face courses to remote instruction. Much of that transition was accomplished with synchronous sessions via ZOOM or some other video conferencing program. Live video conference sessions, if recorded, also served as a support resource for students. In response to the challenges of the past year both live and recorded video were adopted to make remote learning doable. Fully online courses do not have this live element as they are asynchronous and did not have to adapt in this way.

In asynchronous courses at Oregon State University our Ecampus course developers utilize video differently. Video is as a key media element in delivering course content to learners, promoting faculty presence, and to build depth into projects and assignments. Video content may be produced internally by course developers (e.g., instructors) and used in courses via an enterprise video system (e.g., Kaltura). Video content may also be sourced from external video-based social media sites (e.g., YouTube and Vimeo) or educational and commercial collections (e.g., Kanopy or Amazon) and via syndicated video sources (e.g., podcasts and Twitter).

Given the plethora of video available and a trend toward increased video integration into instruction the challenge to course developers is the selecting, managing, and presenting video content to support and compliment course learning outcomes. Ultimately this also becomes a course design challenge for instructional designers who must adapt to manage the integration of increasing levels of video in the course in a way that makes sense from a pedagogical perspective as well as visual design aesthetic.

Course Developers as Media Curators

What is a Curator?

The growing value of video in the experience of a course suggests that course developers (e.g., instructors) consider a new way of thinking about how video is selected, managed and presented. In essence, I am suggesting that for a given course the course developer serves as a curator of video content.

But what is curator? Should a course developer really think like a curator? How might curated media shape course development and instructional design?

In order to explore this notion of course developers as media curators a bit more I would like to share the definition of what a curator is from the American Alliance of Museum (AAM) Curators Committee (2009). The preamble to the curator core competencies of a curator defined the term curator as:

Curators are highly knowledgeable, experienced, or educated
in a discipline
relevant to the museum’s purpose or mission. 

Curators are further described as having nine core competencies and related applied skills. The competencies are:

Collection planning       Scholary Research              Exhibition Development
Collecting                        Object Research                  Education
Collection Care               Applied Research               Outreach & Advocacy

In Figure 2. we see these same foundational roles expressed by the AAM coupled with a definition of curator and description of the work of a curator. Also included is the domain of the work. Those domains are preservation, research, and communication. The global context of curation is, in this definition, a museum. The more discrete context is the exhibition, or exhibit application. Yet it is all part of a curator’s work.

Curator defined with context.
Figure 2. Definition of the term curator and select context example.

What we see in this definition in Figure 2. is the premise that curators select, gather, care for, and prepare presentations of single items that in aggregate make up a curated collection. That collection becomes a resource and object of education, outreach, advocacy and presentation.

This makes the act of curatorship a scholarly and creative practice that is deeply intentional and based upon the definitional parameters of the organization doing the work.

Course Developers – Curators of Video Collections

Now let us think about what an online course developer is and what they do. At Ecampus course developers collaborate with instructional designers to plan an online course. Instructional designers advise and take content selected by the course developer and build that content into Canvas, our learning management system.  The created courses are then shared with students. Course developers are considered content experts much like museum curators are. Let’s look at that a bit more closely.

In Figure 3. below we can see a comparison between the definitional role and duties of a museum curator and course developer. There are striking parallels between these roles. So much so that it would seem reasonable to think about what a course developer does as also a curatorial practice. A practice focused on the learning content, including video, for a given course.

Perhaps the greatest difference between these to two curatorial practices is the context of each. In asynchronous course development it is not uncommon for instructors to perform many of these same functions as museum curators but on a more discrete scale. The scope and context of their focus is obviously different.

In essence a course developer actively gathers and in may cases, creates unique course elements that form the curated media collection for a course. That collection of texts (readings), images, web resources and video is then used for education, research, and perhaps outreach with a constant eye on student access to media. Ultimately a course media collection is intended to permit the course developer to fulfill the purpose of the course and guide students in achieving the course learning outcomes.

The physical design of the course, with its media collection, is the domain of the instructional designer. The collaboration between the course developer and instructional designer are key in preparing the course as an “education exhibition” of sorts that has clear learning outcomes.

Course Video Selection: The Art of Curatorship

We began this discussion with the importance of video in online course development and design. With that in mind it is logical that video curation is an important element of course-wide media collection identification.

Video collection, cataloging, arranging and assembling for display in a course fits quite well within the parameters of curating. Any curation is also about a level of storying, opportunities for engagement, information sharing and perspective sharing (Potter, 2017). In course development these processes as applied to course media, and in particular video, have the potential to create and shape the nature, experience, and associated learning in an online course.

In making decisions about video use in online courses, a course developer would apply their knowledge and expertise to curate the selections. Clear learning outcomes provide a pedagogical and content structure to the video curation process. Once a video collection is established other decisions may come into play that reference an aesthetic for the collection. This is the art of curatorship.

The art of curatorship has been viewed as closely aligned  to a design process (Shuey, 2014) and may be guided by an interpretation of the universal visual design principles as conceptual guides to the education exhibition that is the online course. In this sense the curator is not thinking as much about the collection items per se but more about how the collection fits together to provide and support a narrative, flow, or education scaffolding for the course.

Thinking Like A Curator 

As an exercise in curatorial thinking let’s take some re-interpreted concepts of visual design and see if they help us think through how we curate not only individual videos but also a video collection. This brief list includes accompanying questions that are informed by the identified principle and may shape the curation of video. In these examples found videos are outside video sources where created videos are those made by the course developer.

  • Balance: What is the intended balance between: Created and found curated videos? Permanent video and temporary (single-use) video content?
  • Emphasis: How does found video reinforce or extend created video? Is there a particular focus or intention of video use?
  • Movement: Is there a scaffolding of curated video that matches the scaffolding of the course progression? How does the video curation contribute to that progression?
  • Pattern: Is curated content focused, more general in nature, or quite diverse in source, topic or message? 
  • Rhythm: Does video use and viewing support or promote a rhythm of engagement for the course that compliments course objectives?
  • Repetition: Are curated videos reinforcing similar ideas or concepts? Are videos used consistently for certain aspects of the course (i.e., narrated lectures)?
  • Proportion: Does the video collection time commitment fit within the time expectations for the course? What is the ideal proportion of video to text, image, and other course media?
  • Variety: Are curated videos from different content sources and types? What is the ideal balance for the course?
  • Unity: Does the video collection promote a sense of wholeness to the course? Could the video collection, on its own, communicate identifiable ideas, patterns of ideas, or a range of perspectives on a topic?
    Does video accessibility contribute to the overall course accessibility?

In working through this exercise, we begin to move beyond video collecting by subject toward a more complete analysis of video collection selection and use that includes intertwined pedagogic and aesthetic considerations. This helps create a video collection that is intentional in its item selection, organization and use.

Final Thoughts

Recent research by Kaltura Inc. indicates that video use in education is on the rise in the past year. A continued growth of access to video and ability to create video coupled with an interest in integrating video in education efforts suggests course developers have a challenging task regarding media selection and use.

This article presents the idea that course developers, whether obvious or not, are actively engaged in a curatorial process regarding media selection and use. In addition, because of the importance and prevalence of video, its curation is presented as a key element of the larger course media curation effort. Lastly, we have explored how video collections contribute to academic and aesthetic value of a course and provided some key considerations based upon extending classic visual design principles to a curatorial practice.

It is interesting that the term curation has Latin roots in the verb curare; which means to take care of. Course developers conducting intentional video curation contribute to meaningful media curation for a course. This engagement in the practice of a curator is truly a professional act of caring about the quality of course development and the impact on student learning.

In Part II of this series we will address the practice of video curation in the context of an online course and explore instructional design considerations for video use that balance and complement a sample course video collection.

References

American Alliance of Museums. (2009). Curators Committee (CurCom): Curator’s core competencies. https://www.aam-us.org/professional-networks/curators-committee/ 

Kaltura Inc. (2020) The state of video in education 2020: Insights and trends [seventh edition].
https: //corp.kaltura.com/resources/the-state-of-video-in-education-2020/

Potter, J. (2017). Curation. In K. Peppler (Ed.), The SAGE encyclopedia of out of school learning (pp. 4-6). SAGE Publications Inc., Thousand Oaks, CA.

Shuey, G. (2014, October 21). The art of content curation. RELEVANCE.
https: //www.relevance.com/the-art-of-content-curation/

Wikipedia (n.d.). Definition of term collection.
https://en.wikipedia.org/wiki/Collection_(artwork)

Wikipedia (n.d.). Definition of term curator.
https://en.wikipedia.org/wiki/Curator

Video Resources 

Special thanks for the following individuals for their contributions to this article.

  • Chris Lindberg, Instructional Design Specialist, Oregon State University, Ecampus, Corvallis, Oregon.
  • Cody Rademacher, Curator, Holocaust Museum & Cohen Education Center. Naples, Florida.

When looking at the name Serverless, it may seem obvious what Serverless is; the lack of a server for an application. The name is actually quite deceiving, as Serverless applications still require servers to perform their duties. Serverless actually refers to a collection of managed cloud services that help to run our applications including storage, databases, functions, back and forth data transfer and more. With serverless, a cloud provider like Amazon Web Services, Google Cloud or Microsoft Azure handle all the configuration, provisioning and management of the server instead of the developer. In simple terms, this means organizations adopting a serverless architecture will be saving a lot of time and money by removing the need to worry about setting up and managing servers.

The Platform Development Team (part of the multimedia group at Oregon State University Ecampus) builds and maintains a number of platforms that leverage Serverless. Web Platforms are pieces of software that facilitate the creation and consumption of content or activities at scale. By using Serverless, our team has experienced a huge decrease in time needed to develop and deploy new platforms and applications. Without the need for our team to configure and manage servers we can handle the setup of our backend for new applications more quickly and efficiently. Any support needed for a dedicated server has also completely disappeared, that is now all handled by the cloud provider. Another huge money saver for our team has been the lack of need for a dedicated server (a server dedicated to you, not shared with anyone else). In the past when using a dedicated server, you would have to pay for both the server, in addition to any resources dedicated to that server, these costs continue to occur even when the server is not in use. With Serverless, you simply pay for what you use, this means when our applications are not receiving requests we are not being charged. When a serverless architecture is performing jobs, the costs accrued are very small, each job costing less than a fraction of a penny. The combination of both an increase in our speed to produce new applications and the lower price tag of using Serverless to handle tasks has allowed our team to undoubtedly save on development costs and provide software to users in a timelier manner.

Apart from its cost benefits, there are also many other positives to using a serverless architecture. These include security, scalability and accessibility. Because the server is no longer managed by the developer, many of the security aspects for applications that a developer would have had to manage in the past are handled by the cloud provider. There are still many security concerns a developer has to consider and handle outside of what the cloud provider handles, but Serverless helps reduce the list of concerns for the developer. Scalability is also a huge plus. As an application gets more popular or starts receiving more requests, Serverless allows scaling to handle those requests. With a dedicated server you would need to manually increase resources. Often when increasing the resources for a dedicated server there will likely be a good portion of those resources going to waste (wasted resources means wasted money), especially as the application receives different levels of traffic at different times. With Serverless, there is no need to worry about wasting resources because it only uses what is needed and scales to the amount of traffic an application is receiving. One of the main goals of our team is to make everything that we develop fully accessible. Serverless helps to us achieve this goal by being offering the ability to deliver content from different regions all over the world, rather than being dependent on a delivering all content from dedicated server located in Oregon. This allows students to more easily access our content and at higher speeds.

Ecampus’ Platform Development Team has seen so many benefits from using the serverless architecture over a dedicated server that it is now used in almost everything that we do. Every single one of our platforms including NES (our platform designed to handle long form content), SLIDE (our platform designed to add interactivity to slideshows), VDL (our platform designed to add interactivity to videos) and the upcoming interactive labs platform all have fully adopted a serverless architecture, which has helped us in producing interactive content for Ecampus’ courses in lightning fast speeds. We can also now utilize the time we have saved to improve our platforms and the overall interactive content that is used in Ecampus’ courses. In summary, Serverless has not only saved our team time and money but also has allowed us to offer better learning experiences to students taking Ecampus’ courses.

Author – David Jansen

Audio in Online Learning banner.

Audio is a term we all understand on some level. Commonly we think of audio as the transmission, reception, or reproduction of sound. Audible sound is what we hear. So, when we consider audio as an element of course design we are thinking about how sound can be used to communicate or support learning in an online course environment. Integrating audio in course delivery can be quite powerful if done well.

Perhaps the most common method of using sound in an asynchronous online course is via narrated lecture. The narrated lecture is typically a voice over a slide presentation or screencast. It can be an essential tool of instruction if designed effectively.

Another way the voice of an instructor can be incorporated into a course is via audio feedback on student assignments. These are short audio recordings that have been found to help build a sense of instructor presence in an online course.

Highly focused use of audio is also utilized in subjects where audio is, in essence, the topic at hand. Here we are considering language, music, and media arts courses as examples.

Other valued voices are often brought into the online learning experience via guest interviews in either audio or video format. Not to be left out, the voices of students are increasingly present in online course via tools such as VoiceThread and university provided video portals such as Kaltura Media Space. And with tools such as Zoom recording audio interviews and voice overs is easier than ever. With the availability of media platforms such as YouTube, Vimeo, Amazon Prime, Audible, and Apple Music and Podcasts the ability to bring external audio resources into the online experience seems almost limitless.

Audio is also used as a supporting resource for text-based content in online courses. In this case screen readers may typically provide the audio support. When using audio as a primary learning resource it is necessary to provide text-based transcripts as accessibility options. A fuller description of making audio accessible can be found at the W3C website.

The examples listed above are common ways we integrate audio elements into online learning. Are there other perhaps different ways we might consider? In the next few paragraphs we will explore a few ideas of how we might use audio in specialized ways in course design.

Specialized Audio Use

Orientation & Review Audio

Audio is a great tool to use when smaller segments of media should be used to orient students to a part of an online course. Think about short, more ephemeral, voice messages that can be easily produced and updated from term to term as the course changes. These audio segments need not be highly produced but should be of good quality. This type of audio segment reconnects students with the instructor via voice.

Listen to the orientation audio sample below that was used in an online course: RE 270 – Outdoor Recreation Resources, Behavior and Values | Module III Orientation by Dr. Craig Rademacher; Northern Michigan University c. 2012. (00:02:56).  [download orientation audio transcript  from Temi.com]

Similar short segments of audio may be used to review sections of content. The review audio may be produced by instructors or students. These audio reviews may be used in preparation for an exam, major project, or collaborations within the course. The goal of such reviews may vary but certainly one goal would be to re-focus the listener to the task at hand while providing timely tips or learning objectives.

One of the things you may have noticed about the audio clip above is the integration of music to the orientation message. Purposeful music selections can support the emotional feel of a course or module being introduced. Music can also serve as an audio cue, or audio branding, for a course. So, selecting audio stingers, or music introductions, can highlight that a particular message or topic is coming or reinforce an emotional tone if carefully planned.

The primary benefit of using audio for orientation and review is that audio is less production intensive making it a quick way to provide feedback. Audio is also fairly easy to edit with a free cross-platform audio tool such as Audacity.

Narrative

The oral traditions of learning go back centuries. Prior to print, learning was interwoven in spoken traditions, legends, and cultural stories. Today story remains a potent vehicle for learning. As you might imagine audio is a great vehicle for story.

An example of this is an Oregon State University political science course titled Governing after the Zombie Apocalypse which was designed and taught by Dr. Rorie Solberg. The story that underpins this course is that a natural disaster has caused the breakdown of the U.S. government. In response citizens must create a new government including a bill of rights and constitution. Students become the citizens creating that new government taking into account marginal populations such as the surviving zombies which are called “blues”due to their virus-caused color.

Audio is used creatively in the course by periodically inserting radio broadcasts about odd happenings around the country. Although not the heart of the effort of the course, these audio presentations, really imagined radio newscasts, provide situational tenor and decision points as students go about creating a new government. Listen to a segment of a mock radio broadcast below.

Mock radio broadcast excerpt: Story by Dr. Rorie Solberg. Produced by Oregon State University Ecampus. Voice acting credit: Warren Blyth (00:02:04)

This segment highlights how audio can be used to shape and carry a narrative through an online course. You might imagine how different narrative audio presentations may support history, literature, or science courses.

Soundscapes & Nature Sounds

Experiencing authentic places or environments is believed to be a valuable form of learning. This idea is a driving force behind field-based learning and experiential learning. Audio soundscapes provide access to authentic acoustic environments that can support online learning about the context of an environment. The environment may be urban, rural, or perhaps in a wilderness-like setting. Soundscapes may also be used to create sense of cognitive and emotional world building that can be used in instruction. Soundscapes typically feature a molar perspective of the acoustic environment.

Listen to an example of such a soundscape titled Elk Rut and Rain Shower — Rocky Mountain National Park in Colorado by Gayi immersions (00:28:03) at SoundCloud. (link will open in a new tab)

Other, more specific sounds of nature are potentially positive resources for online instruction. Below is a sound sample of the call of a common raven. Listen to the raven’s call.

Audio recorded in the Beaver Basin Wilderness at Pictured Rocks National Lakeshore in Michigan in 2010 | Craig Rademacher. (00:00:26)

Now imagine how this simple recording may be utilized in a course. It might be used to help identify ravens from crows in an ornithology course. Perhaps this audio clip could be used to help communicate a sense of isolation for listeners studying wilderness values. Or, perhaps it could be used to introduce the poem by Edgar Allen Poe titled The Raven. In each case the audio would be used intentionally to deepen the context or experience of the learner.

Fidelity Matters

Sound quality is an important factor when selecting and using audio in an online course. Audio files need to be of sufficient quality to clearly indicate what you are expecting students to hear. Poor audio, or a confusing sound recording, is experienced as distracting and student will likely tune out. Recording and editing audio does require some knowledge and practice. And there are many places where you can learn to produce audio. LinkedIn Learning offers courses in audio production, podcasting, and even how to select a microphone. So, if you are interested give it a try.

If you are not inclined to produce your own audio content there are resources available where you can find high quality audio for use in courses. Some of these resources are royalty free. Others may require licensing of audio for use.

Final Thoughts

We have reviewed how audio is commonly used in online courses and how we might think about new ways of integrating audio. As you explore the links to resources below start to think about your next course design. How can you augment the text and video you normally use with audio? How might you leverage voice, narrative, or soundscapes to connect online students to the context, authenticity, and humanity of learning? You might want to experiment with audio at first. Start small. If it works, then you will have truly found a sound idea for online course design.

Select Audio Resources

Royalty free online resources:

Podcast Resources
There are several ways to find audio podcasts to review for inclusion in a course. Apple Podcasts is a dominant resource in this area. Apple streams over 750,000 podcast shows with over 20 million episodes. Google Play Music is another good resource. Podcast feeds can also be found simply by browsing for podcasts online.

Audiobooks
Audiobooks are found in many online book seller sites such as Amazon (Audible.com). Additionally some more specific sites such as audiobooks.com also provide resources.

Soundscapes and Nature Sound Resources


**Special thank to Matt Djubasak and Chris Lindberg for their contributions to this post.

example of the Hubs toolThe Ecampus multimedia team researches emerging tools, and works with our sibling team of Instructional Designers to help support instructors. So lets take a moment to peek at tools we all might be using in the coming years for communicating with teammates from a distance.

Multimedia developers primarily use a paid tier of Slack (for instant messaging), Outlook (for email), and Zoom (for meetings with live video or audio). While we play around with many other emerging tools, I believe we’re using the same basic trio as most everyone else. Just wanted to be clear that I don’t have a revolutionary new secret tool in my back pocket which you must start using today. We’re all in the same basic boat at the moment.

CDT shares files through a variety of different online services. Documents are usually shared through Box, with Google Drive as a backup. Videos usually end up on Kaltura through OSU’s MediaSpace, but works in progress start out on Frame.io to leverage some handy features for time stamped feedback. We manage our team’s projects through Asana, and store final deliverable files with a wrap-up note in a private internal database tool (that our team created and maintains). So those are handful of tools that might be mentioned when working with us. You may have already been sent a Box folder to upload files into, or a frame.io link to comment on a video.

As we all settled into home office work back in March, there was an interest in new tools for social interaction. I was particularly interested in applications that were connecting Virtual Reality users with phone and desktop users. Mozilla, the creators of the Firefox browser, are quietly building up Hubs, which strikes me as the most promising tool in this space. It’s free, easy to learn, and offers a ton of excellent functionality. Stop by the experimental space I set up for my team. It features a 3D model imported from our sketchfab account, and a video from our YouTube account.

One of the developers of Hubs recently laid out the secret plan for this tool: to build up a persistent global 3D network to rival the world wide web. Exciting stuff for all you fans of the scifi metaverse, and the freedom of early web pages.

There are other interesting tools bubbling around at the moment in the VR space. Facebook is letting anyone sign up for the beta of a shared social universe for Oculus VR users called “horizon.” Microsoft acquired AltspaceVR, which mixes VR users with desktop users and has already hosted multiple conferences during the quarantine. If you’ve invested in a VR headset, it might be worth checking out the bustling communities in VR chat or Rec Room. The makers of Second Life tried out 2 approaches to VR (Sansar and High Fidelity), but recently changed course. My team is currently trying to schedule a time to try out Sketchbox in different VR headsets. I stumbled across “Somnium Space” while writing this blog post. It’s kind of crazy how many things are being developed, but… aren’t quite ready for mass consumption just yet.

There is a cognitive load problem with all the new tools bubbling up in these cauldrons around the world and begging for attention. While Mozilla Hubs is my favorite, it does take a few minutes to go through it’s tutorial and learn what all you can do. These days that’s a lot to ask of people who just seek the simplicity of walking into a room to meaningfully interact with other humans in a natural way. More and more I’m nervous about suggesting new tools to colleagues, because I know they’re already dealing with a lot. And I see a lot of folks casually making a notable pile of work for others without seeming to notice the strain. As a designer, I enjoy walking through a new tool, and once I determine it’ll be useful for others it is hard to appreciate how exhausting it might also be for them. I think the key mistake is to require others learn a tool before they can get back to whatever task they set out to do in the first place. Hopefully we can find ways to design simpler tools, and to help people enjoy learning useful new third party tools. Wait until you’re ready to jump into the ones I’m mentioning here, and take it easy on your coworkers.

Suggestions? Want to meet up and talk about this further, perhaps inside one of the tools mentioned above? Please just leave a comment, or send us an email – we’d love to hang out with you and explore what the world is cooking up!

Storytelling is a fundamental part of human culture. With the use of narrative and world building in an educational setting, we can imagine ourselves as one of the characters and better engage with the material at hand. In distance education, these tools can be powerful allies made stronger with a multimedia approach. In a typical lecture scenario, students are presented information in the form of topics and relationships, specific ideas and often jargon. All these things are a necessary part of learning and provide a framework for the course’s content as well as preparing them for the application of the material. But by using storytelling as a tool, student engagement can be brought to higher levels and create memorable experiences.

A great example of the storytelling approach is Rorie Solberg’s PS 110: Governing after the Zombie Apocalypse. The course deals with the rebuilding of government after a fictional zombie apocalypse. Her course might be a bit too relevant to modern society during a pandemic, as it takes a closer look at the effects of a global health crisis. The students of PS 110 have been ‘selected’ as delegates to a constitutional convention. They represent one of the four territories standing in the place of the former United States, and each student faces the challenge of writing a new constitution, under which a new democracy will be built. The duty of the students is to create the outlines of a new government, accounting for the new needs of the people in this post-apocalyptic environment and, should they find it necessary, addressing the shortcomings of previous governments from around the world. The class begins with the first meeting of the delegates and at no point is the fourth wall broken.

Leveraging multiple forms of media can reinforce the verisimilitude of these stories and provide different avenues for student engagement. Rorie’s course is making full use of what Ecampus’ Multimedia Team has to offer with press release designs, audio broadcasts, animation and an interactive voting simulator.

The audio broadcasts, released by “PZA News” after the collapse of mainstream media outlets, are made to sound like the work of amateur Ham Radio operators doing their best to keep their communities informed. With a distinct taste of Orson Wells’ “War of the Worlds” radio play, these broadcasts feature our very own Warren Blyth as not one or two, but all of the eleven different characters and voices featured therein. The broadcasts cover local issues, giving insight to how societies and communities have changed in light of a global disaster. By tackling social issues as well, these fictional news broadcasts provide a more complete context to the decisions these students will eventually make in drafting their constitutions. They must consider any long reaching effects of their specific wordings and how their policies may affect disadvantaged groups, even unintentionally. Rorie’s course goes beyond being placed into a simple setting and focuses on how her fictional characters would interact with each other and their environments.

In addition to audio there are written publications. While reading is typical in any class, written press releases allow students to read more stories taking place in their post-apocalyptic society. Multiple forms of media for news releases reinforces the world building aspect and contributes to a multi-dimensional, fleshed out feel to the course’s setting. An animation, depicting the daily life of the surviving population is also being developed for this course. This is another fun and engaging way to bring the class materials alive. What better way for students to understand their roles than to see for themselves how their constituents live.

Storytelling and world building can be powerful tools for both student engagement and learning that can create memorable experiences. Enriching stories with multimedia creates an immersive experience that entertains as much as it educates. Rorie’s PS 110 is an excellent example of storytelling, world building and leveraging media assets to enhance immersion.

Author: Matt Djubasak

Welcome to the Webcam and Video Tips guide by Oregon State University Ecampus
This brief series of tips is meant to be a beginner’s overview for DIY home recording on webcam, with some additional options suggested if you want to take your video production even further.
Since this document may not cover every issue you encounter while acclimating to DIY video recording, we recommend contacting your school tech person for additional troubleshooting.

WHERE TO START

  • Internet Connection
    • Wired connection via ethernet cable is best
    • If wired connection is not possible, having a clear line of sight to wifi router will give the best wireless connection
    • Disconnect any wifi devices that are not in use or needed.
  • Computer Check
    • Determine if your computer meets minimum system requirements for streaming software
    • Close all non-essential programs to free up more computer resources
    • Disconnect any external monitors if you are on a laptop and it is running slowly
  • Testing Your Tech
    • Does your computer have a built in webcam or do you have a 3rd party webcam?
    • Identify where your microphone is and talk towards it
    • Test the webcam and audio settings BEFORE your first recording. 
    • Practice practice practice
      • The last recording will be better than the first
  • Making sure your voice is clear and easy to understand
    • Having a microphone helps with this
    • Smart phone earbuds have a built-in microphone that can help you with voice clarity
    • Airpods would also work when recording to an iPhone

PRESENCE AND ENVIRONMENT

  • Be aware of your environment.
    • Limit any background noise as much as possible.
    • Clean up your space and be aware of what is in the background of the video.
    • Rooms with carpets and drapes are best for audio.
    • Turn off lights and close windows that are behind you when you are recording.
    • If possible, turn on a light behind the camera.
    • Keep experimenting with lighting until you have a set up that works for you.

  • Try not to bump the desk, computer, camera, or microphone while recording.
    • Typing should also be avoided.
  • Do a test lecture and watch it.
    • See what works and what doesn’t.
    • If possible, get feedback from others
  • Practice
    • The more you practice, the more natural it will feel.
    • Run through what you want to say before you start recording.
  • Relax and be natural! Hopefully you are sharing knowledge that you are passionate about and we want that to show. (Remember that we are always our own worst critic, and your teaching team will be there to help you with constructive feedback on how to help students best enjoy and learn from these videos.)
  • Have notes in front of you while you’re recording. 
    • It is easy to get distracted or off topic, especially when you are uncomfortable.
    • Having notes in front of you while you record can help you stay on track.
    • These notes can be as vague or as detailed as you want, but avoid reading off of them directly and not looking at the camera.

DIGITAL NOTATION

GOING FURTHER WITH VIDEO PRODUCTION

  • For DIY video production, there are many ways to go about this!
    • The lowest barrier to recording on your own would be to use a smart phone attached to a tripod or other mount.
    • If you have access to a camcorder or DSLR, get out there and use it!
  • For smart phone video
    • Avoid handheld and invest in a tripod or smart phone / camera mount
    • If you have a decent internet connection for uploads, consider recording 1080p at 30fps
    • Use an external microphone whenever possible

ACCESSORIES TO CONSIDER IF RECORDING WITH A PHONE

Apps:

  • Filmic Pro – $14.99
    • Allows manual control of exposure and white balance, audio monitoring, and other useful features.

Audio:

  • Lavalier microphone – $18.99 
    • Highly recommended. Audio recorded from your phone’s microphone can be difficult to hear if you aren’t standing near the phone or if the location is noisy. 
  • Double lavalier microphone – $25.99
    • For when you have two people on camera. Both mic cable feed into the same phone, removing need to sync two audio sources. 
  • Audio cable extension – 10 ft. $9.95 or 20 ft. $15.95
    • For when you need to stand farther away from the camera.

Stabilization:

  • Selfie stick w/built-in tripod and Bluetooth remote – $23.99 (heavy duty, 51″ extended), $14.99 (27.6″ extended)
    • Terrific for self-recording in the field.
  • Combination hand grip/small tripod/tripod adapter – $8.89
    • Can be used as a hand grip for filming on-the-go or as a desktop tripod. Phone mount can be removed from the hand grip/tripod legs section, allowing you to mount your phone on most standard tripods.
  • Gimbal stabilizer – $94.99
    • Pricey, but will greatly increase the quality of your footage if you’re filming something that requires camera movement, such as a walk-and-talk interview or a field trip video.
  • Creative ways to mount a smart phone with household items:


ADD-ONS / TIPS AND TRICKS

  • If you would like to have access to a teleprompter as you record video, consider one of the following:
  • Here are some sound improvements to consider to reduce echo in your recordings.
    • Add blankets or blinds on walls to reduce echo.
    • Record in the smallest room possible.
    • Avoid rooms with hardwood floors.

Lighting for video

  • Turn a window or glass door into a soft “Key Light” by hanging a cheap, frosted shower curtain over the window. 


Authors: Jason Jones, Drew Olson, and Sammi Lukas, with special thanks to Victor Yee for technical support with the images.