For the first part of this post, please see Media Literacy in the Age of AI, Part I: “You Will Need to Check It All.”
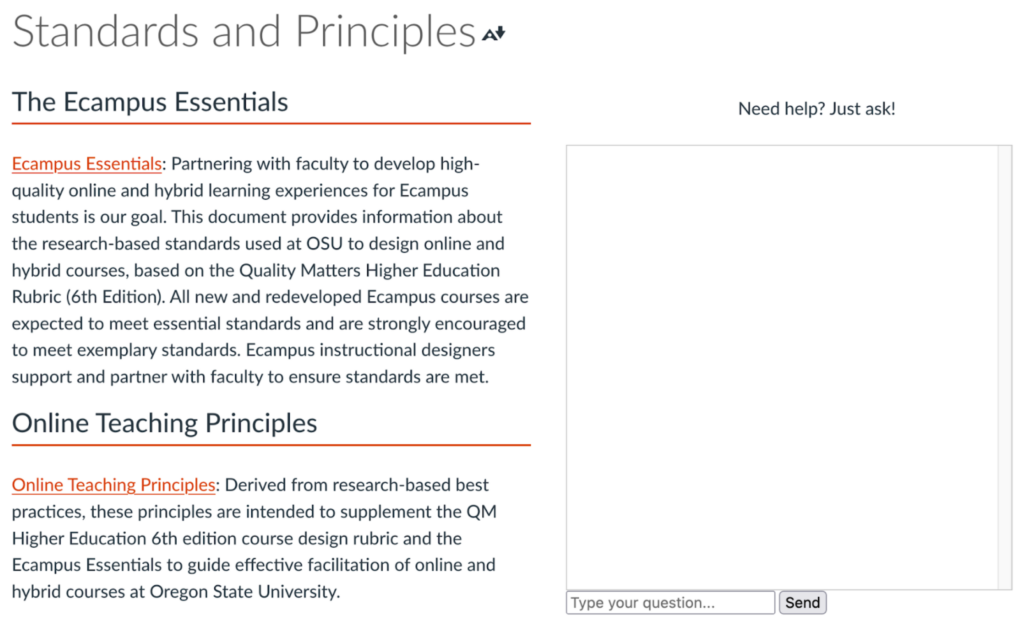
Just how, exactly, we’re supposed to follow Ethan Mollick’s caution to “check it all” happens to be the subject of a lively, forthcoming collaboration from two education researchers who have been following the intersection of new media and misinformation for decades.
In Verified: How to Think Straight, Get Duped Less, and Make Better Decisions about What to Believe Online (University of Chicago Press, November 2023), Mike Caulfield and Sam Wineburg provide a kind of user’s manual to the modern internet. The authors’ central concern is that students—and, by extension, their teachers—have been going about the process of verifying online claims and sources all wrong—usually by applying the same rhetorical skills activated in reading a deep-dive on Elon Musk or Yevgeny Prigozhin, to borrow from last month’s headlines. Academic readers, that is, traditionally keep their attention fixed on the text—applying comprehension strategies such as prior knowledge, persisting through moments of confusion, and analyzing the narrative and its various claims about technological innovation or armed rebellion in discipline-specific ways.
The Problem with Checklists
Now, anyone who has tried to hold a dialogue on more than a few pages of assigned reading at the college level knows that sustained focus and critical thinking can be challenging, even for experienced readers. (A majority of high school seniors are not prepared for reading in college, according to 2019 data.) And so instructors, partnering with librarians, have long championed checklists as one antidote to passive consumption, first among them the CRAAP test, which stands for currency, relevance, authority, accuracy, and purpose. (Flashbacks to English 101, anyone?) The problem with checklists, argue Caulfield and Wineburg, is that in today’s media landscape—awash in questionable sources—they’re a waste of time. Such routines might easily keep a reader focused on critically evaluating “gameable signals of credibility” such as functional hyperlinks, a well-designed homepage, airtight prose, digital badges, and other supposedly telling markers of authority that can be manufactured with minimal effort or purchased at little expense, right down to the blue checkmark made infamous by Musk’s platform-formerly-known-as-Twitter.
Three Contexts for Lateral Reading
One of the delights in reading Verified is drawing back the curtains on a parade of little-known hoaxes, rumors, actors, and half-truths at work in the shadows of the information age—ranging from a sugar industry front group posing as a scientific think tank to headlines in mid-2022 warning that clouds of “palm-sized flying spiders” were about to descend on the East Coast. In the face of such wild ideas, Caulfield and Wineburg offer a helpful, three-point heuristic for navigating the web—and a sharp rejoinder to the source-specific checklists of the early aughts. (You will have to read the book to fact-check the spider story, or as the authors encourage, you can do it yourself after reading, say, the first chapter!) “The first task when confronted with the unfamiliar is not analysis. It is the gathering of context” (p. 10). More specifically:
“The Three Contexts” from Verified (2023)
- The context of the source — What’s the reputation of the source of information that you arrive at, whether through a social feed, a shared link, or a Google search result?
- The context of the claim — What have others said about the claim? If it’s a story, what’s the larger story? If a statistic, what’s the larger context?
- Finally, the context of you — What is your level of expertise in the area? What is your interest in the claim? What makes such a claim or source compelling to you, and what could change that?
At a regional conference of librarians in May, Wineburg shared video clips from his scenario-based research, juxtaposing student sleuths with professional fact checkers. His conclusion? By simply trying to gather the necessary context, learners with supposedly low media literacy can be quickly transformed into “strong critical thinkers, without any additional training in logic or analysis” (Caulfield and Wineburg, p. 10). What does this look like in practice? Wineburg describes a shift from “vertical” to “lateral reading” or “using the web to read the web” (p. 81). To investigate a source like a pro, readers must first leave the source, often by opening new browser tabs, running nuanced searches about its contents, and pausing to reflect on the results. Again, such findings hold significant implications for how we train students in verification and, more broadly, in media literacy. Successful information gathering, in other words, depends not only on keywords and critical perspective but also on the ability to engage in metacognitive conversations with the web and its architecture. Or, channeling our eight-legged friends again: “If you wanted to understand how spiders catch their prey, you wouldn’t just look at a single strand” (p. 87).

Image 2: Mike Caulfield’s “four moves”
Reconstructing Context
Much of Verified is devoted to unpacking how to gain such perspective while also building self-awareness of our relationships with the information we seek. As a companion to Wineburg’s research on lateral reading, Caulfield has refined a series of higher-order tasks for vetting sources called SIFT, or “The Four Moves” (see Image 2). By (1) Stopping to take a breath and get a look around, (2) Investigating the source and its reputation, (3) Finding better sources of journalism or research, and (4) Tracing surprising claims or other rhetorical artifacts back to their origins, readers can more quickly make decisions about how to manage their time online. You can learn more about the why behind “reconstructing context” at Caulfield’s blog, Hapgood, and as part of the OSU Libraries’ guide to media literacy. (Full disclosure: Mike is a former colleague from Washington State University Vancouver.)
If I have one complaint about Caulfield and Wineburg’s book, it’s that it dwells at length on the particulars of analyzing Google search results, which fill pages of accompanying figures and a whole chapter on the search engine as “the bestie you thought you knew” (p. 49). To be sure, Google still occupies a large share of the time students and faculty spend online. But as in my quest for learning norms protocols, readers are already turning to large language model tools for help in deciding what to believe online. In that respect, I find other chapters in Verified (on scholarly sources, the rise of Wikipedia, deceptive videos, and so-called native advertising) more useful. And if you go there, don’t miss the author’s final take on the power of emotion in finding the truth—a line that sounds counterintuitive, but in context adds another, rather moving dimension to the case against checklists.
Given the acceleration of machine learning, will lateral reading and SIFTing hold up in the age of AI? Caulfield and Wineburg certainly think so. Building out context becomes all the more necessary, they write in a postscript on the future of verification, “when the prose on the other side is crafted by a convincing machine” (p. 221). On that note, I invite you and your students to try out some of these moves on your favorite chatbot.
Another Postscript
The other day, I gave Microsoft’s AI-powered search engine a few versions of the same prompt I had put to ChatGPT. In “balanced” mode, Bing dutifully recommended resources from Stanford, Cornell, and Harvard on introducing norms for learning in online college classes. Over in “creative” mode, Bing’s synthesis was slightly more offbeat—including an early-pandemic blog post on setting norms for middle school faculty meetings in rural Vermont. More importantly, the bot wasn’t hallucinating. Most of the sources it suggested seemed worth investigating. Pausing before each rabbit hole, I took a deep breath.
Related Resource
Oregon State Ecampus recently rolled out its own AI toolkit for faculty, based on an emerging consensus that developing capacities for using this technology will be necessary in many areas of life. Of particular relevance to this post is a section on AI literacy, conceptualized as “a broad set of skills that is not confined to technical disciplines.” As with Verified, I find the toolkit’s frameworks and recommendations on teaching AI literacy particularly helpful. For instance, if students are allowed to use ChatGPT or Bing to brainstorm and evaluate possible topics for a writing assignment, “faculty might provide an effective example of how to ask an AI tool to help, ideally situating explanation in the context of what would be appropriate and ethical in that discipline or profession.”
References
Caulfield, M., & Wineburg, S. (2023). Verified: How to think straight, get duped less, and make better decisions about what to believe online. University of Chicago Press.
Mollick, E. (2023, July 15). How to use AI to do stuff: An opinionated guide. One Useful Thing.
Oregon State Ecampus. (2023). Artificial Intelligence Tools.