Natter’s Notes
Jean R. Natter, OSU Master Gardener
Many gardeners are trying to be environmentally sensitive in various ways, in particular, trying to conserve water use in the garden. Often, an in-ground sprinkler system (or hose-end device) is forsaken on behalf of soaker hoses or a drip sytem. Unfortunately, the entire project can go south in a hurry. Plants don’t thrive; some become puny, others wilt, and still others die.
Rather than explaining how to install a drip system, I’d rather discuss the guiding principles one must adhere to if the system is to be successful. In other words, if the gardener intends to obtain the abundant yield s/he expects. So, consider starting your first installation with a kit; it will contain all the needed parts and clear directions how to hook them up. Or, if you’re determined to dive in and set up everything from the start, you might want to obtain an instruction text or a manufacturer’s booklet, the latter often free at retail outlets, located with the irrigation supplies.
The important principles
Oh, yes. Here’s an overriding principle, whatever your method: On an individual dripline, always use component parts from the same brand because, unfortunately, one brand’s half-inch, etc., isn’t necessarily the same as another brand’s.
Disasters can be avoided by understanding a few basic principles, perhaps the most critical of which include the following:
– Output of an in-ground sprinkler system is gallons per minute.
– Output of a soaker or drip system is gallons per hour.
– Therefore, a drip system must run much longer than a sprinkler sytem to adequately supply plants.
– A drip system will put out uniform amounts of water per hour if pressure-compensated drippers are used.
– Further, it’s important that a drip line is on its own valve, not combined with sprinklers. To convert a sprinkler system to drip, all heads must be either changed to drip or capped off.
Soaker hoses
With soaker hoses, the output is inherent in the product. Output will be the same the length of the hose as long as it is on level ground and the water pressure is only sufficient to make the hose sweat. If a soaker hose sprays, the plants at the far end of the hose will receive less water than those at the beginning. Then, too, the hose may burst. (The exceptions are hoses which are designed to spray.)
Even though soaker hoses aren’t pressure-compensated, gardeners can gain that advantage from a commercially available plastic drip hose which has built-in pressure-compensated drippers at specified intervals. (Just make certain the intervals match the spacing for the plants at hand.)
Watering principles
These principles concern the plants and planting media:
– At sunrise, a plant’s root system should be fully moist and ready to meet the day. With elevated temperatures, stomates close; water uptake slows and may stop.
– Whenever you water, moisten the entire rootzone. In general, rootzones for seasonal vegetables and flowers go to 10- to 12-inches deep, trees and shrubs to 18 inches.
– As a vegetable ages from seedling to maturity, its root sytem gradually enlarges, both deep and wide. Irrigation frequency and duration must also increase. Similarly, with young trees, as the years go by, the number of drippers must increase, as must duration of irrigation.
– Water movement in soils (and container mixes) relies on pore size: The bigger the pores the better, and faster, the drainage.
The larger the soil pores, the more rapidly water moves. Sandy soil has large soil pores and must be watered frequently to maintain moisture within the rootzone. (It’s very similar with potting mixes.) In contrast, the small pores of clay limit water penetration; several on-off cycles may be required to moisten the roots and avoid surface runoff. Over all, the same amount of water is required for both kinds of soils.
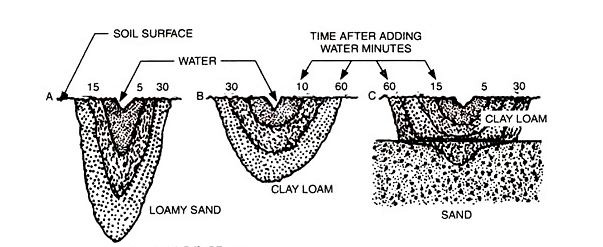
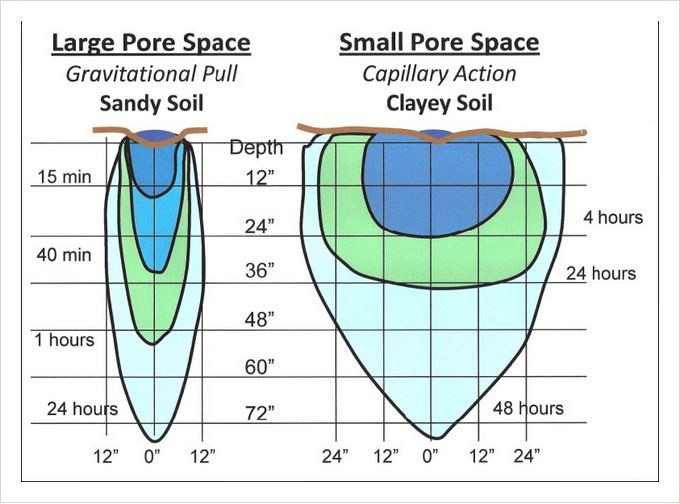
When water is applied as a point source, as in drip irrigation, it moves downward and laterally, according to the basic characteristics of the soil. In sandy soils and potting mixes, water moves downward in a narrow profile. The much smaller pores of clay soil results in a shallow but broad profile. Such profiles mean that more drippers are needed per unit area of sandy soil than in clay-based soils. (Source: “Drip Irrigation for the Yard and Garden”)
Questions and answers
Q: How long should I water?
A: Long enough to moisten the entire rootzone; on average to about a foot deep. To know for certain, go outdoors, stick a trowel in the soil or potting mix, and look.
Q: How often should I water?
A: Often enough to maintain moisture throughout the rootzone, thereby avoiding wilt. To know for certain, go outdoors, stick a trowel in the soil, and look.
(A vegetable that wllts won’t be able to produce the abundant yields it could otherwise. This is true in spite of the plant’s apparent recovery after you dashed over to water it.)
Q: Is it true that a drip system is 90 to 95 percent efficient?
A: It might be that efficient; the answer is to moisten the entire root system but to avoid excessive runtimes such as 24 or 48 hours.
Fun for gardeners: Run a watering test.
Each gardener must determine for his/her own soil runtime and frequency for their own soil. And realize that it varies among containers, raised beds, and inground plantings. Run the drip system for an hour, stop for an hour, then check the soil with a trowel. How deep and wide did the water go?
Resources
– How-to booklets from suppliers available at retail outlets with drip irrigation supplies
– “Drip Irrigation for Every Landscape and All Climates” by R. Kourik (2nd edition; Metamorphic Press)
– “Drip Irrigation in the Home Landscape” – University of California; 2015
– “Drip Irrigation for the Yard and Garden” R. Troy Peters, Ph.D. WSU http://irrigation.wsu.edu/Content/FAQs-Tutorials/Basics-of-Plant-Soil-Water-Relations-Tutorials.php#irrigationScheduling