Natter’s Notes

Jean R. Natter, OSU Master Gardener

Many gardeners are trying to be environmentally sensitive in various ways, in particular, trying to conserve water use in the garden. Often, an in-ground sprinkler system (or hose-end device) is forsaken on behalf of soaker hoses or a drip sytem. Unfortunately, the entire project can go south in a hurry. Plants don’t thrive; some become puny, others wilt, and still others die.

Rather than explaining how to install a drip system, I’d rather discuss the guiding principles one must adhere to if the system is to be successful. In other words, if the gardener intends to obtain the abundant yield s/he expects. So, consider starting your first installation with a kit; it will contain all the needed parts and clear directions how to hook them up. Or, if you’re determined to dive in and set up everything from the start, you might want to obtain an instruction text or a manufacturer’s booklet, the latter often free at retail outlets, located with the irrigation supplies.

The important principles

Oh, yes. Here’s an overriding principle, whatever your method: On an individual dripline, always use component parts from the same brand because, unfortunately, one brand’s half-inch, etc., isn’t necessarily the same as another brand’s.

Disasters can be avoided by understanding a few basic principles, perhaps the most critical of which include the following:

– Output of an in-ground sprinkler system is gallons per minute.

– Output of a soaker or drip system is gallons per hour.

– Therefore, a drip system must run much longer than a sprinkler sytem to adequately supply plants.

– A drip system will put out uniform amounts of water per hour if pressure-compensated drippers are used.

– Further, it’s important that a drip line is on its own valve, not combined with sprinklers. To convert a sprinkler system to drip, all heads must be either changed to drip or capped off.

Soaker hoses

With soaker hoses, the output is inherent in the product. Output will be the same the length of the hose as long as it is on level ground and the water pressure is only sufficient to make the hose sweat. If a soaker hose sprays, the plants at the far end of the hose will receive less water than those at the beginning. Then, too, the hose may burst. (The exceptions are hoses which are designed to spray.)

Even though soaker hoses aren’t pressure-compensated, gardeners can gain that advantage from a commercially available plastic drip hose which has built-in pressure-compensated drippers at specified intervals. (Just make certain the intervals match the spacing for the plants at hand.)

Watering principles

These principles concern the plants and planting media:

– At sunrise, a plant’s root system should be fully moist and ready to meet the day. With elevated temperatures, stomates close; water uptake slows and may stop.

– Whenever you water, moisten the entire rootzone. In general, rootzones for seasonal vegetables and flowers go to 10- to 12-inches deep, trees and shrubs to 18 inches.

– As a vegetable ages from seedling to maturity, its root sytem gradually enlarges, both deep and wide. Irrigation frequency and duration must also increase. Similarly, with young trees, as the years go by, the number of drippers must increase, as must duration of irrigation.

– Water movement in soils (and container mixes) relies on pore size: The bigger the pores the better, and faster, the drainage.

The larger the soil pores, the more rapidly water moves. Sandy soil has large soil pores and must be watered frequently to maintain moisture within the rootzone. (It’s very similar with potting mixes.) In contrast, the small pores of clay limit water penetration; several on-off cycles may be required to moisten the roots and avoid surface runoff. Over all, the same amount of water is required for both kinds of soils.
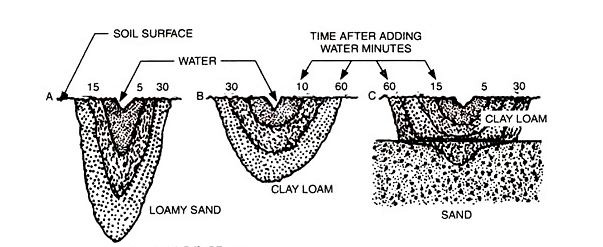
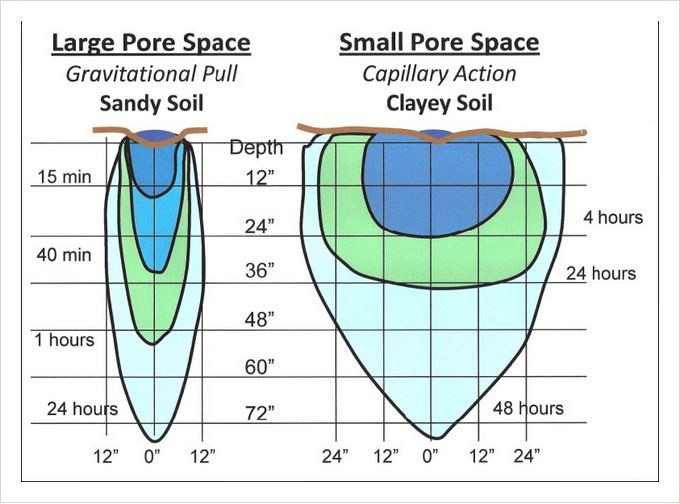
Illustration showing water movement in soils: loamy sand, clay loam, and sand.
When water is applied as a point source, as in drip irrigation, it moves downward and laterally, according to the basic characteristics of the soil. Here, equal amounts of water were applied to each of the 3 points. Notice at the far right, what occurs when a “drainage layer” is added. Consider a layer of a different texture to be a “barrier.”
Illustration showing water movement through sand vs clay.

When water is applied as a point source, as in drip irrigation, it moves downward and laterally, according to the basic characteristics of the soil. In sandy soils and potting mixes, water moves downward in a narrow profile. The much smaller pores of clay soil results in a shallow but broad profile. Such profiles mean that more drippers are needed per unit area of sandy soil than in clay-based soils. (Source: “Drip Irrigation for the Yard and Garden”)

Questions and answers

Q: How long should I water?

A: Long enough to moisten the entire rootzone; on average to about a foot deep. To know for certain, go outdoors, stick a trowel in the soil or potting mix, and look.

Q: How often should I water?

A: Often enough to maintain moisture throughout the rootzone, thereby avoiding wilt. To know for certain, go outdoors, stick a trowel in the soil, and look.

 (A vegetable that wllts won’t be able to produce the abundant yields it could otherwise. This is true in spite of the plant’s apparent recovery after you dashed over to water it.)

Q: Is it true that a drip system is 90 to 95 percent efficient?

A: It might be that efficient; the answer is to moisten the entire root system but to avoid excessive runtimes such as 24 or 48 hours.

Fun for gardeners: Run a watering test.

Each gardener must determine for his/her own soil runtime and frequency for their own soil. And realize that it varies among containers, raised beds, and inground plantings. Run the drip system for an hour, stop for an hour, then check the soil with a trowel. How deep and wide did the water go?

Resources

– How-to booklets from suppliers available at retail outlets with drip irrigation supplies

– “Drip Irrigation for Every Landscape and All Climates” by R. Kourik (2nd edition; Metamorphic Press)

– “Drip Irrigation in the Home Landscape” – University of California; 2015

– “Drip Irrigation for the Yard and Garden” R. Troy Peters, Ph.D. WSU http://irrigation.wsu.edu/Content/FAQs-Tutorials/Basics-of-Plant-Soil-Water-Relations-Tutorials.php#irrigationScheduling

Natter’s Notes

By Jean R. Natter, OSU Master Gardener

The Winter Cutworm, Noctua pronuba, was officially identified by Oregon Department of Agriculture (ODA) as an invasive pest in Oregon during 2012. Even so, the metro Master Gardener offices had been receiving complaints about their activity since 2001.

Plants were nibbled and/or destroyed from fall through the winter. At first, most folks assumed the damage was due to slugs and snails. However, the mutilation was different than the shredded tissue left behind by slugs and snails. Seedlings were toppled; emerging bulbs lost their heads and sometimes flower buds; and hostas lost leaf tips or had gaping holes. At my place, the pests would climb my 3- to 4-foot tall delphiniums to eat the flower bud at the tip of the stalk, sometimes settling down for a snooze.  To accurately identify the culprits, MGs in the offices had to activate their Master Gardener CSI mode.

The Winter Cutworm, Noctua pronuba

As you likely recall, caterpillars (Order Lepidoptera) have complete metamorphosis, with 4 life stages.  After the adults mate, the female lays several hundred eggs in a large tidy patch, most often covering, or nearly so, the surface of a leaf. The larvae (youngsters) hatch in 2 to 4 weeks. These caterpillars have different habits than most you are familiar with because they feed at night, whenever the temperature exceeds 40F, from fall through winter.

Perhaps the most effective treatment strategy is to go outdoors about 10 pm or so, with a cup of soapy water and tongs or a pair of gloves. As you trek through your plantings keep any eye out for caterpillars chomping at your expense. They may be anywhere from ¾ to 1.5 inches long, the size depending on their age. They’re often aligned with the edge of a leaf, or out-of-sight among the leaves. Hand pick and drop into the cup.

During the day, the larvae hide just under the soil surface, typically quite close to the stem of the victimized plant. Disrupting a bit of soil often reveals their hiding place.

The caterpillars of the Winter Cutworm (Noctua pronuba, aka the Large Yellow Underwing) appear bright green after they have molted; the color will gradually change to the various browns within hours. Source: http://www.wildlifeinsight.com/british-moths/large-yellow-underwing-moth-and-caterpillar-noctua-pronuba/

Fun for gardeners

This spring, as you prepare your garden, it’s very likely you’ll find a number of Lepidoptera pupae in the soil. Rearing the pupa is the best way to determine the parent moth’s identity.

To rear pupae, place in clear container with a porous lid, such as paper toweling secured with a rubber band. Set the container somewhere you’ll see it, but not in the sun, then wait for the adults to emerge.

The Gray Garden Slug

Slugs, especially gray garden slugs (Deroceras reticulatum) thrive throughout the northwest, feeding in gardens, greenhouses, roadsides and fields. They’re omnivores which feed on live plant material and much more, including mushrooms, dead slugs, earthworms. They have the ability to detect predatory carabid beetles through the use of olfactory cues. And, because slugs are hermaphrodites, reproduction is by cross-fertilization which may occur year-round when conditions are favorable. Mating occurs mainly at night with each animal capable of laying approximately 60-75 eggs (4 mm each) in a clutch, totaling about 700 eggs per year per slug. Each slug may live a year or two. (https://idtools.org/id/mollusc/factsheet.php?name=Deroceras reticulatum)

The Gray Garden Slug (Deroceras reticulum) is perhaps the most damaging slug in local gardens. Damage often avoids (stringy) leaf veins. Source: https://idtools.org/id/mollusc/factsheet.php?name=Deroceras reticulatum

Fun for gardeners

If you happen upon a clutch of slug eggs – they’re transparent and either round or tear-drop shape – scoop them up with a bit of surrounding soil, put them in a clear container with a porous lid, and wait.

Resources

“Winter Cutworm: A New Pest Threat in Oregon” – https://catalog.extension.oregonstate.edu/sites/catalog/files/project/pdf/em9139.pdf

 “Slugs and Snails in Oregon” (ODA) – https://agsci.oregonstate.edu/sites/agscid7/files/vlach-2016-odaguidemolluscs-forweb.pdf

“Snails and Slugs” – http://ipm.ucanr.edu/QT/snailsslugscard.html

 “Cornu aspersum” [The Brown Garden Snail, formerly Helix aspersa] – https://idtools.org/id/mollusc/factsheet.php?name=Cornu%20aspersum

 “Terrestrial Mollusc Tool” (USDA, University of Florida, & Lucidcentral: Incudes Fact Sheets with images; and a Glossary – https://idtools.org/id/mollusc/glossary.php

Natter’s Notes

Jean R. Natter, OSU Master Gardener

The Japanese Beetle (Popillia japonica) Eradication Project

Because Japanese beetles (Popillia japonica) typically feed in groups, they can decimate their host plants in short order. Roses are a particular favorite. (Image downloaded 2017-02-06: http://extension.missouri.edu/p/ipm1005)

The Japanese Beetle (Popillia japonica) Eradication Project of the Oregon Department of Agriculture (ODA) issued its most recent update in late 2019.

Overall, 95% of you [within the quarantine boundary] consented to treatment this year. With your help we treated 8,500 residences, 6 schools, 8 parks, 3 shopping centers, and 1 golf course. This came out to roughly 3,000 acres.

This year we trapped 7,749 Japanese beetles in the Cedar mill area. The overall number of beetles trapped in 2019 was a 56% reduction from the previous year. There was a 65% reduction in the number of beetles trapped within the 2018 treatment boundary as a result of the 2018 granular treatment and 2019 foliar treatment. We saw a 75% decrease within the boundaries of the supplementary foliar treatment.

In order to eradicate this pest, we will continue our treatment next season. We are thrilled with our success, and will be more aggressive with our approach next year while we have the upper hand. We are currently planning a larger treatment boundary for the 2020 eradication and will update everyone soon with the new map. We thank you all for your continued support with helping Oregon eradicate Japanese beetle.  It wouldn’t be possible without all of you!

We would also like to introduce the 2020 Japanese beetle team: Ashley Toland (Eradication Entomologist), Jessica Rendon (Japanese Beetle Eradication Specialist), and Austin Johnson (Japanese Beetle Outreach Coordinator). 

For more information on the Japanese beetle eradication project please visit our website: https://www.japanesebeetlepdx.info/.

New exotic Agrilus species beetle on twinberry in Portland

During 2019, a new exotic beetle was reported by the Oregon Forest Pest Detector (OFPD) program.

In May, an OFPD program graduate submitted a report to the Oregon Invasive Species Hotline after finding D-shaped exit holes and a green insect on a twinberry in her yard in southeast Portland. She recognized the signs as characteristic of insects in the genus Agrilus, which includes the bronze birch borer (A. anxius) and the deadly forest pest, emerald ash borer (A. planipennis).

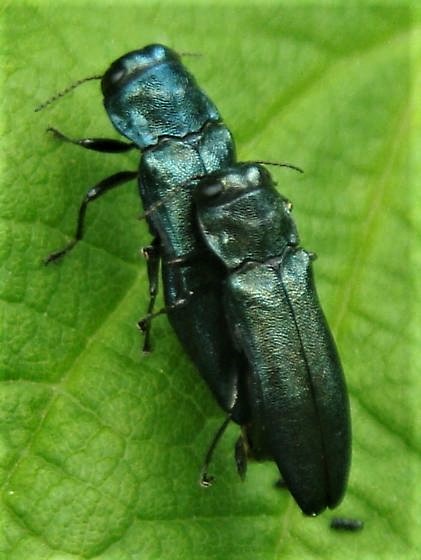
Evidence of new exotic beetles (Agrilus cyanescens) attacking twinberry, a native honeysuckle, were found by citizen scientists in their Portland, OR, gardens during 2019. Fortunately, the beetles are not expected to become serious economic pests. But if you see the characteristic damage, report it to Invasive Species. (Image Camden, New Jersey, 2019: https://bugguide.net/node/view/1666294/bgimage)

The green insect she found was later identified as Agrilus cyanescens, an exotic beetle that has been established in the eastern U.S. since the 1920s, but this is the first detection in the Pacific Northwest. (https://oregoninvasiveshotline.org/reports/detail/2670)

Then, in early August 2019, another OFPD graduate submitted a report to the Oregon Invasive Species Hotline after she noticed similar damage to a twinberry in her yard in northeast Portland. This was also later confirmed to also be Agrilus cyanescens. (https://oregoninvasiveshotline.org/reports/detail/2778)

Known host plants in U.S. and Europe include those in the genus Lonicera (honeysuckles) including the native plant, twinberry (Lonicera involucrata Richardson). The Oregon Department of Agriculture does not believe Agrilus cyanescens will be an economic, ecological, or horticultural pest.

But, if you do notice any signs or symptoms of Agrilus cyanescens (branch dieback; 2 mm. D-shaped exit holes; serpentine-shaped galleries beneath the bark; and metallic green beetles feeding on leaves in April-May), we encourage you to submit a report. (https://oregoninvasiveshotline.org/)  

The OFPD program trains volunteers to monitor for and report potential infestations of invasive forest pests. Thank you to these two Oregon Forest Pest Detector graduates for being on the lookout and submitting reports to the Oregon Invasive Species Hotline!  Details about the OFPD training program of citizen scientists are at https://extension.oregonstate.edu/ofpd.

By Jean R. Natter

Group and water containers

In an emergency, as in you were caught off guard, realize that container-grown plants are more sensitive to cold than the same kind of plants in the ground. It’s because roots are more sensitive to cold than top growth. Root are essentially exposed when in pots but are protected by the large soil mass in the ground.

The first things that need attention are container-grown plants. Set them pot-to-pot tight, in a sheltered place, then throw frost-blanket or an old blanket over the group. You can protect hanging baskets similarly, by setting each one on an up-turned pot or bucket. Then, too, a large cardboard box will shelter an individual specimen nicely. Such emergency covers can protect against several degrees of cold.

But don’t use plastic sheeting unless you prop it above the plants. The reason? When the freeze arrives, any plant tissue touching the plastic will die.

If you have sufficient time to think ahead, make certain all the containers are well-watered, even those you’re unable to move because of their size or weight. Even though it may be hard to believe, moist growing media is less likely to freeze than if it’s dry. (That’s true for all plants, whether in a container or the ground.)

And if you forget to set the plants in a sheltered site, you may still be able to protect them if you act just before dawn, the time when the lowest temperature occurs

The effects of a freeze

Frozen plant tissue turns dark and becomes soft to mushy. The reason, in most cases, is that ice crystals form inside the plant cells during a freeze and, then, perforated the cell walls. If you see minor freeze damage on a treasured plant early in the day, you may be able to limit potentially serious damage by shading the damaged area from direct sunlight. With shade, the intracellular ice crystals thaw slowly and will be less likely to rupture cell walls than if they thawed rapidly.

Camellia flower with frost damage

Camellia sasanqua, a winter-flowering shrub with flower damage from freezing temperatures several days prior. The damaged tissue is somewhat brown and appears moist; the petals flop. (J.R. Natter; Dec 6, 2009)

Some generalizations

  • Get ahead of the game by adding several inches of mulch on the soil around cold-sensitive plants.
  • In general, recently installed plants, even if a kind that’s normally hardy, are more likely to be frost-damaged than those planted a year or more previously.
  • If a shrub or tree is seriously damaged during a freeze event, wait to remove damaged wood until after new growth begins in the spring. Then, cut at least an inch below the dead section. In the meantime, the damaged parts will provide a small amount of frost protection to the plant.
  • If a hard frost, extended or not, is predicted, move sensitive plants into a shed or garage for the duration. Water, if needed, during their stay. (One year, several of my plants were still in good condition after 10 days in an attached garage with only one small window.)
  • If a hard frost, extended or not, is predicted, move sensitive plants into a shed or garage for the duration. Water, if needed, during their stay. (One year, several of my plants were still in good condition after 10 days in an attached garage with only one small window.)

Resources

Winter Injury of Landscape Plants in the Pacific Northwest: (PNW Plant Disease Handbook; https://pnwhandbooks.org/plantdisease/pathogen-articles/nonpathogenic-phenomena/winter-injury-landscape-plants-pacific)

Abiotic Disorders of Landscape Plants (A copy of this book is in each metro MG office; pages 133-138 and 175-176.)

The following two Natter’s Notes have many images of cold damage but, unfortunately, are old enough that some of the listed references no longer exist:

Natter’s Notes: “Cold Damage – Lessons from the Garden” (In metro Mg Newsletter, January 2011. pages 4-5) http://www.metromastergardeners.org/files/news/January2011.pdf

Natter’s Notes: “December’s Cold Damage to Plants” (In metro Mg Newsletter, February 2010, pages 8-9) http://www.metromastergardeners.org/files/news/February2010.pdf

Freezing winter weather takes toll on home landscape plants: OSU eNews, (Reprinted in metro Mg Newsletter, February 2010, page 10) http://www.metromastergardeners.org/files/news/February2010.pdf


Western Red Cedars Dying

Jean R. Natter, OSU Extension Master Gardener

Failing trees have been a persistent topic in MG Clinics and on the online Ask an Expert service during the past 6 or 7 years. Overall, it’s been an issue of continuing higher than normal temperatures combined with less than normal rainfall. Then, too, few homeowners realize that the continuing heat and drought affects their landscape trees in spite of being watered with the lawn sprinklers.

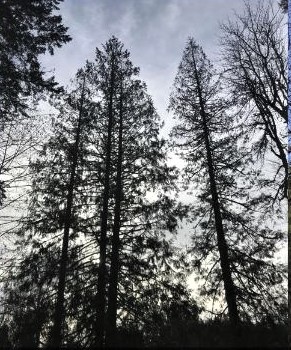
Fig 1 (right): Western red cedar, Thuja plicata, with thinning crowns most likely due to climate changes and continuing drought. (“Why is My Tree Dying? – Western Redcedar (Thuja plicata)” – April 2019; https://www.oregon.gov/ODF/Documents/ForestBenefits/TreeDeclinesRedcedar.pdf)

In order for trees to thrive, they should be irrigated separately from grass, with at least one watering to about 10 inches deep to the soil below the canopy every 3 weeks during our dry season. Indications of a water deficit is revealed by multiple signs and symptoms, among them wilted leaves; leaves with curled and/or dry edges; early fall color; leaf yellowing and early leaf drop.

Foresters have been puzzled by problems with Western Red Cedar (Thuja plicata) which normally do well on moist sites. The most recent thought is that these trees are finally succumbing to stress from many successive years of heat and drought stress.

Several recent Ask an Expert responses have noted “We are getting many reports of western redcedars dying this year, and the consensus seems to be that the combination of extreme heat and drought experienced since around 2013 through last summer is an important factor. Although this summer was mild, it often takes a year or so for a tree to show any signs of distress from drought.”

Another expert, in a response to a different client, said it this way: “Western redcedar are dying in some areas due to a complex of climate stress and other issues, with no clear primary agent of mortality.”

Two Western Red Cedars at the Oregon State University campus

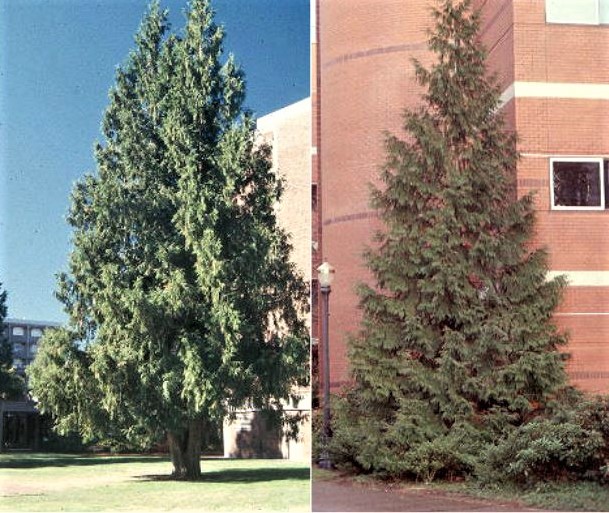
Fig 2 (right): Two healthy Western red cedars (Thuja plicata) on the Oregon State University campus, southeast of Fairbanks Hall. ( OSU Landscape Plants; https://landscapeplants.oregonstate.edu/plants/thuja-plicata)

In general, the foresters responding through Ask an Expert are including a link to a publication released in April 2019: “Why is My Tree Dying? – Western Redcedar (Thuja plicata)” which, in summary, states:

Top-dieback, branch mortality, crown thinning and whole-tree mortality in all ages of western redcedar has [sic] been observed recently at lower elevations in the Willamette Valley and beyond. Although it is common to see ‘spiked’ or dead tops in older western redcedar, usually there are living lateral branches and a functional crown. No single factor has been identified in these more recent die offs, but a combination of poor or unsustainable growing conditions may be to blame. Redcedar may simply be growing in areas or within microclimates outside of their preferred range or areas that are no longer sustainable for long-term growth under current climate conditions.

Then, too, it suggests that alternate species for red cedar on generally dry sites include incense cedar, sequoia, and big leaf maple; on more moist sites which don’t dry out in the summer, western white pine, maple, alder, ash, or cottonwood.

Resources

– Abiotic Disorders of Landscape Plants” (#3420 UCANR); pages 51-59. A copy is in each of the metro MG offices.

“Thuja plicata (Western Red Cedar)” outlines a basic description of this native conifer (50-70 feet, or more) which thrives in sun to part shade on moist soils, with numerous images of a healthy tree. https://landscapeplants.oregonstate.edu/plants/thuja-plicata

– “Why is My Tree Dying? – Western Redcedar (Thuja plicata)” – April 2019 – https://www.oregon.gov/ODF/Documents/ForestBenefits/TreeDeclinesRedcedar.pdf

– “Pruning Drought Stressed Shade Trees” encourages caution to remove as little wood as possible from a stressed tree, in part because it already has limited reserves, with precious little remaining to “spend” on otherwise unneeded wound repair. https://droughtresources.unl.edu/droughtpruning

Natter’s Notes

Found in OR: A Native Squash Bee

Jean R. Natter, OSU Master Gardener


female squash bee scopa square jaw, in center of squash flower, legs covered with powdery yellow pollen

This month, let’s talk about a friendly “first record” for Oregon. Instead of a new pest, it’s a native bee previously thought not to be in OR: the squash bee, Peponapis pruinosa, collected for the first time in southern Oregon during 2018.

Fig 1: Female squash bee (above image); numerous pollen grains clinging to the scopa (pollen-collecting hairs) on hind leg of female squash bee; also notice her squared-jaw. (https://bugguide.net/node/view/1420105/bgimage)


Thanks for the effective sampling goes to citizen scientists collecting native bees for a survey sponsored by the recently formed Oregon Bee Atlas (OBA). A second sample was acquired later on, again in southern Oregon. 

The Oregon Bee Atlas (OBA) represents the first steps towards gathering and organizing knowledge about our state’s native bees. The OBA’s mission (2018-2021) is to train citizen scientists (committed volunteers) to identify the many native bees known to reside in the state, and to seek new native bee records for the state. After a species checklist has been created, periodic follow-up surveys will be able to determine whether the numbers and health of Oregon bees is improving or declining.

As a result of finding these two bees, the OBA has issued a “squash bee call to action.”

Now that we “have two confirmed samples,” they say, “it would be great to get a map this year of the extent to which these bees have spread through Oregon – even negative results are welcome” In other words, OBA would like its volunteers start looking specifically for squash bees.

This is a project perfect for early risers. Volunteers need to go out early – dawn — before the flowers open, and manually unfurl the flowers.

[Currently, it’s thought likely that squash bees won’t be in the northern part of the Willamette Valley. But who knows? Nature may surprise us.]

The OBA Protocol for locating squash bees:

1. Early in the morning, open mature flowers of the larger flowered Cucurbita species and count the squash bees inside. These are male bees.

2. Only survey zucchini, pumpkin, and other large flowered squashes. Not cucumbers or small flowered plants. 

3. Take photos (clear, focused) of the flowers with squash bees.

4. Record how many squash bees you find in the flowers, collect the bees, then preserve them in rigid containers in your freezer until you contact me (j.r.natter@aol.com). I‘ll forward your documentation to the OBA.

5. OBA also requests you record the date and time of the collection; your name; the address; latitude; longitude; the flower (pumpkin; squash, etc.); and the number of squash bees in each.


Female honey bee, Apis mellifera, common in landscapes and gardens country-wide.

Differentiating between squash bees and the more common honey bees will be easy. The two bees are about the same size, but the abdomens of squash bees (Fig. 1) are marked with well-defined white bands whereas honey bee abdomens aren’t. (Fig.2)

Fig 2: Female honey bee (above image), Apis mellifera, common in landscapes and gardens country-wide. (https://bugguide.net/node/view/1364844)


Resources

Video: “Journey of the Squash Bees” (UC Davis) https://www.youtube.com/watch?v=pAQVNl0C-H0

Video: “Squash Bee Natural History” (UC Davis) https://www.youtube.com/watch?v=WobQObH4oDE

“The Bees in Your Backyard” (Wilson & Carril; Princeton University Press; 2016; pages 224-225.)

Images of squash bees, Peponapis pruinosa. (https://bugguide.net/node/view/83553/bgimage)

Natter’s Notes

Summer’s Challenges

Jean R. Natter, OSU Master Gardener

Ah, summer.  Thoughts of gentle breezes and abundant harvests. But, wait! Even as I write this, temperatures are soaring. Just how severely plants were damaged by the time you read this will depend upon how rapidly gardeners reacted. Or, better yet, were ahead of the game.

Just how plants are affected by high temperatures depends upon numerous factors, among them the extent and duration of the heat; the relative humidity; windy or not; soil moisture content; also, the kind of plant, its age, site, and general status when the heat hit. Sometimes leaves are only damaged superficially.  Other times, tissues die.

Tissue survival is most likely when the plant is fully hydrated well before the heat hits. After extreme heat arrives, stomates close, inhibiting water uptake by roots. So, whenever a heat wave is predicted, water the night before or early morning, between 2 and 6 AM.

Although sufficient and timely irrigation is important, so is temporary shade. Container-grown plants are especially vulnerable to damage during bright, hot weather. If possible, move them to a shaded site until the heat passes; if that’s impossible, rig temporary shade at least 18 inches overhead.

Avoid wilt

It’s critical to avoid wilting because wilted plants are permanently damaged even if the plant “totally recovers” after it is watered. Vegetables won’t produce the abundant yields gardeners expect.

Wilting is obvious with herbaceous plants, less so with woodies. In all cases, watch for subtle changes in leaf color. Early on, water shortages are signaled by an off-color, a somewhat blue- or gray-green.

Abiotic sunburn rhododendron 2015-07-client.jpg
These rhododendron leaves reveal varying degrees of tissue damage from excessively bright light combined with high temperatures and reflected light. In the yellow zone: the chlorophyll was killed whereas in the brown areas, tissues took the brunt of the damage and are dead. (Client image; 2015-07)

Other effects of excessive heat include the following:

– Leaves droop, a plant’s temporary response to protect tissues from excess sunlight.

– Flower buds shrivel and dry instead of opening.

– Flowers scorch, especially at the petal edges.

– Fruits with insufficient leafy cover, may sunburn, and eventually spoil.

– Pollination fails, such as when immature summer squash doesn’t enlarge and, instead, rots at the blossom end. Or, when tomatoes stop setting fruit, resulting a harvest lull later on.

– Pollination is incomplete, as when summer squash resembles a billy club.

Blossom End Rot in tomatoes

Blossom end rot in tomatoes won’t be recognized by gardeners for a week or two. It’s caused by insufficient transport of calcium to the bottom of the fruit. (No; crushed eggshells in the soil won’t help.)

Early on, you’ll see a slight graying of the skin color on the blossom end. With continued stress, cells die, producing a black area which gradually enlarges and may permeate the entire fruit with a secondary infection (rot). Perhaps most frustrating is, even though damage isn’t visible on the exterior, the internal flesh has rotted. See “Blossom-End Rot of Tomatoes” (FS139; https://catalog.extension.oregonstate.edu/sites/catalog/files/project/pdf/fs139.pdf).

Abiotic vine maple heat one-sided 2017-08 client.jpg
A thorough history and appropriate images are critical to resolving a diagnosis. If only a few leaves were submitted from this tree with one-sided damage from excessive heat, one would probably assume the tree was dead. (Client image; 2017-08)

General guidelines for water

– Water early in the day so that your plants will meet the rising temperatures well supplied with a fully moist rootball.

– On scorching days, consider adding a second brief supplemental irrigation, perhaps up to half the usual amount, in the early afternoon to “top off” soil moisture.

–  Realize that the output of drip irrigation and soaker lines is in gallons per hour whereas sprinklers, in-ground or not, is gallons per minute.

Resources

– “Abiotic Disorders of Landscape Plants” (UC); pages 139 to 155.

– “Diseases of Trees and Shrubs” (Sinclair & Lyon, 2nd edition); pages 492 to 494.

– “How High Heat Affects Vegetables and Other Crop Plants” https://extension.udel.edu/weeklycropupdate/?p=3203


PDF Version Summer’s Challenges

Natter’s Notes

Brown Rot vs Bacterial Blight/Canker

Jean R. Natter, OSU Master Gardener

Fig 1:
To verify a diagnosis of bacterial blight/canker, expose the cambium adjacent to, and below, the ooze. (Image: PNW Disease Handbook)

Two problems common to many fruiting and ornamental Prunus species are bacterial flower blight which often progresses into bacterial canker, and brown rot blossom blight and fruit rot.

Both diseases begin with very similar signs and symptoms. Flowers brown earlier than normal and collapse; the infection sometimes continues onto the attached twigs, where the affected leaves dry and cling to the branch; then, too, gumming or ooze may appear. Both diseases may kill branches, eventually the tree.

So, if you’ve been stumped now and then as to the correct diagnosis—brown rot versus bacterial blight – be heartened by the words of Jay Pscheidt, co-author of the PNW Disease Management Handbook: “Symptoms of the two will initially look the same. The big difference will be the development of signs – brown rot spores that give it that dull sort of gray coloration. So, if it has spores, it is for sure brown rot but, if they do not develop, we can’t really say for sure which it might be.” (Ed. comment: Ugh.)

A diagnostic option

As you know, MGs begin by obtaining a thorough history from clients. Another critical part of a successful inquiry is to examine suitable samples or images of much more than just one leaf.

Professional plant detectives visit sites where the troubled plants live; MGs don’t. Determining an accurate diagnosis is difficult, sometimes impossible while confined to an office.

But we must make every effort to resolve the issue before hand. One option is to pass the inquiry to the next shift or two via a Referral Form, another is to contact another of the metro MG offices during our shift.

Although MGs seldom submit affected tissues to the OSU Plant Clinic for diagnosis, we can do so. Insect ID is free; disease ID typically requires a fee. But, before submitting any sample from your MG Office, consult with one of the following persons: for Clackamas County: Jane Collier; for Multnomah and Washington Counties: Jean Natter.

Factors in both diseases

– Cold wet weather for Bacterial Blight; warm moist weather for Brown Rot. (This spring was perfect for brown rot.)

– Stressed trees are more susceptible.

– Some cultivars have tolerance while others are very susceptible

Fig 2:
A verification of brown rot may have to wait until signs of fungal sporulation appear on affected tissues, among them fruits. (Image: Jean R. Natter)

Cultural management of brown rot

– Remove and destroy infected twigs and branches in summer.

– Remove and destroy all affected fruit all dropped fruits as well as mummies that cling to the tree; don’t compost.

– Avoid wounding fruit at harvest and cool it immediately.

Chemical management of brown rot

– Apply fungicide during bloom; PNW Disease Handbook lists possible home gardener products.

– Realize that a product suited for application to ornamental flowering trees may be prohibited for fruiting trees.

Cultural management of bacterial flower blight

– Prune out affected tissues during dry weather; avoid the rainy months when bacteria may easily enter healthy tissues via leaf scars, the site of a mechanical injury, and/or pruning wounds.

– Disinfect pruners between trees with a 30-minute soak in 70% alcohol or in 10 percent bleach (9 parts water with one part of bleach)

– Consider replacing severely affected tree(s) with a tolerant kind. “Prunus sargentii ‘Rancho’ and P. yedoenis ‘Akebono’ appear to have some resistance. ‘Kwanzan’ cherries appear to be resistant when mature but not when young.” (https://pnwhandbooks.org/plantdisease/host-disease/cherry-flowering-prunus-spp-bacterial-canker)

Chemical management of bacterial flower blight

– No chemicals are listed for use by home gardeners.

– Client could hire a Certified Arborist to spray. It’s helpful to request on-site evaluations from 3 or more Certified Arborists. (Use zip code to search for nearby Certified Arborists at www.treesaregood.org.)

– Use of copper is discouraged because of bacterial resistance problems, also that it may increase disease intensity.

Resources

Bacterial Flower Blight and Canker:

— PNW Disease Handbook: https://pnwhandbooks.org/plantdisease/host-disease/cherry-prunus-spp-bacterial-canker

— Bacterial canker – http://ipm.ucanr.edu/PMG/r105101511.html

Brown Rot Blossom Blight and Fruit Rot:

— PNW Disease Handbook: https://pnwhandbooks.org/plantdisease/host-disease/cherry-prunus-spp-brown-rot-blossom-blight-fruit-rot

—  Brown rot – http://ipm.ucanr.edu/PMG/GARDEN/FRUIT/DISEASE/aprbrownrot.html

PDF Version Brown Rot vs Bacterial Blight

Natter’s Notes

Noctua pronuba, the Winter Cutworm

Jean R. Natter, OSU Master Gardener

Fig 1: Common mullein, Verbascum thapsus, with numerous holes, most likely caused by the winter cutworm. (J. R. Natter; 2019-04-14)

Winter cutworms, also known as Large Yellow Underwings, were first identified in Oregon about 2001. Since then, they have raised a ruckus in home gardens, lawns, pastures, and agricultural fields during the winter. The larvae (caterpillars) feed on a wide array of plants at night, whenever the air temperature is 40F or more. So, it’s critical that the damage is differentiated from that of slugs and snails which, by the way, don’t always leave a slime trail.

ID characteristics

Both the adult and larvae are seen in several color forms. Among the adults (moths), the wing coloration ranges from light tan to quite dark brown. But certain characteristics are constant, among them the 2 dark, kidney-shaped spots on each forewing.

To ID the larvae (caterpillars), look for a brown, inverted-Y on a light-colored head capsule. And, along each side of the body, you’ll see a row of dark dashes, each one underlined with a slightly shorter, light colored dash. Newly molted caterpillars are bright green. And, as is usual for Lepidoptera, the larvae will also have prolegs and 3 pair of true legs.

Life cycle

Fig 2: Newly molted winter cutworm, 2 inches long (J R. Natter; 2010-04)

During the growing season, the adults rest in the shelter of leaves on low-growing plants. Now and then, it’s likely you’ll flush one out while working in the garden during the summer.

The flash of orange on each hind wing of a brown moth is an easy field ID character. (See https://bugguide.net/node/view/9821.)

The life cycle follows complete metamorphosis. The several hundred eggs are laid in large patches on the host plant, arranged in neat side-by-side rows. Larvae (caterpillars) hatch in 2 to 4 weeks. They’ll feed in the fall and continue through the winter, at night, whenever the temperatures are above 40F. During the day, the larvae rest just under the soil surface, quite close to the stem of the victimized plant.

Because caterpillars are chewing pests, plant parts disappear. Winter cutworms commonly align with leaf edges and eat inward, creating larges scallops. Or they may chow down somewhere within the leaf blade.

The caterpillars pupate in the soil. Likely you’ll find a number of them as you prepare your flower and veggie beds this spring. A fun project is to rear out the pupae to verify which particular caterpillar species you have.

To rear a pupa, place it in clear container and cover with a breathable lid, perhaps paper toweling held in place with a rubber band. Set the container somewhere you’ll see it often, but not in the sun, then wait for the adult to emerge. Adult moths are always easier to ID than are pupal cases you find in soil.

Common victims

Favored host plants are numerous, among them flowers and vegetables; Pacific coast iris; and the great common mullein, Verbascum thapsus, the latter considered a weed here in Oregon. During 2015, they specialized in “mowing” grasses at their bases.

 Damage

Because damage occurs during winter, be certain to differentiate damage from that caused by slugs and snails which, by the way, don’t always leave a slime trail. Then, too, before you suggest treatment, determine if damage is current and possibly ongoing. Or is it old damage? In that case, the pest is long gone.

Management

The PNW Insect Management Handbook discusses home garden management of caterpillars in the section Horticultural, Landscape, and Ornamental Crops: Common Landscape Pests.

Take your choice of physical methods, among them to handpick; feed to the birds, drop into a nearby spider web; flick into soapy water; cut in half or stomp. Bacillus thuringiensis (Bt) is an organic ingredient useful against caterpillars on both ornamental and edible plants; always apply according to label directions.

Resources

  1. Large Yellow Underwing A New Cutworm in Idaho includes images of several very similar species, most of which are more common in agricultural sites than in home gardens; http://www.cals.uidaho.edu/edComm/pdf/CIS/CIS1172.pdf.
  2. Winter Cutworm: A New Pest Threat in Oregon contains close-up views of the larvae [page 3] as well as chemical recommendations for both home and commercial users; https://catalog.extension.oregonstate.edu/sites/catalog/files/project/pdf/em9139_1.pdf.
  3. Large Yellow Underwing moth and cutworm caterpillar, Noctua pronuba has excellent images of eggs, larvae, pupae, and adults; http://www.wildlifeinsight.com/british-moths/large-yellow-underwing-moth-and-caterpillar-noctua-pronuba/.

PDF Version Noctua pronuba

Natter’s Notes

Fertilizing Garden Plants

Jean R. Natter, OSU Master Gardener

As we discussed last month, the cue to start fertilizing seedlings of seasonal flowers and vegetables is by using a commercial trick: Apply a liquid fertilizer at half, or quarter, strength as soon as the cotyledons (seedling leaves) change position from vertical to horizontal. An early fertilization such as this will give your seasonal flowers and vegetables a running start toward the abundant harvests you expect. (Fertilizing Seasonal Vegetables and Flowers; Metro MG Newsletter; February 2019: http://blogs.oregonstate.edu/mgmetro/?cat=1179565)

A brief overview

Fertilizer deficiencies in landscape plants are uncommon in our region’s clay-based soils. Typically, potassium (K), phosphorus (P), and magnesium (Mg) are present in sufficient quantities for most plants.  Even so, it’s worth knowing that nitrogen is the element most often in short supply because it is water-soluble.

Nitrogen deficiency is characterized by pale and/or stunted growth; oldest leaves that turn yellow and may also dry and shrivel; along with dark green tip growth. (That’s true only if the plants received appropriate amounts of light and water for their kind.)

Growing in containers may complicate things. The soilless planting mixes used in containers, combined with a severely restricted root space, offer plenty of opportunities for plant problems. Here’s where a commercial potting mix premixed with a bit of fertilizer will come in handy for at least the first season to maintain woodies.

Eventually, though, container gardeners must periodically add fertilizer elements needed for growth, more often than in a ground bed. Even so, nitrogen will be the most common nutrient deficiency. The frequent watering required to maintain container-grown plants readily washes out nitrogen because of its high solubility.

Then, too, long-lived container plants become rootbound after a number of years in the same container. Roots have filled all the cracks and crevices in the potting mix such that nothing gets through, not roots nor water, or even fertilizer. Roots aren’t able to function. Sometimes it’s too late to re-pot.

Samples of effective fertilizer programs

Seasonal flowers or vegetables in pots: Mix a slow-release fertilizer into the potting mix, then sidedress about 4 weeks later. If needed during the season, use a dissolve-in-water product to perk up the annuals. Don’t bother adding a high phosphorus fertilizer in the hopes it will encourage flowering. Seasonal plants must absorb the required phosphorus very early in their brief lifetime.

Seasonal flowers or vegetables in the garden: Rake a starter dose of granular fertilizer into the conditioned soil. Immediately after setting the transplants, settle the soil around their roots with a diluted fertilizer solution. Sidedress about 4 weeks later. (Again, high phosphorus isn’t needed for bloom.)

Herbaceous perennials in the garden: Proceed as for seasonal flowers the first year. If needed, sidedress in each successive year. (With ornamental grasses, consider skipping the starter fertilizer because the plants may grow too soft and flop; also consider minimizing, or skipping, any sidedressings.) With experience, you’ll learn how to “read” your plants.

Lawns: Choose from fertilizing programs for high-, moderate-, or low-input lawns. Complete details for planting and maintaining lawns are in “Practical lawn care for western Oregon” https://catalog.extension.oregonstate.edu/sites/catalog/files/project/pdf/ec1521.pdf.

Shrubs and trees in the landscape:

Contrary to popular opinion, established landscape shrubs and trees seldom need fertilizer, especially if they are supplied with an organic mulch such as bark dust or wood chips out to the dripline. Bark chips, 3 to 4 inches deep, are recommended for trees or use bark dust, but to only 2 inches deep. That sort of program is similar to following nature’s lead: Maintain an organic mulch around the base, both to slowly fertilize the trees and shrubs as the mulch degrades in place, also to conserve soil moisture and to minimize fluctuations of soil temperatures. (Yes, you’ll still have to weed now and then.) The main undesirable effect of fertilizing long-lived landscape trees and shrubs is that doing so increases the frequency for pruning.

If you think that you absolutely must fertilize woodies, apply granular nitrogen after the new leaves have fully expanded. Then, they’re able to put fertilizer to good use while they photosynthesize. (Broadcast it underneath the canopy, out to the dripline.) Fertilizing at other times of year may produce new growth but the tree must use its own reserves, not the fertilizer, to do so.

This, by the way, brings an important caution to mind: Never fertilize a stressed tree because it needs all its reserves to survive the stress.

Blueberries would be notable exceptions to the take-it-easy guidelines for landscape woodies, simply because you want them to fruit well. See Growing Blueberries in Your Own Gardenhttps://catalog.extension.oregonstate.edu/sites/catalog/files/project/pdf/ec1304.pdf.

Roses are another exception to laid-back fertilizing because, this time, the desired yield is abundant flowers for outdoor display and probably also as indoor cut flowers. Obtain a “rose fertilizer” from a large garden center or use one of the formulations available from the Portland Rose Society, then apply according to directions. (http://www.portlandrosesociety.org/fertilizer.html) Don’t bother with homemade concoctions.

Resources

Soils and Fertilizers (chapter 2 in Sustainable Gardening, the MG handbook)

Fertilizing Shade and Ornamental Trees https://catalog.extension.oregonstate.edu/sites/catalog/files/project/pdf/fs103.pdf

The PDF Version:
Fertilizing Garden Plants