The following is a guest blog post from Andrea De Lei. Andrea completed an Instructional Design internship with OSU Ecampus during Fall 2021.
WHY SELF-CARE IS IMPORTANT FOR COLLEGE STUDENTS
Stress is not a new concept to college students, faculty, or staff. By teaching and incorporating self-care and overall health into your curriculum and design, your students can better manage stress and the host of obligations they may have to balance: full course loads, employment, commitments to their family and friends, internship, and networking opportunities. The Covid-19 pandemic this past two years added additional stressors both in teaching and engaging with students -added isolation and global pandemic stressors. To say these past two years was challenging would be an understatement. One way to get students and ourselves to practice self-care is to incorporate it into our lessons.
In a 2016 survey of Canadian university students,
90% of respondents reported feeling overwhelmed by all they had to do,
over 40% reported stress as the number one impact on their academic performance,
71% wanted more information on stress reduction (Alberta Canada Reference Group, 2016).
BURNOUT IS NOT NEW
College students are experiencing high rates of anxiety, depression, burnout, and unhealthy coping mechanisms to manage their stress. A study done by Ohio State University showed that in August 2020, student burnout was at 40%. When Ohio State conducted the survey again in April 2021, it was 71%, highlighting the continued struggles of student mental health and the need for higher education to create a holistic approach centered around student health and wellness. Teaching self-care can help instructors prevent student burnout, interact more effectively with students and create a culture more conducive to learning. Teaching and practicing self-care is necessary to balance and prevent burnout (Tan & Castillo, 2014).
BENEFITS OF ADDING SELF-CARE INTO THE CURRICULUM
The past year was filled with unprecedented events; social injustices, global pandemic, and increased stress diminished our prioritization of self-care. Increased isolation and loneliness mixed with online learning have created a void in identifying when someone needs help. Traditional self-care checkpoints are not as prominent for distance online learners as students learning in-person. Instructors can play a crucial role in supporting student mental health and wellbeing by incorporating self-care into their curriculum.
Supporting university-wide mental health initiatives is critical to student success and wellbeing. But, how do I add self-care in my online math course? Understanding the values of your university, department, campus culture, and needs of the students can help align these values into the curriculum and add self-care into any online course. A key component is giving students opportunities to plan time to incorporate self-care into their busy and stressful lives.
“Self-care has an experiential component in that it includes reflection and action in conjunction with real-world encounters” (Hroch, 2013, p. 5). Consider one or multiple assignments focused on self-care and wellness. Adding self-care and wellness can look like a wellness self-assessment, engaging in self-care activities and reflecting on that experience, incorporating additional resources into the syllabus or providing a “get out of jail [assignment] card.”
Image 2: Self-Care and Wellness Discussion Module online Canvas course created by Andrea De Lei, 2021.
O’Brien-Richardson (2019) recommends four self-care strategies to support students: making yourself available, pausing for mental breaks, allowing for moments of self-reflection, and equalizing class participation. Suggested self-care activities for students can include an array of possibilities. From physical, spiritual, emotional, social and many more. Self-care is personal to the individual and looks different for everyone. Some examples include:
Physical self-care activities
Go on a run
Practice yoga
Get some sleep
Spiritual/Mindfulness self-care activities
Read poetry
Meditate
Take a milk bath
Emotional self-care activities
Write your feelings down.
Cry and laugh
Practice self-compassion.
Social self-care activities
In-person or virtual coffee or lunch with a friends/family
Phone or virtual facetime
Join a [insert interest] club
Watch a movie or show with friends/family
THERE’S ROOM FOR IMPROVEMENT
To sum it up, adding self-care and wellness into the online curriculum can help students take time for themselves, destress, self-reflect, and create healthy habits to become better involved and engaged students. Instructors can continue to support students in various ways: self-care assignments, making yourself available, pausing for mental breaks, and allowing for moments of self-reflection.
References
Alberta Canada Reference Group (2016). Executive summary. American college health association. National College Health Assessment.
Tan, S. Y., & Castillo, M. (2014). Self-care and beyond: A brief literature review from a Christian perspective. Journal of Psychology and Christianity, 33(1), 90-95.
A group of instructional designers at Ecampus participated in a book club reading “Ungrading” (Kohn & Blum, 2020). We learned many creative ways of designing assessments through participation in this book club. If you happen to be searching for ideas on designing or re-designing assessments in your teaching, we would highly recommend this book!
The idea of “Ungrading” may sound radical to many of us. Yet instructors at all types of educational institutions have tried ungrading in many different courses, ranging from humanity courses, to STEM courses, and from primary education to higher education. Starr Sackstein (author of Chapter 4 “Shifting the Grading Mindset” of the book) encourages educators to consider “ways to adjust small things in the classroom that will lead to important growth for students”. And this suggestion of starting small is coherent with what James Lang proposes in his book “Small Teaching” (Lang, 2016) and Thomas Tobin’s +1 strategy for implementing new teaching and learning strategies (Tobin & Behling, 2018). Sackstein provides a table comparing the grades vocabulary that focuses on judgement or criticism, with the non-grade vocabulary focusing on assessing and opportunity for improvement.
In chapter 5, Arthur Chiaravalli proposed a way for teaching without grades: Descriptive Grading Criteria, such as A for outstanding, B for Good, C for Satisfactory and I for Incomplete. Do you remember elementary school report cards that use E for Excellent, S for Satisfactory, and NI for Need Improvement type of categories? I think that is exactly what descriptive grading criteria represent.
In chapter 7, Christina Katopodis and Cathy Davidson offer a new approach to start a new term/semester by asking students:” What is Success in this class for you? And How can I help you achieve it?” (p. 107) Katopodis and Davidson also remind us the importance of explaining why when you challenge your students to take their own learning seriously and give students opportunities for metacognitive reflections about the learning activities themselves. Katopodis and Davidson also offer a model of contract grading for Twenty-First Century Literacies and a model of collaborative peer evaluation. Students’ grades in the course come from self-and-peer evaluations using detailed evaluation forms.
In chapter 8, Christopher Riesbeck described his critique-driven learning and assessment design of do-review-redo submission process for his intermediate-level programming course. I have used similar approach in my own teaching before and it works very well for any course with manageable number of students. The advantage for this approach is every one of your students can improve their first submissions based on feedback they receive from the instructor. The disadvantage for this approach is the potentially extended time instructors may spend on providing the feedback and reviewing the submissions and re-submissions. The key to this assessment method is making sure that the workload of providing feedback and reviewing revisions is manageable. In chapter 9, Clarissa Sorensen-Unruh provided her experience of using ungrading in her organic chemistry II course, giving students opportunities to practice evaluating their own work.
And that is only snippets of what I took away from a few chapters from this book. Many resources about ungrading outside the book were shared during our book club meetings, such as two-stage exams, group exams and public exams. To answer a common question that ungrading practices may fit humanity courses more easily, Cyndie McCarley shared “Grading for Growth” blog written and maintained by two math instructors Robert Talbert and David Clark. To learn about all the creative assessment design methods introduced in this book, read it yourself either through library ebook or get a hard copy and enjoy reading, designing and experimenting!
References
Kohn, A. and Blum, S. (2020). Ungrading. West Virginia University Press.
Lang, J. (2016). Small Teaching. Jossey-Bass.
Tobin, T.J. and Behling, K.T. (2018). Reach Everyone, Teach Everyone. West Virginia University Press.
“Annotation provides information, making knowledge more accessible. Annotation shares commentary, making both expert opinion and everyday perspective more transparent. Annotation sparks conversation, making our dialogue – about art, religion, culture, politics, and research – more interactive. Annotation expresses power, making civic life more robust and participatory. And annotation aids learning, augmenting our intellect, cognition, and collaboration. This is why annotation matters.”
When you think back to your early college years, you may remember your professor assigning a text to annotate. Annotating a text has long been a common task in higher education, one that ideally promotes deeper reading, interaction with, and comprehension of important texts. Annotation assignments vary widely but the traditional paper-based type of annotation asks readers to respond to a text as it is read, physically marking or highlighting the text itself and perhaps writing in the margins. This approach allows students to enter into a dialogue with the text by recording their responses to the text, adding reflections or critiques, and anchoring those reactions to a specific place in the text. When students annotate a text, they are working their way through skills that span the levels of Bloom’s Taxonomy, from remembering to predicting, connecting, analysing, and evaluating. Annotation, at its best, encourages active engagement with a text beyond the surface level, promoting deeper critical thinking and stronger retention of concepts.
While this is, of course, fantastic individual practice, the nature of traditional annotation assignments is primarily solitary. Today’s classrooms place more of an emphasis on 21st century skills such as group and collaborative study, and new digital tools have been developed that have revolutionized what, how, and with whom we can annotate. So-called social annotation has picked up speed with the growing popularity of two major players, Perusall and Hypothes.is, bolstered by the sudden shift to remote learning in 2020. Online instructors seeking ways to replicate the back and forth, robust discussion of a face-to-face class have found these tools a fitting substitute, and the asynchronous format of the discussion means these tools have a place in all modalities.
Equity, Inclusion, & Community
“As a teaching method, critical social annotation allows for equitable conversations to unfold in-line with the knowledge being presented in course texts. In this way, it can potentially subvert or even redress instances of inequity in course content.”
Social annotation platforms increase equity and inclusion in a course in several ways. Digital annotation platforms offer students a variety of ways to connect with material, allowing students to post links, images, video, and more in response to the text, their peers, and other annotators. By putting students’ ideas front and center, social annotation can empower learners to take initiative and experience more feelings of control over their educational process. Unlike the fast paced back and forth of traditional face-to-face discussions, the nature of digital social annotation allows students more time to engage with the text and to take as long as they need to post and respond (within the assignment boundaries). Additionally, the major platforms discussed in this post feature easy-to-use controls that require little technical expertise to use. They also boast comprehensive accessibility features that combine to provide inclusivity to a wide range of student needs.
Social Annotation as Collective Construction of Meaning
One major difference between today’s digital social annotation and traditional solitary practice is that when students in a particular class collectively annotate a text using one of the digital platforms available today, they are actively building knowledge and understanding as a group. By sharing the document for collective annotation, the act of annotating itself becomes a social activity and contributes to the interaction of individuals within the group. Socially annotating a text is one of the best ways to encourage close and active reading skills, with many studies reporting higher levels of student comprehension of socially annotated materials. Students who collectively annotate a text are entering into an exchange of questions, opinions, perspectives, and reactions to a text, engaging in a discourse with their peers (and facilitator, usually) and by extension learning from and with them. The process of a social annotation assignment allows students to see knowledge creation in action and become co-creators.
Use of social annotation in asynchronous online courses can also increase sociability within an otherwise geographically remote, disparate group of students. Asynchronous instructors sometimes struggle to provide opportunities for real social interaction and building of community given the limits of the modality. An often unstated goal of higher education is to socialize students to academic community norms, and social annotation allows students to experience and practice some of these. For example, students annotating collectively learn appropriate language for responding to peers’ ideas and criticisms, develop online academic social identities, and gain experience with navigating power dynamics within the higher education classroom.
Ready to Try It Out?
Adding social annotation to a course involves matching the task to your learning outcomes, deciding which readings would be best suited to annotation, and choosing your online annotation platform.
Assignments can be tailored to meet a variety of instructional purposes and goals:
Recognizing formatting of various documents
Providing background or contextual information
Learning academic norms for responding to peers- supporting, agreeing, disagreeing
Drafting questions and responses that are rigorous and meaningful
Determining main points vs. supporting details
Distinguishing fact from opinion
Identifying themes, tone, biases, author’s purpose, rhetorical devices, etc.
Learning and practicing discipline-specific writing and reading conventions
Connecting the material to the field of study, to their own practice, or to other course materials
Developing evaluative and analytical skills
Considering differing perspectives and viewpoints in constructing knowledge
Facilitating a deeper understanding of difficult passages
Some best practices to consider when using collective annotation online:
Remind students that they have already practiced annotation in their everyday lives (reading and making your own notes in your inherited cookbook, reading your teacher’s remarks on your essay, leaving comments on a colleague’s report)
Model annotation with a fun text first
Seed the reading with your own comments, questions, and notes to help guide students
Situate the social annotation assignment within the context of the course and make clear the intentions you have for the activity
If the activity is to be graded, be sure students know the grading criteria, preferably by providing a rubric
Annotation assignments are ideal for small group activities, and some platforms automatically create groups
Be prepared to provide guidelines for behavior and etiquette among students and to need to enforce these guidelines if students step out of line
Monitor the discussion and provide nudges, likes, upvotes, or validations, and otherwise engage with the dialogue throughout the assignment
If the platform allows tagging, do so- students get notified when someone responds to their post or asks a question, a convenience which increases the likelihood of them returning to the assignment for further interaction
Social Annotation Tools: The Major Players
Perusall (stand-alone site/integrated into various LMS, including canvas)
Perusall is a collective annotation platform developed by Harvard University following a major research initiative into online collective annotation. Perusall offers free accounts for teachers and students at the basic level with options for institutions to integrate the tool into their LMS. The platform allows educators to use Perusall directly for stand-alone courses and upload their own materials for annotation as well as partner with their textbook catalog to purchase and annotate textbooks directly. For integrated LMS users, Perusall offers seamless grade pass back and options for pass/no pass grading as well as a robust automatic AI grading system that saves time and effort. Some instructors have also used Perusall for peer review to great effect using student-uploaded documents. *recommended tool for Ecampus courses
Hypothes.is is a groundbreaking new tool that bypasses restrictions of the classroom and enables anyone anywhere to annotate any webpage via a unique delivery system- as a browser extension that creates a layer over any webpage. This open source, free tool can revolutionize how we view and interact with web pages as well as texts by allowing us to save our annotations privately as well as publicly, inviting the world at large to socially annotate with us. Hypothes.is is also available as an integrated tool in most LMSs. The company also hosts the AnnotatED community, a group of users that hosts events, studies, and conferences to learn best practices for the tool. *recommended tool for research with a wider audience.
This post is a continuation of an earlier one, Boost Your Student Engagement with Qualtrics: Part 1. This post will describe the setup and use of a specific Qualtrics Survey used in a recent OSU Ecampus Course, Communications Security and Social Movements (Borradaile, 2021).
In the survey example, I am going to share, an instructor had an assignment in which each student was to select from a list of social movement groups they wished to research and prepare a recorded lightning talk. The instructor didn’t want any two students to be able to select the same group to research.
What the survey needed to do was eliminate each choice once it had been selected by a student. As the students take the survey, one by one, and select their group, the next students taking the survey should not see the choices previously selected.
Qualtrics lets you add “Quotas” to a survey. Using quotas you can specify a number of actions that modify your survey’s behavior once a condition has been met. That is how this design challenge was solved. Each option in the survey was given a quota of 1. Once that quota had been reached, because a student selected that social movement group, and then submitted their survey, the item would disappear from the list.
This survey uses a combination of a Simple Logic Quota and Display logic. This is a bit more complex than setting up a normal survey, so let’s walk through the steps.
Design Your Survey
Do the following steps outside of Qualtrics.
Identify a list of topics students can choose from.
Determine how many students should be able to select an individual answer (this number would not have to be the same for each option).
If the list is long, you will want to write out the list of choices in a text file. It will make the question creation a little faster, and if anything goes wrong, you can easily start over.
Implement Your Survey in Qualtrics
The following steps assume basic familiarity with creating surveys in Qualtrics. Where applicable, links to the Qualtrics documentation will be provided to go into more detail as needed.
During this step, you will be defining how many students (survey respondents) you would like to be able to select each choice.
Navigate to the Survey Options by clicking on the Survey Options Icon on the left hand side of the screen.
Select “Quotas” from the Advanced Section
Select Add a Quota
Choose “Simple Logic Quota”
Make the following selections under “Increment the quota when a response is submitted that meets the following conditions:”
Question
MC question containing your list
Select the first option in the MC list
Choose “Is Selected”
From Quota Options choose, Choose “None for Skip Logic or Survey Flow) from “When the quota has been met, then:” pull-down.
On the left-hand side, give the item a name and set the number of students you would like to be able to choose the MC answer selected above. Once you have set how many you like, it should show 0/1. This says that zero people have selected the option out of the 1 you want for each choice.
Once you set up the Quota for one of your MC answer choices, you can copy the quota logic and re-use it for the other choices. Additional information can be found in Qualtrics Creating Quotas Documentation.
When you have completed setting up your desired quota for each choice, move on to the Display Logic configuration.
Set the Display Logic for Each Answer Choice
During this step, you will be configuring your survey question to only display each answer until the quota has been reached.
Activate the first option in your list.
From the pull-down, select “Add Display Logic”
Under “Display this Choice only if the following condition is met:” Select “Quota” in the first pull-down
Select the first option in your MC list
Select “Has Not Been Met” from the third pull down. In other words, only display this option if the quota has not been met.
Select Save.
Again, repeat this for each item in your list.
Creating Surveys
Working with Large Lists
In the social justice example described above, there were close to 40 options in one MC question. The long list was copied from a text file and then pasted into the survey. This made it easier and quicker to create the long list. It also helped as we were experimenting with the survey and setting up samples ahead of the design. It is easy to paste by clicking on the first MC question where it says “Click to write Choice 1” and paste your list of options See this in action.
Additionally, to make it easier to navigate, the options were grouped by category using the Assign to Group feature.
Gotchas to Watch Out For
Survey responses do not increment quota numbers until the survey is submitted. If multiple students launch the survey at the same time, it is possible that they both could make the same choice, resulting in your set quota being exceeded.
If you are using this survey as an assignment (for instance giving completion points for participation), make sure that your assignment settings do not allow for multiple submissions.
References
Borradaile, G. (2021, March 29). CS 175 Communications Security and Social Movements.
A trigger warning in a college course alerts students to the presence of material that may provoke a traumatic response. It might sound something like this:
As a reminder, this week’s reading contains an account of suicide. Please prepare accordingly and employ self‐care throughout the in‐class discussion. One self‐care option is to make use of the Monsour Counseling Center (Sample Syllabus Language, Claremont Colleges CTL).
The usage of trigger warnings has been debated by faculty, administration, students, and researchers, and after spending time reading the arguments and research, I am uncertain whether I would recommend them to an instructor who asked for my advice on the matter. So, rather than advocating for or against trigger warnings, this guide presents several resources for instructors exploring their usage.
Among my instructional design colleagues, trigger warnings have some obvious appeal, perhaps because they dovetail well with the UDL checkpoints that direct us to “facilitate personal coping skills and strategies” and “minimize threats and distractions” in our courses, but their utility is contested. The American Association of University Professors (AAUP), in their report “On Trigger Warnings” outlines some of the issues. Trigger warnings might stifle free and open discussion of difficult topics, prejudice students against engaging with instructional materials critically or encourage avoidance, and interfere with academic freedom. However, in “Teaching with Trauma: Trigger Warnings, Feminism, and Disability Pedagogy,” Carter (2019) asserts that the AAUP misunderstands the goal of trigger warnings and who they’re for – they aren’t intended to protect students in general from adverse learning experiences but rather to provide students who experience trauma and anxiety with the means to engage – in other words, trigger warnings are a question of access and accommodation. Indeed, students themselves are requesting trigger warnings or complaining when they’re not used, as found by the National Coalition Against Censorship in its survey of 800 faculty.
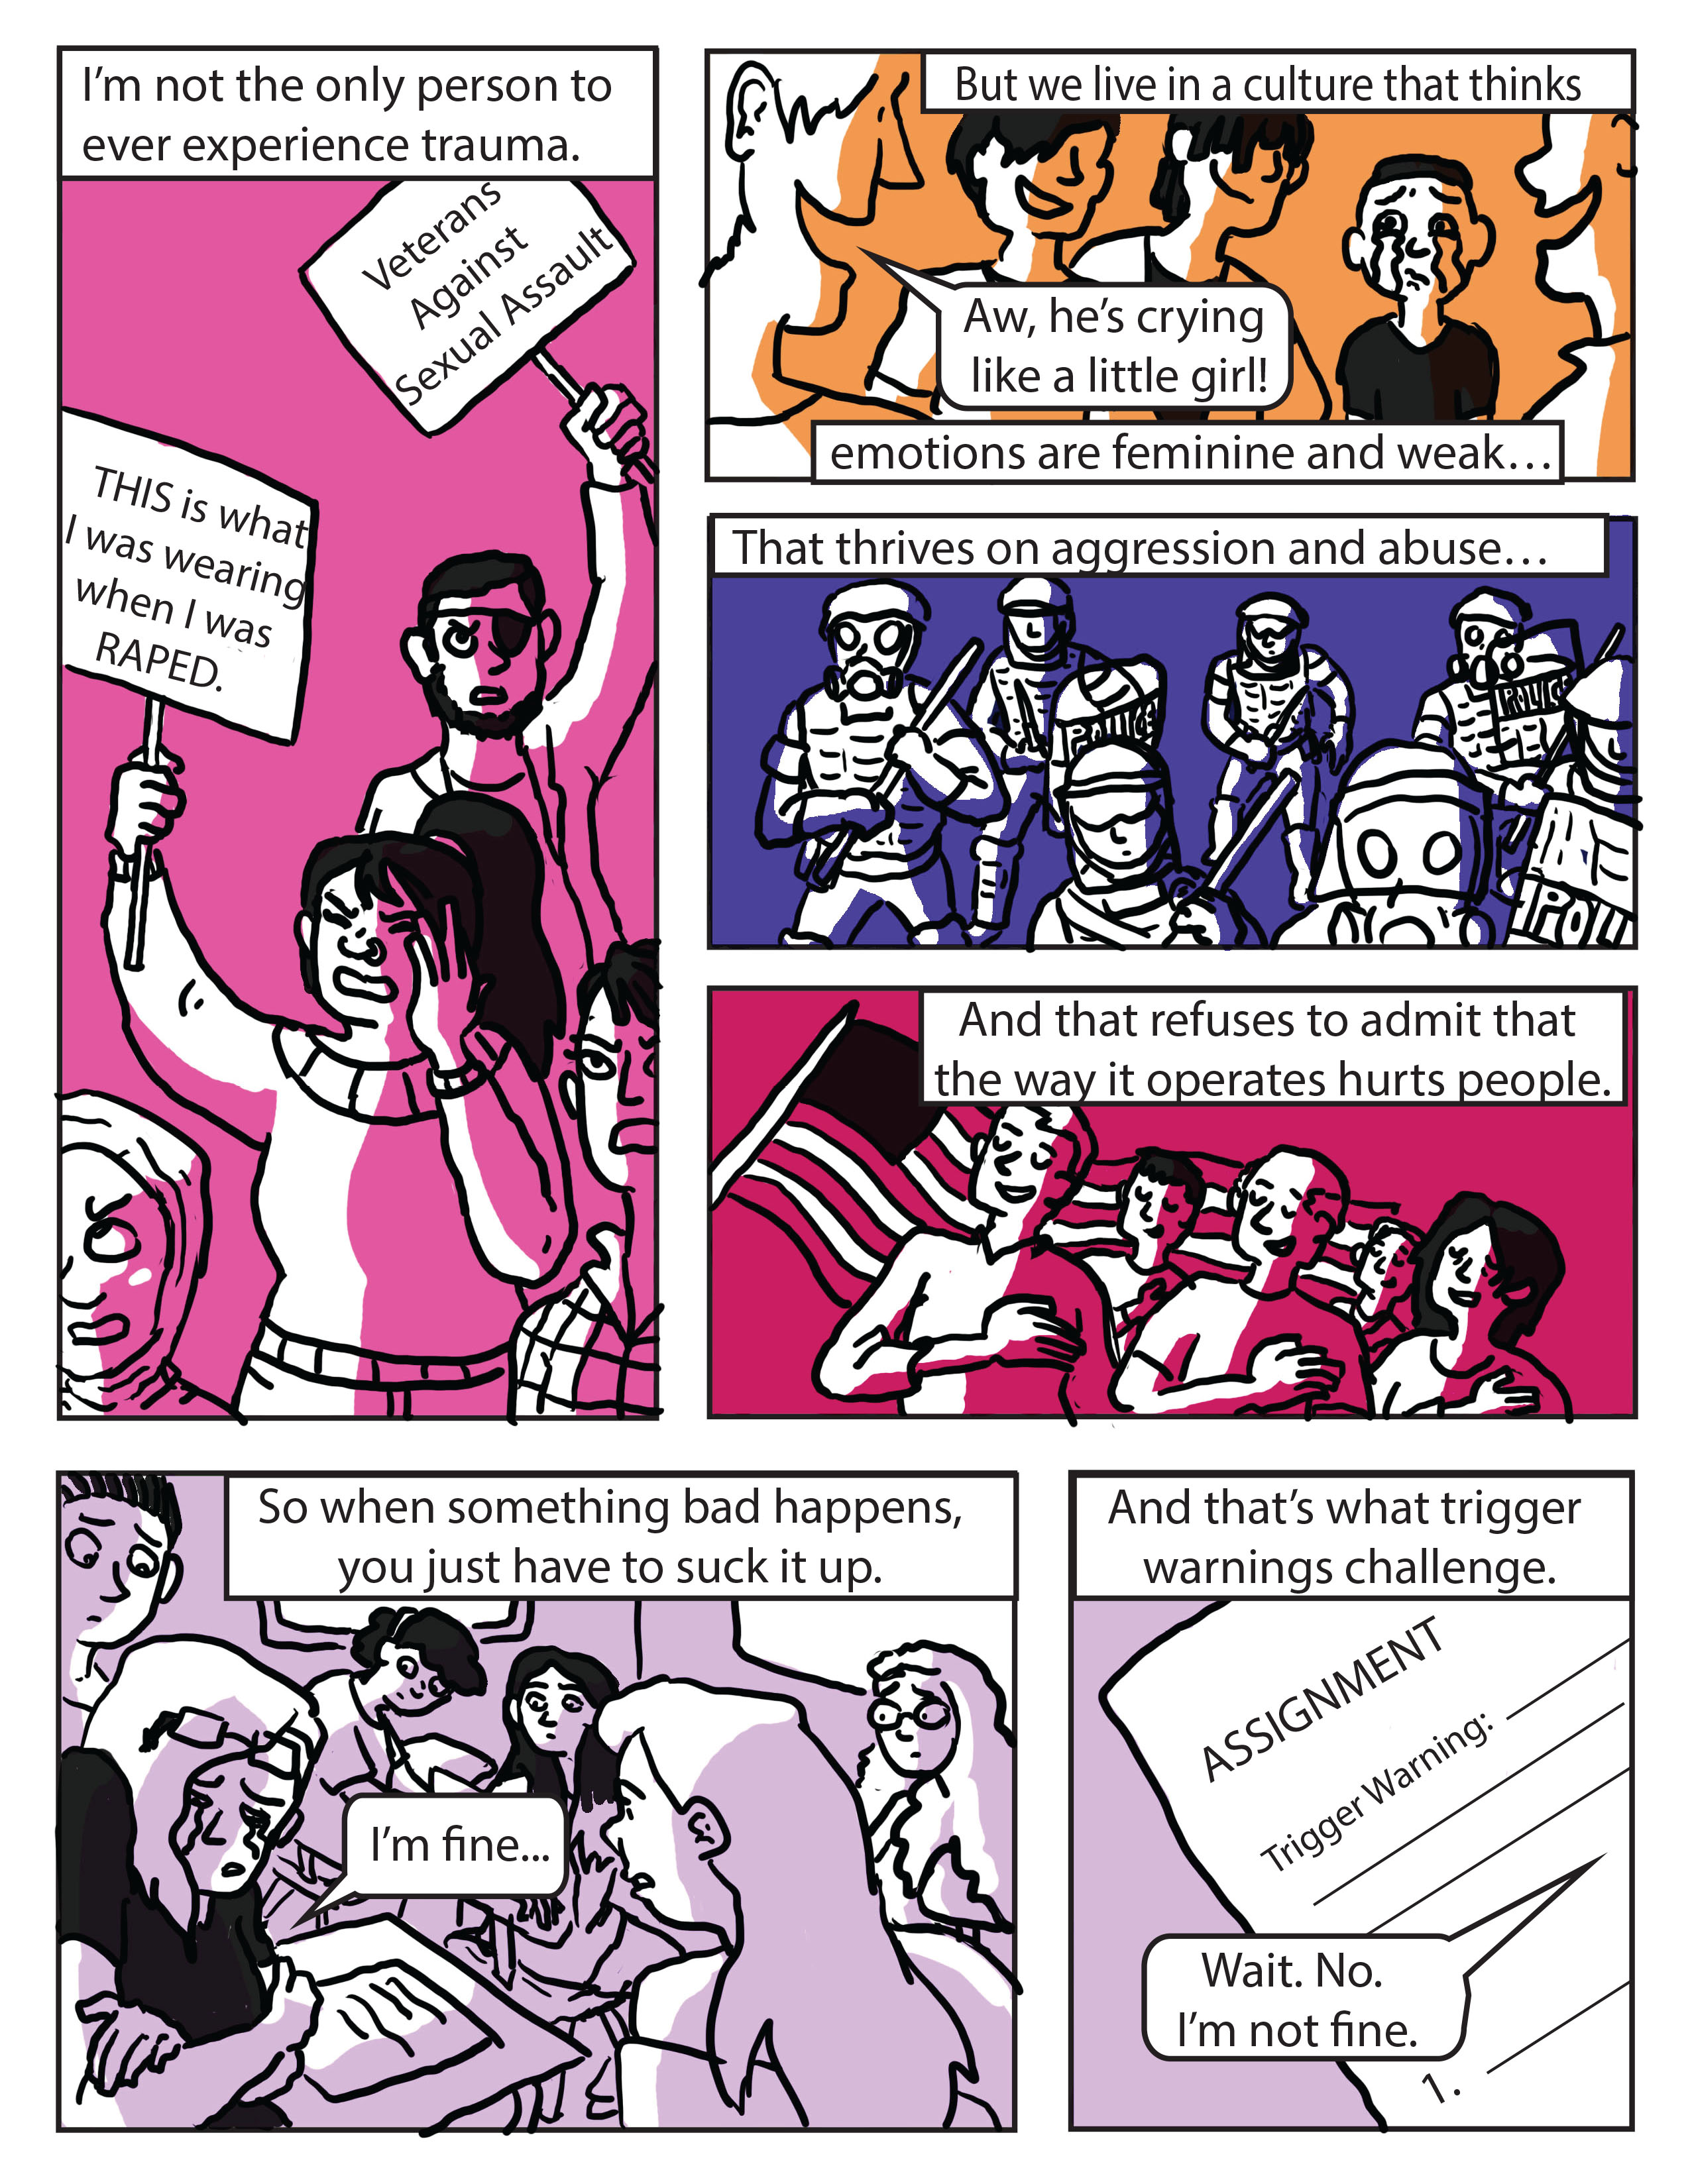
Excerpt from M. Slade’s cartoon at Everyday Feminism
What do we know from experimental research about the effects of trigger warnings? Jones et al. (2020) in their article “Helping or Harming? The Effect of Trigger Warnings on Individuals With Trauma Histories” describe how they presented reading passages that either did or did not contain trigger warnings to over 400 non-students who self-reported trauma. The trigger warnings did not reduce anxiety and instead seemed to cause participants to view traumatic life experiences as even more central to their life stories. Because trauma survivors who ascribe more importance to their trauma are at greater risk for PTSD, this research would suggest that trigger warnings are harming the students we most want to help.
Bentley (2017) in her article “Trigger warnings and the student experience” investigates the reactions of about 60 undergraduates taking 2nd and 3rd year courses that included trigger warnings related to the topics of war and terrorism. Notably, students who didn’t self-report a mental health condition actually experienced more anxiety. The 3rd year students, perhaps because they were further along in their degree, were more likely to perceive trigger warnings as an affront to their self-competence as learners. On the other hand, some students found the warnings helped them explore difficult topics more freely, because they were given time to frame their thoughts and feelings within an academic, rather than a reactionary or personal, context. Other students found the warnings useful because, without them, the triggering nature of course topics would not have been immediately obvious.
For instructors looking for practical tips on how, when, and where to employ a trigger warning, the University of Michigan has prepared a comprehensive “Introduction to Content Warnings and Trigger Warnings”. While content featuring sexual assault may be an obvious trigger, this guide lists 20 other potential triggers that instructors might not have considered, such as classism or fat phobia, and for which students might appreciate a warning. The guide also suggests that, since what triggers others can be hard to predict, instructors should consider inviting students to request which specific types of content they’d like to be flagged. Rather than infantilizing students, the guide argues, trigger warnings empower students to prepare to engage with difficult topics, because with the knowledge of potential triggers, students can work with a therapist or schedule more time to engage with materials, thereby making them more responsible for their learning, not less. The guide also details options for implementation, like flagging individual learning materials in the course schedule by triggering topic, or by issuing blanket warnings in the course description for a course that is largely composed of potentially triggering material. This is a must-read for anyone who has decided to implement trigger warnings.
Fund research that is actionable and impacts student online learning
Provide resources and support for research leading to external grant applications
Promote effective assessment of online learning
Encourage the development of a robust research pipeline on online teaching and learning at Oregon State
Fellows program applications are due Nov. 1 each year. If you are interested in submitting an application, reach out to Naomi Aguiar, the OSU Ecampus assistant director of research. Research Unit staff are available to help you design a quality research project and maximize your potential for funding.
Many Oregon State colleagues have had transformative experiences in this program. A Fellows study funded in 2020 highlights the ways in which these projects have advanced research in online/hybrid education, as well as Fellows’ programs of research.
Fellows program highlight
Funding recipients expand the inclusivity mindset of computer science students
Lara Letaw, an experienced online instructor and lead researcher from Oregon State’s School of Electrical Engineering and Computer Science, partnered with Heather Garcia, an OSU Ecampus inclusive instructional designer on a research study called “Impacting the Inclusivity Mindset of Online Computer Science Students.”
Together with their team, Letaw and Garcia implemented an intervention that was designed to improve feelings of gender inclusivity among online computer science students and to train these students to develop more gender-inclusive software applications.
In this intervention, online computer science students experienced new curriculum developed by Letaw and Garcia’s team. The curriculum was based on GenderMag, a software inspection method for identifying and correcting gender biases in software. Curriculum for teaching GenderMag concepts can be found on the GenderMag Teach website. Students completed a set of assignments and, if they chose to participate in the research study, questionnaires about inclusivity climate, both in the course and in the computer science major. Students’ software design work was also evaluated for the use of gender-inclusive principles.
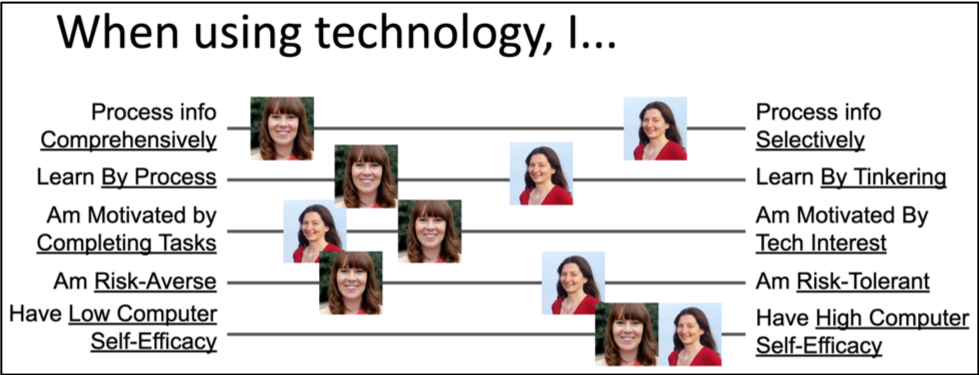
The image below shows examples of the cognitive facet values people (e.g., Letaw and Garcia) bring to their use of software, shown across the spectra of GenderMag facets (information processing style, learning style, motivations, attitude toward risk, and computer self-efficacy).
Computer science students in the Ecampus courses Letaw and Garcia modified learned about their own cognitive styles and those of their teammates. They also built software that supports the cognitive diversity of software users. One student reflected, “Identifying my facet values was tremendously helpful [for articulating what had] been abstract… I feel much more confident.”
The results of their study showed that, overall, students felt included by the GenderMag curriculum (nobody felt excluded by it), it increased their interest in computer science, and it had positive effects on their team dynamics and self-acceptance. Students who completed the GenderMag intervention were also more effective in developing gender-inclusive software designs, and they reported greater recognition and respect for the diversity of software users.
The image below highlights what students considered when designing a software user interface before (left) and after (right) learning GenderMag concepts. As one student put it, “Now when I think of users using a piece of software I don’t picture them … just jumping in and tinkering … I am more aware that there are [people whose] interests in using a software … might not align with mine.”
As a result of this project, Letaw and Garcia published a paper in the ACM’s International Computing Education Research conference proceedings in 2021. This project contributed to a $300,000 National Science Foundation grant awarded to Oregon State’s Margaret Burnett, Letaw, and Kean University. With this funding from the NSF, they will partner on a project entitled, “Embedding Equitable Design through Undergraduate Computing Curricula.”
This Fellows project has also provided research opportunities for two female Ecampus computer science students (Rosalinda Garcia and Aishwarya Vellanki), a group that is typically underrepresented in STEM fields. Rosalinda Garcia successfully defended her honors thesis with these data in the spring of 2021, and Vellanki is currently working on her own.
Join the Ecampus Research Fellows Program
Learn more about the Fellows Program and what materials are needed to prepare your proposal.
At a recent faculty professional development workshop series, I became aware of faculty’s concerns about addressing the learning needs of students from different cultural and linguistic backgrounds. Students with multilingual and multicultural identities are oftentimes perceived as deficient (Almon, 2014; Flores & Rosa, 2015) and might feel they hold an outsider status (Merryfield, 2000). In my personal experience navigating multiple identities that intersect culture and language, and in my work supporting faculty in their learning design and instructional decisions, I began examining ways in which blended and online learning spaces can offer more welcoming opportunities for students. One of these ways is using a cultural lens and mindset towards inclusive learning design.
Culturally Responsive Approaches
There have been several culturally responsive approaches to teaching and learning. By and large these approaches advocate for the recognition of students’ cultural backgrounds as critical to their learning success (Gay, 2013; Ladson-Bilings, 1994). In fact, a culturally responsive pedagogy (CRP) aims to promote the integration of students’ culture to support their learning experiences. In blended and online learning, this pedagogy can create an environment that “acknowledges, celebrates, and builds upon the cultural capital that learners and teachers bring to the online classroom” (Woodley, Hernandez, Parra, & Nagash, 2017, p.1).
For students whose first language is not English, we first should focus on their strengths and not their deficiencies. These students bring their cultural backgrounds, values, experiences, and language diversity with them to the online learning environment. It is important to recognize that culture is central to teaching and learning; therefore, advancing online and blended learning design should be grounded on dimensions for cultural sensitivity where students’ diverse identities, cultures, languages, and backgrounds are seen through an asset-based lens. This means, recognizing the value in the cultural backgrounds, experiences, and languages of students; and embracing these students’ traits as assets. This asset-base approach can be the first step in developing a mindset for designing and teaching in ways that promote social, academic, and emotional learning for these and ALL students.
Culturally responsive approaches have been mapped out to the three principles of Universal Design for Learning to offer (1) multiple means of engagement, (2) multiple means of representation, and (3) multiple means of action and expression (UDL, n.d.). UDL and CRP can help instructors amplify the opportunities for students from different cultural backgrounds to demonstrate their knowledge when given strategies that incorporate multiple perspectives, experiences, connections to the real world, and choices (Bass & Lawrence-Riddell, 2020; Kieran & Anderson, 2018)
The connection of UDL and CRP offers consideration to inform instructional design choices. Yet, these considerations appear to be adds-on to the design of the learning experience. How can we expand the UDL and CRP connection to embrace a mindset to move towards an inclusive learning design where the cultural and linguistic traits of students are seen from an asset-based perspective? A few dimensions from research and praxis would get us started to help achieve this goal.
Dimensions for Learning Design
The following dimensions for learning design, that expand the connections between UDL and CRP, should be considered whenever possible in the design of blended or online learning experiences. Following are the six dimensions.
Dimensions for Culturally Responsive Learning Design
Instructor’s reflection
Visual design
Linguistic domain
Content
Interaction
Technology
Identity and Experience
Instructor identity and experience relates to the practice reflection –inner analysis to reveal assumptions about teaching and learning (Jaramillo Cherrez & Jin, 2020). Through these reflections, instructors can identify ways to humanize the learning experience. Instructional designers (IDs) can help instructors engage in a (self) dialogue to explore how the instructor’s identity informs or impacts their teaching and instructional decisions, how they respond to students’ cultural differences and embrace them as strengths, and how instructors could also learn from students.
Design
The visual design of the course and learning materials can have a profound impact on students’ learning experience (Hedberg & Brown, 2002). For students whose first language is other than English in particular, it is important to be aware that these students may come from different cultures and social groups, and thus, visual representations may have positive or negative consequences to their success in the course. Visuals should be carefully chosen because the variety of images, colors, and symbols may affect the message students receive in the class. When using images from pop culture, it is helpful to add context to give more clarity to the instructional purpose. The visual design also relates to the readability of the content and how it is presented and structured. Asking a colleague or friend to read the instructions and descriptions of assignments can help clarify expectations and requirements for students. Bear in mind that what is clear to one is not always clear to others, especially when using complex sentences and terminology of a discipline.
Linguistic Variability
Many students might have a first language different from English. Also, keep in mind that different cultures may have different ways of writing, usually influenced by rhetorical and social contexts (Almuhailib, 2019). There may also be linguistic and cognitive differences in the way that students interpret the information given to them. For some cultures, direct descriptions are fine, whereas for others the context is important before addressing a specific perspective. Some cultures may characterize themselves for being more individualistic and others more holistic, and students, including those whose first language is other than English, can find themselves moving along that continuum. In designing culturally responsive blended or online courses, language matters because of the transactional distance characteristic of asynchronous spaces. Many students may already be pressured to demonstrate “good”, “academic”, “professional” English. One way to be aware of linguistic diversity is to be more explicit with instructions. For example, indicate clearly the use of naming conventions, abbreviations, acronyms, and descriptors in activities and assignments.
Content
The fourth consideration is content. The main suggestion is to try to diversify the curriculum with resources from around the world (e.g., content from scholars from diverse cultures and linguistic backgrounds). Allow students to see themselves represented in the materials. Create activities and assignments that help students explore the concepts in connection to their own backgrounds and communities(e.g., linguistic, cultural) and experiences, and that allow students to move from low to high cognitive tasks (e.g., staged projects). Yet, diversifying the curriculum goes far from bringing into the course content perspectives that are commonly ignored. It involves explicit acknowledgement of the value of the different perspectives and modes of knowledge.
Interaction
Interaction also can benefit from a culturally responsive mindset in that instructors can vary the modes of interaction by using audio/video communication(e.g., assignment feedback, DB, announcements). It is also important to guide and scaffold group activities with resources such as guidelines, group contracts, teamwork guidelines, group rapport activities, conflict resolution resources). Particularly for teamwork, instructors can build group activities early in the course to promote collaborative learning. For online discussions, instructors could allow students to select the tools that they feel more comfortable with using, bearing in mind that many students from different cultural backgrounds might not be familiar or have experience participating in discussion activities. Another suggestion is to promote student-led discussions to help students move from the individual task to the group task. This will allow to vary the cognitive demands that can foster meaningful knowledge construction and organization while also addressing different audiences, styles of writing and analysis, and communication modes.
Technology
It is important to recognize that technology is not neutral. Clearly, it is important to select tools and evaluate them for intended and unintended consequences for students, such as the cost, the technical support, the pedagogical affordances, and the availability in other geographic areas. It will be helpful to consider the different levels of technology skills that students may have and plan on developing guidelines and technical resources (e.g., links to providers, manuals, accessibility and privacy policies) that can help students. Additionally, in considering digital tools it is important to review whether the affordances the tools offer are available to all students, in the different browsers and devices (e.g., tablets, smart phones, browsers). In using digital tools, careful attention should be given to the kinds of data that the tools require students and instructors to share. It is important to read carefully the terms of use, data privacy, and the information that is being collected as a way to understand how the users can trust the tools and their procedures for sharing or not with others the data collected.
These dimensions underscore the need to approach learning design with a mindset that not only acknowledges student multilingual and multicultural identities, but also catalyzes these identities to help students be valued and successful. I consider these dimensions in my instructional design work, and I would like to invite you to consider them next time you design an online or blended learning experience.
Sources
Almon, C. (2015). College persistence and engagement in light of a mature English language learner (ELL) student’s voice. Community College Journal of Research and Practice, 39(5), 461-472.
Almuhailib, B. (2019). Analyzing Cross-Cultural Writing Differences using Contrastive Rhetoric: A Critical Review. Advances in Language and Literary Studies, 10(2), 102-106.
Bass, G., & Lawrence-Riddell, M. (2020). Culturally Responsive Teaching and UDL. Faculty Focus. https://www.facultyfocus.com/articles/equality-inclusion-and-diversity/culturally-responsive-teaching-and-udl/
Dougherty, E. (2012). Assignments matter: Making the connections that help students meet standards. Alexandria, VA: ASCD.
Kieran, L., & Anderson, C. (2019). Connecting universal design for learning with culturally responsive teaching. Education and Urban Society, 51(9), 1202-1216.
Gay, G. (2013). Teaching to and through cultural diversity. Curriculum Inquiry, 43(1), 48-70.
Hedberg, J. G., & Brown, I. (2002). Understanding cross-cultural meaning through visual media. Educational Media International, 39(1), 23-30.
Ladson-Billings, G. (1994). What we can learn from multicultural education research. Educational Leadership, 51(8), 22-26.
Merryfield, M. M. (2000). Why aren’t teachers being prepared to teach for diversity, equity, and global interconnectedness? A study of lived experiences in the making of multicultural and global educators. Teaching and Teacher Education, 16(4), 429-443.
Flores, N., & Rosa, J. (2015). Undoing appropriateness: Raciolinguistic ideologies and language diversity in education. Harvard Educational Review, 85(2), 149-171.
Last fall, my colleague featured the Ecampus Research Fellows (ECRF) program in her blog post. The ECRF program, which began in 2016, funds OSU faculty-led research on online and hybrid education. Each year, approximately five projects are selected to receive funding. One unique aspect of the program is that, in the past few years, 1-2 members of the Ecampus Course Development and Training (CDT) team are paired with the faculty on funded research projects. The CDT team includes instructional designers and media developers. These professionals have expressed interest in conducting research, but in most cases, have had few opportunities to engage in formal research projects. Similar to faculty, CDT fellows have to apply to the ECRF program.
For this blog post, I’d like to share some takeaways from my experience as a CDT research fellow, as well as some takeaways my CDT colleagues have shared with me. I will also share some feedback from faculty fellows who have had CDT colleagues join their research teams. But before I dig into these valuable takeaways from past participants, let me first address the importance of this program for instructional designers and related disciplines.
In 2017, the Ecampus Research Unit published a report titled “Research Preparation and Engagement of Instructional Designers in U.S. Higher Education.” This report was the result of a national study of instructional designers working in higher education environments. Among the many findings of this study, one compelling finding was that more than half (55%) of respondents indicated that instructional designers need more training in research methods to fulfill their role. Instructional designers also indicated why they think it is important to gain more experience in research. Among the reasons, respondents indicated that research skill development would allow them to grow professionally, further their discipline, better understand the needs of students and faculty, and collaborate with faculty.
The Ecampus Research Unit (ECRU) answers this call through their CDT research fellows program.
In the summer of 2020 at the NWeLearn conference, three CDT fellows reflected upon their participation in the program, sharing valuable insights and experience. I, Heather Garcia, was one of them. The other participants were Susan Fein and Tianhong Shi. The full recording can be viewed on YouTube at this link, but I’ll summarize some highlights from the session in the following paragraphs.
The projects undertaken by CDT research fellows in partnership with faculty spanned disciplines from computer science to field-based courses.
When asked why they were interested in being research fellows, all three participants indicated that they were pursuing additional graduate education at the time they applied. One participant also indicated that acquiring more knowledge and experience with research would allow faculty to see course design suggestions as “more convincing and easily accepted,” giving her additional credibility when recommending new design approaches to faculty.
The fellows also shared details about their contributions to the research projects they were working on. All of the instructional designers spoke to ways their existing expertise was valued by the researchers. They gave examples of the expertise they offered, which ranged from reviewing course design and educational technologies to designing surveys to offering a fresh perspective and a critical eye. In addition to contributing their design expertise to the research projects, CDT research fellows contributed to the research processes as well, through data analysis and research paper writing and reviewing.
All of the CDT research fellows indicated that they learned a lot from their experiences partnering with faculty on research. One particular highlight in this area is that fellows learned that they contribute diverse perspectives to the research process; they have different backgrounds, experiences, and areas of expertise, and everyone on the team contributes something valuable. CDT fellows also indicated that they learned about the IRB process and the importance of asking questions. Perhaps most importantly, they learned that their expertise is valuable to research teams.
Faculty fellows were also given the opportunity to share how having a CDT fellow on their research team enhanced the research experience, and their feedback was shared in the conference session. They expressed many positive sentiments about the experience including the following:
“Our research team started as a group of inspired but like-minded computer scientists wanting to make better online classrooms for diverse students. After she joined the team as an instructional design fellow, the work became credentialed, interdisciplinary, and stronger. She brings expertise and sees what we miss—she not only makes us better able to serve the students we hope to, she makes our team better by adding diversity of thought.”
“The combined knowledge and experience of teaching faculty and an instructional designer is incredibly powerful.”
“She viewed the scope of the research and content of the courses involved through a different lens than I did.”
“The instructional designer provided valuable input on areas of my project merging the instructional design with the research.”
“My work with the instructional designer let me explore very practical logistic issues that are often not included in the literature.”
Altogether, it becomes clear that many instructional designers are eager to participate on research projects and they are valuable contributors to the research process. The questions I have now are: How can we continue these partnerships into the future? And, how can we create more research partnership opportunities for other instructional designers and teaching and learning professionals, who aren’t traditionally involved in research?
References
Dello Stritto, M.E., Fein, S., Garcia, H., Shi, T. (2020). Instructional Designers and Faculty Partnerships in Online Teaching Research. NWeLearn 2020 Conference.
Linder, K. & Dello Stritto, M.E. (2017). Research Preparation and Engagement of Instructional Designers in U.S. Higher Education. Corvallis, OR: Oregon State University Ecampus Research Unit.
Loftin, D. (2020). Ecampus Research Fellows Program. Ecampus CDT Blog.
Reflection assignments as an active learning strategy are commonly seen in humanities courses. The purpose of this writing is to share an example of how simple reflection activities can make a huge impact in two math courses.
MTH 251 Differential Calculus covers five units, with one exam for each unit, counting 14% of the final grade. Before students attempt to take the unit exam, they are assigned to read textbook readings, watch instructor-created lecture videos, work on Canvas-based homework assignment and Adaptive Learning based practice assignments in Knewton Lab online platform. After assignment due date expires, students are assigned to complete a weekly written homework reflection. The weekly homework and the weekly homework reflection together count for 14% of final grade in this course, weighing the same as each of the unit exams.
MTH 341 Linear Algebra I has ten weekly modules. Each week, students read textbook assigned readings, watch lecture videos created by the instructor (Dr. ), complete post-reading questions in quiz format, work on graded group discussion questions to solve math problems in small groups, complete written homework individually, and in the following week, complete a written homework response activity individually in discussion format.
The written homework reflection in MATH 251 and the written homework response in MATH 341 are both reflection activities designed to optimize student learning success, through comparing their own homework solutions with answer keys and evaluate whether they did it correctly or incorrectly and analyze where they did it wrong and how to get it right. The purpose of such weekly reflection is to help students develop meta-cognitive skills related to their learning. By looking back at students’ own work and learning from their mistakes, they develop an understanding of what is the proper way to solve a problem and what is not the proper way for solving a particular math problem. It also prompts students to plan for proper action in the future and exercises students’ executive functioning skills (CAST, 2018).
Here is what the instructions for the weekly reflection look like: 1. First answer the weekly prompt: Reflecting on the Unit 1 module, which topics did you struggle with the most? 2. Download the written homework solutions PDF: (Solution for each written homework in pdf format is attached here.) 3. Look over the solutions and compare to your submitted homework. Look for any problems where your solution differs from the posted solution.
If your solutions had one or more incorrect problems then in the discussion board please discuss the following:
why you struggled with certain problems
why each solution makes sense now
what your misunderstanding was
what will you do in the future when solving problems similar to these?
what strategies will help you?
what did you learn by making a mistake?
what did you learn from looking at the solutions?
If you are still confused about a problem, ask a question. DO NOT simply list which problems you got wrong.
If your solutions are all correct then in the discussion board please discuss the problem that you found the most challenging. Describe what specific tasks helped you to complete that problem. Be as detailed as you can about your solution process.
Students not only posted their own reflections, but they also comment on or answer other students’ reflections as well. Additionally, the instructor and the four TAs in the course responded actively to students’ reflections, which makes the reflection more valuable since students get encouragement, praises, or corrections from the instructor and teaching assistants. Again, feedback from experts is critical in the success of a reflection activity (Vandenbussche, 2018)
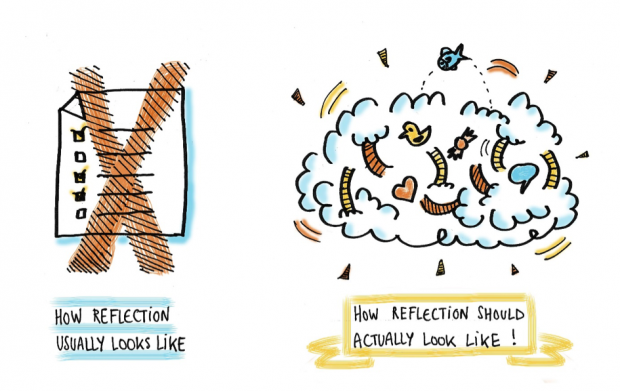
Image 1: How reflection usually looks like and How reflection should look like (Image Source)
Many students were reflecting on what they did wrong and asked for help. Some were reflecting on their time management in completing the homework assignments. And we were glad to see students completing homework, evaluating their own work, analyzing where they did wrong, and planning for future improvement. Overall, the purpose of this assignment is accomplished!
A great benefit that comes from these weekly reflection activities is increased or sustained homework completion rate. For MTH 251 winter 2021 week 1 to week 7, over 85% of students completed the weekly homework and the reflection activity on average. For MTH 341 Fall 20 week 1 to week 7, over 90% of students on average completed the weekly homework and the reflection assignments. All math teachers love to see their students practice with homework assignments before they attempt to take the quizzes or exams! And evidence-based research tells us that deliberate practice with targeted feedback promotes mastery learning (Ambrose et al., 2010).
So, if it works in math courses, it will work in Chemistry, Biology, Physics, Engineering and other STEM courses too! If you’re interested in implementing this technique in your teaching and have questions about setting it up, feel free to contact us. We’d love to help you figure out the easiest way to set it up in your course.
References
Ambrose, S.A., Bridges, M.W., DiPietro, M., Lovettt, M.C. , Norman, M.K., & The Eberly Center for Teaching Excellence at Carnegie Mellon University. (2010). How learning works: Seven research-based principles for smart teaching. San Francisco, CA: Jossey-Bass
People spend more time in virtual worlds than ever before. And educators are leveraging these popular forms of recorded and interactive escapism to increase student engagement. Recently academic departments have begun to experiment with the use of virtual reality (VR) headsets, which have become much easier to use and far less expensive. Headsets can make people feel like they have traveled to a new place, so they are an intriguing new tool for learning. They can create an experience that differs significantly from using a computer to work or play in an online environment.
When using a computer to visit an online world, your sense of immersion is affected by many factors, including the quality of video and audio, the number of distractions from real life, and your virtual representation on the screen. It is like a tug-of-war. Your avatar may be traveling in a helicopter through a fantasy landscape, but your brain also knows that you are sitting in front of your desk. You can see and feel the cat in your lap for example, but it is not in the helicopter with your avatar, so you are managing two worlds at once. In a continuum of this sense of immersion, at what point is there presence, where you lose connection with your environment and truly feel that you are somewhere else?
Using a VR headset instead of a computer may move you along this pathway, because you don’t see your desktop or clearly hear the sounds of your household. The sense of being connected with the everyday world changes. “I usually say the way to tell if it is working is if you take off the goggles and are surprised by which direction you are now facing,” says Warren Blyth, Multimedia Developer at Course Development and Training Department (CDT) at Oregon State University’s Ecampus. And whether you are a student who may find themselves in a class with VR components, or an instructor curious about adding this kind of experience to your teaching, VR, like most new adventures, will be shaped by your readiness for it.
You could think of the act of putting on a headset as departing on a voyage, because for many it feels like traveling somewhere and being present in another place. When you take off the headset at the end of the trip you may have moved physically, mentally and/or emotionally. Or not. Just like a trip to Paris, everyone’s experience will be different. To help you get ready, this article is a checklist about the very beginning of your journey, before you put on the goggles. It is about the pre-departure phase in which, as for any other trip, you might prepare by researching, planning, packing your bag, and saying goodbye to the cat.
Researching
Image by Okan Caliskan from Pixabay
Technology lift may be a part of your pre-departure phase. This is a term floating around the CDT Department, thanks to the adventurous lexicon of Assistant Director of Course Development & Training Laurie Kirkner, who says that “technology lift takes place over a longer period of time than cognitive load, which is specific to working memory. It includes activities like reading manuals, investigating safety protocols and coping with expectations. And it will vary with the difficulty of the task and your skill level, just like cognitive load.”
Technology lift in anticipation of a VR journey may be analogous to researching luggage before taking a trip to a foreign city. You may ask: how much weight can I lift and for how long? Many of us have witnessed the oversupplied backpacker on a trip overseas. She struggles with a heavy load while shouldering her way through the crowds. One wonders if more thoughtful preparation could have saved her from being on the brink of pitching over during her first day in Paris. And although she probably had a great time anyway, planning ahead may have been worthwhile.
Platform Safety
Before entering a new VR space you can find out what controls exist for dealing with inappropriate or annoying behavior. For example, some platforms allow you to mute the audio of other avatars or create a personal space bubble. If you plan to meet others or visit a popular platform it can be helpful to do a test run by yourself beforehand, taking the time to get used to the location without any social awkwardness concerns. Owners, builders and organizers of platforms may have additional controls like banishing certain users – instantly and/or permanently. In addition there may be codes of conduct governing acceptable behavior. It is great to learn something about the culture before arriving.
Pre-departure planning can increase positive experiences and keep you safe. For example, people have experienced sexual harassment, lack of respect for personal boundaries, and socially undesirable behaviors in real life (IRL) as well as in VR. “Social VR creates a life-like, immersive and public experience. Given this immersive nature and the overwhelmingly unequal gender dynamic with more men than women in this space, respondents talked about these spaces as seeming similar to public settings where they have been harassed.” (Outlaw & Duckles, 2017) You can take off the headset for a quick exit and also research other strategies to keep your trip free of pests.
Privacy
Because there is so much more data to potentially capture via these headsets, privacy is an increasingly important issue. “I think we’re all sitting on this time bomb with regard to “inside out” tracking,” says Blyth. “At the moment the companies using it are carefully assuring us that the 3D models they’re building at 30+ frames per second, of the insides of our house (including other people in our houses) are just for local tracking and not being sent back to any server for processing/monetizing. But even those assurances (from Facebook specifically, regarding the Quest and Rift S) have carried an ‘at the moment’ tag.” (Lang, 2019) So before you turn your headset on, it is a good idea to really consider the privacy policy on the manufacturer’s website.
Navigation Controls
If you took a trip to Paris, how would you get from the Charles de Gaulle airport to your hotel? After getting through customs you may feel jet lagged and confused, which is not a good time to learn new things. So your cognitive load would be less heavy if, for example, you already knew how to buy a ticket and get on the right train. In VR, navigation systems vary widely, so you may want to learn something about them before departure. A good example is learning how to move, fly, or teleport. And especially if you plan to meet others, it is helpful to know how to open the menu system and search for locations/meetings.
Planning
Photo by Julia M Cameron from Pexels
When you go places, you occupy new spaces. Once you put on a VR headset, you will set up a play area that can be stationary or quite a bit bigger. For the Oculus Quest 2, a popular newer headset, at least 6.5 feet by 6.5 feet is recommended for natural body movement. Once you get out the measuring tape, your house may suddenly feel claustrophobic as you figure out the distance between the couch and the cat box. So consider how much movement you would like to have on your trip and whether it is worth moving the furniture.
Packing your bag
Photo by Ivan Samkov from Pexels
For a voyage to Paris, you might think about which beret (and matching scarf) to bring along for a feeling of style and comfort. For your VR trip, the headset will eliminate any possibility of style, but you can still plan for comfort. In the last couple of years, headsets have become much less onerous; for example, they are now untethered from computers, and lighter. But there are still personal adjustments that can make you feel more at ease. And in regards to style, you could always try a beret over the headset.
Headset
“Did you know? The world’s first VR headset was created in 1968, and weighed so much it had to be mounted from a ceiling. Due to its appearance, it was nicknamed “The Sword of Damocles.”” (Best Reviews, 2020)
Interpupillary Distance
When shopping for the right backpack for your trip to the City of Light, the size and shape of your body comes into consideration. For VR, it turns out that the distance between your eyes is important. This is because you want the lens spacing in the headset and your interpupillary distance (IPD) to line up in order to decrease the possibility of motion sickness. This may be especially important for people with smaller bodies, such as women. According to the 2012 Anthropometric Survey of U.S. Army Personnel, the mean interpupillary distance is 61.7mm for women and 64.0mm for men. The Oculus Quest 2, for example, has three IPD settings: 61mm or smaller, 61 to 66mm, and 66 mm or larger. You can check with your optometrist to find your own IPD and then make sure that your headset is on the right setting.
Straps and Comfort
Even though headsets have become much more comfortable, it is always a good idea to make sure that things fit properly. A trial run with the headset powered off but resting on your face can give you some time to dial in the best strap tension and see how it feels on your head. “I often tell people before a demo that they want it just snug enough that it isn’t falling off their face – but not so tight that it’s cutting off circulation,” says Blyth. Some people report discomfort with the way their headset feels on their face, which can be distracting. Because you may need to spend less time using it than anticipated if it bothers you, taking the time to adjust your headset properly will help you feel more immersed on your trip.
Controllers
Before you put your headset on and can’t see anything, you may want to try out your hand controllers, which can include features such as buttons, thumb-sticks and triggers. You could view support materials from the manufacturer or other users to investigate all of the functions in order to create a tactile memory of the controllers.
Saying goodbye to the cat
Expectations
As you get to the final stages of pre-departure, you may want to check in with your expectations. “Virtual reality – even the name is hype,” says Nick Harper, CDT Multimedia Developer. “VR only addresses the senses of sight and sound, and even those may not work well for some users. Touch, smell and taste are underdeveloped at this point. So trying to immerse yourself in VR through a headset can feel like a struggle because your body wants to keep you safe and your brain is getting so many mixed signals.” One thing we know for sure is that your virtual trip will not be like anyone else’s experience. It may disappoint, or possibly blow your mind. And your memories will be affected by any problems you run into along the way. For example, if you walked right into a sewer during your first trip to Paris, it might be hard for you to believe other people had an amazing time in the Louvre or atop the Eiffel Tower.
Au revoir
Right before you leave, there is a point where you say some goodbyes. After all, you are leaving to meet new people and experience groovy new things in virtual reality. And the cat can’t come along. So saying goodbye may mean removing pets and humans from your play area, shutting the door, and putting the phone on mute. With the headset on, immersed in video and audio, it won’t be fun to step on your pet or hear snarky comments from your roommate (even if you are wearing a beret). Finding a way not to have an audience on the ground can help you relax and feel immersed.
It may be said that reading about VR is like dancing about architecture. So if you do get the chance, try it for yourself, (and also maybe think about that trip to Paris). No matter how many descriptions you read, the final destination will surprise (and hopefully delight) you in ways you may never have imagined. Especially if you have researched, planned, packed your bag and said goodbye to the cat, you will be ready for a great trip. Bon voyage!
VR Readiness Checklist
Read and consider the privacy policy of the headset manufacturer.
Take some time to plan/create your play area.
Research the platform codes of conduct.
Find out what controls exist to minimize unwanted interactions.
Learn how to navigate, access the menu system and search for locations/meetings.
Check with your optometrist to find your IPD and then make sure your headset is on the right setting.
Experiment with controller functions and create a tactile memory.
Adjust the straps so that they are snug but not cutting off circulation.
Explore your expectations.
Create a distraction free space.
Take a test run before meeting others.
References
Best Reviews. (2020, December). Best VR Headsets. https://bestreviews.com/best-vr-headsets
Kei Studios. (2017, November 23). A Complete Virtual Reality Glossary.
Outlaw, J., Duckles, B. (2017, October). Why Women Don’t Like Social Virtual Reality: A Study of Safety, Usability, and Self-Expression in Social VR. The Extended Mind. https://static1.squarespace.com/static/56e315ede321404618e90757/t/5afca0716d2a73e7b3c77f28/1526505624385/The+Extended+Mind_Why+Women+Don%27t+Like+Social+VR_Oct+16+2017.pdf
The Economist. (2019, November 21). Virtual reality continues to make people sick. https://www.economist.com/science-and-technology/2019/11/23/virtual-reality-continues-to-make-people-sick


 (image from pxfuel.com)