One of my favorite design strategies is to make a small adjustment that delivers a big impact. When it comes to creating a welcoming online course, certain small adjustments can do just that and go a long way in warming up the online classroom. But first, let us look at why online courses ought to be welcoming and then what it means to be welcoming in the online space.
Why Welcoming Students Is Important
First, why is it important to design a welcoming course? According to the OSU Ecampus Online Teaching Principles, which are supported by research and endorsed by Quality Matters, it is recommended to “[m]ake facilitation choices that support diverse students and make each student feel welcomed and valued.” Additionally, specific review standard 1.8 from the Quality Matters Higher Education Rubric, 7th Edition, states that “The self-introduction by the instructor is welcoming and is available in the course site.” Furthermore, UDL 3.0 Guidelines were updated recently and include “Design Options for Welcoming Interests & Identities.” While all of those are evidence-based recommendations, I think it is safe to say that many faculty also have plenty of anecdotal evidence for the benefits to students when feeling welcome in a course. If one has been working in the higher education context for several years, it is easy to forget that many students struggle to feel that they belong in this context. Warm communication and greetings is one way to begin connecting with students who are skeptical that their experience matters or that their presence is valued.
What Does It Mean To Be Welcoming?
Next, let’s look at what it means to be welcoming in the online classroom. If we get down to basics and turn to a dictionary definition, we see that Merriam-Webster has defined welcoming as “to greet hospitably and with courtesy and cordiality; to accept with pleasure the occurrence or presence of.” For the online modality then, we can ask ourselves some questions: Where in the course can facilitators greet students? When students inquire about office hours or email with a question, can their presence be warmly accepted? Next let’s look at actions that faculty or other course facilitators, such as graduate teaching assistants, can take to be welcoming.
Creating a Welcoming Online Classroom
The following tips are just a few of the actions that can be taken to create a welcoming online classroom:
Greet each student in the introduction discussion. Replying to each student is one of those actions that is small but has a big impact.
Many online students are older than the traditional college age, so they often have extensive work experience and life experiences to draw upon. Acknowledging this life experience can go a long way in welcoming students.
Rename office hours to something like Coffee Chat, Afternoon Tea, or Q&A Hour. Here is an example to consider: Which description of office hours sounds more welcoming, Example 1 or Example 2? Example 1: “Office Hours are held by appointment. Please email to make an appointment.” Let’s compare that to Example 2: “Please join me for a Coffee Chat this term! Coffee Chats are held three times per term, as an open Zoom room for our class. If you can’t attend any of the scheduled Coffee Chats, please email me and schedule a time to meet. I want to get to know each of you. Furthermore, when I get to know students, I am better positioned to serve as a reference for educational or professional opportunities that come up in our field. I look forward to meeting with you!”
Consider how students are described in the course site. Alternative descriptions besides “students” could be fellow scholars, colleagues, participants, etc.
Consider these two different introduction discussion prompt designs, 1 and 2:
Design 1: “Students: Post an introduction that includes the following: Your major and why you are taking this course. Reply to two other students.”
Design 2 (designed to be more welcoming): “Welcome, fellow engineering scholars! Please introduce yourselves so that we may all begin to get to know each other. In your post, include 1) an educational or professional goal that you have connected to this course, 2) a time management tip that you have found helpful that you are willing to share with others, and 3) a photo or fun fact about yourself. Replies to other participants are optional but encouraged.”
Ecampus Online Teaching Principles, endorsed by Quality Matters, recommend “referring to each student by name with their chosen pronouns.” Sometimes students who use a shortened nickname will say so in their introductory post, but it is also nice to include instructions for students on how to change their display name in the course site. That way, facilitators of the course, including graduate teaching assistants, if applicable, do not have to refer back to the introduction post to remember what students prefer to be called.
Takeaway
Adding a welcoming tone to a course does not mean that the whole course needs to be redesigned. A few small adjustments here and there can make a difference.
I’d like to share a recent experience highlighting the crucial role of collecting and using feedback to enhance our online course materials. As faculty course developers and instructional designers, we understand the importance of well-designed courses. However, even minor errors can diminish the quality of an otherwise outstanding online course.
A lighthouse on the Oregon coast, where student feedback and technological tools act as the guiding light. Image generated with Midjourney.
A Student’s Perspective
Recently, feedback was forwarded to me submitted by an online student enrolled in a course I had helped develop.
He praised the overall design of the courses and the instructors’ responsiveness, but he pointed out some typographic and grammatical errors that caused confusion. He mentioned issues like quiz answers not matching the questions and contradictory examples.
What stood out to me was his statement:
“These courses are well-designed and enjoyable. Their instructors are great. They deserve written material to match.”
Proactive Steps for Quality Improvement
This feedback got me thinking about how we can proactively address such concerns and ensure our course materials meet the high standards our students deserve. Here are a few ideas that might help:
Implement a Feedback Mechanism
Incentivize students to hunt for flaws. Reward sharp eyes for spotting typos and grammar slips. Bonus points could spark enthusiasm, turning proofreading into a game of linguistic detective work. For example:
Weekly Surveys: Add a question to the weekly surveys asking students to report any errors they encounter, specifying the location (e.g., page number, section, or assignment).
“Did you encounter any typographic or grammatical errors in the course materials this week? If so, please describe them here, including the specific location (e.g., page number, section, or assignment).”
Assignment Feedback: Include a text-field option for students to report errors alongside their file uploads in each assignment submission.
Utilize Technology Tools
Consider using technology tools to streamline the review process and help identify typographic, grammatical, or factual errors.
AI tools
The latest advanced AI tools can assist in identifying grammatical errors, suggesting more precise phrasing, and improving overall readability. They can also highlight potential inconsistencies or areas needing clarification, ensuring the materials are more accessible to students. They can also help format documents consistently, create summary points for complex topics, and even generate quiz questions based on the content.
(Oregon State University employees and currently enrolled students have access to the Data Protected version of Copilot. By logging in with their OSU credentials, users can use Copilot with commercial data protection, ensuring their conversations are secure and that Microsoft cannot access any customer data.)
Many powerful AI tools exist. But always verify their information for accuracy. Use them as a helper, not your only guide. AI tools complement human judgment but can’t replace it. Your oversight is essential. It ensures that AI-suggested changes align with the learning goals. It also preserves your voice and expertise.
Tools for content help
Some tools can be used to target different areas of content improvement:
Grammar and Style Checkers:
Grammarly: Checks grammar, spelling, punctuation, and style
Read Aloud: A text-to-speech extension for browsers (Chrome|Firefox )
Collaborative Editing Platforms:
Google Docs: Allows real-time collaboration and suggesting mode
Microsoft Word (with Track Changes): Enables collaborative editing
Request Targeted Assistance
If specific content requires a closer review, ask for help from other SMEs, your instructional designer, colleagues, or even students. Collaboration can provide fresh perspectives and help catch errors that might have been overlooked.
Encourage Open Communication
Foster an environment where students feel comfortable reporting errors and providing feedback. Make it clear that their input is valued and will be used to improve the course.
Embrace Constructive Criticism
It’s natural to feel defensive when receiving critical feedback (I always do!), but view it as an opportunity for potential improvement. By addressing these concerns, you can enhance the quality of your course materials and ultimately improve our students’ learning experience.
All the buzz recently has been about Generative AI, and for good reason. These new tools are reshaping the way we learn and work. Within the many conversations about Artificial Intelligence in Higher Ed a common thread has been appearing regarding the other AI–Academic Integrity. Creating and maintaining academic integrity in online courses is a crucial part of quality online education. It ensures that learners are held to ethical standards and encourages a fair, honest, and respectful learning environment. Here are some strategies to promote academic integrity and foster a culture of ethical behavior throughout your online courses, even in the age of generative AI.
Create an Academic Integrity Plan
Having a clear academic integrity plan is essential for any course. Create an instructor-only page within your course that details a clear strategy for maintaining academic integrity. This plan might include a schedule for revising exam question banks to prevent cheating, as well as specific measures to detect and address academic dishonesty (plagiarism or proctoring software). In this guide, make note of other assignments or places in the course where academic integrity is mentioned (in the syllabus and/or particular assignments), so these pages can be easily located and updated as needed. By having a plan, you can ensure a consistent approach across the course.
Exemplify Integrity Throughout the Course
It is important to weave academic integrity into the fabric of your course. Begin by introducing the concept in your Start Here module. Provide an overview of what integrity means in your course, including specific examples of acceptable and unacceptable behavior. This sets the tone for the rest of the course and establishes clear expectations. On this page, you might:
Offer resources and educational materials on academic integrity for learners, such as guides on proper citation and paraphrasing.
Include definitions of academic dishonesty, such as plagiarism, cheating, and falsification.
Provide guidance on how learners might use generative AI within the class, including what is and is not considered acceptable.
Add scenarios or case studies that allow learners to discuss and understand academic integrity issues, specifically related to the use of generative AI.
Connect academic integrity with ethical behavior in the larger field.
Provide a place for learners to reflect on what it means for them to participate in the course in a way that maximizes their learning while maintaining academic integrity.
Throughout the course, continue to reinforce these ideas. Reminders about academic integrity can be integrated into various lessons and modules. By articulating the integrity expectations at the activity and assignment level, you provide learners with a deeper understanding of how these principles apply to their work.
Set Clear Expectations for Assignments
When designing assignments, it is important to be explicit about your expectations for academic integrity. Outline what learners should and should not do when completing the task. For instance, if you do not want them to collaborate on a particular assignment, state that clearly. Provide examples and resources to guide learners on how to properly cite sources or avoid plagiarism. Be specific with your expectations and share why you have specific policies in place. For instance, if you want to discourage the use of generative AI in particular assignments, call out the ways it can and cannot be used. As an example, you might tell learners they can use generative AI to help form an outline or check their grammar in their finished assignment, but not to generate the body text. Share the purpose behind the policy, in this case it might be something about how a writing assignment is their opportunity to synthesize their learning and cement specific course concepts. This kind of transparency shows respect for the tools and the learning process, while also clearly outlining for learners what is acceptable.
Encourage Conversations About Integrity
Creating opportunities for learners to engage in discussions about academic integrity can help solidify these concepts in their minds. You can incorporate forums or discussion boards where learners can share their thoughts and experiences related to integrity. This also gives them a chance to ask questions and seek clarification on any concerns they may have. Encourage open dialogue between instructors and learners regarding academic integrity and any related concerns. These conversations can also extend beyond the classroom, exploring how integrity applies in your field or career paths. By connecting academic integrity to real-world scenarios, you help learners understand its relevance and importance in their professional lives.
Foster a Supportive Learning Environment
A supportive learning environment can help reinforce academic integrity by making learners feel comfortable asking questions and seeking guidance. Offer resources like definitions, guides, or access to mentors who can provide additional support. When learners know they have access to help, they are more likely to adhere to integrity standards. With generative AI in the learning landscape, we will inevitably encounter more “gray areas” in academic integrity. Be honest with your learners about your concerns and your hopes. Being open to conversations can only enhance the learning experience and the integrity in your courses.
We all play a role in cultivating a culture of academic integrity in online courses. By documenting a clear plan, weaving integrity into the course content, setting clear expectations, encouraging conversations, and providing support, you can create an environment where honesty and ethical behavior are valued and upheld. This not only benefits learners during their academic journey but also helps them develop skills and values that will serve them well in their future careers.
I was recently reminded of a conference keynote that I attended a few years ago, and the beginning of an academic term seems like an appropriate time to revisit it on this blog.
In 2019, Dan Heath, a bestselling author and senior fellow at Duke University’s CASE Center, gave a presentation at InstructureCon, a conference for Canvas users, where he talked about how memories are formed. He explained that memories are composed of moments. Moments, according to Heath, are “mostly forgettable and occasionally remarkable.” To illustrate, most of what I’ve done today–dropping my kids off at spring break camp, replying to emails, going to a lunchtime yoga class, and writing this blog post–will largely be forgotten by next month. There is nothing remarkable about today. Unremarkable is often a desirable state because it means that an experience occurred without any hiccups or challenges.
Heath went on to describe what it is that makes great experiences memorable. His answer: Great experiences consist of “peaks,” and peaks consist of at least one of the following elements: elevation, insight, pride, or connection. He argued that we need to create more academic peaks in education. Creating peaks, he contends, will lead to more memorable learning experiences.
So, how do we create these peaks that will lead to memorable experiences? Let’s explore some ideas through the four approaches outlined by Heath.
Elevation. Elevation refers to moments that bring us joy and make us feel good. You might bring this element into your course by directly asking students to share what is bringing them joy, perhaps as an icebreaker. Sharing their experiences might also lead to connection, which is another way (see below) to create peaks that lead to memorable experiences.
Insight. Insight occurs when new knowledge allows us to see something differently. Moments of insight are often sparked by reflection. You might consider making space for reflection in your courses. Creativity is another way to spark new insights. How might students engage with course concepts in new, creative ways? To list off a few ideas, perhaps students can create a meme, record a podcast, engage in a role play, or write a poem.
Pride. People often feel a sense of pride when their accomplishments are celebrated. To spark feelings of accomplishment in your students, I encourage you to go beyond offering positive feedback and consider sharing particularly strong examples of student work with the class (after getting permission–of course!) Showcasing the hard work of students can help students to feel proud of their efforts and may even lead to moments of joyful elevation.
Connection. Connection refers to our ties with other people. Experiencing connection with others can feel deeply rewarding. As I mentioned above, asking students to share their experiences with peers is one way to foster connection. In Ecampus courses, we aim to foster student-student and student-teacher connection, but I encourage you to explore other opportunities for students to make meaningful connections. Perhaps students can get involved with their communities or with colleagues, if they happen to have a job outside of classes. Students could connect with their academic advisors or the writing center to support their work in a course. There are many ways to foster connections that support students in their learning!
It’s easy to focus on delivering content, especially in online courses. This was one of Heath’s overarching points. The key, however, to creating memorable learning experiences is to take a student-centered approach to designing and facilitating your course.
I invite you to start the term off by asking yourself: How can I create more moments of elevation, insight, pride, and connection for my students? It might be easier than you think.
References:
Heath, D. (2019, July 10). Keynote. InstructureCon. Long Beach, CA.
This article has its roots in a discussion I had with an Ecampus intern about going on the job market. This intern is working in an academic technologies role at a higher ed institution already, but also getting the Instructional Design certificate here at OSU. It was my first time thinking about what the growth of instructional design certificate and degree credentials means for all instructional designers. Very few of the instructional designers I’ve met and worked with here or at my previous institutions actually have degrees in instructional design, including myself. The field of instructional design emerged out of a specific institutional and educational need in higher education and corporate education, which makes for an ever-growing, ever-changing, but always innovative membership. How do we, as a field, continue to be inclusive of all instructional designers, regardless of their academic or educational backgrounds?
One potentially positive fact is that academia moves very slowly, so we have some time to strategize. Instructional design is still an emerging speciality within higher education, with each institution classifying that role differently, and providing that role with different levels of support. Some institutions, even today, do not have any instructional designers. Current research indicates that this must change. One of the best sources of data about the field of instructional design in higher education and instructional designers is the Changing Landscape of Online Education (CHLOE) Project. The participants in the CHLOE survey are “the senior online officer at each participating institution.” This survey pool recognizes the variance in organizational structures at different institutions by focusing on the COO’s purview. In the 2019 CHLOE 3 survey, it was reported that the median number of instructional designers employed at 2-year colleges, and public and private 4-year institutions, was four, regardless of enrollment or institution size. In CHLOE 7, one of the conclusions was that “insufficient instructional design staffing may be one of online learning’s most serious long-term vulnerabilities,” with only 10% of Chief Online Officers surveyed describing their ID capacity as sufficient for their current needs, and only 3% believing they would be able to meet anticipated need.
These findings signal that universities should be moving towards a significant fiscal investment in hiring instructional designers. Joshua Kim wrote a few key takeaways from the CHLOE 7 in CHLOE 7: The Present and Future of Instructional Design Capacity. Kim predicts that universities will need to not only hire more instructional designers, but that these roles will need to be hybrid or remote to attract the post-pandemic workforce. In addition to hybrid and remote options, Kim posits that, “Forward-thinking universities may find that they need to start offering star non-faculty educators the same recognition and incentives that have long been necessary to recruit and retain star tenure-line faculty.” But what does this mean for instructional designers? How would an instructional designer even be able to become identified as a “star” within the field or even at a specific institution?
Understanding Branding for Faculty and Non-Faculty Educators
Circling back to my initial inquiry about what instructional designers can do to ensure the field stays inclusive, I believe an individual enterprise will have a collective impact that will benefit the largest number of people: personal branding. In What’s the Point of a Personal Brand? Executive coach Harrison Monarth uses the story of his client, Mike, to illustrate how important it is for employees to think about how personal branding is now a strategy for gaining visibility within organizations, and that visibility is now a key component when employers are thinking about promotion. Monarth observes that “In high-performing organizations, at certain levels, everyone is exceptional. To clearly differentiate your value and what you bring to the table, you need to do more than have a good reputation. You need to have an outstanding personal brand.” Having a brand isn’t the same thing as being a celebrity, although I think many would agree that there are celebrities in every field, even instructional design.
Creating a personal brand is a successful career strategy outside of the corporate world as well, and one of the fields that is encouraging faculty to think about branding is not, as one might think, business but medicine. In 2019, the Academic Medicine blog published Knowing Your Personal Brand: What Academics Can Learn From Marketing 101, the purpose of which was to persuade medical professionals that a brand identity can be empowering. According to the article,
[K]nowing one’s academic brand can (1) help faculty members approach projects and other responsibilities through the lens of building or detracting from that brand, (2) provide a framework for determining how faculty members might best work within their institutions, and (3) help faculty members better understand and advocate their own engagement and advancement.
Although this article specifically speaks to and about academic teaching faculty, Instructional designers at institutions are often placed in the professional faculty role, along with librarians or program directors, and have many of the same professional demands on their job descriptions. As former faculty, I can attest that both of my careers have included independent research, departmental service, and conference or publication responsibilities.
Finding Your Personal Brand
If a brand is defined as opinions that people have about you based on your work, it is important to be self-aware, and intentional about the work that you do. Creating your brand can be a difficult task if, like me, you have a variety of experiences and interests. It requires self-reflection about one’s accomplishments and body of work as a whole, and the need to generalize what are sometimes very disparate activities. In Using Your Personal Mission Statement to INSPIRE and Achieve Success, an article published in Academic Pediatrics, the official journal of the Academic Pediatric Association, the authors describe a framework for building a personal mission statement (INSPIRE):
Identify Your Core Values
Name the Population You Serve
Set Your Vision
Plan How You Will Achieve Your Vision
Identify Activities That Align With Your Mission
Review, Revise, and Refine Your Mission Statement
Enlist Others to Help You Accomplish Your Mission
A slimmed down version of this same framework can be a helpful starting point for creating a brand identity. It enables you to identify your core values, name the population you serve, and identify activities that support those values and populations. But unlike a mission statement, this framework is best completed in reverse; a backwards brand design, if you will. (Sidenote: Instructional designers love to do things backwards). I call this framework SIFT:
Start with your experience and accomplishments
Identify keywords or topics
Frame your work and interests
Tie everything together
I believe that SIFT-ing has the potential to be a reflective process that will lead to a changing self-awareness of different types of instructional designers, for ourselves, and collectively.
Start with your experience and accomplishments
The best place to begin is with your complete resume or CV. It might be tempting to start with the tailored version you used to get your last position, but you don’t want to limit your view to only things that you think are relevant to instructional design. I can trace some elements of my brand back to my undergraduate and graduate degrees. I also include my two years as a contracted captioner for 3play and Rev within the same brand. Finding a brand that encompasses all that you are will only be successful if you use the most complete picture of yourself.
Identify keywords or topics
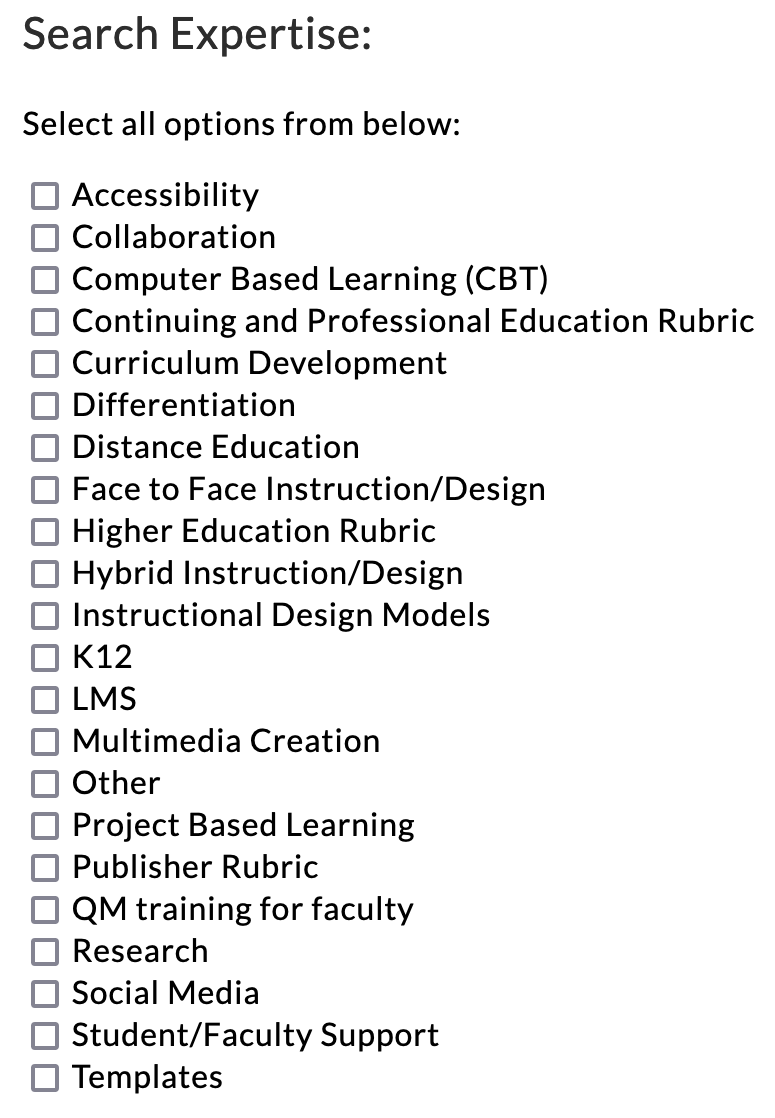
Your brand is more than just the places that you’ve worked at, the committees you’ve served on, and projects you’ve worked on. To understand your brand, you should begin by identifying a perspective, or positionality, that informs the decisions you’ve made in the past, however unconsciously that might have been, and looks towards the future. Keywords can be a useful next step, but you will want to avoid the potential to find yourself trapped within categories! In a field like medicine, there are already established research interests and specialties. As a field, instructional design hasn’t reached the point of specialization, but we are trending towards accepting that there are too many topics that fall under the broad umbrella of instructional design for everyone to be experts in everything. For example, the Quality Matters Instructional Designers Association has 21 expertise categories that you can select from when joining the association that others can use to find you to connect with you.
A screencapture of the list of categories from the QM IDA website
When I first joined the QM IDA, I didn’t know what boxes to check, or even what some of these categories were. And since they are presented without explanation, the criteria for self-identification are unclear. I can check almost all of these boxes as things I have experience in—with the exception of K12 and the Continuing and Professional Education Rubric, but is experience the same thing as expertise? It might be my imposter syndrome talking, but I am more inclined to identify with interests than areas of expertise. (Sidenote: I still haven’t checked any boxes.)
Frame your work and interests
I hadn’t noticed a pattern to my interests while I was doing them, but by reflecting on my professional journey, I realized that I could trace one interest all the way back to my undergraduate honors thesis, through to my current career as an instructional designer. I’ve always had an interest in communities and the community spaces they inhabit—especially if they are online. Community doesn’t appear on QM’s list of categories, but it is the lens through which I approach many of the categories on that list. Accessibility, Computer-Based Learning, Distance Education, Hybrid instruction/Design, LMS, Multimedia Creation, Problem-Based Learning—all of these categories need to address questions of community by addressing inclusivity, access, equity, and authentic student-student and student-teacher interactions. Community is the keyword I use to frame my research interests and approach to instructional design, in all of its various forms.
Tie everything together
If you go to my LinkedIn profile, you’ll see that I have “Humanities girl in an instructional technology world” as my headline. That’s my brand. You might notice that it does not include “instructional design” or “community.” But at the same time, by labeling myself a humanist, I am evoking the words associated with humanities and humanism–things like communities, kindness, compassion, human potential, and the arts. Technology is often viewed either as the savior of humanity, or its destruction. In reality, of course, it’s both. By framing myself as a humanist working with technology, I am clueing people in that my perspective on technology will incorporate potential negative impacts for people. The playful nature of the headline i.e. using “girl” to rhyme with “world” also reveals my personality. Compare this headline with something like, “I am interested in humane approaches to technology used in education.” It’s true, but it doesn’t tell you about me as a person outside of my interests.
Being “On Brand”
To declare a brand is not to limit your interests, nor should it be criticized as promoting a non-interest in other topics. Another observation from Kim is that instructional designers are likely very busy, and overstretched. In his words, there is “a significant mismatch between institutional demand for instructional design services and the available supply.” To avoid burnout, instructional designers need to be strategic with the projects they commit to. A brand can also help you be selective about which conferences you attend, or committees you serve on. Being “on brand” can be a way of focusing your energy, and also a touchstone of your identity.
Using the SIFT framework, you can reflect on your professional values, and your professional goals. One of my colleagues in the field is an accessibility expert, and gets called in to consult on all things related to accessibility in addition to her daily work as an instructional designer. She recently became a certified Accessibility Professional with the IAAP, and this credential is visible on her LinkedIn profile as an emblem of her brand. Knowing her brand allowed her to appeal to her institution to allow her this opportunity that enriches not only her own skillset, but the prestige of her institution by having an IAPP certified accessibility professional on their staff. In that sense, personal branding can also help institutions build diverse departments that are teams of specialists.
To return to the three benefits of branding for faculty outlined in the Academic Medicine article, knowing my brand helps me decide where to devote my limited bandwidth by pursuing professional activities that are “on brand” for me. I can also use my brand to search for specific opportunities that will build my brand, even if those fall outside the typical skillset of instructional designers. However, moving towards a “branding” mindset also benefits my colleagues, who are equally, individually, uniquely talented, and should be recognized for their specialties and allowed to follow their passions, rather than be constrained to their job duties. As instructional design teams at universities grow, having a team of specialists can also help alleviate burnout by allowing people to play to their strengths. This can ensure that instructional design remains a space where all career pathways are valid and not contingent on specific credentials.
As educators and instructional designers, one of our tasks is to create online learning environments that students can comfortably use to complete their course activities effectively. These platforms need to be designed in such a way as to minimize extraneous cognitive load and maximize generative processing: that is, making sure that the learners’ efforts are spent on understanding and applying the instructional material and not on figuring out how to use the website or app. Research and practice in User Experience (UX) design – more specifically, usability – can give us insights that we can apply to improve our course page design and organization.
Getting Started: General Recommendations
Steve Krug, in his classic book Don’t Make Me Think: A Common Sense Approach to Web Usability, explains that, in order for a website or app to be easy to use, the essential principle can be stated as “don’t make me think” (Krug, 2014). That may sound like a strange principle in an educational context, but what Krug referred to is precisely the need to avoid wasting the users’ cognitive resources on how a particular platform works (thus reducing extraneous cognitive load), and to make them feel comfortable using that product (enhancing generative processing). When looking at a web page or app, it should be, as much as possible, obvious what information is on there, how it is organized, what can be clicked on, or where to start; this way, the user can focus on the task at hand.
Krug (2014) provided a few guidelines for ensuring that the users effortlessly see and understand what we want them to:
Use conventions: Using standardized patterns makes it easier to see them quickly and to know what to do. Thus, in online courses, it helps to have consistency in how the pages are designed and organized: consider using a template and having standard conventions within a program or institution.
Create effective visual hierarchies: The visual cues should represent the actual relationships between the things on the page. For instance, the more important elements are larger, and the connected parts are grouped together on the page or designed in the same style. This saves the user effort in the selection and organization processes in the working memory.
Separate the content into clearly defined areas: If the content is divided into areas, each with a specific purpose, the page is easier to parse, and the user can quickly select the parts that are the most relevant to them.
Make it obvious what is clickable: Figuring out the next thing to click is one of the main things that users do in a digital environment; hence, the designer must make this a painless process. This can be done through shape, location or formatting—for example, buttons can help emphasize important linked content.
Eliminate distractions: Too much complexity on a page can be frustrating and impinges on the users’ ability to perform their tasks effectively. Thus, we need to avoid having too many things that are “clamoring for your attention” (Krug, 2014, Chapter 3). This is consistent with the coherence principle of multimedia learning, which states that elements that do not support the learning goal should be kept to a minimum and that clutter should be avoided. Related to this, usability experts recommend avoiding repeating a link on the same page because of potential cognitive overload. This article from the Nielsen Norman Group explains why duplicate links are a bad idea, and when they might be appropriate.
Format text to support scanning: Users often need to scan pages to find what they want. We can do a few things towards this goal: include well-written headings, with clear formatting differences between the different levels and appropriate positioning close to the text they head; make the paragraphs short; use bulleted lists; and highlight key terms.
Putting It to the Test: A UX Study in Higher Education
The online learning field has yet to give much attention to UX testing. However, a team from Penn State has recently published a book chapter describing a think-aloud study with online learners at their institution (Gregg et al., 2020). Here is a brief description of their findings and implications for design:
Avoid naming ambiguities – keep wording clear and consistent, and use identical terms for an item throughout the course (e.g., “L07”, “Lesson07)
Minimize multiple interfaces – avoid adding another tool/platform if it does not bring significant benefits.
Design within the conventions of the LMS – for example, avoid using both “units” and “lessons” in a course; stick to the LMS structure and naming conventions as much as possible.
Group related information together – for example, instead of having pieces of project information in different places, put them all on one page and link to that when needed.
Consider consistent design standards throughout the University – different departments may have their own way of doing things, but it is best to have some standards across all classes.
Are you interested in conducting UX testing with your students? Good news: Gregg et al. (2020) also reflected on their process and generated advice for conducting such testing, which is included in their chapter and related papers. You can always start small! As Krug (2014, Chapter 9) noted, “Testing one user is 100 percent better than testing none. Testing always works, and even the worst test with the wrong user will show you important things you can do to improve your site”.
References
Gregg, A., Reid, R., Aldemir, T., Gray, J., Frederick, M., & Garbrick, A. (2020). Think-Aloud Observations to Improve Online Course Design: A Case Example and “How-to” Guide. In M. Schmidt, A. A. Tawfik, I. Jahnke, & Y. Earnshaw (Eds.), Learner and User Experience Research: An Introduction for the Field of Learning Design & Technology. EdTech Books. https://edtechbooks.org/ux/15_think_aloud_obser
Krug, S. (2014). Don’t make me think, revisited: A common sense approach to Web usability. New Riders, Peachpit, Pearson Education.
My family and I were preparing for a move. We packed up some of our things, removing extraneous items from our walls and surfaces and preparing our house to list and show. Not willing to part with these things, we rented a small storage unit to temporarily warehouse all this extra “stuff.” Well, as it turned out, we ended up not moving at all, and after a few months went to clear out the storage unit and retrieve our extra things. The funny thing was, we could hardly remember what had gone in there, and as it turns out, we did not miss most of the items we had packed away. We ended up selling most of what was in that storage unit, and shortly thereafter, we did even more “spring cleaning.” One of the bedrooms, which also doubles an office, needed particular attention. The space was dysfunctional, in that multiple doors and drawers were blocked from fully opening. After a little purging and reorganization this room now functions beautifully, with enough space to open every door and drawer. I have been calling this process “moving back into our own house,” and it’s been a joy to rethink, reorganize, and reclaim our living spaces.
Course Design Connection
As I have been working with more instructors who are redeveloping existing courses, I have been trying to bring this mindset into my instructional design work. How can we reclaim our online learning spaces and make them more inviting and functional? How can we help learners open all the proverbial doors and operate fully within the learning environment? You guessed it: While our first instinct might be to add more to the course, the answer might lie in the other direction. With a little editing and a keen eye on alignment, we can very intentionally remove things from our courses that might be needless or even distracting. We can also rearrange our pages and modules to maximize our learner’s attention.
Memory and Course Design
Our working memories, according to Cowan (2010), can only store 3-5 meaningful items at a time. Thus, it becomes essential to consider what is genuinely necessary on any given LMS page. If we focus on helping learners to achieve the learning outcomes when choosing the content to keep in each module, we can intentionally remove distractors. There can be a place for tangential or supplemental information, but those items should not live in the limelight. To help get us started on this “cleaning process,” we can ask ourselves a few simple questions. Are there big-ticket items (assignments, discussions, readings) that are not directly helping learners reach the outcomes? Are we formatting pages and arranging content in beneficial and progressive ways? Might we express longer bodies of text in ways that are more concisely or clearly? Can we break text up with related visuals? Below are some tips to help guide your process as you “clean” up your course and direct your learners where to focus.
Cut out the Bigger Extraneous Content
It is simple to assume that for your learners to meet the course outcomes, they must read and comprehend many things and complete a wide variety of assignments. When planning your learning activities, it’s crucial to keep in mind the limits of the brain and also that giving learners opportunities to practice applying content will be more successful than asking them to memorize and restate it. For courses with dense content, lean into your course outcomes to guide your editing process. Focusing on the objectives can help you remove extraneous readings and activities. This will allow your learners to concentrate on the key points. (Cowden & Sze, 2012)
Review Instructions
For the items you choose to keep in your course, reviewing assignment instructions, and discussion prompts is helpful. Consider inviting a non-expert to read these items. An outside eye might help you to simplify what you are asking your learners to accomplish by calling to your attention any points of confusion. You may be tempted to add more detail, but try to figure out where you can remove text when possible. Why use a paragraph to explain something that only needs a few sentences? Simplifying your language can enable learners to get to the point faster. (For more on this, see the post by intern Aimee L. Lomeli Garcia about Improving Readability). When reviewing your instructions and prompts, think about what learners want to know:
· What should they pay attention to?
· Where do they start?
· What do they do next?
· What is expected?
· How are they being assessed/graded?
(Grennan, 2018)
Utilize Best Practices for Formatting
Use native formatting tools like styles, headers, and lists to help visually break up content and make it more approachable. Here are some examples:
If I were to list my favorite animals here without a list, it would look like this: dogs, turtles, hummingbirds, frogs, elephants, and cheetahs.
Suppose I give you that same list using a header and number list format. In that case, it becomes much easier to digest mentally, and it looks nicer on the page:
Julie’s Favorite Animals
Dogs
Turtles
Hummingbirds
Frogs
Elephants
Cheetahs
Provide High-Level Overviews
If an assignment does need a more thorough explanation, and your instructions are running long, you can always create a high-level overview, calling out the main points of the page. You could place this in a call-out box or its own section (preferably at the top). This is where learners can quickly look for reminders about what to do next and how to do it. Providing a high-level overview alongside detailed instructions will cater to a variety of learning preferences and help set up your learners for success.
Module Organization
Scaling up beyond single pages and assignments to module organization, consider the order you want learners to encounter ideas and accomplish tasks. Don’t be afraid to move pages around within your modules to help learners find the most efficient and helpful pathway through your material (Shift Elearning, n.d.).
Wrapping It Up
The culture of “more is better” is pervasive, and it’s almost always easier to add rather than to remove information. In online learning, when we buy into the “culture of more” we can impede the success of our learners. But more isn’t always better; sometimes more is just more. Instead, don’t be afraid to dust off that delete button and start reclaiming and reorganizing your course for ultimate learner success. Sometimes less is best. For more on the art of subtraction, see Elisabeth McBrien’s blog post from February of 2022.
References
Cowan, N. (2010). The magical mystery four. Current Directions in Psychological Science, 19(1), 51–57. https://doi.org/10.1177/0963721409359277
Cowden, P., & Sze, S. (2012). ONLINE LEARNING: THE CONCEPT OF LESS IS MORE. Allied Academies International Conference.Academy of Information and Management Sciences.Proceedings, 16(2), 1-6. https://oregonstate.idm.oclc.org/login?url=https://www.proquest.com/scholarly-journals/online-learning-concept-less-is-more/docview/1272095325/se-2
Lomeli Garcia, A. L. (2023, January 17). Five Tips on Improving Readability in Your Courses. Ecampus Course Development and training. Retrieved April 4, 2023, from https://blogs.oregonstate.edu/inspire/2023/01/17/five-tips-on-improving-readability-in-your-courses/
McBrien, E. (2022, February 24). Course design challenge: Try subtraction. Ecampus Course Development and training. Retrieved April 4, 2023, from https://blogs.oregonstate.edu/inspire/2022/02/24/course-design-challenge-try-subtraction/
Parker, R. (2022, June 30). Why less is more for e-learning course materials. Synergy Learning. Retrieved April 4, 2023, from https://synergy-learning.com/blog/why-less-is-sometimes-more-when-it-comes-to-your-e-learning-course-materials/
Shift Elearning. (n.d.). The art of simplification in Elearning Design. The Art of Simplification in eLearning Design. Retrieved April 4, 2023, from https://www.shiftelearning.com/blog/the-art-of-simplification-in-elearning-design
Announcements are among the most basic yet effective ways to communicate with students, whether in person or online. In our Ecampus asynchronous online courses, announcements are often the primary way instructors pass on important information to students and can be a formidable tool for fostering instructor presence. They can be used to welcome and orient students, summarize and reiterate key concepts, and remind students about upcoming assignments, projects, and exams. Some instructors send out weekly announcements that reflect on the prior week and provide general feedback on student performance, while others only use announcements for course related logistics such as schedule changes or instructor unavailability. No matter how you use announcements, the following suggestions can help ensure you are leveraging the power of the announcements feature in Canvas.
Best Practices
Keep announcements concise. Students have a limited amount of cognitive capacity and lengthy announcements may not be read in full.
Consider your purpose before composing and resist the urge to rehash what you have written elsewhere.
If you need to remind students of an assignment, consider linking to the instructions rather than rehashing them in the body of the announcement.
Send announcements on a regular schedule. If you plan to send weekly announcements, do so on the same day of the week and general time if possible.
Sending out a recap of the prior week and preview of what to expect in the upcoming week is most valuable if sent at the beginning of the week. If you start your course week on Monday, send your announcements on Monday mornings.
Give announcements meaningful titles to reflect the content of the announcement. Labeling announcements as “week X update”, “Important date change for assignment X”, or another such descriptive title will help students find the correct announcement if they need to revisit it.
Canvas Tips
Delete old announcements from imported course content. Old announcements from previous courses or instructors copy over when a Canvas course is copied and are visible to students in the announcements tab unless deleted, including your own prior term announcements or those from a previous instructor. This could be very confusing for students as some instructors provide the class with quiz or test answers or information about exams in announcements that may be disadvantageous for current term students to read.
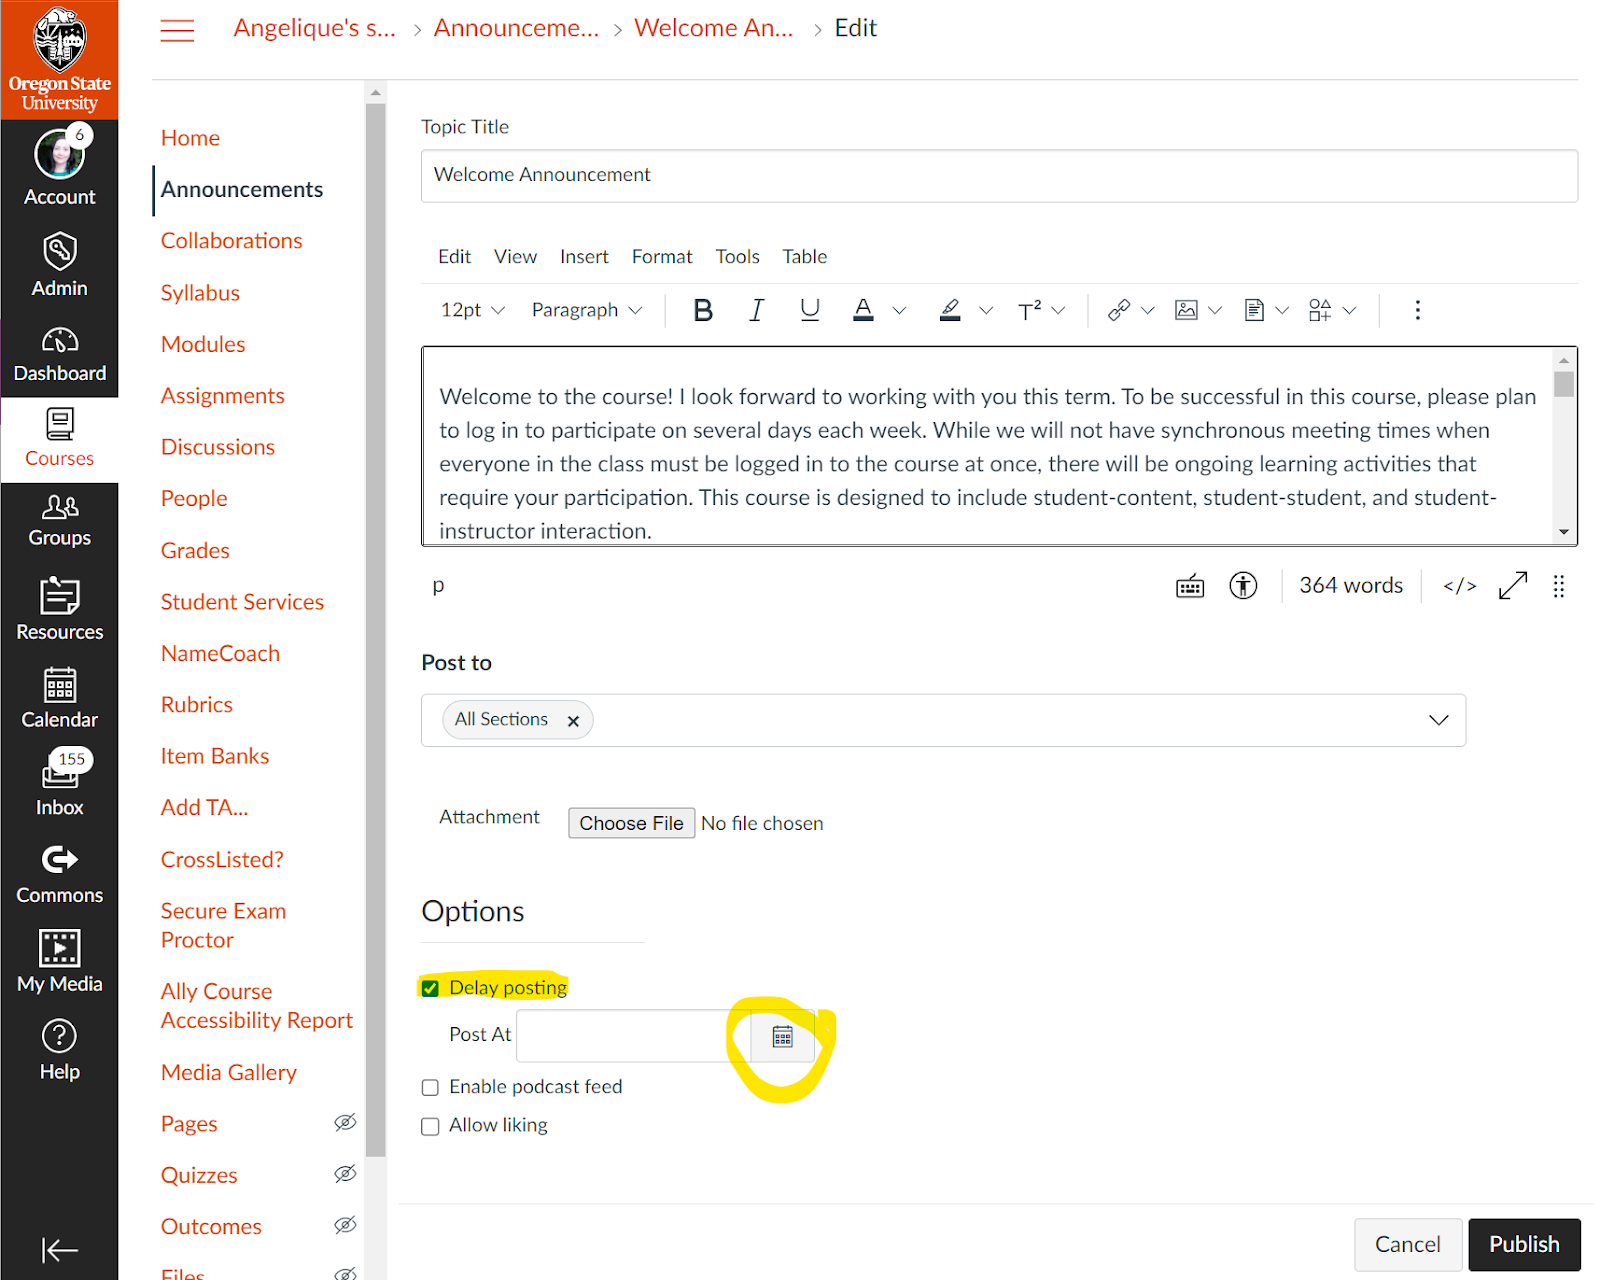
Schedule out your announcements in advance using ‘delay posting’ (see image below). If you do want to reuse announcements imported from a previous term, be sure to open each message, edit the content for the current term, and choose when you would like to post each one. New announcements can also be scheduled to post on whatever day and time you choose.
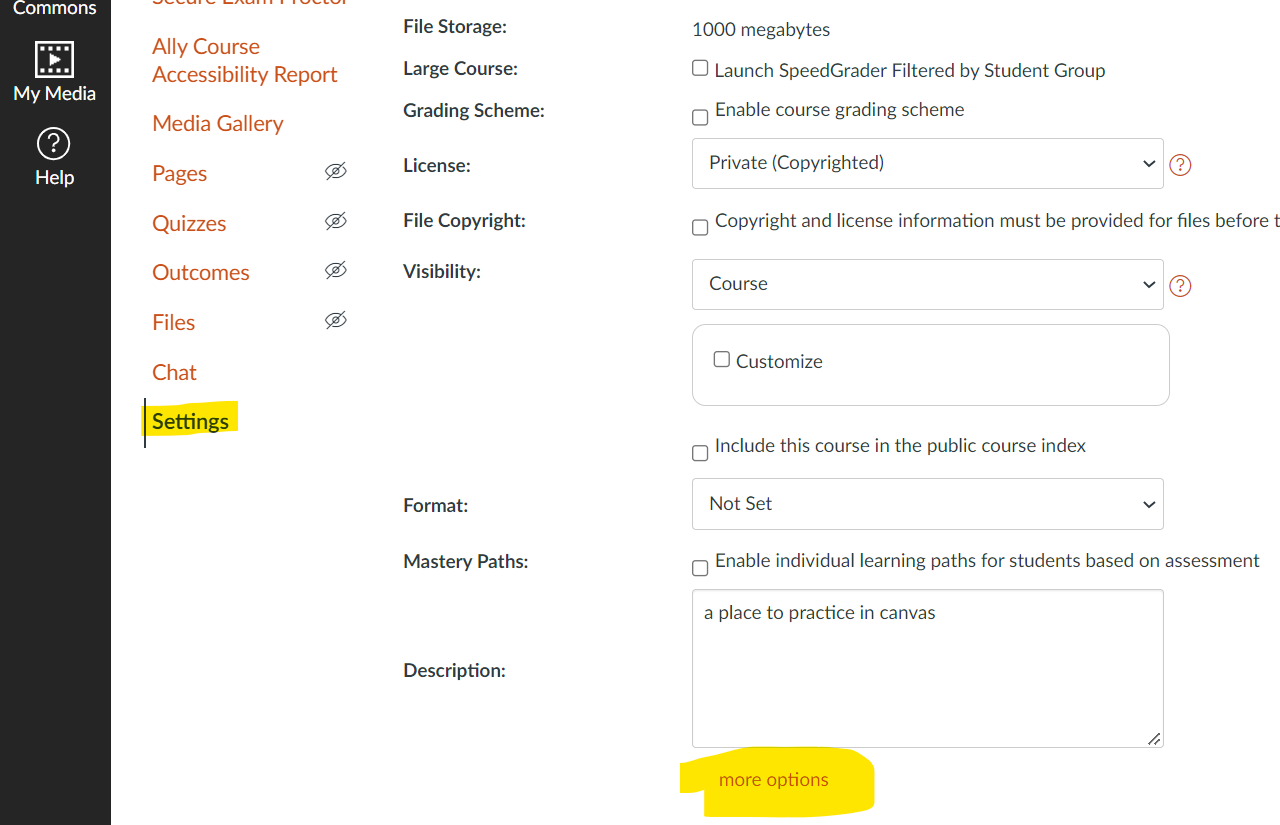
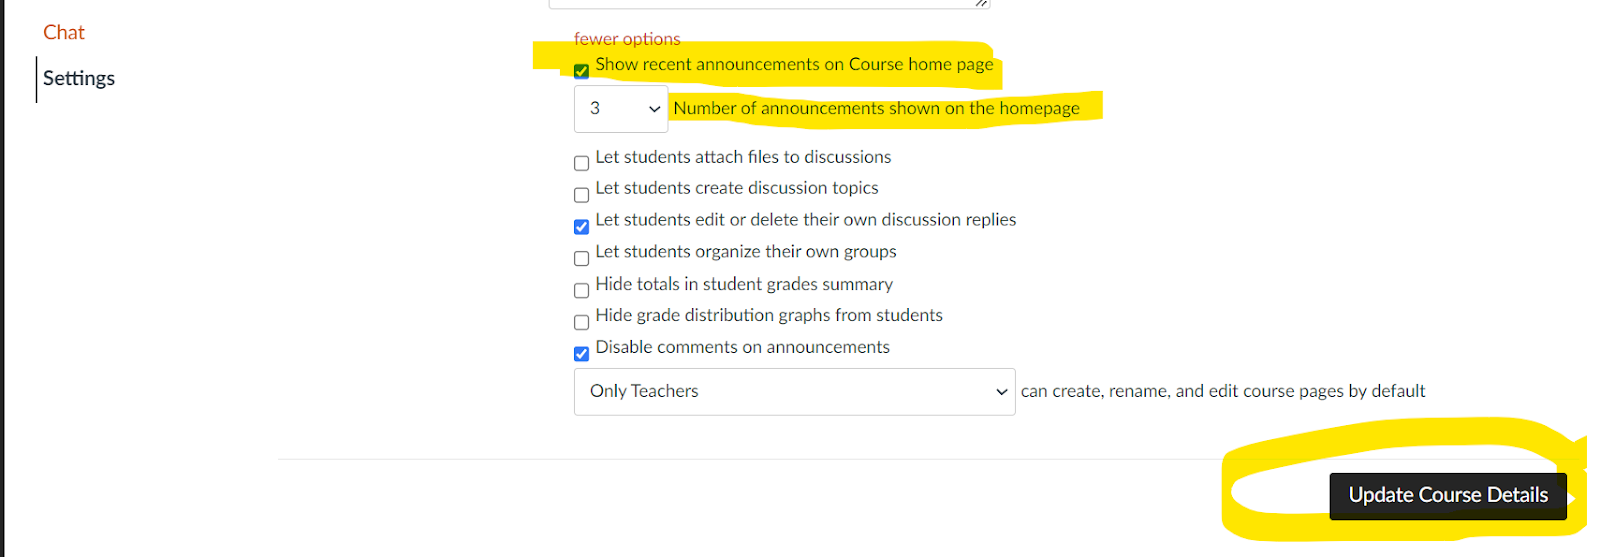
You can set up your homepage to show recent announcements at the top of the page, ensuring students see them when logging into the course (see below). Go to the main Settings menu item at the bottom left course menu. From there, scroll down and click the “more options” link at the bottom. You’ll then see further course options- click the box next to “Show recent announcements…” and then choose how many to display. Don’t forget to save your choices by clicking “Update Course Details”.
This story may sound familiar. It begins in a space of learning. You enter as a student. You know you will be in this place for the next two or three months with other students and an instructor. But although you know you are all there in the same space, you can’t see or hear any other students. You wander alone until you discover a pre-recorded message telling you what to do. This should be reassuring, but the person in the video doesn’t look like the instructor listed on your course schedule.
“Welcome,” says the man in the video. “In this course you will learn how to apply theoretical concepts in the real world.”
You wander around the space. An announcement appears, welcoming you to the course. It includes a picture of the instructor listed on your schedule.
“So they do exist,” you think to yourself. And yet, as you look around, all the recordings you see are of someone else. This isn’t really their class, you realize. Someone else built this place. It’s unsettling to be in this space and feel like your instructor doesn’t belong here. Maybe you don’t belong here either.
Eventually, you find the one place where you can talk to other students, but even this space feels strange and isolating. There’s writing on the wall.
Please introduce yourself.
You can see writing by other students in the class, but the instructor never makes a comment. You come back to this room several times during the term to write more, as directed. You write replies to what other students have written, but it doesn’t really feel like talking. It feels like a performance, judged by the unseen, unheard instructor who exists only in writing.
The weeks go by. You listen to a disembodied voice talking over a slideshow lecture. Your instructor makes their ghostly presence known through weekly announcements and in the grades that appear on your homework. On one assignment, you see a comment in addition to the grade:
If you would like to talk to me about your grade, please make an appointment to meet during my office hours.
But you don’t. The idea of meeting your mysterious instructor is more terrifying than a bad grade.
The term ends, and the doors open for the students to leave. Even though you did well, you feel unsatisfied with the experience. You can’t wait to leave and put this strange, unsettling experience behind you. You learned what you were supposed to learn, but the instructor was a ghost; their presence an afterimage of a creator from long ago. Months later, you realize you’ve forgotten your instructor’s name, but you never forget the man in the videos.
My ghost story was partly inspired by the story I read last year about automated courses that are still using the videos created by someone who has since passed away. Sometimes it takes a true story like this to remind us that students know when an online instructor is present, and when they are absent. They know what it’s like to be taught by a ghost–even if that instructor is still living. This story was also a stark reminder to me as an instructional designer that it doesn’t matter how well-designed a course is if the students do not feel like the instructor is actually there and present with these students, while the course is running.
What it means for an instructor to be present in an online course was challenged by the forced shift to online teaching in the early days of the pandemic lockdown. Many teachers used Zoom or other web conferencing software to meet with students during their scheduled class times, to varying degrees of success, and varying degrees of exhaustion. Suddenly, we were not in a classroom or office and neither were our students. We saw bedrooms, kitchens, living rooms, cars, parks, and parking lots. We saw parents and kids and intrusive cats. We saw a lot of camera malfunctions, heard a lot of microphone feedback, and experienced many technical difficulties.
But because this was a global crisis, there was a collective understanding that it is more important to be present than to be perfect. While online students may have already experienced the ghost in the course shell, for the first time, instructors were experiencing the other side of that ghost story. Previously embodied in a physical classroom, they were now reduced to digital images, speaking into the void of black boxes; ghosts of their former selves. They found the experience just as eerie as their students. And just like a ghost who struggles to get a message to their loved ones from beyond the grave, a lot of instructors struggled to find a way to reach their students from beyond the classroom.
In the early days of lockdown, a colleague of mine asked for help with one of his online course videos. He always recorded his video announcements the same way he recorded his lectures: inside his office, wearing a suit, looking very formal and professional. This time he wanted to do something different. He wanted to show his students that he was also feeling the strain of lockdown, and that they were all in this lockdown together. An avid walker himself, he decided that he wanted to encourage his students to go for a walk outside, and then show himself walking outside.
“How can I do that?” he asked.
He had no idea how to make a video that did that, because he’d never seen anyone make a video like that–and no one to teach him.
“Go for a walk,” I told him. “Record a video on your phone while you’re walking and send it to me–I’ll do the rest.”
That experience led me to think about how students engage with video content that is formal and compare that to how they interact with content that is informal. Instructors can tap into what makes some of the best internet content these days–authenticity and informality–if they know how. Video is the easiest and most successful way to create authentic presence and build a sense of community with the students taking the course, and it only requires using one technology that most people use every day: a smart phone.
As an instructional designer, I want to enable and empower the faculty I work with, and that includes providing resources and support to prepare them to deliver their course as well assist with the design. I can find many articles written for educators about how to create home recording studios for professional-looking lecture videos, but I have yet to find an article that explicitly focuses on advising faculty how to make informal videos for course delivery purposes that goes beyond the theoretical to the practical, so I decided to write one.
I’m going to focus on TikTok as the model for these videos not because I think faculty should be on TikTok, but because TikTok changed the game for authentic video engagement. Like many of my generation, I’m not on TikTok, and I needed my younger Gen Z friends to explain it to me. (PBS just premiered a documentary on TikTok as explained by Gen Z, so I am clearly not alone in this). But what I do understand, and what I think faculty can bring to their course videos, is the importance of the creator-viewer dynamic popularized by TikTok.
So how can instructional designers, media producers, and instructors tap into this zeitgeist? How do you prove to your students that you’re not a ghost lurking in the course shell? Good design for videos is often invisible–just like good design in an online course–because we experience them as a whole and they have a cumulative effect. But by looking at examples, we can identify specific elements that are associated with TikTok videos that are visually distinct from traditional videos. They also serve a different purpose, and that purpose can be supplemental to a traditional video. I’ve separated out eight individual elements in the two video examples where the design decision has a different effect on the audience.
Design Element
YouTube
TikTok
Purpose
Educational/entertainment
Announcement/call to action
Orientation
Horizontal (optimal for viewing on a television or desktop browser)
Vertical (optimal for recording and viewing on a phone)
Setting
In a studio
On location
Lighting Source
Stage/studio overhead
Hand-held ring light
Camera Angles
Medium, multiple shots from multiple camera angles
Medium, close up, extreme close up, one continuous shot
Wardrobe
“Formal”
“Casual”
Audience
Speaking to a group
Speaking to an individual
Length
15 minutes
1 minute
There’s one additional element that is important to understanding why TikTok creates an immediacy with the viewer even beyond the timeliness of the video. TikTok videos are both ephemeral (in the sense that social media platforms are themselves ephemeral and therefore so is the content) and time-specific (in the sense that the content is only relevant until the event takes place). This time-specific framing and call to community is what makes the video feel so immediate and inclusive. Instructors often try to connect with students in this way through announcements or discussion boards, but it is far more difficult to try to accomplish with those tools. Video, because it is visual, and because it is such a large part of students’ daily lives, is able to make that connection far more easily.
–
And now the moment you’ve all been waiting for: here are some strategies for how to create a video with TikTok vibes using existing pre-scripted announcements.
Record your video on your phone. You do not need to have the latest iPhone or Pixel with a 4k camera. Remember that amateur videos are better than professional-looking videos in creating the “person to person” connection. Your students don’t all have the latest phone, and so they don’t expect you to either. There are a couple of different ways to get video from your phone to your online course. At Oregon State, we use Kaltura to host videos, and you can either upload a video from your phone directly to Kaltura, or record your video using the Zoom app on your phone, which will automatically upload to Kaltura.
Keep it current. Students want to feel like their instructors are existing at the same moment in time as they are and are in a specific location–even if it’s not in the same location as they are. You can comment on the weather or changing of the seasons. And don’t hesitate to go outside! Nothing signifies real time than the weather, and think of the impact of a term-long video sequence in front of a tree as it goes from green summer, to red fall, and finally bare winter. If there are events happening on OSU’s campus, or holidays, those are also good opportunities to connect with students at a specific time.
Keep it short. Most of the video content students consume on social media platforms is under 5 minutes. Any longer than that and you risk losing their attention. Keeping the videos short reinforces their purpose as timely, especially if they see a new video every week.
Make students feel “seen.” You might comment on work that has been received, or point to meaningful discussion board posts they might have missed. You might address a question that a student brought up during office hours or by email. Students value this kind of acknowledgement, even if they are not one of the students being acknowledged. Even the tone you use in recording to the video can create that relationship between speaker and audience. Talk to the camera as if it is a person, and not just a recording device. Students want to feel like you are talking to them, not at them.
Change the way they see you–visually. If all of your videos in your class are studio productions or voiceover slideshows, your students have only one idea of what you are like. Move locations. If your students only see you behind a desk or in the studio, find another location. If you can find a location that relates to the week’s topic, fantastic, but even going to your living room or kitchen will be a welcome change. Change your wardrobe. Go casual. If your formal lecture videos have you in a suit and tie in a library, dress down in a fleece or t-shirt and go outside the office–or even outdoors! (climate YMMV). Even being in a kitchen, living room, or patio will create an informality that feels authentic.
One of the major advantages of digital learning is that we can ensure our materials are accessible to all students. As such, at Ecampus, we are striving – and encouraging others to strive – for universal design, that is, design that anyone can use comfortably regardless of any impairments. In past posts, we have covered various ways of improving accessibility in a course, including how to fix PowerPoint or Word files. Today I’d like to focus on making Canvas pages accessible and making use of the on-page Accessibility Checker available in the Canvas Rich Content Editor.
Common Issues
Here are the main things you can do to ensure your Canvas pages (including assignments, discussions etc.) are accessible:
Use proper hierarchy of headings and do not skip heading levels. You want to start with Heading 2 (Heading 1 is the title), then subordinate to that will be Heading 3 and so on. This is especially useful for screen reader users because it helps with logical page navigation. Some people choose their headings by the font size – not a good idea! If you want to adjust the size of your text, use the “Font sizes” option in the editor, after designating the correct heading level.
Add an alt text description to any image or mark it as decorative. This is helpful for screen reader users and people for whom the images are not loading.
Make the link names descriptive, rather than just pasting the url. For example, you would write Student Resources instead of https://experience.oregonstate.edu/resources. Also, avoid linking “click here” type of text. This helps screen reader users (which would read a url letter by letter), and it also makes it easier for everyone to scan the page and find the needed information.
Ensure good color contrast. I often see instructors making their text colorful – in particular, red seems to be very popular. Indeed, a touch of color can make the page more visually pleasing and help bring out headings or important information! The danger lies in using colors that don’t have enough contrast with the background. This is especially problematic for people with less-than-optimal eyesight, but good contrast really just makes it easier for all of us to read. Also, a word of caution: Canvas has recently rolled out dark mode for mobile platforms and many people like to use it. Some colored or highlighted text may not look clear in dark mode.
Add caption and header row to tables. These are extremely helpful for screen reader users, and the caption helps everyone to quickly see what the table is about. To add these things, you actually have to rely on the on-page accessibility checker – it will flag the issues and walk you through fixing them. While we’re on the subject of tables, you also want to avoid complex tables with merged cells because they are hard to navigate for a screen reader.
Avoid underlining text. Underlining is normally reserved for links. Try using other means of highlighting information, such as bold, italics or caps.
Find and Fix
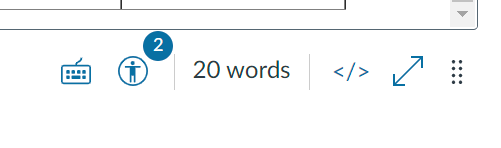
Canvas has a very useful tool that can help you find some accessibility issues as you edit your page. At the bottom of the editor, the icon representing a human in a circle will show notification when something is amiss.
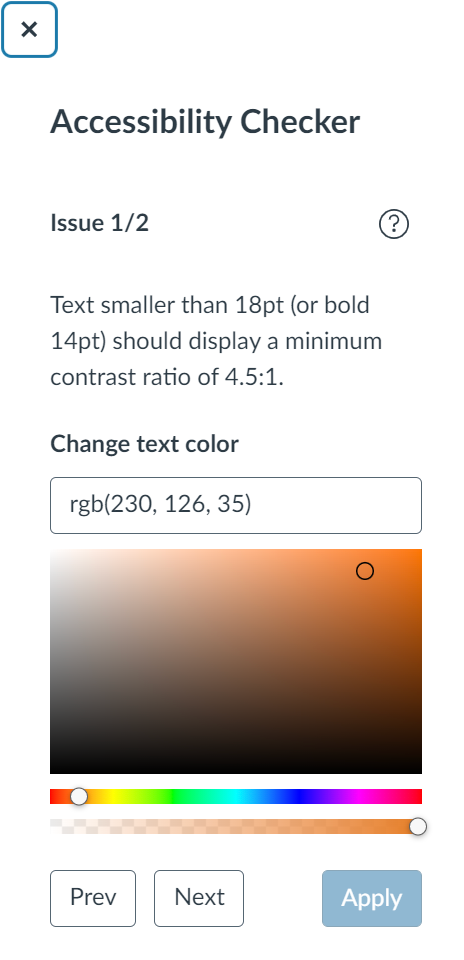
When you click on that icon, the checker will open on the right-hand side, explaining each issue and allowing you to fix it right there.
This tool can find:
Skipped heading levels/starting with the wrong heading
Missing alt text
Insufficient color contrast – you can find a suitable color right here
Missing table caption and header row
It will NOT flag poorly formatted links or underlined text. So, for these issues, you’ll have to watch out yourself!
When you’ve finished building your course, you can also use UDOIT, the global accessibility checker, or Ally, if your institution has installed it. These tools can help you find additional problems, including embedded materials with accessibility issues.
To conclude, following these simple rules can greatly enhance the usability of your Canvas course. The built-in accessibility checker will help you spot and fix some common issues. Once you start paying attention, building instructional content with accessibility in mind will become second nature!