Welcome to the Webcam and Video Tips guide by Oregon State University Ecampus
This brief series of tips is meant to be a beginner’s overview for DIY home recording on webcam, with some additional options suggested if you want to take your video production even further.
Since this document may not cover every issue you encounter while acclimating to DIY video recording, we recommend contacting your school tech person for additional troubleshooting.

WHERE TO START

  • Internet Connection
    • Wired connection via ethernet cable is best
    • If wired connection is not possible, having a clear line of sight to wifi router will give the best wireless connection
    • Disconnect any wifi devices that are not in use or needed.
  • Computer Check
    • Determine if your computer meets minimum system requirements for streaming software
    • Close all non-essential programs to free up more computer resources
    • Disconnect any external monitors if you are on a laptop and it is running slowly
  • Testing Your Tech
    • Does your computer have a built in webcam or do you have a 3rd party webcam?
    • Identify where your microphone is and talk towards it
    • Test the webcam and audio settings BEFORE your first recording. 
    • Practice practice practice
      • The last recording will be better than the first
  • Making sure your voice is clear and easy to understand
    • Having a microphone helps with this
    • Smart phone earbuds have a built-in microphone that can help you with voice clarity
    • Airpods would also work when recording to an iPhone

PRESENCE AND ENVIRONMENT

  • Be aware of your environment.
    • Limit any background noise as much as possible.
    • Clean up your space and be aware of what is in the background of the video.
    • Rooms with carpets and drapes are best for audio.
    • Turn off lights and close windows that are behind you when you are recording.
    • If possible, turn on a light behind the camera.
    • Keep experimenting with lighting until you have a set up that works for you.

  • Try not to bump the desk, computer, camera, or microphone while recording.
    • Typing should also be avoided.
  • Do a test lecture and watch it.
    • See what works and what doesn’t.
    • If possible, get feedback from others
  • Practice
    • The more you practice, the more natural it will feel.
    • Run through what you want to say before you start recording.
  • Relax and be natural! Hopefully you are sharing knowledge that you are passionate about and we want that to show. (Remember that we are always our own worst critic, and your teaching team will be there to help you with constructive feedback on how to help students best enjoy and learn from these videos.)
  • Have notes in front of you while you’re recording. 
    • It is easy to get distracted or off topic, especially when you are uncomfortable.
    • Having notes in front of you while you record can help you stay on track.
    • These notes can be as vague or as detailed as you want, but avoid reading off of them directly and not looking at the camera.

DIGITAL NOTATION

GOING FURTHER WITH VIDEO PRODUCTION

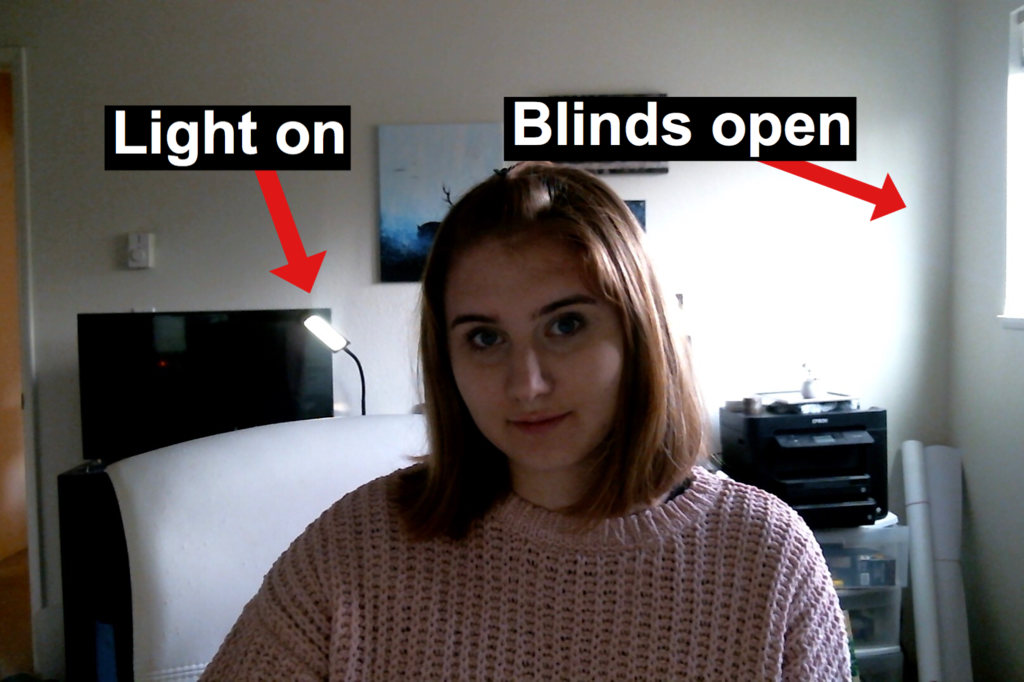
  • For DIY video production, there are many ways to go about this!
    • The lowest barrier to recording on your own would be to use a smart phone attached to a tripod or other mount.
    • If you have access to a camcorder or DSLR, get out there and use it!
  • For smart phone video
    • Avoid handheld and invest in a tripod or smart phone / camera mount
    • If you have a decent internet connection for uploads, consider recording 1080p at 30fps
    • Use an external microphone whenever possible

ACCESSORIES TO CONSIDER IF RECORDING WITH A PHONE

Apps:

  • Filmic Pro – $14.99
    • Allows manual control of exposure and white balance, audio monitoring, and other useful features.

Audio:

  • Lavalier microphone – $18.99 
    • Highly recommended. Audio recorded from your phone’s microphone can be difficult to hear if you aren’t standing near the phone or if the location is noisy. 
  • Double lavalier microphone – $25.99
    • For when you have two people on camera. Both mic cable feed into the same phone, removing need to sync two audio sources. 
  • Audio cable extension – 10 ft. $9.95 or 20 ft. $15.95
    • For when you need to stand farther away from the camera.

Stabilization:

  • Selfie stick w/built-in tripod and Bluetooth remote – $23.99 (heavy duty, 51″ extended), $14.99 (27.6″ extended)
    • Terrific for self-recording in the field.
  • Combination hand grip/small tripod/tripod adapter – $8.89
    • Can be used as a hand grip for filming on-the-go or as a desktop tripod. Phone mount can be removed from the hand grip/tripod legs section, allowing you to mount your phone on most standard tripods.
  • Gimbal stabilizer – $94.99
    • Pricey, but will greatly increase the quality of your footage if you’re filming something that requires camera movement, such as a walk-and-talk interview or a field trip video.
  • Creative ways to mount a smart phone with household items:


ADD-ONS / TIPS AND TRICKS

  • If you would like to have access to a teleprompter as you record video, consider one of the following:
  • Here are some sound improvements to consider to reduce echo in your recordings.
    • Add blankets or blinds on walls to reduce echo.
    • Record in the smallest room possible.
    • Avoid rooms with hardwood floors.

Lighting for video

  • Turn a window or glass door into a soft “Key Light” by hanging a cheap, frosted shower curtain over the window. 


Authors: Jason Jones, Drew Olson, and Sammi Lukas, with special thanks to Victor Yee for technical support with the images.

How do you like to provide and receive information? What circumstances allow you to express yourself best? Our students’ learning experiences center on the exchange of information, and since they don’t typically get to design their own courses, we implicitly ask students to adapt to our communicative norms. I’m not a student, and for 40 hours each week, I work with colleagues who speak a shared language of diagrams, file naming conventions, and annotated comments.

dense email with color-coded table
Would you like to receive this email? This is how I felt most comfortable communicating with an instructor when deciding between two ways to facilitate a 4-step peer review process.

But in my everyday interactions with people outside of work, when I enter other professional domains, I am keenly aware of my communicative disadvantage, not unlike what our students sometimes face. Paying attention to these interactions gives me humility and makes me curious about how I can give students the agency to express themselves in the ways that suit them best. Let me share an anecdote from outside the office.

Recently I had to visit the doctor for a routine health issue, and he showed me a diagram of test results while using some terms I wasn’t familiar with. When I left, I thought in frustration, I would have benefited from having been provided a glossary of key terms in advance, and a reading list afterward to learn more about the implications of the diagnosis. Surely this doctor could have tailored the visit better by assessing my introductory level of knowledge on the subject and then by expanding on what I already knew, while filling in on the gaps he’d discovered. That’s the confident critique from the instructional designer in me. But of course, I was at someone else’s office this time, operating outside of my professional identity, and my expertise wasn’t being solicited. And I was pretty uncomfortable. What did this medical professional think of me? I could barely follow along with the conversation! And, more importantly, what had I gained from the (quite expensive) interaction, for which I had just taken time off from work?

Our students are in a similar bind. Time spent in our courses is time they can’t spend with their families or in the workplace – and they’re paying for it! So how can we make students’ experiences more satisfying?

I return to the UDL Principle “Provide multiple means of Action & Expression” regularly, and I think it’s worth simply reading the original text:

Learners differ in the ways that they can navigate a learning environment and express what they know. For example, individuals with significant movement impairments (e.g., cerebral palsy), those who struggle with strategic and organizational abilities (executive function disorders), those who have language barriers, and so forth approach learning tasks very differently. Some may be able to express themselves well in written text but not speech, and vice versa. It should also be recognized that action and expression require a great deal of strategy, practice, and organization, and this is another area in which learners can differ. In reality, there is not one means of action and expression that will be optimal for all learners; providing options for action and expression is essential.

This UDL principle reminds me to be open to ways of demonstrating and communicating knowledge that are outside my own comfort zone. So, when you create your course’s assessment plan, consider building variety and options into assignments. How will certain activities advantage some students and not others? Consider how can you draw on your students’ funds of knowledge. Like me, who brought along a specific communication toolkit, our students’ backgrounds have prepared them to communicate in unique ways. If your course relies entirely on one type of assessment (all exams, all essays), ask yourself whether the learning outcomes require it. What evidence of learning will be acceptable to prove students’ newly developed skills? What experiences will provide that evidence? For example, you might provide students with opportunities to:

These options can expand the range of actions and expression available to your students so that more of them can communicate to you, and to themselves, that they are successful learners.

“As a stranger give it welcome” – Shakespeare

Students need tactics for when they encounter strange people or strange ideas.(Wilson, 2018) If you think of a first time online student, this is very true as they are entering a new learning environment, likely extremely different from their previous educational experiences. Welcoming that strange experience should include a little bit of information gathering. Look for positive and negatives so that you can decide for yourself how you view it, most of all, have an open mind.

To help potential online students make decisions, and hopefully be more successful should they chose to take an online course, Marie Fetzner asked unsuccessful online students; “What advice would you give to students who are considering registering for an online course?”

Their top 13 responses:

  1. Stay up with the course activities—don’t get behind
  2. Use good time management skills
  3. Use good organizational skills
  4. Set aside specific times during each week for your online class
  5. Know how to get technical help
  6. A lot of online writing is required
  7. There is a lot of reading in the textbook and in online discussions—be prepared
  8. Regular online communications are needed
  9. Ask the professor if you have questions
  10. Carefully read the course syllabus
  11. Be sure you understand the requirements of the online course discussions
  12. Understand how much each online activity is worth toward your grade
  13. Go to the online student orientation, if possible

This needs to raise the question, how can we better help our students? There are obviously struggling students and we want our students to be successful. So, what can we do?

  1. Reach out to students who seem to be lagging behind. A quick email is sometimes all it takes to open up that line of communication between you and the student.
  2. Provide approximate times for course materials and activities. Students can use this to better plan for the requirements that week.
  3. Keep your course organized so students can spend more time with the content instead of search for the content.
  4. Remind students about where to access help and support services.
  5. Develop a Q&A discussion board for student questions about the course. Often, more than one student has the same question and often other students might already know the answer. Have this be something you check daily to answer questions quickly so students can continue with their learning.
  6. Use rubrics for grading. By giving the students rubrics, they will know what is expected, you will get responses closer to your expectations, and it makes grading easier!

Welcome these ideas as you would a new experience. Give it a little try, jump right in, confer with colleagues, or chose your own path. Know that as an instructor or developer for an online course, you have the ability to help your students be successful!

References

Fetzner, Marie. (2013). What Do Unsuccessful Online Students Want Us to Know? Journal of Asynchronous Learning Networks, 17(1), 13-27.

Wilson, J. (2018). “As a stranger give it welcome”: Shakespeare’s Advice for First-Year College Students. Change, 50(5), 60.

First, let’s start by considering the characteristics of effective feedback in general. What comes to mind?

sound waves

Perhaps you hear in your head (in the authentically authoritative voice of a past professor) the words timely, frequent, regular, balanced, specific. Perhaps you recall the feedback sandwich–corrective feedback sandwiched between positive feedback. Perhaps you consider rubrics or ample formative feedback to be critical components of effective feedback. You wouldn’t be wrong.

As educators, we understand the main characteristics of effective feedback. But despite this fact, students are often disappointed by the feedback they receive and faculty find the feedback process time consuming, often wondering if the time commitment is worth it. As an instructional designer, I hear from faculty who struggle to get students to pay attention to feedback and make appropriate changes based on feedback. I hear from faculty who struggle to find the time to provide quality feedback, especially in large classes. The struggle is real. I know this because I hear about it all the time.

I’m glad I hear about these concerns. I always want faculty to share their thoughts about what’s working and what’s not working in their classes. About a year or two ago, I also started hearing rave reviews from faculty who decided to try audio feedback in their online courses. They loved it and reported that their students loved it. Naturally, I wanted to know if these reports were outliers or if there’s evidence supporting audio feedback as an effective pedagogical practice.

I started by looking for research on how audio feedback influences student performance, but what I found was research on how students and faculty perceive and experience audio feedback.

What I learned was that, overall, students tend to prefer audio feedback. Faculty perceptions, however, are mixed, especially in terms of the potential for audio feedback to save them time.

While the research was limited and the studies often had contradictory results, there was one consistent takeaway from multiple studies: audio feedback supports social presence, student-faculty connections, and engagement.

While research supports the value of social presence online, audio feedback is not always considered for this purpose. Yet, audio feedback is an excellent opportunity to focus on teaching presence by connecting one-to-one with students.

If you haven’t tried audio feedback in your classes, and you want to, here are some tips to get you started:

  1. Use the Canvas audio tool in Speedgrader. See the “add media comment” section of the Canvas guide to leaving feedback comments. Since this tool is integrated with Canvas, you won’t have to worry about upload and download times for you or your students.
  2. Start slow. You don’t have to jump into the deep end and provide audio comments on all of your students’ assignments. Choose one or two to get started.
  3. Ask your students what they think. Any time you try something new, it’s a good idea to hear from your students. Creating a short survey in your course to solicit student feedback is an excellent way to get informal feedback.
  4. Be flexible. If you have a student with a hearing impairment or another barrier that makes audio feedback a less than optimal option for them, be prepared to provide them with written feedback or another alternative.

Are you ready to try something new? Have you tried using audio feedback in your course? Tell us how it went!

References:

Image by mtmmonline on Pixabay.

Note: This post was based on a presentation given at the STAR Symposium in February 2019. For more information and a full list of references, see the presentation slide deck.


student response slide

In my last post, I described how Ecampus courses use synchronous study sessions to provide listening and speaking practice to students of world languages. Much of the Ecampus language learning experience is entirely asynchronous, however, to provide flexibility for our students. So how exactly do students converse asynchronously? This post will describe the design of asynchronous listening and speaking exercises in 300-level French conversation courses, executed by Ana-Maria M’Enesti, PhD, and facilitated via VoiceThread, a slide show within the LMS that displays course content about which participants comment via text, audio, or video.

Title slide and Intro slide
In these two slides, Ana-Maria intros the topic via video comment, contextualizes the resource via audio, and links out to the resource. The “i” icon indicates an “Instructions” comment and the numbered icons indicate links 1 and 2.

VoiceThread was an appealing platform because of the ease with which students can add audio or video comments, more streamlined than the protocol for uploading video to a discussion board, and because of its display of content in sequential slides. When Ana-Maria and I began exploring how to present her asynchronous conversational lessons within VoiceThread, we realized that we could chunk each stage of the activity into these individual slides. This made the cognitive load at each stage manageable, yet provided continuity across the activity, because the slides are contained in a single assignment; students navigate by advancing horizontally from slide to slide. VoiceThread allows each slide to link to external content, so students can maintain their place in the sequence of the assignment while engaging with linked resources in another window. Most importantly, since students encounter all the related learning activities from within a single context, it is clear to them why they are investing time in reading or watching a resource – they anticipate that, at the end of the assignment, they will complete a culminating speaking activity.

For the culminating speaking activity, we used VoiceThread to provide each student with a place to upload his or her initial post as a new, individual slide that occupies the entire horizontal pane. Replies from peers are then appended to each student’s initial slide post. Visually, this is easier to follow than a text-based discussion, with its long, vertical display of posts that uses nesting to establish the hierarchy of threaded replies. Within VoiceThread, as students advance through the slides, they are able to focus their attention on each student’s initial post and the associated peer replies, one at a time.

student response slide
A student’s initial slide post displays her individual environmental footprint gained from using the resource linked earlier. On the left, there is an audio explanation and comments between the student, “AC,” instructor, and peers, labeled by their initials or profile pic.

Now that I’ve discussed how we exploited the mechanics of VoiceThread, I’ll review the learning design. To progressively scaffold students’ conversational skills, Ana-Maria builds each assignment as a series of activities of increasing difficulty. On the first slide, students might be prompted to share opinions or personal experiences of a topic in order to activate prior knowledge of thematic vocabulary and associated grammatical structures. Then, on subsequent slides, students are challenged to read or watch related content that is comprehensible, but a bit beyond their current language competence, the “i+1” level, as Krashen coined it. Afterwards, to ensure they’ve grasped the resource, Ana-Maria typically poses factual comprehension questions and then asks students to re-read or re-watch so that they can grasp any meanings they may have missed on the initial encounter.

Finally, students are asked to speak critically on what they read or watched, express a solution to a problem, or place the topic within their own cultural context, using topic-specific vocabulary and associated grammatical structures that they’ve heard or read from the included resources. The instructor is present throughout, mediating the interaction between student and content, since Ana-Maria narrates each slide, reading the instructions aloud and adding additional context. There is also support for listening comprehension, as the most critical instructions are written on each slide.

For the feedback stage of the assignment, students learn from each other’s responses, listening and providing replies to at least two peers on two different days of the week. This requirement allows conversations to develop between students and provides the third type of interaction, learner-to-learner, so that the activity sequence facilitates all three of the interactions described by Moore (1989): learner to content, learner to instructor, and learner to learner.

As expressed by one of our own students, “I was uncertain how a conversation course online would really work,” but “VoiceThread proved to be a helpful tool.” It allowed us to solve the puzzle of providing asynchronous conversational activities for students, who reported in surveys that it helped:

  • to “humanize” them to each other, like being “in an actual classroom”
  • to connect them with their instructor
  • to provide “access to multiple tasks within one [assignment]”
  • to improve listening and speaking skills
  • to make “group projects flow better”

VoiceThread is quite a versatile tool and is being piloted for use with many other disciplines at Ecampus. I’m sure you can imagine other ways to adapt it to your own context and content!

Two cartoon men argue over a drawingDifficult Conversations

We all have conversations that are difficult from time to time. These are stressful, can make you (or the other person) feel bad, and they can take a lot of time to work through.

Frameworks for conversations allow the participants to approach these conversations with some tools to help those conversations stay productive and turn the temperature down at the same time. By using these frameworks, you’ll help make this conversation not personal, be able to calm the situation, and arrive at better solutions, sooner.

What are these difficult conversation frameworks? Let’s get started!

Change Advocate Hats

When working with someone, often we come in with our own hat on. We know what we are going to bring to the table and what we’d like the other person to contribute. Before you even come to this meeting, you should try on another hat. Try the hat of the person who you will be meeting with, what might they expect? Is there a third party affected by the decisions that you’ll be making? Try their hat on. Seeing things from another’s perspective helps us to have a better understanding of what they might bring to the table.

Go to the Neutral Zone

Action and re-action is part of who we are as human beings. These are two ends of a rope that can cause frustration when we don’t take a step back and view. When one person tugs at the end of the rope, the other end’s reaction is likely a huge step forward and then a quick tug back. The two people on the ends could keep tugging back and forth causing actions and re-actions but they might not get anywhere. If you can step away from those two ends and take a look at the whole picture, you can see that neutral zone where you can look at underlying issues that might be causing the tug-of-war. Even having one party step into this neutral zone takes away the constant back and forth and diffuses the difficult or possibly heated conversation allowing the parties to move forward.

Phone-a-friend

I’m sure this is familiar to those who’ve watched a popular T.V. show a “few” years ago. What we are talking about here is an outside source that can aide in the conversation. This could be a research article showing why a suggestion would be the right approach, a colleague that has had a similar experience and can talk to the success of an option, or bringing in facts and figures to support suggested approaches. Whatever it is, that “friend” can help provide support while deciding on a course of action with an outside opinion, not another tug on an end.


Personally, I’ve used each of these in conversations before and each one of them has helped multiple times. Do you have other frameworks or tips you’d like to share? Let us know in the comments!

So you’ve scheduled your first video shoot with Ecampus. Great! We can’t wait to work with you. Here are answers to a few questions we commonly receive from instructors.

How can I prepare for my video shoot?

Rehearse! And this doesn’t have to be a bunch of work, just run through your piece once or twice before the shoot.

If you’d like for the finished video to include any additional graphics, photos or video, please let a member of the video team or your instructional designer know in advance of the shoot so that we can plan accordingly.

Should I write a script?

Maaaaaaaybe. It’s up to you. Some people prefer to work from a teleprompter, others prefer to wing it. We always suggest going with your comfort zone. If you would like to work with a teleprompter, please send your script or bulleted list to ecampus.productions@oregonstate.edu at least one day before your shoot.What should I wear?

Wear clothes that are comfortable and make you feel good about yourself…that’s the priority. Feel free to show off your personality and have fun with it.

Here are a few guidelines:

  • Avoid wearing plain white. It’s distracting against a black background, and gets lost in a white background.
  • If you’ll be filming against a black background, you’ll want to avoid wearing black, lest you appear to be a floating head and arms in your video. Also, black or really dark clothing can sometimes cause more shadowing on the face, accentuating wrinkles and aging the subject.
  • Instead, you might consider a medium-dark blue or gray. Or even better, go for a rich, solid color.
  • Also, avoid tight lines and patterns. These types of patterns cause a distracting optical effect called moiré where the pattern appears to move. Larger patterns, like plaid, look fine.
  • Finally, please avoid noisy jewelry and accessories as the microphone may be able to pick up the noise.

Oh gosh! Now that I’m here and I’m on camera, I have no idea what to do with my hands.

Think of the camera as another person. How do you move when you’re talking to somebody? If you tend to gesture when you speak, then please do! The movement will add energy to the video and help to convey your excitement about the topic.

Another option is to hold a prop. Just be sure that your prop is relevant to the video so that you don’t confuse the viewer.

If you prefer to be more still, that’s also great. Just be sure to maintain open body language and avoid crossing your arms in front of you or behind you.

This terrific Wistia article talks about the science behind why your gestures look so awkward on camera and dives into the hand thing a bit more, explains why we feel so awkward on camera, and suggests some ways to feel more comfortable at your video shoot.

That’s A Wrap!

If you have any questions, concerns, or ideas to share, please contact the Ecampus video team at ecampus.productions@oregonstate.edu. Looking forward to working with you!


In a time when ideas and technology are rapidly changing within online education, it can be increasingly challenging to determine what students truly value and how to measure what impacts their overall success. Research has shown that online learners who are engaged with the material, intrinsically motivated, possess self-regulation, and have a positive or growth mindset have preferable outcomes – yet the correlation between these areas has not been thoroughly explored (Richardson, 2017; Diep, 2017; Sahin, 2007). Emerging from the intersection of positive psychology and higher education is a new vision for student success that encompasses these areas called thriving.

Created by Dr. Laurie Schreiner, Chair and Professor in the department of Higher Education at Azuza Pacific University, the Thriving Quotient measures the characteristics of thriving, and has been used with thousands of students in hundreds of institutions around the world. Schreiner defines thriving students as those who are “engaged in the learning process, invest effort to reach educational goals, and are committed to making a meaningful difference in the world around them” (Schreiner, 2010).

The five factors of thriving are grouped as:

  • Engaged Learning
  • Academic Determination
  • Positive Perspective
  • Social Connectedness
  • Diverse Citizenship

Thriving students deeply value their education, possess the self-efficacy and determination to persist towards their long term goals, feel connected to their institution, faculty, and other students, and want to make a positive impact on the world. While all five factors of thriving are connected and crucial to student success, the area that instructors and instructional designers may most directly impact is Social Connectedness. Social connectedness refers to the support networks we build, the relationships that are cultivated, and how connected we feel to our community. Social connectedness can span the areas of student to student connection, student to instructor connection, and student to administrator connection. Student interaction with other students and instructors has been determined to be fundamental to their experience as an online learner (Symeonides, 2015; Rust, 2015; Vianden, 2015; Cole, Shelley, Swartz, 2014; Allen, 2008).

Within this context of social connectedness, the research on social presence and creating a sense of belonging contribute to the understanding of how relationships may contribute to online student satisfaction. In Jörg Vianden’s study on what matters most to students, students were asked to report on their most satisfying and dissatisfying experiences. For both categories, they focused primarily on their interpersonal relationships (Vianden, 2015). In regards to how these impacted students’ interactions, the most common dissatisfaction regarding faculty relationships was disrespect and unresponsiveness. Students not only desire positive relationships with their faculty, staff, and peers, but it is exceedingly important in predicting their academic outcomes. Social presence and connection with others was found to be exceedingly important in predicting student satisfaction and perceived learning (Richardson, 2017). The connection is even furthered with the assertion that social presence should be the foundation of critical thinking and learning objectives for students (Garrison & Akyol, 2013).

What does all of this mean for instructors?

As an instructor, you are often the primary and most valued relationship and connection that an online student will have in their education. While students have additional support from academic advisors, student success professionals across departments, and other student-facing roles, these individuals will not have the daily interaction and impact that an instructor has with their students. In partnership with instructional designers, instructors have the ability to positively create spaces for connection through teaching preferences, course design, resource choices, and communication policies.

Some common guidelines for creating connection within your classroom include:

  • Utilizing videos or screencasts so that students can feel more connected to their instructors and create a more welcoming and personal environment
  • Responding to student inquiries in discussion boards and by e-mails in a timely manner
  • Completing grades for assignments promptly so that students feel comfortable with knowing their progress and any adjustments that might be needed
  • Providing opportunities for students to connect with their instructor and one another using tools such as videos in the discussion forums, FlipGrid, or WebEx/Zoom conferencing for recordings and lectures.

Below are some comments from our most recent student survey that speak to the importance of connectedness for online learners.

“I would encourage professors to hold an optional “live” WebEx meeting with their classes at the beginning of each term. This would help build a better connection between the students and teachers and allow students to ask any questions they might have about the course ahead of time.”


“Don’t be afraid to communicate with your teachers. They are usually very accommodating and sincerely wish to help you achieve academic success.”

Please know that you can always reach out to the Ecampus Success Counselors with questions or to refer students that may be struggling or not participating. We appreciate the great work you are continually doing and value the critical role you hold in educating, guiding, and empowering our online students.

Whether you are a new or seasoned online instructor, understanding how to establish and maintain instructor presence is a commonly shared challenge. What is known about online learners is they want to know their instructors are engaged and regularly interacting in the course. Students also express how important it is to know that their instructors care about them.

There is a natural distance inherent in online classrooms which necessitates purposeful actions and intentional structures to prevent isolation and to foster connection. There is great news… this distance can be overcome!  Moreover, research has indicated that instructor presence has a relationship with perceived student satisfaction and success. Being there for your students can make a difference!

Being present goes a step further beyond students perceiving that their instructors are there. By definition, instructor presence is “the design, facilitation, and direction of cognitive and social process for the purpose of realizing personally meaningful and educationally worthwhile learning outcomes.” This may sound like a significant undertaking, but rest assured that you can craft your presence over time and that you have ample support from the Ecampus team. We can help bring your ideas to life!

Keep in mind that curating instructor presence will be an evolution. Learning environments and experiences are dynamic. In addition, the composition of students will change each term, so learner needs and wants will continually shift. Strategies used within a specific context may not work for another, and that is okay.

Let’s get started!

Try starting out small by exploring different ideas. Don’t be afraid to change directions if one approach doesn’t work. With all that said, what are some strategies for establishing and maintaining presence which can be leveraged today?

Establishing presence

  • Welcome announcements
  • Instructor introduction video
  • About your instructor page
  • Course overview video
  • Virtual office hours or individualized virtual sessions to connect with students
  • Personalized language to humanize the learning experience

Maintaining presence

  • Non-graded community building spaces to connect around complex learning activities
  • Announcements to send regular updates, reminders, and check-ins
    • Tip! Announcements can also be leveraged to share and highlight valuable connections, expand upon those insights, and provide relevant resources for learners to explore.
  • Monitor learner progress
    • Regular and timely feedback which is clear and actionable
    • Outreach to learners who are struggling or engagement is lacking
  • Present content in diverse ways
    • Module overview videos
    • Audio recordings (e.g. podcast)
    • Screencast demonstrations
  • Engage in course discussions
  • Solicit student feedback
    • Tip! Consider adding a short anonymous survey in the middle of the course.

As ideas begin to percolate, please do share those with your Instructional Designer so that together you can explore different strategies and tools that will work best for you.

References

  • Budhai, S., & Williams, M. (2016). Teaching Presence in Online Courses: Practical Applications, Co-Facilitation, and Technology Integration. The Journal of Effective Teaching,16(3), 76-84.
  • Ekmekci, O. (2013). Being There: Establishing Instructor Presence in an Online Learning Environment. Higher Education Studies, 3(1), 29-38.
  • Jaggers, S., Edgecombe, N., & West-Stacey, G. (2013, April). Creating an Effective Online Instructor Presence. Retrieved from https://ccrc.tc.columbia.edu/media/k2/attachments/effective-online-instructor-presence.pdf
  • Ladyshewsky, R. K. (2013). Instructor Presence in Online Courses and Student Satisfaction. International Journal for the Scholarship of Teaching and Learning, 7(1). doi:10.20429/ijsotl.2013.070113
  • Sandercock, I. (2014, October 14). The Importance of Instructor Presence in Online Courses. Retrieved from https://teachonline.asu.edu/2014/10/important-instructor-presence-online-course/
  • Smith, T. (2014, September 30). Managing Instructor Presence Online. Retrieved from http://teachonline.asu.edu/2012/08/managing-instructor-presence-online/#more-1069

Becoming a Student Again

With excitement and a bit of apprehension I logged in to my first ever online class. Sure, I’ve taught online classes for years, but this was my first time as a student in an online class that I had paid to take and where grades were given.

I reviewed the “Start Here” module and familiarized myself with the structure of the class before I opened the first lecture from my new instructor. The instructor’s voice came through my speakers and as she began to speak I noted the length of the lecture: 44 minutes. “What?!? I don’t have time for this,” I thought as I slammed my laptop shut. It suddenly and powerfully occurred to me that I did not have control over this classroom and my expectations as a student might be vastly different from my instructor’s.

Eventually, I settled in to the rhythm of the class and my instructor’s expectations. As it turns out, that 44 minute lecture was an outlier (the rest were closer to 15 minutes), and I figured out a way to incorporate the lectures into my schedule (I watched them while on the spin bike).

The Needs of the Online Student

As a working parent, trying to balance family, work, and school obligations, I am the target customer for online education, and I certainly felt the “squeeze” of all these obligations competing for my time. Like many of my students, my days are jam-packed and most of the time, I am scheduled to the minute. Uncertainties can throw my well-planned schedule into turmoil… “Wow, that reading took longer than I expected. No, I can’t participate in a live webinar or meet for a group project at 3pm. I have to pick up kids from school. Darn, this link is broken and the instructor hasn’t responded to my questions about it…now I’ve lost my window for working on this project. My dog died today, and while I had to go to work and had to make dinner, I just don’t have it in me to watch a class lecture and take a quiz. I’m too sad…can I have an extension?”

Meeting Our Students Where They Are

I ended up taking several classes from several instructors over the course of a year. Being a student in these classes exposed me to a number of different teaching styles and techniques and strategies, and I was able to experience these things from a student point of view. Based on my experience, here are 4 strategies for instructors that your students might find helpful:

  1. Provide time estimates for weekly activities. Estimated read times and watch times for learning materials are very helpful for a busy student trying to plan the week.
  2. Chunk the material. As an online student, I rarely had long chunks of time to work on my classes, but I could squeeze in smaller chunks of time here and there. And while students can start and stop a task as needed in the online classroom, it’s rewarding to actually finish a task in one sitting.
  3. Make it easy to find class resources. In the online classroom there are many wonderful learning materials we can easily incorporate (e.g., links to blogs, videos, calculators); but when these resources are scattered throughout 10 learning modules, they can be difficult for the student to find. Provide a works cited page (with hyperlinks) or a glossary of key terms to help students locate material, especially when studying for exams.
  4. Anticipate Questions. This might be tough the first time you teach a course, but over time we often see the same questions arising from our students. We can reduce the delay in response time, by anticipating these questions and providing answers and support ahead of time. This could be a Q&A sheet for complex assignments or a guided worksheet with comments from the instructor to help students get through well-known tricky spots.

The flexibility of the online classroom gives busy students around the world access to educational opportunities that have not been available in the past. These students are working hard in every aspect of their lives and with a little support from us, their online instructors, we can help them make the most of the time they have in order to learn and grow.

-Nikki Brown, Instructor, College of Business