Welcome to the Webcam and Video Tips guide by Oregon State University Ecampus
This brief series of tips is meant to be a beginner’s overview for DIY home recording on webcam, with some additional options suggested if you want to take your video production even further.
Since this document may not cover every issue you encounter while acclimating to DIY video recording, we recommend contacting your school tech person for additional troubleshooting.

WHERE TO START

  • Internet Connection
    • Wired connection via ethernet cable is best
    • If wired connection is not possible, having a clear line of sight to wifi router will give the best wireless connection
    • Disconnect any wifi devices that are not in use or needed.
  • Computer Check
    • Determine if your computer meets minimum system requirements for streaming software
    • Close all non-essential programs to free up more computer resources
    • Disconnect any external monitors if you are on a laptop and it is running slowly
  • Testing Your Tech
    • Does your computer have a built in webcam or do you have a 3rd party webcam?
    • Identify where your microphone is and talk towards it
    • Test the webcam and audio settings BEFORE your first recording. 
    • Practice practice practice
      • The last recording will be better than the first
  • Making sure your voice is clear and easy to understand
    • Having a microphone helps with this
    • Smart phone earbuds have a built-in microphone that can help you with voice clarity
    • Airpods would also work when recording to an iPhone

PRESENCE AND ENVIRONMENT

  • Be aware of your environment.
    • Limit any background noise as much as possible.
    • Clean up your space and be aware of what is in the background of the video.
    • Rooms with carpets and drapes are best for audio.
    • Turn off lights and close windows that are behind you when you are recording.
    • If possible, turn on a light behind the camera.
    • Keep experimenting with lighting until you have a set up that works for you.

  • Try not to bump the desk, computer, camera, or microphone while recording.
    • Typing should also be avoided.
  • Do a test lecture and watch it.
    • See what works and what doesn’t.
    • If possible, get feedback from others
  • Practice
    • The more you practice, the more natural it will feel.
    • Run through what you want to say before you start recording.
  • Relax and be natural! Hopefully you are sharing knowledge that you are passionate about and we want that to show. (Remember that we are always our own worst critic, and your teaching team will be there to help you with constructive feedback on how to help students best enjoy and learn from these videos.)
  • Have notes in front of you while you’re recording. 
    • It is easy to get distracted or off topic, especially when you are uncomfortable.
    • Having notes in front of you while you record can help you stay on track.
    • These notes can be as vague or as detailed as you want, but avoid reading off of them directly and not looking at the camera.

DIGITAL NOTATION

GOING FURTHER WITH VIDEO PRODUCTION

  • For DIY video production, there are many ways to go about this!
    • The lowest barrier to recording on your own would be to use a smart phone attached to a tripod or other mount.
    • If you have access to a camcorder or DSLR, get out there and use it!
  • For smart phone video
    • Avoid handheld and invest in a tripod or smart phone / camera mount
    • If you have a decent internet connection for uploads, consider recording 1080p at 30fps
    • Use an external microphone whenever possible

ACCESSORIES TO CONSIDER IF RECORDING WITH A PHONE

Apps:

  • Filmic Pro – $14.99
    • Allows manual control of exposure and white balance, audio monitoring, and other useful features.

Audio:

  • Lavalier microphone – $18.99 
    • Highly recommended. Audio recorded from your phone’s microphone can be difficult to hear if you aren’t standing near the phone or if the location is noisy. 
  • Double lavalier microphone – $25.99
    • For when you have two people on camera. Both mic cable feed into the same phone, removing need to sync two audio sources. 
  • Audio cable extension – 10 ft. $9.95 or 20 ft. $15.95
    • For when you need to stand farther away from the camera.

Stabilization:

  • Selfie stick w/built-in tripod and Bluetooth remote – $23.99 (heavy duty, 51″ extended), $14.99 (27.6″ extended)
    • Terrific for self-recording in the field.
  • Combination hand grip/small tripod/tripod adapter – $8.89
    • Can be used as a hand grip for filming on-the-go or as a desktop tripod. Phone mount can be removed from the hand grip/tripod legs section, allowing you to mount your phone on most standard tripods.
  • Gimbal stabilizer – $94.99
    • Pricey, but will greatly increase the quality of your footage if you’re filming something that requires camera movement, such as a walk-and-talk interview or a field trip video.
  • Creative ways to mount a smart phone with household items:


ADD-ONS / TIPS AND TRICKS

  • If you would like to have access to a teleprompter as you record video, consider one of the following:
  • Here are some sound improvements to consider to reduce echo in your recordings.
    • Add blankets or blinds on walls to reduce echo.
    • Record in the smallest room possible.
    • Avoid rooms with hardwood floors.

Lighting for video

  • Turn a window or glass door into a soft “Key Light” by hanging a cheap, frosted shower curtain over the window. 


Authors: Jason Jones, Drew Olson, and Sammi Lukas, with special thanks to Victor Yee for technical support with the images.

Facilitating Active Learning with Zoom

connected learners image
Image by Gerd Altmann from Pixabay

By Christine Scott, Instructional Design Specialist, Oregon State University Ecampus

So you managed to get your face-to-face courses up and running remotely in the midst of a global pandemic. You’ve secured your Zoom sessions to avoid unwanted disruptions, your students are in their virtual seats, and you’ve successfully delivered a few lectures. So what’s next?

Now that you have students’ attention, you may find that you’re ready to focus on transforming your synchronous session into a space for active learning to take place. It’s no secret that students learn better when they are actively engaged in the learning process. The question is how that translates to a remote Zoom session. Is it even possible to recreate the dynamic learning environment of your face-to-face class? 

To answer that question, we can look to best practices in online pedagogy. We know that students in online environments experience better outcomes and higher satisfaction when there are opportunities for active learning and engagement with the instructor, the course content, and each other. Fortunately, Zoom has several tools we can leverage to incorporate learner engagement in the remote setting.

Creating Opportunities for Active Learning

To set the stage for active learning, consider breaking your content delivery into shorter chunks, punctuated by periods of activity. Ask students to do something meaningful to help them engage with the content. This approach not only supports learning, but it also encourages accountability. If students understand they will be called upon to complete a task, they are more likely to be motivated to engage with the lecture.

During your synchronous session, you might ask students to: 

  • Respond to a question
  • Take notes to share
  • Create a list of examples or discussion questions to share afterward on the Canvas discussion board
  • Prepare a reflection to submit after the fact
  • Solve a problem

Breakout Rooms in Zoom

Breakout rooms are easy to set up and operate in Zoom. These small group spaces are useful as a means of incorporating peer-to-peer interaction and feedback into your remote course. They can also promote inclusion by providing an opportunity for low-stakes participation for learners who may be reluctant to chime in during large group sessions. Finally, breakout session activities can serve as a tool for formative assessment as the activities students complete can help instructors gauge achievement of the learning outcomes. 

Creating Breakout Room Tasks

Breakout room tasks can be carried out on-the-fly in the synchronous session, or they can form part of a more complex assignment. You might provide a prompt, file, or a link as a springboard for spontaneous discussion in small groups. Alternatively, you might flip your remote classroom by providing students with a pre-activity to complete before the live session. For further engagement, you might have students build on what they produce in their breakout rooms through an asynchronous submission in Canvas. 

When creating breakout room tasks: 

  • Set clear expectations. Any explanation of expectations should include a clear relationship to learning outcomes. Provide a code of conduct for interaction, performance expectations related to the task, etc.
  • Prepare instructions in advance. Provide students with a clear task and deliverable. Include any resources needed to complete the task. Outline the deliverable or provide a model so that students understand what is expected upon reconvening with the whole class. 
  • Guide students in how to self-organize. Assign roles or ask students to assign them (host facilitator, notetaker, timekeeper, and speaker who reports back to the class). 
  • Provide technical support. A tip sheet for the technology can be helpful in case they get stuck, for example. 
  • Monitor. Circulate as you would in your face-to-face class by joining breakout rooms to check in. 
  • Report back. Ask students to present a summary slide (groups might contribute a slide to a class google presentation), share group’s response, etc. Follow up with whole-group sharing in some form. 

Sample Breakout Room Activity Types

  • Small group discussion
  • Think – Pair – Share
  • Group project
  • Data analysis/text analysis
  • Debate preparation
  • Simulation practice – mock interview
  • Peer feedback
  • Jigsaw activity

Polling 

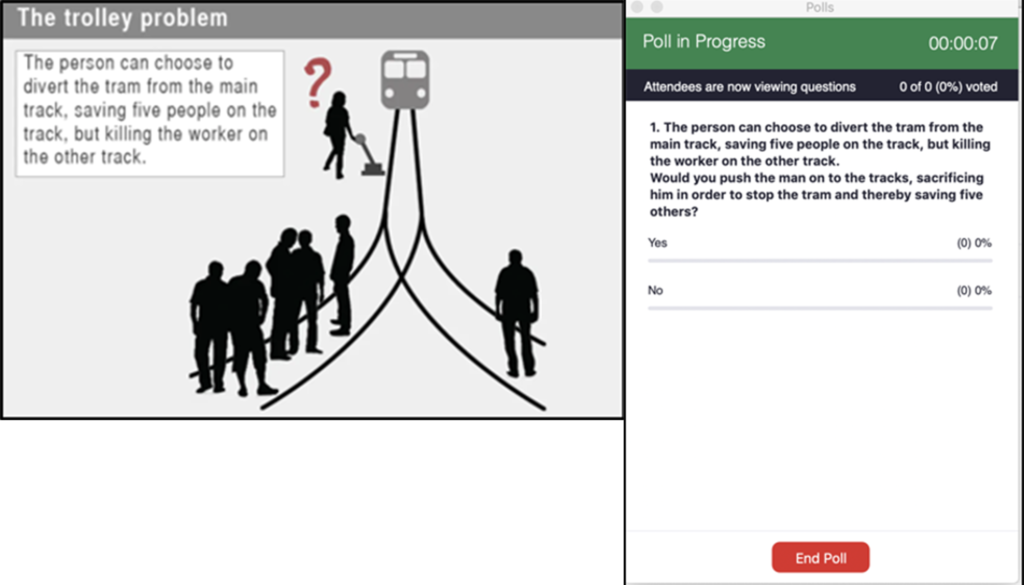
Another option for interactivity during lectures is the Zoom poll. Polls are easy to launch and are a handy tool for icebreakers at the beginning of sessions, to check for understanding, or to allow students to have input on lecture content. They can be created as anonymous surveys or as simple question responses. 

Fig. 1 This example demonstrates how polling could be used to pose a question and elicit an anonymous response from participants.

Non-verbal Feedback in Zoom 

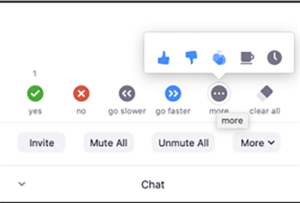
Sample of Nonverbal feedback icons from Zoom
Nonverbal Feedback options in Zoom

If you miss the non-verbal feedback of a live audience in a face-to-face setting, you might consider encouraging students to use Zoom’s non-verbal feedback options available in the chat window. This tool allows students to input quick yes/no responses to questions, ask for the speaker to speed up or slow down, indicate that they need a break, and more. 

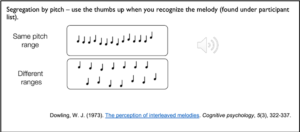
Sample of a music activity
Fig 2. Consider how the simplicity of non-verbal feedback indicators might be useful in a cognitive psychology course for student feedback while listening to audio clips. Students could be asked to use the thumbs up when they can name the familiar melody mixed with interfering tones, for example.


Facilitating Lab Experiences Remotely

Live lab activities provide another opportunity for interactive experiences in Zoom. The following examples of lab tasks that implement active learning principles are taken from existing online courses through Oregon State University Ecampus. Consider how similar field and lab experiences could be used to engage learners in your remote courses. 

Sample Experiences

image from science course

Science Education

In this example from a phenology course, students observe and record specific elements in a local natural area over the course of the term. After watching an instructor-led demonstration, learners record key elements based on Nature’s Notebook. They then share their data, photos, and drawings with the class to create a collective body of observations. Students then contribute their observations to a national phenology network. 

Public Health

pedometer walker
Image source: pixfuel.com, cc

Learners in this course collect and analyze authentic data through a public health topic: the human-built environment. Students wear a pedometer to track how many steps they take over a 48-hour period. They ask other members of their family or community to track the same information. Students gather, analyze, and compare their data to identify potential strategies their community could implement to improve its built environment to promote active transportation by walking, biking, or other means.

Tips for setting up remote lab demonstrations or tasks: 

  • Consider common household items to recreate a lab experience
  • Add or find components online
  • Use online videos or DIY recordings of a demonstration
  • Present simulations and provide an analysis or breakdown of what is happening
  • Connect students to virtual labs or simulations
  • Provide instructions and expected outcomes
  • Demonstrate or show the process for collecting data
  • Provide raw data for students to analyze
  • Offline – engage students with assignments or discussions related to the remote lab experience

Whether you opt to use breakout rooms to facilitate collaborative tasks, quick polls to gather student input on lecture content, or non-verbal feedback options to take the pulse of your audience, the features of Zoom offer a means of interaction that can help you to bring students to the center of your remote teaching sessions. 

Adapted from slide presentation by Cyndie McCarley, Assistant Director of Instructional Design, Oregon State University Ecampus