Storytelling is a fundamental part of human culture. With the use of narrative and world building in an educational setting, we can imagine ourselves as one of the characters and better engage with the material at hand. In distance education, these tools can be powerful allies made stronger with a multimedia approach. In a typical lecture scenario, students are presented information in the form of topics and relationships, specific ideas and often jargon. All these things are a necessary part of learning and provide a framework for the course’s content as well as preparing them for the application of the material. But by using storytelling as a tool, student engagement can be brought to higher levels and create memorable experiences.

A great example of the storytelling approach is Rorie Solberg’s PS 110: Governing after the Zombie Apocalypse. The course deals with the rebuilding of government after a fictional zombie apocalypse. Her course might be a bit too relevant to modern society during a pandemic, as it takes a closer look at the effects of a global health crisis. The students of PS 110 have been ‘selected’ as delegates to a constitutional convention. They represent one of the four territories standing in the place of the former United States, and each student faces the challenge of writing a new constitution, under which a new democracy will be built. The duty of the students is to create the outlines of a new government, accounting for the new needs of the people in this post-apocalyptic environment and, should they find it necessary, addressing the shortcomings of previous governments from around the world. The class begins with the first meeting of the delegates and at no point is the fourth wall broken.

Leveraging multiple forms of media can reinforce the verisimilitude of these stories and provide different avenues for student engagement. Rorie’s course is making full use of what Ecampus’ Multimedia Team has to offer with press release designs, audio broadcasts, animation and an interactive voting simulator.

The audio broadcasts, released by “PZA News” after the collapse of mainstream media outlets, are made to sound like the work of amateur Ham Radio operators doing their best to keep their communities informed. With a distinct taste of Orson Wells’ “War of the Worlds” radio play, these broadcasts feature our very own Warren Blyth as not one or two, but all of the eleven different characters and voices featured therein. The broadcasts cover local issues, giving insight to how societies and communities have changed in light of a global disaster. By tackling social issues as well, these fictional news broadcasts provide a more complete context to the decisions these students will eventually make in drafting their constitutions. They must consider any long reaching effects of their specific wordings and how their policies may affect disadvantaged groups, even unintentionally. Rorie’s course goes beyond being placed into a simple setting and focuses on how her fictional characters would interact with each other and their environments.

In addition to audio there are written publications. While reading is typical in any class, written press releases allow students to read more stories taking place in their post-apocalyptic society. Multiple forms of media for news releases reinforces the world building aspect and contributes to a multi-dimensional, fleshed out feel to the course’s setting. An animation, depicting the daily life of the surviving population is also being developed for this course. This is another fun and engaging way to bring the class materials alive. What better way for students to understand their roles than to see for themselves how their constituents live.

Storytelling and world building can be powerful tools for both student engagement and learning that can create memorable experiences. Enriching stories with multimedia creates an immersive experience that entertains as much as it educates. Rorie’s PS 110 is an excellent example of storytelling, world building and leveraging media assets to enhance immersion.

Author: Matt Djubasak

Welcome to the Webcam and Video Tips guide by Oregon State University Ecampus
This brief series of tips is meant to be a beginner’s overview for DIY home recording on webcam, with some additional options suggested if you want to take your video production even further.
Since this document may not cover every issue you encounter while acclimating to DIY video recording, we recommend contacting your school tech person for additional troubleshooting.

WHERE TO START

  • Internet Connection
    • Wired connection via ethernet cable is best
    • If wired connection is not possible, having a clear line of sight to wifi router will give the best wireless connection
    • Disconnect any wifi devices that are not in use or needed.
  • Computer Check
    • Determine if your computer meets minimum system requirements for streaming software
    • Close all non-essential programs to free up more computer resources
    • Disconnect any external monitors if you are on a laptop and it is running slowly
  • Testing Your Tech
    • Does your computer have a built in webcam or do you have a 3rd party webcam?
    • Identify where your microphone is and talk towards it
    • Test the webcam and audio settings BEFORE your first recording. 
    • Practice practice practice
      • The last recording will be better than the first
  • Making sure your voice is clear and easy to understand
    • Having a microphone helps with this
    • Smart phone earbuds have a built-in microphone that can help you with voice clarity
    • Airpods would also work when recording to an iPhone

PRESENCE AND ENVIRONMENT

  • Be aware of your environment.
    • Limit any background noise as much as possible.
    • Clean up your space and be aware of what is in the background of the video.
    • Rooms with carpets and drapes are best for audio.
    • Turn off lights and close windows that are behind you when you are recording.
    • If possible, turn on a light behind the camera.
    • Keep experimenting with lighting until you have a set up that works for you.

  • Try not to bump the desk, computer, camera, or microphone while recording.
    • Typing should also be avoided.
  • Do a test lecture and watch it.
    • See what works and what doesn’t.
    • If possible, get feedback from others
  • Practice
    • The more you practice, the more natural it will feel.
    • Run through what you want to say before you start recording.
  • Relax and be natural! Hopefully you are sharing knowledge that you are passionate about and we want that to show. (Remember that we are always our own worst critic, and your teaching team will be there to help you with constructive feedback on how to help students best enjoy and learn from these videos.)
  • Have notes in front of you while you’re recording. 
    • It is easy to get distracted or off topic, especially when you are uncomfortable.
    • Having notes in front of you while you record can help you stay on track.
    • These notes can be as vague or as detailed as you want, but avoid reading off of them directly and not looking at the camera.

DIGITAL NOTATION

GOING FURTHER WITH VIDEO PRODUCTION

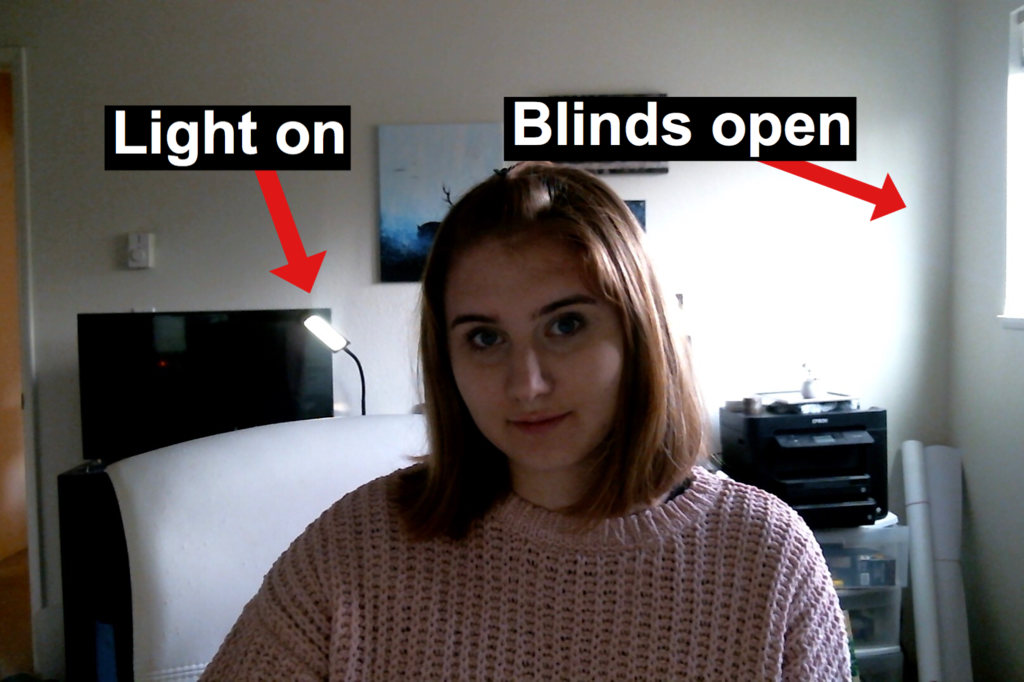
  • For DIY video production, there are many ways to go about this!
    • The lowest barrier to recording on your own would be to use a smart phone attached to a tripod or other mount.
    • If you have access to a camcorder or DSLR, get out there and use it!
  • For smart phone video
    • Avoid handheld and invest in a tripod or smart phone / camera mount
    • If you have a decent internet connection for uploads, consider recording 1080p at 30fps
    • Use an external microphone whenever possible

ACCESSORIES TO CONSIDER IF RECORDING WITH A PHONE

Apps:

  • Filmic Pro – $14.99
    • Allows manual control of exposure and white balance, audio monitoring, and other useful features.

Audio:

  • Lavalier microphone – $18.99 
    • Highly recommended. Audio recorded from your phone’s microphone can be difficult to hear if you aren’t standing near the phone or if the location is noisy. 
  • Double lavalier microphone – $25.99
    • For when you have two people on camera. Both mic cable feed into the same phone, removing need to sync two audio sources. 
  • Audio cable extension – 10 ft. $9.95 or 20 ft. $15.95
    • For when you need to stand farther away from the camera.

Stabilization:

  • Selfie stick w/built-in tripod and Bluetooth remote – $23.99 (heavy duty, 51″ extended), $14.99 (27.6″ extended)
    • Terrific for self-recording in the field.
  • Combination hand grip/small tripod/tripod adapter – $8.89
    • Can be used as a hand grip for filming on-the-go or as a desktop tripod. Phone mount can be removed from the hand grip/tripod legs section, allowing you to mount your phone on most standard tripods.
  • Gimbal stabilizer – $94.99
    • Pricey, but will greatly increase the quality of your footage if you’re filming something that requires camera movement, such as a walk-and-talk interview or a field trip video.
  • Creative ways to mount a smart phone with household items:


ADD-ONS / TIPS AND TRICKS

  • If you would like to have access to a teleprompter as you record video, consider one of the following:
  • Here are some sound improvements to consider to reduce echo in your recordings.
    • Add blankets or blinds on walls to reduce echo.
    • Record in the smallest room possible.
    • Avoid rooms with hardwood floors.

Lighting for video

  • Turn a window or glass door into a soft “Key Light” by hanging a cheap, frosted shower curtain over the window. 


Authors: Jason Jones, Drew Olson, and Sammi Lukas, with special thanks to Victor Yee for technical support with the images.

Are you looking for something to “spice up” your online course? Connect with students? Show them what your lab looks like? Take a look at what Oregon State University Ecampus is including in courses in our Course Demo.

Media elements in courses help students to visualize sometimes difficult concepts, connect with their instructors, and hear from professionals in the field. The Ecampus media team along with the talented instructors and instructional designers, work together to create custom media ranging from videos to augmented sandbox experiences. Do you have something in your class that could benefit from adding in media?

Adding elements doesn’t have to be hard. Start with something small – interesting images with alt-text, something you can do on your own, or collaborate with someone who’s done media you saw and liked and ask for their guidance and benefit from their experience.

You can do this!


""

Are you interested in reading about research in the field of online teaching and learning? Could you use some help in reading and digesting the results of various research reports in the field? Would you like to be able to identify the strengths and weakness of the study reports that you read? If you answered “yes” to one or more of these questions then you might be interested in the  Ecampus Research Unit’s new resource: the Report Reader Checklist.

The Report Reader Checklist includes a comprehensive set of criteria that offers you a guide to evaluate the quality and rigor of study reports. The checklist is intended to provide an overview of the foundational elements that should be included when reporting on the results of a study. You can apply each checklist criterion to a report to see whether that element has been included or not.

Here is an overview of the six areas of the checklist and the criterion in each area:

  1. Context: Does the report describe the larger purpose of the study? Does it explain the history or theoretical framework? Does the report include research goals and suggestions for further research?
  2. Methodology: Does the report have a methodology section? Is it clear how data were collected and analyzed? If the study used statistics, were they named? If coding was used, was the procedure described?
  3. Sample: Are the study participants described in detail? Is it clear how participants were recruited? Does the sample represent an appropriate level of diversity? Are subgroups appropriately identified?
  4. Reporting Results: Are all numbers in the report easy to comprehend? Is the “N” provided? Does the report identify missing data? Is it clear where study findings fit with the study’s purpose? Do data visualizations enhance your understanding of the results?
  5. Transparency: Are raw data included in the report? Are instruments or study protocols provided in the report? Are the authors clear about any conflicts of interest? Is the discussion rooted in data results?
  6. Reader Experience: Does the report use language that is easy to understand? Is the report ADA accessible? Does it include a summary or abstract? Is the study an appropriate length?

There are no “points” or “weighting” within the checklist, but if you find one area (e.g., “Context” or “Methodology”) that is missing several criteria within a report, that would indicate that a report is weaker in that particular area.

You can download a one-page PDF of the checklist or visit our supplementary website that provides more details on each of the criterion. Further, the site includes sample reports for each criterion so that you can learn more about areas that you are unfamiliar with.

We hope you find this resource useful for reading and evaluating reports in the field. We also hope it helps you make data-driven decisions for your work.

About the Oregon State University Ecampus Research Unit: The Oregon State University Ecampus Research Unit makes research actionable through the creation of evidence-based resources related to effective online teaching, learning and program administration. The OSU Ecampus Research Unit is part of Oregon State Ecampus, the university’s top-ranked online education provider. Learn more at ecampus.oregonstate.edu/research.


“As a stranger give it welcome” – Shakespeare

Students need tactics for when they encounter strange people or strange ideas.(Wilson, 2018) If you think of a first time online student, this is very true as they are entering a new learning environment, likely extremely different from their previous educational experiences. Welcoming that strange experience should include a little bit of information gathering. Look for positive and negatives so that you can decide for yourself how you view it, most of all, have an open mind.

To help potential online students make decisions, and hopefully be more successful should they chose to take an online course, Marie Fetzner asked unsuccessful online students; “What advice would you give to students who are considering registering for an online course?”

Their top 13 responses:

  1. Stay up with the course activities—don’t get behind
  2. Use good time management skills
  3. Use good organizational skills
  4. Set aside specific times during each week for your online class
  5. Know how to get technical help
  6. A lot of online writing is required
  7. There is a lot of reading in the textbook and in online discussions—be prepared
  8. Regular online communications are needed
  9. Ask the professor if you have questions
  10. Carefully read the course syllabus
  11. Be sure you understand the requirements of the online course discussions
  12. Understand how much each online activity is worth toward your grade
  13. Go to the online student orientation, if possible

This needs to raise the question, how can we better help our students? There are obviously struggling students and we want our students to be successful. So, what can we do?

  1. Reach out to students who seem to be lagging behind. A quick email is sometimes all it takes to open up that line of communication between you and the student.
  2. Provide approximate times for course materials and activities. Students can use this to better plan for the requirements that week.
  3. Keep your course organized so students can spend more time with the content instead of search for the content.
  4. Remind students about where to access help and support services.
  5. Develop a Q&A discussion board for student questions about the course. Often, more than one student has the same question and often other students might already know the answer. Have this be something you check daily to answer questions quickly so students can continue with their learning.
  6. Use rubrics for grading. By giving the students rubrics, they will know what is expected, you will get responses closer to your expectations, and it makes grading easier!

Welcome these ideas as you would a new experience. Give it a little try, jump right in, confer with colleagues, or chose your own path. Know that as an instructor or developer for an online course, you have the ability to help your students be successful!

References

Fetzner, Marie. (2013). What Do Unsuccessful Online Students Want Us to Know? Journal of Asynchronous Learning Networks, 17(1), 13-27.

Wilson, J. (2018). “As a stranger give it welcome”: Shakespeare’s Advice for First-Year College Students. Change, 50(5), 60.

Could your online course use a boost? Is it lacking the secret spice that could be the difference between students coming away feeling satisfied rather than feeling like something was missing? Maybe there is a complex topic that students are consistently having a difficult time understanding or perhaps a particular concept that begs for more than a Power Point with some bland images collected from the internet. Well, perhaps the missing ingredient is an animation!

A brief history of animation…

In 1914, cartoonist Windsor McCay wowed audiences with his short animated film. Although not the first animation ever produced, Gertie the Dinosaur broke ground by employing new techniques, such as keyframes, loops, and the use of an appealing character, all of which would become standard practice in the creation of future animations. Interestingly, Gertie the Dinosaur also featured an interactive element where McCay would appear to give commands to Gertie which she would then carry out on screen.

Fast forward to 1928 where upstart Walt Disney Studios released the animated short Steamboat Willy and introduced the world to Mickey Mouse. Steamboat Willy also marked the first use of sound integrated onto film in an animation.

The 1930’s saw a boom in animation with Warner Brothers creating  its Merrie Melodies and Looney Tunes cartoons which featured a cast of outrageous characters including Bugs Bunny and Daffy Duck and arguably some of the most enduring pop-culture references ever. I admit, the Looney Tunes were an invaluable supplement to my formal elementary school education!

Disney upped the ante in 1937 with the release of the first feature length animated film Snow White and the Seven Dwarves. With Snow White, the Disney animators ventured into uncharted territory and proved that an animated film could be both visually stunning and a legitimate medium for storytelling. It was also around this time that the Disney animators planted the seeds of what would become the 12 principles of animation, a system of principles and techniques which have endured to this day and serve as the foundation in the creation of animation and motion graphics.

In the 1940’s and 50’s Disney continued to produce classics with films like Bambi and Fantasia while  another animator, Ray Harryhausen, perfected his “Dynamation” stop motion technique and brought fantastic monsters to life alongside live actors in films like The 7th Voyage of Sinbad and Jason and the Argonauts. Meanwhile, across the Pacific Ocean the Japanese were busy developing their own unique style of animation known as anime.

In 1960, The Flintstones became the first animated prime time television series and paved the way for animated programs like The Simpsons, the longest running series of all time.

In the 1970’s, animated cartoons dominated Saturday morning television. Although the content was mostly aimed at keeping kids engaged while mom and dad slept in, the power of animation’s potential as a learning tool was being explored in the form of short interludes during the commercial breaks. Most notable, Schoolhouse Rock combined animation and music in a powerfully memorable format to teach kids topics like grammar, history, math, and science. Meanwhile, Sesame Street  featured groundbreaking animations aimed at teaching through entertainment.

In the 1980’s, the computer arrived and ultimately revolutionized the way that animation was created as well as the way it looked. It was a clunky start but by 1995, Pixar studios released the first entirely computer animated feature Toy Story and there was no looking back. The omnipresence of the internet added fuel to the fire and allowed anyone with a laptop and a story to tell to publish their ideas to the world.

So, what does all of this have to do with online learning? Well, before the pedagogical red flag goes up and you think that animation is just for kids or that it’s too frivolous to occupy space in the world of higher education, read on.

We need look no further than the media that we consume on a daily basis to see how ubiquitous animation is. From television commercials, to the prevalence of the online “explainer” video, to online apps such as Headspace, which utilizes  animations to demystify the practice of mindfulness and meditation, animation is proving to be an effective medium to deliver information and get it to stick. Why wouldn’t we want to implement this powerful and available tool in online learning?

A well-crafted animation is a multi-sensory experience that can take a complex or abstract concept and explain it in a way that is concise, understandable, and engaging to the learner. Combining audio/verbal and visual information to illustrate difficult topics allows learners to associate images with concepts and has been proven to actually increase learner understanding and retention.

Additionally, animation can be used to visualize things that would otherwise be impossible or too cost prohibitive to depict with film, text, or still images. Things such as a biological or chemical processes that are invisible to the naked eye, or the ability to look beneath the earth to witness how a plants’ roots grow and utilize nutrients, can effectively be illustrated with animation. Larger scale events like planetary orbits, the hydrologic cycle, earthquake science, or the Russian Revolution can be represented in ways that are much more effective than using still pictures with arrows and text. Does the topic require a horse, a bug, a whale, a tractor, a piece of DNA? There’s no need to worry about the exorbitant costs and time required to train, catch, dive, drive, or dissect…simply animate it!  Animated characters, human, abstract, or animals can also add visual appeal and inject humor into a lesson. Finally, and arguably most important: animations are entertaining! If the student is entertained, they are more likely to be engaged in the subject matter and if they are engaged, they are more likely to retain information.

So what’s the next step? The Ecampus Custom Team is here to help you develop your animation. We’ll start by meeting with you to determine a learning objective and to brainstorm ideas for the project. You can view examples of our work to see if a particular style sparks your interest or, if you have a specific aesthetic in mind, we will work with you to refine it. Once we have pinned down a solid direction for the project, we’ll work with you to create a script. The script will serve as the narration for the animated video and is vital as it is an opportunity to distill the content down to its most potent elements. We prefer to keep the maximum length of the animation under 5 minutes and have found this to be most effective for the learner. When the script is finalized, you will come in to one of our studios to record the voice over narration. At this point, it’s full steam ahead and our team begins production on the animation! We’ll check in with you regularly with samples and progress reports to ensure an amazing final product.

-James Roberts, media team, Oregon State University Ecampus

References:

As a stranger give it welcome.” – Shakespeare

Students need tactics for when they encounter strange people or strange ideas. (Wilson, 2018) First-time online students are a perfect example of individuals who are encountering something new, strange, and often uncomfortable, for the first time. Welcoming that strange experience should include a little bit of information gathering. Look for positive and negatives in situations to help decide how you view it and, most of all, have an open mind.

To help potential online students make decisions, when they take their first online course, Marie Fetzner asked unsuccessful online students: “What advice would you give to students who are considering registering for an online course?”

Their top 13 responses:

  1. Stay up with the course activities—don’t get behind
  2. Use good time management skills
  3. Use good organizational skills
  4. Set aside specific times during each week for your online class
  5. Know how to get technical help
  6. A lot of online writing is required
  7. There is a lot of reading in the textbook and in online discussions—be prepared
  8. Regular online communications are needed
  9. Ask the professor if you have questions
  10. Carefully read the course syllabus
  11. Be sure you understand the requirements of the online course discussions
  12. Understand how much each online activity is worth toward your grade
  13. Go to the online student orientation, if possible


These responses raise the question: how can we better help our students? From the advice above, we know students struggle with time management, expectations, communication, etc.  So, what can we do to help foster their success?

  1. Reach out to students who seem to be lagging behind. A quick email is sometimes all it takes to open up that line of communication between you and the student.
  2. Provide approximate times for course materials and activities. Students can use this to better plan for the requirements that week.
  3. Keep your course organized so students can spend more time with the content instead of search for the content.
  4. Remind students about where to access help and support services.
  5. Develop a Q&A discussion board for student questions about the course. Often, more than one student has the same question and often other students might already know the answer. Have this be something you check daily to answer questions quickly so students can continue with their learning.
  6. Use rubrics for grading. By giving the students rubrics, they will know what is expected, you will get responses closer to your expectations, and it makes grading easier!


Welcome these ideas as you would a new experience. Give it a little try, jump right in, confer with colleagues, or chose your own path. Know that as an instructor or developer for an online course, you have the ability to help your students be successful!

References

Fetzner, Marie. (2013). What Do Unsuccessful Online Students Want Us to Know? Journal of Asynchronous Learning Networks, 17(1), 13-27.

Wilson, J. (2018). “As a stranger give it welcome”: Shakespeare’s Advice for First-Year College Students. Change, 50(5), 60.


What is it?

Image of animator’s face in Character Animator program showing the facial data points used for animation creation.

Facial motion capture (Mo-Cap) is a process that uses a camera to map and track points on the user’s face. Software such as Adobe’sCharacter Animator derive data from the camera to animate cartoon characters in real time. This can greatly reduce the amount of time needed to create an animation and breathes subtle life into the character that would be otherwise difficult to achieve. Character Animator harnesses the power of the webcam to map several parts of the face to the respective parts of the character allowing it to record in real time. This includes your eyebrows, eyes, mouth, and head position. It also intakes audio to change mouth shapes to match what the user is speaking. In addition to the webcam, the user can operate their keyboard to trigger additional movements, effects, and walk motions. All these different aspects combine and give the character a personalized feel.

How does it help?

Image of character being rigged into a puppet showing the mesh and body tags.

Cartoon animations currently do not have a large presence in online learning. This is mostly because they take a long time to create and not everyone has had the resources to create them. Normally, character animation for cartoons requires drawing each frame or using a pose-to-pose process called key framing. With innovative technology such as Character Animator, it greatly reduces the barrier to create cartoon animations for online learning. Each motion of the face records instantly and gives the character life by adding subtle movements to the face and head. The bulk of the work is completed early on to draw, rig, and add triggers to the character, or in this case, the puppet. Once the puppet is set up to record, it is smooth sailing from there. All movements, audio, and facial expressions are recorded in one take; greatly reducing the amount of time for development. However, Character Animator allows you to choose which aspects you want to record, so you can record the eye movements one time, then the eyebrows another time. This is helpful for the perfectionists out there who cannot seem capture it all at once.

How does it work?

To create an animation using Character Animator, there are a handful of stages to complete. The first step is to draw the character in either Photoshop or Illustrator. Next, Character Animator imports the graphics and they are rigged into puppets to prepare for recording. This means the eyes, nose, mouth, etc. are tagged with their respective labels. Also during this time, you can create keyboard triggers. These are animations such as arm movements, walk motions, and more, that the pressing of certain keys on the keyboard triggers the character to perform. After the puppets are prepared, it is time to record. It does not have to be shot perfectly all at once; you can blend the best bits from different recordings into one masterpiece. The last step is to export the character’s recording and composite it into a story using video software such as Premiere Pro or After Effects. Once you achieve the flow of facial Mo-Cap, you can start cranking out animations faster than ever before.

Click Image to View Video

Below is a quick rundown of what it takes to set up a character and how to record it. At the end of the video, there is a sample of multiple characters in one scene.

What does the process look like?


Author: Zach Van Stone, Oregon State University Ecampus

Two cartoon men argue over a drawingDifficult Conversations

We all have conversations that are difficult from time to time. These are stressful, can make you (or the other person) feel bad, and they can take a lot of time to work through.

Frameworks for conversations allow the participants to approach these conversations with some tools to help those conversations stay productive and turn the temperature down at the same time. By using these frameworks, you’ll help make this conversation not personal, be able to calm the situation, and arrive at better solutions, sooner.

What are these difficult conversation frameworks? Let’s get started!

Change Advocate Hats

When working with someone, often we come in with our own hat on. We know what we are going to bring to the table and what we’d like the other person to contribute. Before you even come to this meeting, you should try on another hat. Try the hat of the person who you will be meeting with, what might they expect? Is there a third party affected by the decisions that you’ll be making? Try their hat on. Seeing things from another’s perspective helps us to have a better understanding of what they might bring to the table.

Go to the Neutral Zone

Action and re-action is part of who we are as human beings. These are two ends of a rope that can cause frustration when we don’t take a step back and view. When one person tugs at the end of the rope, the other end’s reaction is likely a huge step forward and then a quick tug back. The two people on the ends could keep tugging back and forth causing actions and re-actions but they might not get anywhere. If you can step away from those two ends and take a look at the whole picture, you can see that neutral zone where you can look at underlying issues that might be causing the tug-of-war. Even having one party step into this neutral zone takes away the constant back and forth and diffuses the difficult or possibly heated conversation allowing the parties to move forward.

Phone-a-friend

I’m sure this is familiar to those who’ve watched a popular T.V. show a “few” years ago. What we are talking about here is an outside source that can aide in the conversation. This could be a research article showing why a suggestion would be the right approach, a colleague that has had a similar experience and can talk to the success of an option, or bringing in facts and figures to support suggested approaches. Whatever it is, that “friend” can help provide support while deciding on a course of action with an outside opinion, not another tug on an end.


Personally, I’ve used each of these in conversations before and each one of them has helped multiple times. Do you have other frameworks or tips you’d like to share? Let us know in the comments!

So you’ve scheduled your first video shoot with Ecampus. Great! We can’t wait to work with you. Here are answers to a few questions we commonly receive from instructors.

How can I prepare for my video shoot?

Rehearse! And this doesn’t have to be a bunch of work, just run through your piece once or twice before the shoot.

If you’d like for the finished video to include any additional graphics, photos or video, please let a member of the video team or your instructional designer know in advance of the shoot so that we can plan accordingly.

Should I write a script?

Maaaaaaaybe. It’s up to you. Some people prefer to work from a teleprompter, others prefer to wing it. We always suggest going with your comfort zone. If you would like to work with a teleprompter, please send your script or bulleted list to ecampus.productions@oregonstate.edu at least one day before your shoot.What should I wear?

Wear clothes that are comfortable and make you feel good about yourself…that’s the priority. Feel free to show off your personality and have fun with it.

Here are a few guidelines:

  • Avoid wearing plain white. It’s distracting against a black background, and gets lost in a white background.
  • If you’ll be filming against a black background, you’ll want to avoid wearing black, lest you appear to be a floating head and arms in your video. Also, black or really dark clothing can sometimes cause more shadowing on the face, accentuating wrinkles and aging the subject.
  • Instead, you might consider a medium-dark blue or gray. Or even better, go for a rich, solid color.
  • Also, avoid tight lines and patterns. These types of patterns cause a distracting optical effect called moiré where the pattern appears to move. Larger patterns, like plaid, look fine.
  • Finally, please avoid noisy jewelry and accessories as the microphone may be able to pick up the noise.

Oh gosh! Now that I’m here and I’m on camera, I have no idea what to do with my hands.

Think of the camera as another person. How do you move when you’re talking to somebody? If you tend to gesture when you speak, then please do! The movement will add energy to the video and help to convey your excitement about the topic.

Another option is to hold a prop. Just be sure that your prop is relevant to the video so that you don’t confuse the viewer.

If you prefer to be more still, that’s also great. Just be sure to maintain open body language and avoid crossing your arms in front of you or behind you.

This terrific Wistia article talks about the science behind why your gestures look so awkward on camera and dives into the hand thing a bit more, explains why we feel so awkward on camera, and suggests some ways to feel more comfortable at your video shoot.

That’s A Wrap!

If you have any questions, concerns, or ideas to share, please contact the Ecampus video team at ecampus.productions@oregonstate.edu. Looking forward to working with you!