Bruce’s twist on Torshi-e Bademjan (eggplant pickle relish) Instructions say to let it marry until the Winter Solstice. <3 Photo by Buffy Rhoades
A former co-worker, mentor, customer, and friend popped up in my inbox the other day to ask if the post Tiny Bubbles was me. (We popped up in a Google search! Yay!!) We chatted about his ferment and yesterday he brought homemade Persian pickled eggplant. I asked what to eat it with and he smiled that bright-eyed smile he gets when we talk about food and said, “Rice.” Inspiration for dindin.
I asked my friend and former co-worker, Katlyn Axmaker, to share her meal planning methods, because that lady has mad meal planning skills! Take note folks, this is good stuff.
What’s For Dinner?!?
If you’re anything like me, the question, “What’s for dinner?” was asked 297,542 times last year. Maybe it just felt like it? The thing that keeps me sane and in control in the kitchen is my weekly meal plan. I spend much less time staring in the refrigerator trying to figure out what I can make with two eggs and a leftover slice of cold pizza. Let me walk you through how I meal plan for the week.
The first thing I do when starting my plan is look in the fridge to see what needs to be used up. I want to use those ingredients before they go bad. If I don’t make a plan on how to use them, they end up in the compost bin and I hate throwing away my hard-earned money. This week we have sliced ham, carrots, bell pepper, and some chicken bones. The Food Hero ingredients search is an easy way to find recipes specifically for what’s on hand. This week I chose Pineapple Veggie Chicken to use up the bell pepper and carrots. I’m making chicken stock with the chicken bones and then planning to use it and the ham in Ham and Vegetable Chowder.
Next, write out each meal, including snacks. If you are looking for a printable template, check out MyPlate. I look at our family calendar when planning the menu and schedule the quickest/easiest to prep or make-ahead meals for nights we’re gone all day or are busy immediately after work or school. We have sports practice two evenings next week and I’m planning quick meals so we aren’t tempted to go to a drive-thru or order takeout.
Katlyn’s meal plan calendar. Photo by Katlyn Axmaker
Once the meals are planned, I shop my pantry, fridge, and freezer for the ingredients. This way I only buy groceries we need and it allows me to rotate groceries and nothing gets shoved to the back corner of the pantry for five years. The remaining ingredients make up my grocery shopping list, and I stick to the list!
Shopping in bulk and storing in deli-style quart containers, or canning jars and used lids is a great way to see what’s on hand and prevent pantry pests. Always date and label your ingredients. Painters tape and a Sharpie work fine. Photo by Buffy
Finally, prep groceries as soon as you get home from the store. Produce can be cut, meat can be portioned out, and cheese can be cut or shredded. If getting meals in front of my hungry family during crunch-time is easier and faster, I’m more likely to stick to my plans. So when my child asks me, “What’s for dinner tonight?” my answer is, “Pineapple Veggie Chicken and Rice!”
Tip and tricks I use to make my food stretch, keep my grocery costs down, and make sure my family is engaged:
Ask everyone in the family to suggest a meal (or one of each type of meal) they would like to have next week. Keep on file for future reference.
Make ingredients work for more than one meal. Often buying a larger amount of fewer ingredients reduces overall cost.
Plan leftovers as a future meal or use them in a different recipe later.
Freeze leftovers in single serving sizes for quick lunches and dinners.
Have a couple go-to meals where you can mix and match ingredients easily. This makes planning much easier.
Plan meals seasonally. Produce is less expensive and tastes better during its harvest season.
Check grocery store sales when creating the menu list. If something is on special, buy extra to stock up the pantry or freezer, and possibly avoid having to buy it later at a higher price.
Keep in mind that meal plans are just plans. If you want to move meals around, it’s okay.
Helpful meal planning and storage Extension publications :
My first seed catalog showed up in the mail last week and a friend texted to see what type of cucumbers I planted last year, prompting me to stop procrastinating and order my seeds. Dreaming and planning my garden in anticipation of next year’s harvest is one of my favorite things to do in January. I truly appreciated the care in that text. It’s a great reminder to reach out to your peeps and let them know how important they are. Thank you for all that you do in your world. You matter. Keep taking care of yourselves.
As always my friend, stay curious and be excellent to each other.
Buffy Rhoades| mom. forager. gardener. volunteer turned program assistant. a real busy beaver
I harvested the last peppers from my garden two weeks ago. Earlier this Spring, the stellar staff at Naomi’s Organic Garden Supply recommended a yellow chili pepper varietal that I planned to use in ferments. Sarit Gat, a slim, yellow, hot chili from Kosovo and a steady producer, provided colorful heat to my spicy dill pickles and was intended to become a base for fermented hot sauce.
Coriander blossoms and seeds are aromatic and interesting. So much better than dried… Image from Buffy Rhoades.
I’d planned on pairing it with the seemingly ever present green coriander seeds in the garden, along with ginger and garlic. I congratulated myself on planning holiday gifts while purchasing the seeds last February. *pat on the back*
Well…my first two batches failed. I wasn’t alone. Friends reported that their sauerkraut or pickles weren’t bubbling and were way too salty.
Ready for brine… Image buy Buffy Rhoades
Failed batches are a learning opportunity, but we were following tested recipes, so I wasn’t sure what went wrong. Did any of you have issues with your ferments being too salty this year? Did Kahm yeast, that white film that ruins the flavor of ferments, colonize in your jars? Raise your hand if that happened to you too. *hand raised*
It’s important to understand how fermentation occurs so you can learn from your experiences. The subject of fermentation is diverse (pickles, wet-brine, dry-brine, vinegar, wine, beer, kombucha, sourdough, yogurt, cheese, charcuterie…) and is well covered by knowledgeable authors of famous books and university publications that provide step-by-step instructions, equipment recommendations, and trouble-shooting help.
All brined up and no where to go. Image from Buffy Rhoades
We can’t review all these topics in one post, but will dig deeper in the future. (My friend, Kristina, is recommending a multi-part series to cover this topic.) Let me know if you’re interested in more fermenting content. For now, let’s take a look at evaluating pickles, kimchi, and sauerkraut.
This may be putting the cart before the horse, but understanding the principles- the How It Works and Why We Do What We Do- can help you answer your own questions during the process. Every batch, every season, is different and knowing how to respond to this living project may be helpful as you get started.
So this is the low-down:
I purchased a new airlock system with glass weight to see if it prevented yeast development. Image by Buffy Rhoades
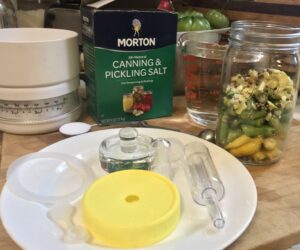
Salt: It creates a beneficial environment for certain bacteria to grow and discourages growth of undesirable bacteria. It’s used to pull liquid from vegetables when dry-salting, a technique used when making sauerkraut, or as a brine to submerge vegetables, such as when making pickles. Only use pickling/canning salt, as not all salts are the same weight by volume and recipes are tested use this salt. It’s also free of additives.
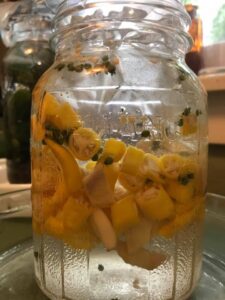
Containers: Glass, food-grade plastic, and ceramic is okay. Avoid metal clasp-top lids because the acidity you’re striving for will eventually ruin them. I like glass containers because the tiny bubbles show active fermenting and I can see if all the bubbles have been released daily. Quart and half-gallon jars are great; place on a non-metal plate or pie tin to catch drips.
A jelly jar fits nicely in wide-mouth quart jars. Image from Buffy Rhoades
Weights: You need something to keep your fermenting ingredients under liquid. This can be easier said than done, as little wispy things like to float. It’s important though, because fermentation bacteria thrive in anaerobic (air-free) environments. Large cabbage leaves or even a couple onion slices can act as the first layer to corral small vegetables or spices. You can go low-tech and use a zip-close bag or jelly jar filled with brine (or jelly), or ceramic or glass weights. I have zero luck using a plate. If it works for you… awesome-sauce. Please tell me what you do in the comments. FYI, The Joy of Pickling suggests using brine instead of water, just in case the bag leaks or the jar spills in your product. By the way, it’s not a matter of if it will leak. It’s a matter of when.
Note the onion slices acting as a first layer and the cloudy brine. Cloudy brine is normal. Photo by Buffy Rhoades
Temperature: This is pretty cool to know. As a general rule of thumb, a slow ferment produces the most interesting flavor. The beginning bacteria like to start out around 60F and 72F. Too low and they have a hard time waking up. Temps higher than 80F and they’re likely to be soft and can skyrocket into what I think of as the Fast Track lactobacillus and can become very acidic, but not have much depth of flavor. Temps over 90F can result in rotting. Sometimes low temps are a good thing, like if you’re going away for the weekend and have no one to babysit your batch, you can pop it in the fridge, but is not ideal at the beginning of your ferment or for long term storage.
Sequential growth of bacterial species with acid production during fermentation. Image from the amazing resource book Food Preservation and Safety: Principles and Practice. by Shirley J. VanGarde and Margy Woodburn
What’s Happening In There? The initial fermenters, the first bacteria, are naturally present on the surface of the vegetables. (Yes, you should still wash the veggies before starting.) Salt, water, temperature, and providing an anaerobic environment help them outgrow the competition. They consume carbohydrates and convert them to acid. That conversion creates a new, optimum (acidic), environment for the next set of microbes, and so on. As they expire, they release gas (CO2) resulting in bubbles.
Managing Brine: Now listen, this is important. Brine is not just salt water. Its the juices pulled from your vegetables. It’s the accumulation of different bacteria converting sugar to acid. It’s valuable stuff. It evolves with your vegetables. When your product is full of bubbles, don’t let them just sit there. Gently shake them out. They create pockets of air, something we want to avoid. Plus it’s a fun way to start the morning. Either way, you don’t want to lose this stuff. (Unless it’s thick and slimy, in which case you toss the contents, note what you did wrong and start over.) Which brings me to the major reason for loss of brine…
See that? Thats not enough headspace. Image by Buffy Rhoades
Headspace: Do not overfill the jar or container. It can be tempting to add “just a little bit more” to a nearly full jar. Please, I beg of you, learn from me and don’t do it. As your ferment becomes more active, it will overflow and if you’ve overfilled the jar, you’ll lose that valuable brine. (This is where the non-reactive plate or pie pan comes in handy.) Some overflow is natural and to be expected, but you don’t want to lose so much that you don’t have enough to cover your ingredients. When this happened I tried to push it down. Guess what. It didn’t work. I had to remove some kraut. Adding new brine at this point is too late, because the microbes have been hard at work creating a whole new environment. I called that failure a “teachable moment.”
Recipes: This is where the proverbial rubber meets the road. Imagine growing peppers from seed and reserved limited garden space to let your coriander plants go to seed, but for some reason used an untested recipe and, instead of fermenting, it became a salty host for Kahm yeast. Do yourself a favor, save time, money, and effort and use extension resources. OSU Extension’s Pickling Vegetables publication is a great place to start!
These take up quite a bit of fridge space. Image from Buffy Rhoades
Now What Do I Do? If left under the same conditions, your product will continue to ferment, but will move beyond peak quality and begin to deteriorate. You have a couple of options:
Store in the fridge. Eat it. Gift it. It’ll be at peak flavor and texture for about 6-9 months, depending on the temperature of your fridge, but will be fine for about a year. The color will fade and texture will become softer but it won’t be unsafe. Depending on how many ferments you have, this may take up a substantial amount of fridge space. Plan accordingly 🙂
Preserve: If you eat fermented foods for its probiotic benefits, you won’t be interested in canning your sauerkraut, as it kills the probiotics. But did you know it’s possible to do so? If you decide to Boiling Water Can fermented pickles, the National Center for Home Food Preservation, OSU’s Pickling Vegetables, and other university publications have recipes to safely do so. Half-fermented products, like half-sours, cannot be processed because they haven’t developed the acid necessary to make it a safe product. Also, fully fermented pickles made from a tested recipe can be safely processed using Low Temperature Pasteurization, if indicated in the recipe.
With guidance from OSU Extension and Master Food Preserver Volunteer Program, I learned the science behind fermentation and gained confidence from my amazing teachers, but still make mistakes. We talk them over, share ideas, experiences, theories and learn from each other. In hindsight, I should have sanitized my equipment, since Kahm yeast likes to stick around a while. I managed to save the failed peppers by rinsing them and applying different preservation techniques. One batch went into the dehydrator to become powder, using the technique mentioned in Tomatoes and Autumn Sweaters, and the other batch is in 5% strength apple cider vinegar. It smells amazing and is nicely spicy. I see pickled onions in my future!
Sarit Gat gifts 2.0 Image by Buffy Rhoades
Don’t be discouraged by failure. If we’re lucky, we learn from it, right?
Until next time friends… please comment, share, and visit the OSU Extension Clackamas County Family and Community Health (FCH) program’s Facebook and Instagram pages, learn new skills on our YouTube channel, read the latest installment of holiday topics in our newsletter, Healthy Together, and more on our website.
Keep exploring, stay curious, and be excellent to each other!
Buffy Rhoades | mom. gardener. volunteer turned program assistant. a real busy beaver