Nasturtiums “from my garden” was listed as a salad ingredient and were peppery and delicious. Photo from Buffy Rhoades. (Yes, these are from my garden.)
A couple weeks ago my husband and I celebrated our anniversary with a fancy-schmancy dinner at a local restaurant. They featured seafood and seasonal produce, and to my delight, corn was one of the highlights of the menu. (Corn pudding or majarete, is delightful! Who’d have known?!)
Photo courtesy of Julian Scholl on Unsplash
Now listen, I’m dating myself here, but I have childhood memories of a large wooden crate of freshly harvested corn on the side of the road with a hand-painted sign advertising “CORN 4 ears for $1”. My family would bring some home for dindin, but also to preserve for the rest of the year, because in-season produce is not only best quality, it’s also more affordable.
Lucky for us, Oregon State University Extension has a number of food preservation publications for individual foods, such as Preserving Corn. If you don’t care to pressure can your corn, but would really like to freeze it, they share everything you need to know about how to get the best results. (I did not know that you need to blanch corn before freezing it until I began training as a volunteer for OSU Extension. This explains my previously disappointing results!)
Photo courtesy of Mohd Hafiz Yahya on Unsplash
The season is winding down, but it’s not too late. I’ll be dreaming of my beloved great-aunt Barbara’s corn chowder while cleaning, blanching, and freezing ears of corn this weekend. Also, don’t forget OSU Extension’s Food Hero site for more recipes, facts, and kid activities.
It’s been a long while since my last post. Be assured, more topics are on the horizon, but in the meantime, if you haven’t already subscribed to our YouTube channel, followed us on Instagram and Facebook, or visited our webpage, please do so. We share all kinds of things relating to the Family and Community Health program. Mostly about life and getting good at it. (I love that quote!)
Sunflowers from the garden have been a source of joy this season. Photo by Buffy Rhoades
Asparagus is in season in the Pacific NW and this is the perfect time to make pickled asparagus. It’s a great condiment with charcuterie, cheese, Bloody Mary’s, and makes an excellent gift.
Asparagus bed at the community garden. Image by Buffy Rhoades.
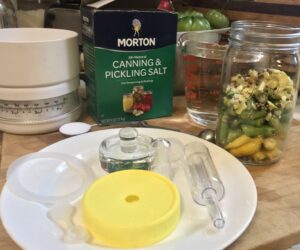
However, unless you’ve been lucky enough to score good canning lids online or have leftovers from last year, they’ve become a valuable commodity. Raise your hand if the thought of not finding lids in the middle of tomato season stresses you out. (Preparing for the season by knowing how much you need to preserve helps.)
I recently asked Jeanne Brandt at OSU Extension in Linn/Benton county if she’s heard anything from Ball. Word on the street is they’re expecting normal production late-April through May, but what does normal look like? Products are slowly starting to appear on store shelves, but seem to sell out fast.
University of Wisconsin-Madison recently shared information on lids and home food preservation in an article called Put a Lid on It! (I love this name!)
“By far the most important step in safe home canning is to follow an up-to-date, research tested recipe. Research-tested recipes recommend metal 2-piece lids for home canning. Two-piece lids are sold to fit regular and wide-mouth glass canning jars and are made up of a flat metal lid and a metal screw band. The lid contains a sealing compound that, when properly used, softens during the canning process and forms an airtight seal as the container cools.”
We know this. But they go on to say, and pay attention, because this is important:
Tattler reusable lids. Image from University Wisconsin-Madison Put a Lid on It! article. *By the way, universities do not endorse specific brands.
“Are reusable lids safe for home-based canning? Recent research suggests that reusable lids such as the Tattler-brand* will safely seal jars when used for home-based canning. This type of reusable lid is used with a thin rubber gasket. A metal screw band is also needed during canning!”
They share helpful advice on using and maintaining lids and gaskets too.
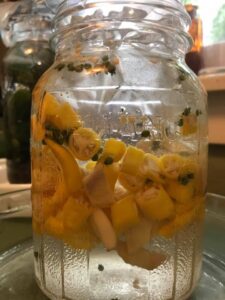
In the meantime, if you have lids, try this tasty pickled asparagus recipe I adapted from The Joy of Pickling by Linda Zeidrich. Betsy, one of our amazing certified Master Food Preserver volunteers, introduced this flavor combination using lemon and rosemary in her pickled asparagus and it was a hit. I have to share it with y’all. For details on how to preserve these beauties and other pickled goodness, refer to the Pickling Vegetables publication PNW355.
Lemon Rosemary Pickled Asparagus-
5 large cloves of garlic
30 black peppercorns
1/2teaspoon hot pepper flakes
5 small sprigs of rosemary
5 slices of lemon
About 3 pounds of washed asparagus, trimmed to fit into 12-ounce jelly jars
2 1/2 cups white vinegar 5% acidity
2 1/2 cups water
2 1/2 teaspoons pickling salt
2 Tablespoons of sugar
Divide the garlic, peppercorns, pepper flakes, rosemary, and lemon slices among 5 12-ounce jelly jars. Pack the asparagus vertically in hot jars with the tips down. (It makes them easier to remove from the jar later.)
In a non-reactive saucepan, bring the vinegar, water, salt, and sugar to a boil. Stir to dissolve the sugar and salt.
Using a funnel, carefully pour boiling vinegar brine over the asparagus, leaving 1/2 inch headspace. Remove air bubbles and adjust headspace.
Wipe the tops of the jar w a damp paper towel or cloth until clean and place two-piece lids and rings on jar, and close finger tight. Do not over tighten.
Process in a boiling water canner:
10 minutes for 0-1000Ft elevation
15 minutes for 1001- 6000ft elevation
Kosher Dills, Pickled Asparagus, and pickled green cherry tomatoes. Image by Buffy Rhoades
20 minutes above 6001ft elevation
The sun is out, the birds are singing, and asparagus is growing. Let’s embrace the season!
And as always my friends, keep up the good work. You’re doing a great job!
Stay curious and be excellent to each other.
Buffy Rhoades| mom. forager. gardener. volunteer turned program assistant. a real busy beaver
I harvested the last peppers from my garden two weeks ago. Earlier this Spring, the stellar staff at Naomi’s Organic Garden Supply recommended a yellow chili pepper varietal that I planned to use in ferments. Sarit Gat, a slim, yellow, hot chili from Kosovo and a steady producer, provided colorful heat to my spicy dill pickles and was intended to become a base for fermented hot sauce.
Coriander blossoms and seeds are aromatic and interesting. So much better than dried… Image from Buffy Rhoades.
I’d planned on pairing it with the seemingly ever present green coriander seeds in the garden, along with ginger and garlic. I congratulated myself on planning holiday gifts while purchasing the seeds last February. *pat on the back*
Well…my first two batches failed. I wasn’t alone. Friends reported that their sauerkraut or pickles weren’t bubbling and were way too salty.
Ready for brine… Image buy Buffy Rhoades
Failed batches are a learning opportunity, but we were following tested recipes, so I wasn’t sure what went wrong. Did any of you have issues with your ferments being too salty this year? Did Kahm yeast, that white film that ruins the flavor of ferments, colonize in your jars? Raise your hand if that happened to you too. *hand raised*
It’s important to understand how fermentation occurs so you can learn from your experiences. The subject of fermentation is diverse (pickles, wet-brine, dry-brine, vinegar, wine, beer, kombucha, sourdough, yogurt, cheese, charcuterie…) and is well covered by knowledgeable authors of famous books and university publications that provide step-by-step instructions, equipment recommendations, and trouble-shooting help.
All brined up and no where to go. Image from Buffy Rhoades
We can’t review all these topics in one post, but will dig deeper in the future. (My friend, Kristina, is recommending a multi-part series to cover this topic.) Let me know if you’re interested in more fermenting content. For now, let’s take a look at evaluating pickles, kimchi, and sauerkraut.
This may be putting the cart before the horse, but understanding the principles- the How It Works and Why We Do What We Do- can help you answer your own questions during the process. Every batch, every season, is different and knowing how to respond to this living project may be helpful as you get started.
So this is the low-down:
I purchased a new airlock system with glass weight to see if it prevented yeast development. Image by Buffy Rhoades
Salt: It creates a beneficial environment for certain bacteria to grow and discourages growth of undesirable bacteria. It’s used to pull liquid from vegetables when dry-salting, a technique used when making sauerkraut, or as a brine to submerge vegetables, such as when making pickles. Only use pickling/canning salt, as not all salts are the same weight by volume and recipes are tested use this salt. It’s also free of additives.
Containers: Glass, food-grade plastic, and ceramic is okay. Avoid metal clasp-top lids because the acidity you’re striving for will eventually ruin them. I like glass containers because the tiny bubbles show active fermenting and I can see if all the bubbles have been released daily. Quart and half-gallon jars are great; place on a non-metal plate or pie tin to catch drips.
A jelly jar fits nicely in wide-mouth quart jars. Image from Buffy Rhoades
Weights: You need something to keep your fermenting ingredients under liquid. This can be easier said than done, as little wispy things like to float. It’s important though, because fermentation bacteria thrive in anaerobic (air-free) environments. Large cabbage leaves or even a couple onion slices can act as the first layer to corral small vegetables or spices. You can go low-tech and use a zip-close bag or jelly jar filled with brine (or jelly), or ceramic or glass weights. I have zero luck using a plate. If it works for you… awesome-sauce. Please tell me what you do in the comments. FYI, The Joy of Pickling suggests using brine instead of water, just in case the bag leaks or the jar spills in your product. By the way, it’s not a matter of if it will leak. It’s a matter of when.
Note the onion slices acting as a first layer and the cloudy brine. Cloudy brine is normal. Photo by Buffy Rhoades
Temperature: This is pretty cool to know. As a general rule of thumb, a slow ferment produces the most interesting flavor. The beginning bacteria like to start out around 60F and 72F. Too low and they have a hard time waking up. Temps higher than 80F and they’re likely to be soft and can skyrocket into what I think of as the Fast Track lactobacillus and can become very acidic, but not have much depth of flavor. Temps over 90F can result in rotting. Sometimes low temps are a good thing, like if you’re going away for the weekend and have no one to babysit your batch, you can pop it in the fridge, but is not ideal at the beginning of your ferment or for long term storage.
Sequential growth of bacterial species with acid production during fermentation. Image from the amazing resource book Food Preservation and Safety: Principles and Practice. by Shirley J. VanGarde and Margy Woodburn
What’s Happening In There? The initial fermenters, the first bacteria, are naturally present on the surface of the vegetables. (Yes, you should still wash the veggies before starting.) Salt, water, temperature, and providing an anaerobic environment help them outgrow the competition. They consume carbohydrates and convert them to acid. That conversion creates a new, optimum (acidic), environment for the next set of microbes, and so on. As they expire, they release gas (CO2) resulting in bubbles.
Managing Brine: Now listen, this is important. Brine is not just salt water. Its the juices pulled from your vegetables. It’s the accumulation of different bacteria converting sugar to acid. It’s valuable stuff. It evolves with your vegetables. When your product is full of bubbles, don’t let them just sit there. Gently shake them out. They create pockets of air, something we want to avoid. Plus it’s a fun way to start the morning. Either way, you don’t want to lose this stuff. (Unless it’s thick and slimy, in which case you toss the contents, note what you did wrong and start over.) Which brings me to the major reason for loss of brine…
See that? Thats not enough headspace. Image by Buffy Rhoades
Headspace: Do not overfill the jar or container. It can be tempting to add “just a little bit more” to a nearly full jar. Please, I beg of you, learn from me and don’t do it. As your ferment becomes more active, it will overflow and if you’ve overfilled the jar, you’ll lose that valuable brine. (This is where the non-reactive plate or pie pan comes in handy.) Some overflow is natural and to be expected, but you don’t want to lose so much that you don’t have enough to cover your ingredients. When this happened I tried to push it down. Guess what. It didn’t work. I had to remove some kraut. Adding new brine at this point is too late, because the microbes have been hard at work creating a whole new environment. I called that failure a “teachable moment.”
Recipes: This is where the proverbial rubber meets the road. Imagine growing peppers from seed and reserved limited garden space to let your coriander plants go to seed, but for some reason used an untested recipe and, instead of fermenting, it became a salty host for Kahm yeast. Do yourself a favor, save time, money, and effort and use extension resources. OSU Extension’s Pickling Vegetables publication is a great place to start!
These take up quite a bit of fridge space. Image from Buffy Rhoades
Now What Do I Do? If left under the same conditions, your product will continue to ferment, but will move beyond peak quality and begin to deteriorate. You have a couple of options:
Store in the fridge. Eat it. Gift it. It’ll be at peak flavor and texture for about 6-9 months, depending on the temperature of your fridge, but will be fine for about a year. The color will fade and texture will become softer but it won’t be unsafe. Depending on how many ferments you have, this may take up a substantial amount of fridge space. Plan accordingly 🙂
Preserve: If you eat fermented foods for its probiotic benefits, you won’t be interested in canning your sauerkraut, as it kills the probiotics. But did you know it’s possible to do so? If you decide to Boiling Water Can fermented pickles, the National Center for Home Food Preservation, OSU’s Pickling Vegetables, and other university publications have recipes to safely do so. Half-fermented products, like half-sours, cannot be processed because they haven’t developed the acid necessary to make it a safe product. Also, fully fermented pickles made from a tested recipe can be safely processed using Low Temperature Pasteurization, if indicated in the recipe.
With guidance from OSU Extension and Master Food Preserver Volunteer Program, I learned the science behind fermentation and gained confidence from my amazing teachers, but still make mistakes. We talk them over, share ideas, experiences, theories and learn from each other. In hindsight, I should have sanitized my equipment, since Kahm yeast likes to stick around a while. I managed to save the failed peppers by rinsing them and applying different preservation techniques. One batch went into the dehydrator to become powder, using the technique mentioned in Tomatoes and Autumn Sweaters, and the other batch is in 5% strength apple cider vinegar. It smells amazing and is nicely spicy. I see pickled onions in my future!
Sarit Gat gifts 2.0 Image by Buffy Rhoades
Don’t be discouraged by failure. If we’re lucky, we learn from it, right?
Until next time friends… please comment, share, and visit the OSU Extension Clackamas County Family and Community Health (FCH) program’s Facebook and Instagram pages, learn new skills on our YouTube channel, read the latest installment of holiday topics in our newsletter, Healthy Together, and more on our website.
Keep exploring, stay curious, and be excellent to each other!
Buffy Rhoades | mom. gardener. volunteer turned program assistant. a real busy beaver
Kabocha and Butternut curing on the porchTestukabuto squash samples at the Culinary Breeding Network
February 16th, I attended OSU’s Culinary Breeding NetworkVariety Showcase event, sadly one of my last public events before COVID-19, and sampled a Tetsukabuto cream filled Purple Karma barley waffle cone. It blew my mind. Creamy texture and not-too-sweet, the squash was a perfect marriage with the dark chocolate-lined barley waffle cone. I planted Kabocha seeds and plan to attempt to replicate this dish.
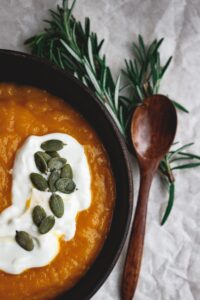
Folks love the comfort-food quality of pumpkin and warm spices, and often ask how they can preserve their winter squash. Unfortunately, pressure canning pumpkin (or other winter squash) puree is unsafe. The density of the low-acid puree prevents thorough heat penetration, creating a serious food-safety risk of Botulism. If your “Charlie Brown Pumpkin Patch” has produced more than your freezer can accommodate, consider canning them in cubes and puree after opening the jar. Also, check out Food Hero’s winter squash and pumpkin recipes, nutrition information, coloring sheets…so much goodness… on their website.
Pumpkin soup and pepitas. Photo courtesy of Tina Vanhove on Unsplash.
Can’t find jars or lids? Remember the dehydrator and powder technique I shared in the last post, Tomatoes and Autumn Sweaters? This technique works for winter squash too. Wash, cut in half and roast, leaving the skin on, until soft. Scoop out the flesh and mash or puree. Gently cook it down to the consistency of canned pumpkin and add spices to the pulp for pie filling or soup base. Dehydrate on a leather tray at 135 degrees f until crispy. Break into shards and grind into powder and store in an airtight container. Don’t waste the seeds! Toasted Pumpkin seeds, aka Pepitas, are delicious and full of nutrients. Instructions here.
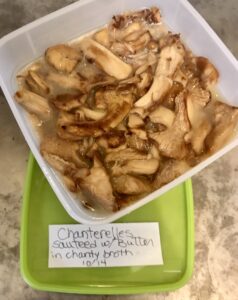
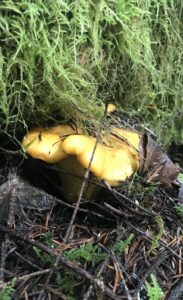
Golden Chanterelle photo by Buffy Rhoades
My favorite seasonal treat, wild mushrooms, present a similar issue when it comes to preserving. Freezing and dehydrating are the only research-based, university-approved methods to preserve wild mushrooms. Mushrooms have a low pH (6.2) and are a food safety risk for Botulism. Due to their uniform size and density, commercially-grown button mushrooms have been researched, resulting in safe, tested recipes. Chanterelles and other edible fungi have not been tested. (I would love to see research on other safe ways to preserve Oregon’s state mushroom.) Until then, I’ll happily forage, freeze, and dehydrate.
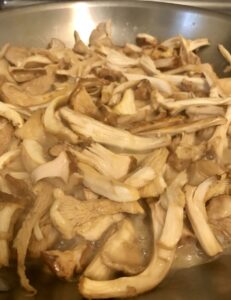
I like the effect of dry sautéing mushrooms. It releases their juices and yields a beautifully caramelized mushroom, perfect for dehydrating or freezing. Instead of boiling away the mushroom juices, I save them in a container to use as broth for freezing. (Or mushroom gravy.) If freezing, I add a tiny amount of butter or olive oil at the end of cooking so the mushrooms get somewhat crispy, but I don’t add fat during the cooking process if dehydrating them. (The oil can become rancid over time.)
When fully cooked, cool, label, and store in the freezer
FYI, button mushrooms do not need to be cooked before drying, but due to the fibrous nature of chanterelles, they benefit from pre-cooking. Our Master Food Preserver dehydrating guru, Don Wiley, explained that the cell structure of most vegetables, and this includes fibrous mushrooms like chanterelles, needs to be broken down before drying so they aren’t tough and rubbery when reconstituted. (Steaming is a fine method of pre-treatment.) After dehydrating, consider grinding them up for an easy mushroom soup base, perfect for backpacking or camping, or leave whole. Sealed in an airtight container or vacuum sealer, they’ll keep for months to years. Thank you Don!
Until next time, friends… enjoy the beautiful Autumn weather and fruits of the season. Look for more information on the OSU Extension Family and Community Health program on Facebook, Instagram, YouTube, our website, and newsletter.
Keep exploring, stay curious, and be excellent to each other!
Buffy | mom. gardener. volunteer turned program assistant. a real busy beaver
As last week’s morning fog can attest, Autumn has arrived in the Pacific Northwest. It brings to mind garden clean up, and one of my favorite songs by Yo La Tengo, Autumn Sweater.
End of season tomatoes on a misty Oregon morning.
As the weather cools and Summer crops fade, it’s tempting to let tomatoes stay on the vine, but if you’re going to be canning them you might want to reconsider. Tomatoes from dead or frost-killed vines in your garden are unsafe to can. (Yes, it’s true!) Why? The pH in tomatoes attached to dead or frost killed vines change to a less acidic level that is unsafe for safe canning directions. Despair not, they’re still great for drying, pickling, freezing, and eating fresh!
Pickled tomatoes w edible flowers and whole spices. Photo courtesy of Kirsten Schockley via #fermentation on Instagram.
The National Center for Home Food Preservation has some great ideas on uses for green tomatoes here. (Pickled green tomatoes are going into this year’s holiday gift baskets as part of a Bloody Mary kit.)
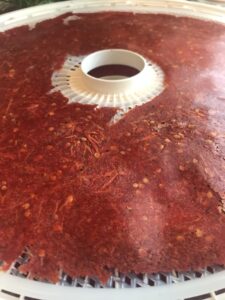
Clackamas County Master Food Preservers utilize every bit of their tomatoes by dehydrating the skins left over after peeling tomatoes for canning. It’s an easy, no-waste method of Extending the Harvest. Dehydrated tomato skins, leftover pulp, and seeds become delicious tomato powder. Powder can be used in soup, sauce base, or paste, and is a perfect backpacking/camping food. Bonus, it doesn’t require jars. (Jar and lid shortage is a real thing!)
Blended tomatoes, dried herbs and garlic for dehydrated pizza sauce. Photo by Buffy Rhoades
To make: Blend cooked skins, or whole cooked tomatoes into a sauce and spread on lightly oiled leather trays. Caution! Let the sauce cool before blending in a blender! Dry at 135°F for approximately 10 hours. After about six hours, the tomato leather should be dry enough to remove from the leather trays. Flip onto mesh drying trays and finish dehydrating until brittle.
Blended tomato skins. Photo from Buffy Rhoades.
When completely dry, you should be able to easily snap or tear it into smaller pieces. Blend with a blender or food processor until powder. Store in an airtight container and shake to condition. To make into a thick sauce, add 1/2 cup of boiling water to 2 1/2 T of powder. It’ll thicken slowly. If you want a thinner sauce, gradually add water.
Hopefully you’re enjoying the warm afternoons, getting time in the kitchen and garden, stocking the pantry, and eating well. Meanwhile, look for the OSU Extension Family and Community Health program on Facebook, Instagram, YouTube, our website, and monthly newsletter.
Keep exploring, stay curious, and be excellent to each other!
Buffy | mom. gardener. volunteer turned program assistant. a real busy beaver
It’s Harvest Season in the Willamette Valley and a busy time of year for anyone involved in local and seasonal food. This year has shown renewed interest in gardening and preserving and we’re all cooking at home more. Farms, farmer’s markets, local fishing industry, and consumers are in the midst of peak-season crops and harvest. But what do you do with all those tomatoes or peppers, or giant zucchini your neighbor left on your porch?
As my friend and mentor, Lin, is wont to say, “It’s Harvest Season Baby! Our day calendars are full of to-do lists. (They look different in 2020, but are still lists.) Today’s list includes canning peaches and dehydrating last year’s bread and butter pickles. Yes, dehydrate your pickles! Especially if they’re softer than you like, or you need the jars. We’re also waiting for our tuna fisherman to call back and say he has our order. (Stay tuned for a video on shopping the dock and canning tuna!)
I’ve been thinking about mentors a lot. We all need one. Some folks grew up with family members that preserved the season’s bounty but may need a refresher course on safe methods and recipes. Others are new to preserving and don’t know where to look or how to begin. Videos are helpful.
In addition to preserving, we like to eat and live well. OSU Extension’s Family and Community Health program is a great place to find budget-friendly, healthy recipes and cooking videos. Or exercise activities for your young ones. We’re part of Oregon State University’s Extension Services, a FREE, safe, and reliable public resource. Let us be your mentor instead of a “well kept secret.”
Extending the Harvest is a bi-weekly selection of science-based resources promoting food preservation, food safety, nutrition, wellness, using food dollars wisely, and strengthening local community food systems. With the help and support of Clackamas County Master Food Preserver/Family Food Educator volunteers, I’m looking forward to sharing stories, knowledge, and helping you Extend your Harvest.
Buffy Rhoades | mom. gardener. volunteer turned program assistant. a real busy beaver
Oregon State University Extension Service offers educational programs, activities, and materials without discrimination based on age, color, disability, gender identity or expression, genetic information, marital status, national origin, race, religion, sex, sexual orientation, or veteran’s status. Oregon State University Extension Service is an Equal Opportunity Employer.


 I like the effect of