If you’ve ever had the unfortunate experience of having your Facebook group page unpublished, then you know getting it re-published can sometimes be a near impossible feat. The automated appeal process does not always offer the remedy you are looking for or the reason behind the original suspension of the page.
Do not despair! There is an alternative process that may help you get your page republished. Here is a step-by-step process that has been successful as recently as February of 2023.
Step-By-Step Process
Step 1: Do not panic and do not build a new page out of frustration until you have attempted to recover your page through this process.
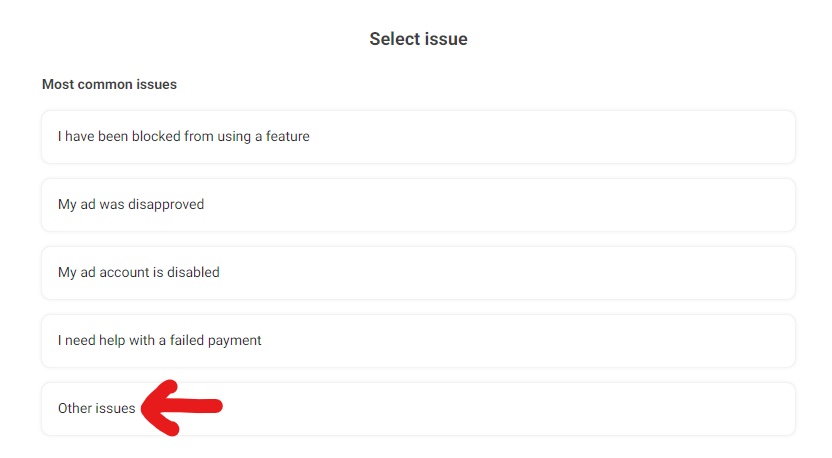
Step 3: In the “Select Issue” section, select the “Other Issues” option.
Step 4: In the “Select Asset” section, select the page that is affected. If you don’t see the page, you may not have Administrator access to the page. Contact an administrator and have them move through this process.
Step 5: In the “Select Issue” section, select the “My Page was unpublished V2” option. If you don’t see that in the options, click on the “Load More” selection at the bottom of the section until you see this option or one that references a page being unpublished.
Step 6: A “Get Help” form will pop up and will prompt you to input your contact information as well as provide a brief description of the problem. It is recommended to use phrases such as “my page does not appear to violate any standards” and “I’d like to request a review” in your comments.
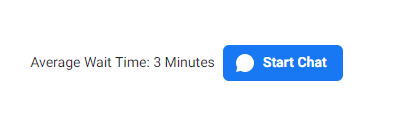
Step 7: Click the “Start Chat” button in the bottom right of the screen. The “Average Wait Time” noted on next to the button is not usually a reliable number so do not be discouraged when a 3 minute wait time is really 45 minutes:
Step 8: Once the chat is initiated, you will be asked to confirm elements of your comments from Step 6 above by the support technician. Make sure that you note your Case ID number for future reference.
Step 9: When you are chatting with the support technician, ensure that you request that your review is escalated and that you do not understand what terms your page violated in order to be unpublished.
Step 10: At some point, the technician will inform you that they have requested an internal review. They will ask if you want a transcript of the chat for your records – make sure you say “Yes” so you have a paper trail. This will also include your Case ID in case you forgot to write it down earlier.
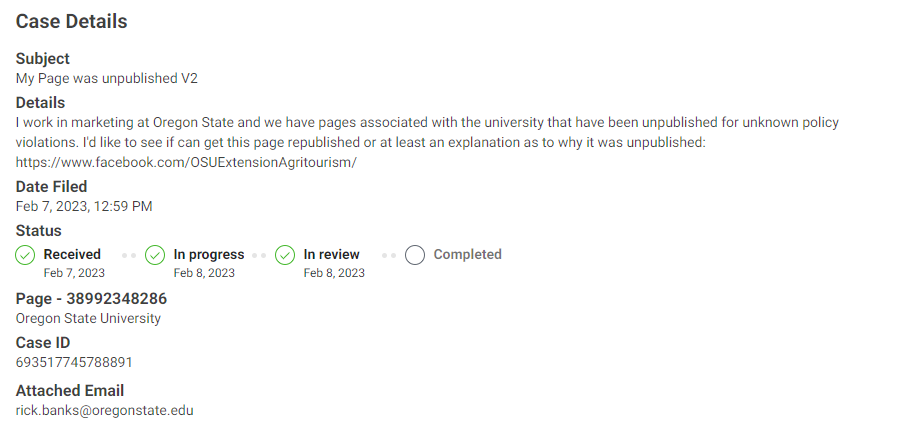
Step 11: An internal review can take from 1 to 3 days, so do not be alarmed if you do not receive an update quickly. You can check the status of your case by again clicking on the original support link from Step 2 ( https://www.facebook.com/business/help/support). You should see a “Follow up on a recent case” with your recently submitted issue below it. When you click on that you will see this “Case Details” screen;
If you do not see an update you can request an update at the bottom of the screen. This should bump the request back up in the support queue.
What to do if this process fails?
You can resubmit requests or request updates as long as the case remains open. Once Facebook Support has closed it, you will have to create another request and go through the process again.
In most cases, this should result in your page being republished. If it does not, then there is something about your page (either how it was built, accessed or used by others) that violates Facebook community standards, advertising policies, or other terms of service. Should this be the case, you will, unfortunately, need to rebuild the page from scratch.
One of the most underrated features in Adobe creative apps are the various object alignment tools (left align, right align, align top edges, horizontal align middle, etc.) If you’re anything like me, you use these tools regularly. And while they are conveniently — and sometimes even dynamically — located in multiple locations, you may find yourself moving your cursor back-and-forth from your artwork to the alignment panel more often than you’d like. This can slow down — or even disrupt — your workflow. The solution? Keyboard shortcuts!
In this guide we setup keyboard shortcuts for the most common alignment actions. I also include notes about variations you can explore on your own.
Adobe apps come chalk full of keyboard shortcuts (see official keyboard shortcuts lists for InDesign, Illustrator, Photoshop and XD), so finding a combination of keystrokes that are not already designated to a shortcut can be tricky, and you’ll likely need to press several keys to employ any new shortcut. In this guide, most of our shortcuts will involve only three keys, but, luckily, they don’t require years of finger yoga to be able to get your hands in the positions required to press them all at the same time.
We’re going to start with Adobe InDesign.
For our keyboard shortcuts we’ll consistently press Control+Command and then add a modifier key.
Note: for ease of research, writing and reading this tutorial, I’ll be using Mac keys only, Windows users willl need to adjust accordingly. I.e. Command on MacOS = Ctrl on Windows.
As much as I tried to get directly into the setup of these shortcuts, there is at least one more thing that needs clarification.
Adobe uses different names for the same action, in different locations within the same app. Here’s what I mean. When you position your cursor over the first button in the Alignment panel, the tooltip says “Align left edges,” but, when you setup your keyboard shortcuts, the name for this action is “Horizontal Align Left.” Why Adobe would use two names for the same action is beyond me, but this is what we have to work with. And, if that isn’t bad enough, these same alignment actions get different names in different Adobe apps. For example, the tool tip in InDesign and Photoshop is “Align left edges,” but in Illustrator it is “Horizontal Align Left” and simply “Align Left” in XD.
Due to these inconsistencies, while writing this guide, I nearly created a keyboard shortcut for inserting the face palm emoji.
So, in the lists of the shortcuts we’ll create, I include the action’s name (from the shortcut creator dialog box), then the tooltip, then the shortcut itself.
Action name
Tooltip
Shortcut
Horizontal Align Center
Align horizontal centers
Control+Command+C
Horizontal Align Left
Align left edges
Control+Command+Arrow-Left
Horizontal Align Right
Align right edges
Control+Command+Arrow-Right
Vertical Align Bottom
Align bottom edges
Control+Command+Arrow-Down
Vertical Align Center
Align vertical centers
Control+Command+M *
Vertical Align Top
Align top edges
Control+Command+Arrow-Up
*I use the letter M for the Vertical Align Center shortcut to differentiate between C for Horizontal Align Center and M for Vertical Align CenterMiddle. I find it helpful to think that you can find the shape of the letter V (for vertical) in the shape of the letter M.
Setup keyboard shortcuts in Adobe InDesign
SelectEdit> Keyboard Shortcuts…
Recommended but optional: Create a new set, just in case something goes wrong you can revert to the default set. Or, like in the case of the latest InDesign release, when settings don’t migrate, you can simply select your set to restore all of your keyboard shortcuts!
Set Product Area: to Object Editing
Under Commands: Scroll to and click on Horizontal Align Center
Note: this list is alphabetical, so this will be the first of our shortcuts to create).
Click in the New Shortcut: text box and press down the following keys: Control + Option + Command + C
Click Assign
Repeat for all the other shortcuts in the list above.
Click Save
Click OK
Use your new shortcuts!
And, you’re done!
… Kind of.
To create shortcuts in other Adobe apps, keep reading.
Adobe Abnormalities
Understanding that Adobe apps are developed by app-specific teams helps us understand why each app handles very similar tasks so differently. Organizations the size of Adobe cannot have an entirely flat org. structure, so silos exist, and this affects how we interact with their apps. In this section, we’ll uncover some of these dissimilarities and how to overcome them.
Adobe InDesign
Adobe InDesign doesn’t list the object alignment actions anywhere in the app’s menus, which is why, when setting up the shortcuts you must find them in Product Area: Object Editing. This isn’t bad, it’s just different than the rest of the apps we cover in this guide.
Adobe Illustrator
The Adobe Illustrator shortcut setup is a bit different than that of InDesign. One of the reasons for this is that the alignment actions can be found in the app’s menus, so that’s where you find the actions in the keyboard shortcut setup process.
Adobe Illustrator does not let you use the Control key or the arrow keys in keyboard shortcuts, so I’ve substituted the Option key for the Control Key and letter keys for the arrow keys.
Setup keyboard shortcuts in Adobe Illustrator
Select Edit> Keyboard Shortcuts…
Select Menu Commands
Under Command: Twirl open the arrow next to Object, then Align
Note: this list is kind of alphabetical, it appears in the same order as it does in the menu.
Click twice in the Horizontal Align Left row and the Shortcut column
Press down the following keys: Option+Command+L
Repeat for all the other shortcuts using the list below as a guide.
Click OK
You will be prompted to save the Set of keyboard shortcuts. Name it, save it and you’re good to go.
Action name
Shortcut
Horizontal Align Left
Option+Command+L
Horizontal Align Center
Option+Command+C
Horizontal Align Right
Option+Command+R
Vertical Align Top
Option+Command+T
Vertical Align Center
Option+Command+M *
Vertical Align Bottom
Option+Command+B
* Remember M is for Middle
Adobe Photoshop
Adobe Photoshop does allow you to use the Command key, but doesn’t allow you to use Arrow keys in keyboard shortcuts. So, similar to Adobe Illustrator, my solution is to use the first letter from each action’s directional component. I.e. C for Center, L for Left, R for Right, etc. as the modifier key in the shortcut.
The shortcut setup is a bit different in Photoshop, too.
Setup keyboard shortcuts in Adobe Photoshop
Select Edit > Keyboard Shortcuts…
Set Shortcuts For: to Application Menus
Under Application Menu Command: Scroll to Align > Top Edges and click in the right half of the Top Edges row. • Note: this list is not alphabetical, it appears in the same order as it does in the menu
Press down the following keys: Control+Option+Command+T • Repeat for all the other shortcuts using the below guide.
Click OK
Action name
Shortcut
Top Edges
Control+Option+Command+T
Vertical Centers
Control+Option+Command+M *
Bottom Edges
Control+Option+Command+B
Left Edges
Control+Option+Command+L
Horizontal Centers
Control+Option+Command+C
Right Edges
Control+Option+Command+R
* Remember M is for Middle
Adobe XD
Adobe XD doesn’t allow you to create custom — or modify existing — keyboard shortcuts. (It has been a feature request since 2018.) This limitation is one of the reasons we used the specific shortcuts key combinations that we did — they are the defaults in XD, so no additional setup is necessary … in XD.
That’s not to say that XD is perfect. XD does its part in confusing all these alignment matters. XD is the only app that lists the vertical alignment options before the horizontal options.
XD also groups the horizontal distribution action with the vertical alignment actions and the vertical distribution action with the horizontal alignment actions. I really gotta think Adobe is just screwing with us in this case. But, it appears that XD is going by the wayside, so maybe I shouldn’t include this section at all.
Further customization
In InDesign, each of the alignment actions can be modified further by setting the Align to: option in the Align panel. We created our shortcuts based on the default option: Align to Selection, but you may find yourself aligning objects to Key Object, Margins, Page or Spread more often than Selection. In this case, you can change your designated actions and/or setup additional shortcuts for multiple Align to settings. I find I use Selection, Key Object and Page most often. Key Object alignment doesn’t require additional keyboard shortcuts, you just have to define the key object before you use the shortcuts we’ve already set up, and it will work as expected — the alignment action will determine its position based on the key object.
Align to Page
To setup additional keyboard shortcuts for Align to Page, I’ve simply added the Option key to the shortcut.
Action name
Shortcut
Horizontal Page Align Center
Control+Option+Command+C
Horizontal Page Align Left
Control+Option+Command+Arrow Left
Horizontal Page Align Right
Control+Option+Command+Arrow Right
Vertical Page Align Bottom
Control+Option+Command+Arrow Down
Vertical Page Align Center
Control+Option+Command+M
Vertical Page Align Top
Control+Option+Command+Arrow Up
Align to Margin
To setup additional keyboard shortcuts for Align to Margin, I’ve simply added the Option and Shift key to the shortcut.
Action name
Shortcut
Horizontal Margin Align Center
Shift+Control+Option+Command+C
Horizontal Margin Align Left
Shift+Control+Option+Command+Arrow-Left
Horizontal Margin Align Right
Shift+Control+Option+Command+Arrow-Right
Vertical Margin Align Bottom
Shift+Control+Option+Command+Arrow-Down
Vertical Margin Align Center
Shift+Control+Option+Command+M
Vertical Margin Align Top
Shift+Control+Option+Command+Arrow-Up
Distribute spacing
Let’s address the elephant in the room. All these Adobe apps’ alignment panel also include Distribute Spacing actions. Let’s set up some shortcuts for these actions as well.
Action name
Shortcut
Horizontal Distribute Space
Shift+Control+Option+Command+H
Vertical Distribute Space
Shift+Control+Option+Command+V
Notes:
Each app handles the modifications of this action a bit differently, but this guide is far past TLDR-qualified, so I won’t cover that here.
InDesign had default keyboard shortcuts for both Control+Command+H and Control+Option+Command+H, which is why we used the more complicated Shift+ Control+Option+Command+H, but you’re welcome to override default keyboard shortcuts if you never (or rarely) use them and will use this one more often.
XD, by default, uses the simpler Control+Command+H and Control+Command+V, respectively.
Okay, now you’re done.
I hope you learned a thing or two and that these shortcuts prove as useful to you as they have to me.
Remember, give yourself time and grace to learn these new skills. Soon enough you’ll get the hang of them and be glad you did.
Some third party apps allow you to setup app-specific keyboard shortcuts, which allow you to create more consistent keyboard shortcuts for like actions across multiple Adobe apps. I have used BetterTouchTool for such. I have no affiliation with BetterTouchTool. I am a paying customer and find it useful for MacOS customizations.
Sometimes your design might call for the subject of your image to be cut out or layered: For example, Oregon State’s branding features contextual graphics, which can be integrated with your photos so they look like they’re behind the subject, or behind mountains, things like that.
I’ll show two methods today. One in photoshop that takes a lot more steps but is more precise, and another in Indesign that is quick but less precise.
The best and most precise way is to make a duplicate of your photo with a transparent background. I’ll start with opening photoshop. -I’m using Photoshop 2021, and they’ve made it very easy to select your subject, as long as you don’t mind going in after to fix their mistakes. -Go to Select>Subject and let it work its magic -It did a pretty good job of guessing, so lets first refine the edge so it doesn’t have a harsh cut line -Go to Select>modify>expand, and I like to use 2px -Again, Select>modify>feather, and again 2 px. This gives it a softer outline so it’s not such a harsh cutout. -At the bottom of the layers panel, select this black square with a circle to create a mask from our outline. This doesn’t delete anything, so if we make mistakes we don’t have to restart from scratch -There’s some background that got included by accident, so let’s fix those -Select the mask, make sure the color selected is white, and select the eraser tool -Erase the bits of background that were included. -Use the brush tool to bring back the bits of benny that were left out of the mask. -Tip: Right click>disable layer mask to show the background again, and in Channels click the eye next to the mask to make it easier to see what needs fixed. -When it’s where you like it, save as either a new Photoshop file or PNG, as those hold the transparency. A JPG will just fill in your transparent areas with white. -Add both your original image and the one you just edited, add your contextual graphic and arrange accordingly.
Next we’ll use just InDesign with the pen tool. -Insert your photo, decide where you want the contextual graphics to go -select pen tool, begin going around the outline of your subject -Close the shape -With the selection tool, select the image and copy -right click the new shape you just created, and paste into -Add your contextual graphic and arrange accordingly.
And there you have it, hopefully one of these methods works well for you and gives you more freedom to make awesome designs. Thanks and good luck.
We have added to our library of icons! Over the past week, we have created and uploaded a number of new icons for you to use in your designs. Icons are created in eps, png and svg file formats. Icons are a great way to add some visual interest to your design. Guidelines of icon use can be found here in our brand site, as well as how to download them.
The icons are sorted into categories for ease of searching. The categories are:
Let’s talk about the best ways to do event promotion on social media. Yes, this means how to create eye-catchy graphics. As we dive deeper into this topic, I’ll break down ideas by each platform.
Facebook
Here are image specs that you need to keep in mind when promoting your event on Facebook.
Facebook Event image specs: 1200 x 628
Native feed image specs: 1080 x 1080 (1:1 ratio)
Facebook Events:
Let’s start with creating a Facebook Event. When designing a graphic to be used in the event, you should keep in mind that you don’t have much space to cram every detail into the graphic. The event page itself can do that for you.
The best graphic you create is an eye-catchy image. Try a headshot of your speaker, a research photo, or a campus beauty picture. Add the title of the lecture or event to the graphic and that’s it. Images that are flooded with info and text will not help draw attention to the event.
Now when you go through the rest of the Facebook event setup, you can add more details including date, time, description of the event and how to register (if needed).
For example, this Facebook event cover isn’t too text-heavy but still has the title of the event.
Facebook timeline:
Just like Facebook Events, the best way to grab the attention of your audience is with a simple graphic. You can use the same image as you did in your event graphic. In this case, it is okay to add the date and time for your event. This graphic can also be used again if you wish to promote it on Twitter.
This example below is of how you can change up your Facebook event cover to be catered towards Facebook or Twitter.
Twitter
Twitter is just like Facebook. You shouldn’t overpower your image with text. You have 280 characters that can help.
Here are image specs that you need to keep in mind.
Native feed image specs: 16×9 or 1080 x 1080 (1:1 ratio)
Instagram
Event promotion on Instagram is good for engaging students. It’s better to use Instagram Stories rather than your native feed because Instagram is a photo and video sharing platform. People will not engage with text-heavy posts.
Here are image specs for Instagram:
Instagram Stories: 9×16
Native Feed: 4×5 (preferred since it takes up more of the screen) or 1080x 1080
Instagram Stories:
Using Instagram Stories to do event promotion is great. You are able to tweak your graphics to be the right specs and either use the “swipe up” feature if you have that or “Link in Bio” for any registration or more info you wish to provide.
Another way to use Instagram Stories is to have multiple cards/slides to deliver information about the event. Have a slide with the title and date and then another with time and location. This helps get all the info across without overcrowding one simple slide.
In the example below, the original image was tweaked to fit IG Stories and still has the most important info.
Instagram Feed:
The feed is not best for text graphics because Instagram is a photo and video sharing platform. People are less likely to engage with something too text-heavy. Try using Instagram Stories instead to help reach your audience. If you do want to post to your feed we suggest using a really high-quality photo– a headshot or campus beauty. In the copy, you can add all the details to the event and you can send people to “Link in Bio” if you need more space. If you have a link in your bio make sure it stays up for the duration of your event promotion.
Navigate to the front page of your site, and then click Customize in the upper left.
Click Change next to the name of your current theme.
Hover over the theme that you’d like to apply and then click on Live Preview.
This will show you what your site will look like with the new theme applied. No changes have been made to your live site yet. You can click on the links to see how each page would look.
Note: if your site has a lot of customization and overrides, then you’ll most likely need to make more adjustments when applying a new theme.
Click on Publish to apply the changes to your live site.
A theme change can be a good time to evaluate your content and structure. For example, if you switch from one of the older themes that has a sidebar widget area to the Branch theme, which has 1 full width column, any widgets in the sidebar will automatically move to the footer. This might prompt you to re-evaluate what you include as a widget and its contents. You might move an important link to the menu and leave the rest at the footer. Or remove the widget altogether. Each site is unique with its needs.
If you need help with changing over your theme, come to Open Lab.
There are many opportunities to celebrate holidays. We have broken it down to the ones we will cover on the institutional Twitter and Facebook accounts.
Awareness and Appreciation Months
This list incorporates existing traditions and activities that are hosted by other units and programs.
Black History Month
Women’s History Month
Asian Pacific American Heritage Month
Mental Health Awareness Month
Pride Month
LatinX Heritage Month
Native American cultural event
ECC Festival
Non Denominational U.S. Holidays
There are a small number of national holidays that we participate in. Our activity will be driven by the quality of content that is developed. These are subject to change.