Trap Crops: what are they and how can they help control pests?

By Carrie Falotico, Master Gardener Trainee

Crucifer flea beetles (Phyllotreta cruciferae) and Brassica juncea, a trap crop that attracts these pests.

Plant pests can certainly be one of the most frustrating parts of growing your own food garden. Trap crops are part of an Integrated Pest Management plan. Here’s how they work. 

A TRAP CROP can be defined as a sacrificial plant that draws away damaging insects from the desirable crop.

Essentially, a trap crop works as an alternative host that draws away invading insects, giving the main vegetable crop an added layer of protection. In some cases, insects have a preference for these alternative hosts, and when given the choice, will go to the trap crop first.  After trap crops are infested with target insects, they can be controlled with timely insecticidal applications or mechanical removal. While trap cropping can be extremely beneficial, it is often not a complete solution. Trap crops will not control all insects and the use of integrated pest management (IPM) is necessary. IPM practices include rotating crops, attracting beneficial insects, and prudently using organic and synthetic chemicals.

This article gives a great explanation of trap cropping for small commercial growers. Many of these practices are also very useful in the home garden and can be done on a smaller scale.

Another great resource that details trap crops as well as intercropping and companion planting, that, when combined with trap crops, can make an even bigger impact when controlling pests.

Identification is key

You will definitely want to make sure you have correctly identified the pests causing damage to your plants. Different pests may prefer different trap crops and may require different integrative pest management (IPM) techniques. This resource is a helpful guide to identifying common pests as well as insects that are beneficial and helpful to gardeners.

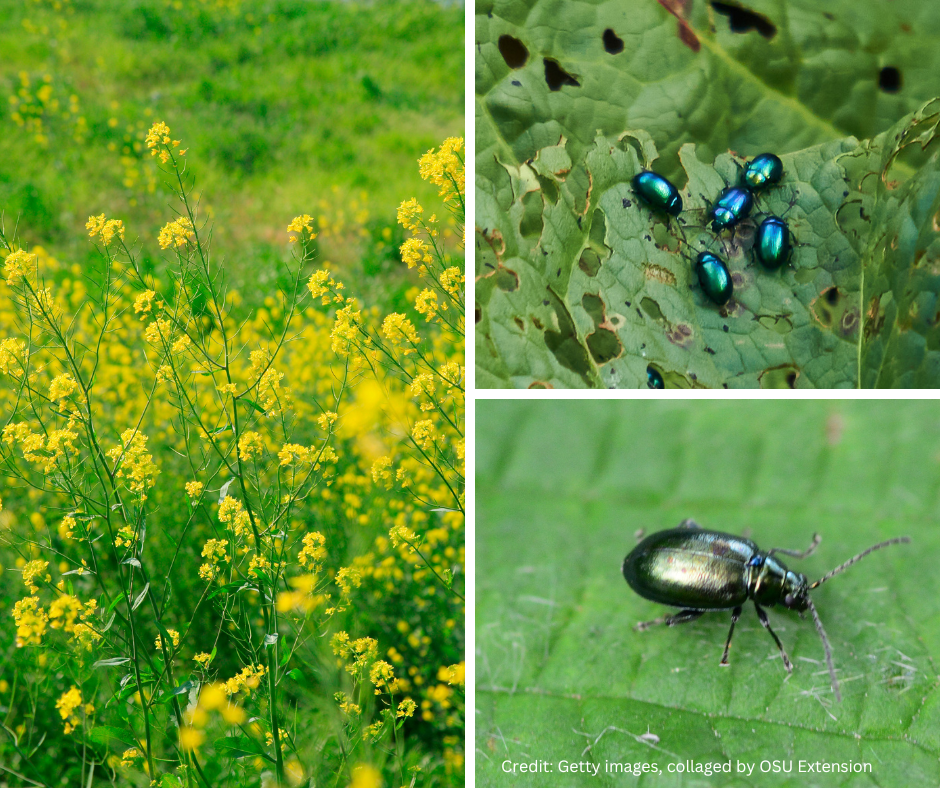
Example: Flea beetles 

Flea beetles (including Epitrix spp. and Phyllotreta cruciferae) are a well-known garden pest on crops like kale and broccoli. For flea beetle control, Chinese southern giant mustard (Brassica juncea var. crispifolia) is an example of a trap crop that has been used effectively in the United States to protect crucifer crops from flea beetle damage. In studies conducted at Washington State University (WSU), a diverse trap crop containing Pacific Gold mustard (B. juncea), Dwarf Essex rape (B. napus), and pac choi (B. campestris L. var. chinensis) successfully protected broccoli from the flea beetle. Diverse trap crop plantings combine plants that have different phenologies (life cycles which can be influenced by the environment, weather conditions, and nutrition), chemical profiles, and physical structures that make them more attractive to flea beetles. 

It is important to note, however, that trap crops may not provide complete protection, especially during heavy pest infestations. You also have to manage the pests on the trap crop by removing them by hand and killing them, or using insecticide. Trap crops will be even more effective if several integrated pest management strategies are used together, like 

  • Control weeds in and around planting sites to limit food sources for flea beetles.
  • Remove old crop debris so that beetles will not be able to get protection in the winter.
  • Plant crops as late as possible. Plants grow faster in warmer temperatures and are more stable to resist damage from flea beetles.
  • Use row covers or other screening to keep beetles out when the seedlings are growing.
  • Remove row covers before the flowers come up so pollinating insects can reach the plants.

These articles give excellent detail on managing flea beetles:

Explore more

If you are interested in reading more about Integrated Pest Management and how it can help your garden thrive, this is a great resource

I hope you find this information helpful and that these methods help you have a more enjoyable gardening experience!

Using and Storing Squash and Pumpkin Seeds

by H. Chris Smith, Master Gardener volunteer

Now that the days are shorter, the air crisper and the windows have a sprinkle of mist in the morning, it’s time to think about how to store and use squash and pumpkin seeds. (text on image of pumpkin and pumpkin seeds)
Save them to plant, eat them… the choice is yours.


Pumpkins are a member of the Cucurbita, or gourd, family that includes other types of squash. “Pumpkins are considered to be drier, coarser, and strong-flavored compared to squash and are therefore used differently in cooking.” (see Reference #1)


In addition to the great taste of roasted pumpkin seeds, there are many health benefits to entice you to bring pumpkin seeds into your kitchen. “Pumpkin seeds are one of the best natural sources of magnesium, a mineral that’s important for keeping blood pressure in check. They’re also a good source of several other minerals, unsaturated fats, and fiber.” (see Reference #2)


Along with being high in nutrients, they’re also rich in antioxidants which aid in reducing a lot of harmful diseases our body tries to defend against. . . .” (see Reference #3)

This is one of the ways to prepare raw pumpkin seeds

  • Clean and wash the seeds
  • Dry the seeds in the oven at 150 degrees F. for 1-2 hours, stirring frequently
  • Roast seeds by:
    • Mixing thoroughly 2 cups dry seeds, ½ teaspoon Worcestershire sauce, 1½ tablespoons melted butter, and 1 teaspoon salt
    • Place in a shallow baking pan and roast (1 hour at 250 degrees F.; 30 minutes at 275 degrees F.; or 10-15 minutes at 300 degrees F.
    • Stir the seeds frequently as they roast
    • Store cooled seeds in a plastic bag. Seeds can be kept in the refrigerator or freezer.
    • Seeds will become rancid if stored at room temperature for long periods of time. (see Reference #4)
There are many simple ways to add pumpkin seeds to your diet
  • Use them as toppings on dishes such as yogurt and granola;
  • Sprinkle them in a salad; or
  • Add them to your pumpkin bread recipe.
  • “You may also buy pumpkin seed extracts which can be especially helpful if you are someone who isn’t a fan of seeds or nuts (or if you are allergic).” (see Reference #3)
Saving seeds


If you decide to collect squash and pumpkin seeds to plant in your garden in the spring, keep in mind that, “[s]eeds from hybrid varieties produce a mixture of plant types, most of which are inferior to the parent. Many varieties could be hybrids but may not be designated as such.” (see Reference #5)


Squash and pumpkin seeds can be inadvertently cross-pollinated in the garden, thereby creating plants with hybrid seeds. But, by taking the time to control pollination you can have confidence that the seeds you store will not be hybrid. “You can control pollination in your garden, but it requires careful attention. First, you need to distinguish between male and female flowers. Male blossoms are on a longer stalk and do not have a miniature fruit at the base as do female blossoms.

  1. With careful observation, note the blossoms that will open the following day. They have a light yellow color and a distinctly pointed tip.
  2. In the evening, select male and female flowers on the same plant. With a paper clip for small flowers or a rubber band for larger flowers, prevent the flower from opening. Flowers open only early in the day.
  3. In the morning, pluck the male blossom and touch the cluster of pollen (called anthers) to the center of the female flower (called the stigma).
  4. Close the female flower again so bees can’t get in.
  5. Tag the blossom.
  6. Grow the fruit to maturity for the desired seed.” (see Reference #5)

Since pumpkin and squash seeds can live up to 4-5 years, it can be worth the time to manage pollination and then carefully store the seeds from your garden. A recommended storage method is to, “[p]lace seed packets in a jar, seal the jar tightly and place it in a refrigerator or freezer. To help absorb moisture, place a small, cloth bag filled with dry, powdered milk beneath the seed packets in the bottom of the jar. Use about 1⁄2 cup of dry milk from a recently opened package. (see Reference #5)

Planting a new crop

Next spring you will need to test your stored seeds for germination before planting. This is one method:

  1. “Moisten two or three layers of paper towels.
  2. Place 25 to 50 seeds on the towels and roll the towels loosely. Place them in a plastic bag.
  3. Keep the towels in a warm place such as on a kitchen counter or on top of a water heater. . . .
  4. Observe the seeds at 2-day intervals to determine the degree of germination.” (see Reference #5)

For more information, you can read this publication, Propagating Plants from Seeds (see Reference #6).

Most of all, enjoy your fall seeds, savor their flavor, and the good memories of tending squash and pumpkin plants in your garden.

References

  1. Squash and Pumpkin Varieties
  2. Seed of the Month
  3. Health Benefits of Pumpkin Seeds
  4. Preserving Foods: Pumpkins & Winter Squash
  5. Collecting and storing seeds from your garden
  6. Propagating Plants from Seed
  7. Give Seeds a Test for A+ Performance

Also see: Storing Pumpkin and Winter Squash at Home

How to Grow Cane Berries and Blueberries in Containers

by Chris Smith, Master Gardener volunteer

Container gardening is popular for a lot of good reasons.  You can grow plants in spaces that have limited sun.  If your containers are movable, the plants can be moved to follow the sunlight.  You can locate your container garden in handy spots, such as just outside your kitchen door where the fruit is easy to harvest, or on a patio or balcony.   If you rent your dwelling, you can take your plants along when you move.

For many, the idea of using containers to grow blueberries and cane berries hasn’t seemed like a good bet as these plants are typically found in backyard gardens.  And, cane berries have been considered problem plants because of their rambling roots.  But, given a bit of careful planning, you can extend your container garden to include berries.

Here are some things to consider when planning a berry container garden

  • Pick plants that are dwarf or limited to about three feet tall
  • Pick plants that are self-pollinating, that don’t require pollen from two or more bushes of different varieties to produce berries.
  • Pick the right size for a container and consider placing it on a tray with wheels.  That way you will be able to move the container to follow the available sunlight, and to overwinter in a protected area if your location is subject to hard freezes.
  • “Raspberries should be grown in 3 to 5-gallon plastic containers. Tie or fasten the growing canes to thin stakes or a trellis to support the growing canes as they grow through the summer. Only fall-bearing raspberries should be used. Heritage is the most popular fall-bearing variety, but others are available. In August flowers will form at the ends of the canes and harvestable fruit will be ready by the end of August.  These raspberries will continue to produce fruit until frost.” (see Reference #1)
  • For blueberries, “[s]elect a well-draining, large weather-proof container like a wooden barrel planter.  Containers for mature blueberries will need to be at least 24 inches deep and about 24-30 inches wide.” (see Reference #2)
  • For blueberries, “[u]se a 50-50 mix of potting soil and peat moss as your planting media. Wet it thoroughly before placing it in the container. If the shrub is pot bound gently tease the roots to encourage root expansion into the potting media. Place the blueberry into the potting media and plant it at the same depth as it was in its container. Then water well.” (see Reference #2)
  • For other berries, use a 50-50 mix of potting soil and compost.
  • Container soil can dry out quickly, so plan to keep the soil in your containers moist.
  • While not making commercial recommendations, there are a number of suppliers that specialize in dwarf, self-pollinating plants such as Direct Gardening, and Bushel and Berry.

References

#1:  Container Gardening with Fruit, from Univ. of Mass

#2:  Growing Blueberries in Containers, from Univ. of Maryland Extension

#3:  Container Gardening, from Oregon State University Extension Service

#4: Growing Blueberries in your Home Garden – EC 1304, from Oregon State University Extension Service.

Linn Master Gardeners win award for pollinator newsletter

 Congratulations to Linn County Master Gardener Association for winning the Marje Luce Search for Excellence from Oregon Master Gardener Association, for their publication Bee Notes.

Bee Notes raises awareness about stewarding native pollinators, including timely tips for care of blue orchard mason bees. Bee Notes is a key component of the outstanding pollinator education initiatives of Linn Master Gardeners, including the BEEvent Pollinator Conference which won this same award in 2019.

Search for Excellence is the recognition program of Master Gardener volunteer work, both throughout the United States and Canada (at the International level), and across the State of Oregon within the OMGA.

In Memory of Marti Olsen

We were sad to learn that onetime Master Gardener volunteer Marti Olsen passed away in July 2022. Fellow volunteers recall that Marti truly loved gardening especially roses. Marti, we miss you.

In 2005 no one stepped forward to take over Through the Garden Gate tour and the board had decided not to have it that year.  Marti didn’t want to see that happen so she started trying to recruit folks.  I was a new trainee that year.   Marti convinced me my garden was worthy to be on tour.  It was March with only a few months to go till the tour.  Not much time to get my garden ready for the tour but I agreed.  The problem was we were still 2 gardens short. Marti asked if I had any ideas. We ended up recruiting two of my wonderful neighbors with beautiful gardens. Had it not been for Marti stepping up the garden could have just been a memory. ”

– Nancy Messman, Linn County Master Gardener Association. 

Read an obituary for Marti Olsen HERE.

Linn County Master Gardeners Honored

Clockwise from the top left: Rene Miller, Brenda Winslow, Bobbye Rainey and Nancy Ragghianti. Congratulations!

This award is presented to an OSU Master Gardener™ from each County by the Oregon Master Gardener™ Association (OMGA) working cooperatively with Oregon State University. This annual award recognizes outstanding dedication and service of an OSU Master Gardener at the county level.

Master Gardener of the Year

Brenda Winslow has been a Linn County Master Gardener since 2010. Over these years she has diligently staffed and answered hundreds of plant clinic questions at the Sweet Home Farmer’s Market. Within the very large Linn County, Brenda’s presence on the eastern side of the county has made a huge difference in keeping more Master Gardeners involved. Brenda has used her gardening knowledge to teach classes in Albany, Lebanon and Sweet Home. She started and fundraised for the high school and junior high school gardens and taught classes at the Boys and Girls Club. She has helped at the Demo Garden, ran clinic tables at the Harvest Festivals, worked container planting sessions and been a resource for the Sweet Home Beautification team and the Garden club. The BEEvent Pollinator Conference and the Albany Garden Tours fundraiser are other projects she has volunteered at. Brenda has been on the Linn Master Gardener Association Board for 5 years, and is currently 2nd Vice President. She is in charge of keeping membership lists up to date and helped produce our membership directory. Her knowledge and experiences are shared with enthusiasm in a way that encourages others. Thank you, Brenda!

Behind the Scenes Master Gardener Volunteer of the Year Awardees

Behind the Scenes Master Gardener Volunteer of the Year Awardees This award is presented to an OSU Master Gardener™ from each County by the Oregon Master Gardener™ Association (OMGA) working cooperatively with Oregon State University. This annual award recognizes an OSU Master Gardener™ who works quietly and unselfishly behind the scenes to further the OSU Master Gardener Program on a county level. This is not a person who is out in front working on projects, so that everyone knows their contributions. Rather, it is a person whom few may actually know the level of their contributions.

Rene Miller became a Linn County Master Gardener in 2018.  Over the past three years she has become a major team worker on the Pollinator Project.  She has helped with many cocoon harvesting classes and has lead sales of bee supplies.  She harvested and cleaned a lot of mason bee cocoons that are sold by Linn Master Gardeners to help fund the association. Recently Rene helped harvest and process teasel for a mason bee research project.  Besides the Pollinator Project she has also become a major team worker at the Willamette Community Garden.  Work there isn’t just gardening, but also helping non-master gardener community members learn more about best practices for vegetable gardening.  Rene is a volunteer garden educator at Waverly Preschool. She has answered questions at the Albany Farmer’s Market table and has been a volunteer on a Garden Tour.  Rene’s cheerful demeanor and having a collaborative attitude make it fun to work with Rene.  Thank you, Rene!

Nancy Ragghianti has been a Linn County Master Gardener since 2018. Nancy is currently a Member-at-Large on the Linn MG Board. She has worked at the Linn Demo Garden and at other events, but the thing that makes her special is her skills with website design and maintenance. www. LinnMasterGardeners.com was set up about 4 years ago. Nancy has done many updates and changes to make this an informative site for the public as well as for our association members. With COVID there were new challenges. The Linn MGA’s BEEvent Pollinator Conference went virtual. Nancy set up the on-line registration and the evaluation process for the conference. With the virtual conference, she set up a new on-line order and pick up process for mason bee supplies. She also publishes the Linn County MGs “Bee Notes” e-newsletter on the website. “Bee Notes” currently has very close to 800 subscribers. The association members and Linn Extension staff appreciate the ardent work she has done to make the website informative, useful and educational. Thank you, Nancy!

Bobbye Rainey became a Linn County Master Gardener in 2020. Before Bobbye went through Master Gardener training (pre-COVID) she volunteered at the Linn Demo Garden and continues to work there twice a week. She has enthusiastically worked on many projects and does whatever is needed whether it is weeding, planting, harvesting or some odd job. This year Bobbye has joined the Linn MG Board as a Memberat-Large. Twice a week she and another new Master Gardener have staffed the Linn County MG plant clinic help. She diligently answers on-line gardening questions from the public. Committing time 4 days a week, she has had a major impact. Additionally, Bobbye set up and staffed seven parking lot pickup sites in Linn, Benton, Marion and Lane County for people to pick up pre-ordered bee supplies. Part of this delivery process was gathering and bagging supplies, calling those who missed the pick-up and finding alternate delivery options. Bobbye’s friendly demeanor along with her professional collaborative style are an asset to our association. Thank you, Bobbye!

What is BEEvent? A volunteer’s history

Osmia lignaria (blue orchard mason bee): Scott Bauer, USDA, Osmia lignaria, Cropped by OSU Extension, CC0 1.0

By Ranee Webb, Master Gardener Volunteer

One of the primary fundraisers and education outlets for Linn Master Gardeners is the BEEvent Pollinator Conference.  The following is a history of that project and how it has grown and changed.    

Our Mission:  The primary purpose of the Linn County Master Gardeners Association Pollinator Project is to provide information to the general public about the plight of pollinators, both native and non- natives.   We provide knowledge and materials to ordinary citizens to help them make their spaces friendly to pollinators, and so that they can become informed advocates. A secondary, but very important, purpose is to raise funds to support the outreach programs of the Linn County Master Gardeners Association to educate the public in healthy and productive gardening practices. 

History:  
In 2014, Barbara Fick, then a Linn County Extension agent, was talking to retired entomologist and Master Gardener Volunteer Rich Little about how we could increase the public’s awareness of pollinators. In 2015 the BEEvent Pollinator Conference was established to help home gardeners and small farmers better understand how they could help bees.  That first conference had 54 participants.  In recent years about 200 participants have registered to hear nationally known speakers and local experts talk about pollinator health. The BEEvent is now the largest pollinator conference in the PNW. Between 60-80% of attendees are new each year, so that means we are reaching a lot of people.  Due to the COVID pandemic, the 2021 BEEvent went virtual. That was a new challenge and learning experience for all!  

Keynote speakers over the years have included Rich Hatfield, senior conservation biologist of the Xerces Society, Robbin Thorp, distinguished emeritus professor of entomology at the University of California, Davis, Olivia Messinger Carril from New Mexico, co-author of “Bees in Your Backyard,” and James Cane, research entomologist with the USDA Agricultural Research Service in Logan, Utah. Cane has been studying bees for 30 years and is known for having applied his long-term interest in bees to help measure, understand and mitigate human factors that can shift nesting and foraging opportunities for bee communities.  

Rich Little has given many presentations about native bees throughout Oregon for Master Gardeners and the public.  Each fall Linn Master Gardener instructors meet with small groups to teach how to properly harvest and clean cocoons.  Harvesting the cocoons helps ensure a healthier outcome and you learn more about what is inside the nesting sites. During these classes our participants develop an understanding and learn to follow the “Best Management Practices” for Mason Bees. This helps gardeners and small farmers become more successful in helping our native bees. 

In 2016 we started an e-mail publication called “Bee Notes”.  The purpose of Bee Notes is to share information and reminders to those who have mason bees. We also share articles about pollinators that will help the home gardener be a better steward in helping pollinators.  Currently there about 800 subscribers.  Rich Little, who has a degree in entomology, writes most of the more technical information.  Ranee Webb writes some of the Bee Notes.  Our webmaster, Nancy Ragghianti, does the final touches and publishes the Bee Notes.  Together we make a team. We are amazed at the success of Bee Notes!  

Linn County Master Gardeners were early in starting the use of our own website.  You can now find a lot of information including Bee Notes on the website- www.LinnMasterGardeners.com

Award: 

The Oregon Master Gardener Association awarded Linn County Master Gardeners the Marje Luce Search for Excellence Award in 2020.   

Proud of Our Successes and Yours:  

Our Master Gardener volunteers sell bee supplies and houses as well as mason bee cocoons.  In normal years about 50 master gardeners are involved in our pollinator project.  

We believe our Master Gardener volunteer’s campaign to promote pollinator health is having a positive effect.    

Linn Master Gardeners have worked with the OSU Bee Project, the Benton Soil Water and Conservation District and Shonnard’s Nursery in developing our Pollinator Project and supporting their outreach programs as well.  We have had contacts from people out-of-state asking to find out more about how we do the conference in hopes of putting on conferences similar to ours. Awareness of native bees has increased and we like to think we have helped you and many others learn more.    

All of these projects happen because at least 50 Linn Master Gardeners and a few Benton Master Gardeners got involved!   

Dry gardening community science

How can you grow tomatoes and melons in a home garden with limited water?

By Ann B., Master Gardener Volunteer

Volunteers measure a soil core to see if the soil is deep enough for dry gardening. Credit: Benton County Master Gardener Association

OSU Extension, with Amy Garrett, has been developing the protocols and plants to garden without irrigation.  Not only will this allow gardening in the ever-increasing years of drought, but it also can save on water bills.   So, a project was started at the Master Gardener volunteer demonstration garden to determine whether vegetables can be grown in the home garden without watering. 

First we used an auger to remove a soil core from our plot to determine if we had at least 4-6 feet of soil.  Our soil was deep enough and contained clay as well.  Organic-rich soils with some clay content have more water-holding capacity.  Shallow or sandy soils are not amenable to dry farming.  Before planting, the soil was tilled, some organic fertilizer and organic matter was added and the area was soaked.    Plants were placed at least twice as far apart as usually indicated.  We planted ours 6 feet apart.  The soil was gently packed around the transplants and 2-3″ mulch was placed on top.  During the summer we did not water at all, removed weeds regularly and did not walk on the area so that the soil was not compacted.  Despite having a very warm summer (above 100F for a week), we harvested lovely Early Girl tomatoes.  Subsequent years we harvested Dirty Girl tomatoes and melons. 

Volunteers install tomato plants for dry gardening experiment. Credit: Benton County Master Gardener Association

During our first summer we noticed that one plant was much bigger than the other two.  We had several theories of what caused it, from it getting less wind to being a hybrid planted by mistake.  In the fall, at the end of the season, when we were removing the dead plants, we solved the mystery.  This was a very clever plant.  It grew a very long thick root that grew over about 6 ft. to a nearby bed that was watered.  Therefore it was not really participating in the experiment!  In subsequent years we did not irrigate that near-by bed. 

Amy Garrett, OSU Extension Service, has run experiments on many other plants.  These are some that she has determined do well with dry farming: Stupice and Perfect Rogue tomatoes, Beefy Resilient beans, Sweet Freckels melon, Eel River  and Christmas watermelon, Zeppelin and Delicata winter squash, Dark Star and Costa Romanesco zucchini.  And there are varieties of potato, dry beans, and grapes that will flourish.  Although we did not do this, using a cover crop over winter, especially a legume such as crimson clover, will add organic matter and increase nitrogen availability.

Growing tomatoes with dry gardening system. Credit: Benton County Master Gardener Association

Tips for success

  • Don’t plant where there is competition for water from trees or other plants.
  • Don’t plant on a slope.
  • Raised beds are not ideal as they dry out faster; sunken beds work the best.
  • Try to find a place protected from wind, which causes plants to lose water quicker.
  • Use plants as indicators of where you have the most water. Notice which plants are still green and lush in August. They’re telling you where deep soil with water-holding capacity exists.
  •  Maintain a neutral pH of 6.5 to 7. Most soils in the Willamette Valley will need an application of lime.
  •  Timing is key. Plant when is not too wet or too dry. It’s tricky, but the important thing to remember is to plant when there’s still moisture in the top profile of soil.
  • It’s possible to use little or no water and have a productive garden. It’s an important technique when you’re trying to save resources, and water is one of the biggest issues.

Resources

  • OSU Extension- Small Farms Dry Farming Demonstration: http://smallfarms.oregonstate.edu/dry-farming-demonstration
  • Runsten, D. and Mamen, K- Introduction to Dry Farming Organic Vegetables.
  • CA Agricultural Water Stewardship Initiative 10 Nov 2014 http://agwaterstewards.org/index.php/practices/dry farming
  • Solomon, Steve- “Gardening Without Irrigation: or without much anyway”, 2013
  • Widtsoe, John-“The Better Days Books Origiganic Guide to Dry-Farming: A Complete System for Achieving Bountiful Harvests Where Rain is Scarce, and Without Irrigation”, Nov. 2008
  • Widtsoe, John- “Dry Farming: A Guide for Farming Crops Without Irrigation in Climates with Low Rainfall and Drought”, 2018

Welcome a Rhododendron Into Your Garden This Spring

By Brenda Bye, Master Gardener Volunteer

Unknown Rhododendron Species. Photo by Brenda Bye. 

One of the reasons that I love spring in the Willamette Valley is the masses of colorful rhododendrons. It’s hardly surprising that this flowering shrub is so popular, because it comes in a wide range of sizes and colors. Many species are evergreen which is an additional bonus to add structure to your garden in grey winter months. Spring is a great time to plant rhododendrons and it’s not too late. 

There are about thirty species of rhododendron native to North America. They are found naturally in temperate deciduous forests and enjoy the acidic soil found in these wooded hills and mountains. If you are looking to plant a Northwest native, consider Rhododendron Macrophyllum, the Pacific Rhododendron. Its flowers can range from pale pinks to deep purples. It will grow to be 8 to 10 feet in the garden but can grow much bigger in the wild. 

Another interesting native is Rhododendron Occidentale, the Western Azalea. Its flowers range in color from white to pink, but all have a yellow spot on the upper petals that adds interest and beauty. Their flowers are known to be quite fragrant. Unlike the Pacific Rhododendron, the Western Azalea is deciduous and can have very pretty autumn foliage. 

Regardless of which rhododendron you choose, they require similar growing conditions: 

  • Acidic soil with a pH usually between 4.5 and 6
  • Soil that drains well and is rich in organic matter
  • A consistent level of moisture
  • Dappled shade, although it will tolerate a variety of sun exposures
Smaller rhododendron species, possibly Rhododendron Japonica, the Japanese Azalea. Photos by Brenda Bye. 

Having the right soil conditions is very important before you plant your rhododendron. Many of us in Western Oregon already have acidic soils but if you have questions about getting your soil tested or how to interpret a soil test, I would recommend reaching out to your local OSU Extension Office. You can also reach them online at https://extension.oregonstate.edu/ask-expert.

Rhododendrons can be prone to root rot. That is one reason to mix in a good amount of organic matter into your planting site. Some sources recommend a mix of 50% organic matter. In addition to building healthy soil this organic matter will make sure the roots are getting oxygen and not becoming soggy. Organic matter also helps to feed your plant to keep it healthy. 

Smaller rhododendron species, possibly Rhododendron Japonica, the Japanese Azalea. Photos by Brenda Bye. 

Before you place your new rhododendron in the ground make sure to water it well. When you place the root ball in the ground it should be planted at the same level as it was in the pot. Then mulch it with a thick layer of pine bark mulch, which is good for those acid loving plants. Make sure there is a nice ring of space between your trunk and your mulch to prevent fungal diseases. As the mulch breaks down it will also provide more nutrients to your rhododendron. 

Although rhododendrons have specific soil requirements, they are very easy to care for once planted. The mulch and organic soil you used will help the soil have consistent moisture, but they may need additional watering in the heat of summer. They generally don’t need to be trimmed but do benefit from deadheading spent flowers. Rhododendrons appreciate a yearly fertilizer in the fall and a refresh of their mulch. 

Rhododendrons look great as foundation plantings around your home. Their range of colors will fit into any planting scheme and they will bloom for years to come. If you don’t have one yet, consider planting a rhododendron. 

If you are looking for more information about this flowering shrub, check out the resources of the American Rhododendron Society, www.rhododendron.org. And here is a very in depth article from the Pacific Horticultural Society about the Western Azalea https://www.pacifichorticulture.org/articles/western-azalea-beauty-and-fragrance/

Less water, successful veggies

By Diane Hyde, OSU Extension Master Gardener Volunteer

Credit: Markus Spiske. Indeterminate (vine) tomatoes, especially earlier-producing small cherry varieties, produce flavorful fruit in a dry garden.

Summers are getting hotter and drier while water is getting more expensive. Some vegetables can produce acceptable yields successfully with no supplemental irrigation with some careful planning. Not all vegtables are suitable for dry gardening, and not all locations will support gardens without water. Dry farming has been done for millennia, and knowledge of the practice has been passed on in a few farming families and cultures.

Oregon State University Extension Dry Farming Project has focused on management strategies to grow with little or no irrigation. Yields may be 25% to 50% less than irrigated crops because plants are spaced out farther apart. Each plant can still have good yield, so a family dry garden might take more space to provide as much produce. Produce grown without irrigation has often been judged to be more better in color, texture and sweetness in taste comparisons. 

Successful dry gardening requires soil that will retain spring rain water. Clay soils and organic humus will hold seasonal moisture, but if the underlying ground has rock that drains well then water will not be available for the summer. Four feet of moisture-retentive soil is recommended. Shallow, rocky or sandy soils may not hold enough water for decent crop yields. The climate should have a wet period, like ours, that provides lots of moisture prior to the dry period. The dry garden area should have no competing trees, shrubs or turf sucking up the water before the vegetables can get it.

Sloped land holds less water than flat land. South-facing gardens lose more water to evaporation than north-facing gardens. A windy garden site will lose water from plant leaf evapotranspiration. A site that grows good weeds or healthy blackberries with no irrigation may be a good place to transform into a dry garden. 

To dry garden in summer, plant as early in Spring as possible to take advantage of seasonal rain. Soil in our area can often be prepared as early as February to April, but frost dates and soil temperatures limit which veg will grow that early. Seeds need to be planted in wet soil, deeper that the seed packet recommends if the surface has dried. Pre-soaking seeds 24 hours before planting helps them germinate and establish more quickly. Transplants may need to have all but the top leaves removed and the stems buried as deep as possible. Mudding in the plants at planting, filling the hole with water, will get the roots started well so they can deal with no more irrigation. 

Roots will reach deeper and wider in a dry garden, so more space per plant will be required, probably at least twice the space recommended on the seed packet. Because there is less water applied to dissolve ground minerals, lime applied to the soil before planting helps prevent blossom end rot in tomatoes, squashes, peppers and other veg that require more calcium. Mulches applied deeply after the plants are established will retain more moisture and keep the soil cooler. 

Indeterminate (vine) tomatoes, especially earlier-producing small cherry varieties, produce flavorful fruit in a dry garden if they are started well. Peppers, potatoes, winter squash, zucchini, melons, dry beans and corn are commonly dry-farmed. Beets, carrots, chard, kale, leeks, rutabagas will grow without irrigation, but will do better with occasional water. Fall-planted garlic, fava beans, root crops and leafy greens establish in the rainy season and mature without irrigation in early summer. Fall-planted broccoli, kale and other cool-season crops can grow through winter but bolt and flower quickly when warmer weather arrives. Spring-planted onions, celery, radishes and greens require irrigation to be productive. Choosing varieties with shorter growing periods listed on the seed packets means they might complete their growing cycle before the water dries up. 

For more information about dry vegetable gardening and a list of resources visit http://center for small farms.oregonstate.edu/dry farm.

Extension publication “Intro to Dry Farming Organic Vegetables” is available for free download at catalog.extension.oregonstate.edu/EM9229.