Arroz Rojo: Easy to Make

Check out a full step by step tutorial online here: https://youtu.be/zDetutOPUnc

Serves: 4

Time: 35 minutes

Ingredients

  • Oil
  • 1 cup of white rice 
  • 2 ½ cups of water 
  • ½ a white onion cut in half 
  • ½ cup of tomato sauce 
  • 1 knorr chicken bouillon cube 
  • Salt

Directions: 

  1. Place a medium frying pan over medium heat. Add oil to cover the entire surface of the pan. 
  2. Add the rice and onion to the hot oil. Stir and fry until they are a light brown color. 
  3. Add tomato sauce with the water to the pan. Place chicken bouillon cube and stir to make sure the cube dissolves. Add pinch of salt for taste.
  4. Allow for it to reach a boil, then lower the heat to low and place lid. Let cook for 20 mins.
  5. Serve and enjoy!

*Hack: use the same sauce base with a spoonful of sour cream for some yummy spaghetti*

Thanksgiving Dinner Recipe

Herb-Roasted Turkey Breast

Serves 6 

Time: 1 hour

Ingredients

1-whole bone-in turkey breast, 3 pounds

1 small onion (diced)

1 tablespoon minced garlic (3 cloves)

1 ½ teaspoon of dry mustard

1 tablespoon chopped fresh sage leaves

1 teaspoon chopped fresh thyme

1 teaspoon salt

1 teaspoon ground black pepper

2 tablespoons olive oil

2 tablespoons olive oil

1 cup chicken stock

Directions

  1. Preheat the oven to 375 degrees F. Place the turkey breast on a cutting board and cut it in half. Place both halves in a roasting pan.
  2. In a small bowl combine, garlic, onion, mustard, herbs, salt, pepper, olive oil, and lemon juice. Smear the paste onto the turkey evenly. Pour chicken stock into the bottom of the roasting pan.
  3. Roast the turkey for 1 hour, until the thermometer registers 165 degrees when inserted into the thickest and meatiest part of the breast. 
  4. When the turkey is done allow to rest at room temperature for 15 minutes.
  5. Slice and serve!

Turkey Gravy

Serves 8

Ingredients

Turkey drippings from the pan or chicken stock (2 cups)

½ cup all-purpose flour

2 tablespoons butter

½ tablespoon thyme

½ tablespoon white pepper

½ tablespoon salt (feel free to add more salt if needed)

Directions:

  1. Add butter into a pan and make a roux- sprinkle flour into the pan and cook while stirring constantly with a wooden spoon until the flour browns slightly, about 4 minutes. 
  2. Gradually add the drippings or chicken stock to the roux while constantly whisking to prevent lumps.
  3. Add the spices/herbs
  4. Let it simmer, whisking occasionally until the gravy thickens.

Lemon Butter Green Beans

Serves 4

Time: 17 minutes

INGREDIENTS

  • 1 lb. green beans 
  • 1 Tbsp butter 
  • 1 lemon
  • Salt and Pepper to taste 

INSTRUCTIONS

  1. Use a zester or small-holed cheese grater to remove the thin layer of yellow zest from the lemon. Set the zest aside. Remove the stems from the green beans and, if you prefer shorter pieces, snap them in half. Place green beans in a colander and rinse well with cool water.
  2. Transfer the rinsed green beans to a deep skillet. Add about one inch of fresh water (the water will not cover the beans). Place a lid on the skillet and turn the flame on to medium-high. Allow the water to come up to a boil. Let the beans simmer and steam for 3-5 minutes, or just until the beans are bright green and just slightly tender. Test the texture with a fork.
  3. Once the green beans are bright green and slightly tender, turn off the heat and drain them in a colander. Return the drained green beans to the still-warm skillet with the heat turned off.
  4. Add the butter, about 1/2 tsp of lemon zest, a quick squeeze of lemon juice (about 1 tsp), a pinch of salt, and some freshly cracked pepper. Toss the green beans to distribute the seasonings and allow the residual heat to melt the butter 
  5. When the butter has melted fully, taste the green beans and add more salt, pepper, lemon juice, or lemon zest to your liking. Serve immediately.

Cranberry sauce

Total time: 37 minutes

1. Empty a 12-ounce bag of fresh or frozen cranberries into a saucepan and transfer 1/2 cup to a small bowl. 

2. Add 1 cup sugar, 1 strip orange or lemon zest and 2 tablespoons water to the pan and cook over low heat, stirring occasionally, until the sugar dissolves and the cranberries are soft, about 10 minutes.

3. Increase the heat to medium and cook until the cranberries burst, about 12 minutes. Reduce the heat to low and stir in the reserved cranberries.

4. Add sugar, salt, and pepper to taste and cool to room temperature before serving.

Vegetable Prep Basics Cooking Class

Recipe: Salad Rolls with Peanut Sauce (Chicken and Tofu)

The vegetable Prep Basics class was our first class Fall term. Our goal for this class was to learn some knife skills that are essential for vegetable and ingredient prepping. When cooking, you’ll often end up prepping the same ingredients/ vegetables repeatedly, for example, onions, garlic, bell peppers. Learning the best, fastest and safest technique could make your cooking more enjoyable and save you lots of time in the kitchen.

Holding a Knife

The way you hold a knife can make a huge difference in the amount of control and force you have. Your other hand should be used to safely hold the ingredient/ vegetable you are cutting securely in place.

Protecting your fingertips

“Bear-claw” grip

In order to protect your fingers on your other hand, it is important to use this technique to tuck your fingers away from the knife and let your knuckles rest against the side of the blade.

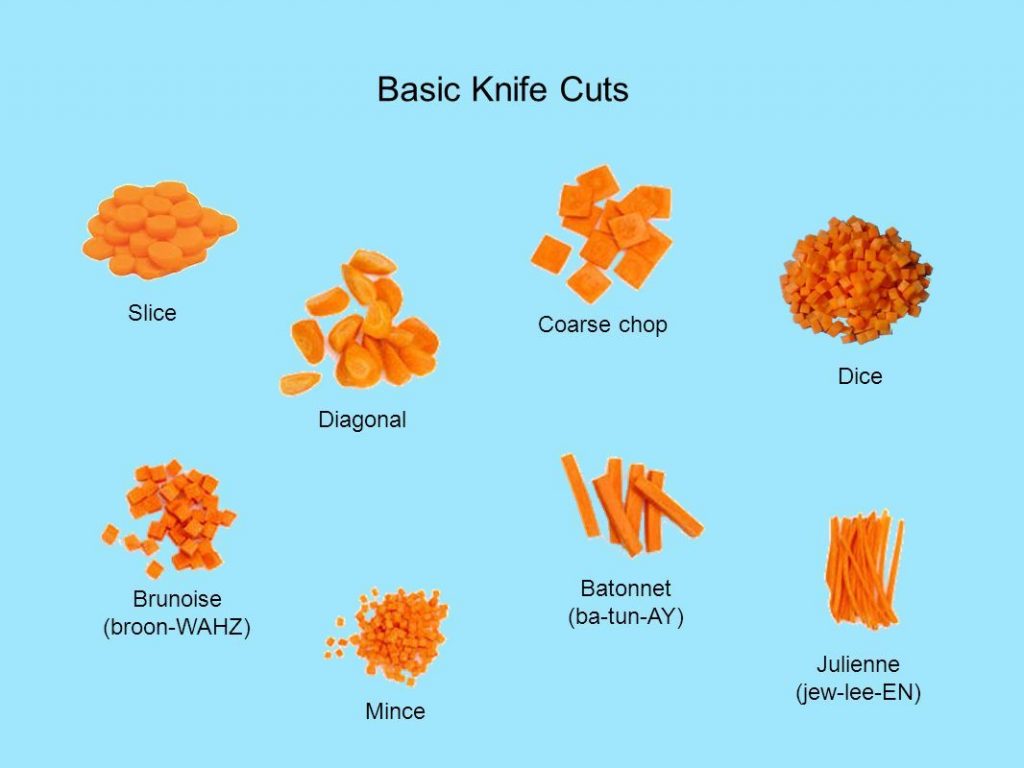
Types of knife cuts

There are several kinds of knife cuts, and depending on what you are preparing each cut could be useful.

Common types of knife cuts

For our cooking class, we mostly used the Julienne method. Julienne/French cut is cut into long, uniform strips like matchsticks. Julienne cut is often used for salad ingredients and green veggies, like cucumbers, bell peppers or zucchini.
In order to achieve this safely, it is important to ensure if the vegetable is round, cut a thin slice off one side to make a stable base.

Julienne cut carrots, bell peppers, and cucumbers

Dorm hacks 101

We also wanted to highlight cooking techniques for students living in the dorms. Students who live on campus may not have access to a lot of kitchen equipment and therefore this can make cooking more challenging. Here at OSU pots, pans and other kitchen supplies are available to be checked out at the dorms. We wanted to take on the challenge to prepare the proteins required for this recipe in the microwave. We used canned chicken( cooked) and Tofu with soy dressing.

Assembling the Salad rolls

To assemble the wraps, you will need rice paper wraps. These are available at most Asian stores. Soak rice paper wrap in warm tap water for 10 seconds, or until pliable; carefully transfer to a slightly damp kitchen towel. Arrange your choice of vegetables and protein on the wrap and fold it over and its a WRAP! Serve with peanut sauce and enjoy!

We’re grateful to everyone that showed up to the cooking class!

Recipe: Banana Pancakes

As college students we hardly have time to have breakfast. Having something to eat before starting the day keeps our energy up and makes it a little easier to go on with the day! For our cooking class we prepared easy breakfast recipes that you all can try. This recipe was adapted from Good and Cheap by Leanne Brown. We have several copies of the book, you are welcome to come check out the cookbook!

Banana Pancakes:

Serves 4 (Makes 10-15)                                                           

Ingredients:

2 cups all purpose flour

¼ cup brown sugar

2 teaspoons baking powder

1 teaspoon baking soda

1 teaspoon of salt

4 bananas

2 eggs

1.5 cups of milk

1 teaspoon vanilla extract

Butter

Syrup for serving

  1. Combine the flour, brown sugar,baking powder,baking soda, and salt in a medium-size bowl. Mix thoroughly with a spoon.
  2. In another bowl, mash 2 of the bananas with a fork. Add the eggs,milk and vanilla, and mix well to combine.
  3. Add the dry mixture to the bananas, stirring with a spoon until everything just comes together. Tender pancakes come from not over mixing the batter.
  4. Let the mixture sit for 10-15 minutes. Meanwhile slice the 2 remaining bananas.
  5. Turn the griddle to medium heat. Once its hot, melt a small amount of butter, about ½ teaspoon, in the skillet and ladle some pancake batter into the center of the pan.

Cook until it’s browned on both sides, about 30 seconds to 1 minute per side.

Serve hot with syrup plus the remaining banana slices.

Black Bean Chili with Acorn Squash and toasted pumpkin seeds


Serves 6

  • 1 teaspoon Chili powder
  • 1 teaspoon cumin
  • 1/4 teaspoon Crushed Red pepper
  • 1/4 teaspoon Black pepper
  • 1 teaspoon olive oil
  • 1 small onion, diced
  • 1 acorn squash, peeled and diced
  • 2 cans (15-ounces) black beans, drained and rinsed
  • 1 cup vegetable broth
  • 2 teaspoons tomato paste
  • 2 cans (14-ounce) fire-roasted tomatoes
  • Toasted pumpkin seeds, for topping

Directions

1.In a large pot, heat olive oil over medium high heat. Add acorn squash and onion. Saute until soft, about 5 minutes. Add black beans, vegetable broth, tomato paste and fire-roasted tomatoes.

2.In a small bowl, combine spices and mix. Add to chili pot.

3.Reduce heat and simmer for about 30 minutes.

4.Top with toasted pumpkin seeds.


Recipe Spotlight: Chicken and Orzo with Spinach and Feta

This is the recipe we prepared during our first cooking class this term; Cooking for 1 or 2. The goal of the class was to learn how to cook efficiently for 1 or 2 in order to cut down on food waste.

Recipe serves 2

Why this recipe works:

In order to make a simple skillet chicken memorable we made the side the star of the show. We used Orzo pasta, which is a small pasta that is easy to cook.

Image result for orzo

In order to add a  deep and complex flavor, we toasted the orzo until golden brown and then simmered it in just the right amount of turkey broth until it was perfectly tender.

Image result for toasted golden brown orzo

To give the recipe some flair we added garlic, oregano and red pepper flakes and stirred in baby spinach, feta cheese and a squeeze of lemon juice just before serving.

You will need:

3/4 cup orzo

2 ( 6-8 oz) boneless, skinless chicken breasts, trimmed and pounded if necessary.

Salt and Pepper

1 tablespoon olive oil

2 garlic cloves

1 teaspoon minced fresh oregano

1(1/4) chicken/turkey broth

4 oz (4 cups) baby spinach

2 oz feta cheese (1/2 cup)

1 (1/2 )teaspoons lemon juice

Directions

1.Toast orzo in 10 inch non-stick skillet over medium heat until golden brown, 3-5 minutes, transfer to bowl.

2. Pat chicken dry with paper towels and season with salt and pepper. Heat 1 teaspoon oil in now empty skillet over medium high heat until just smoking. Brown chicken lightly, 3-4 minutes per side. Transfer to plate.

3. Add remaining 2 teaspoons oil, garlic, oregano and pepper flakes to now empty skillet and cook until fragrant, about 30 seconds. Stir in broth and toasted orzo.

4. Nestle browned chicken into orzo add any accumulated juices, bring to simmer. Reduce heat to medium low, cover and simmer until chicken registers 160 degrees, 10-12 minutes, flipping chicken halfway through cooking. Transfer chicken back to skillet, tent loosely with aluminium foil.

5. Continue to cook orzo until al dente and creamy, 2-5 minutes, stirring in additional broth, 1 tablespoon at a time as needed to loosen consistently. Stir in spinach, 1 handful at a time, until wilted about 2 minutes. Stir in feta and lemon juice and season with salt and pepper to taste. Serve chicken with orzo.

(Recipe adapted from The Complete Coooking for 2 cook book)


Recipe Spotlight: Easy Applesauce Muffins

by Linh Ho, HSRC Intern

This super easy recipe for applesauce muffins has less than ten ingredients, many of which can be found either in the HSRC Food Pantry, or in your pantry at home! The stars of this recipe are the pre-made baking mix that can be found in our Food Pantry at Avery Lodge, as well as some unsweetened applesauce that we also have an abundance of.

The baking mix, supplied by the Oregon Food Bank, is very versatile and can be used to make pancakes, biscuits, and even muffins like we are doing today! The unsweetened applesauce also adds some natural sweetness and additional moisture to the muffins. Applesauce can also be used to replace eggs in many recipes. Check out this website for tips!

Onto the recipe, which can be either a sweet treat or even an easy on the go breakfast item!

The ingredients you will need for the muffins:

  • 2 cups of baking mix
  • 1/4 cup of sugar
  • 1 generous teaspoon of cinnamon
  • 1 serving container of unsweetened applesauce (about 1/2 cup)
  • 1/4 cup milk
  • 1 egg
  • 2 tablespoons of oil

For the cinnamon sugar topping:

  • 1/4 cup sugar
  • 1/2 teaspoon of cinnamon
  • 2 tablespoons of melted butter

Instructions

  • Preheat oven to 400 degrees Fahrenheit.
  • Combine baking mix, sugar, and cinnamon into a bowl.

  • Stir in applesauce, egg, milk, oil.


  • Add other mix-ins if desired. I added about a third of a small chopped granny smith apple to half the batter.

  • Fill greased muffin tins with batter, about 2/3 full. Using cupcake liners saves some mess and clean up time!


  • Bake the muffins for about 10-12 minutes. They are done when an inserted toothpick comes out clean.

  • Combine the remaining cinnamon and sugar in a shallow dish or bowl. Melt the butter in bowl — be careful with this: remember to cover the bowl with plastic wrap and only heat for about 15 seconds.

  • Gently dip the tops of the muffins into the melted butter and quickly roll into the cinnamon sugar mixture.
  • Enjoy your muffins!

Recipe spotlight: Egg Fried Rice

Here is a quick fried rice recipe that uses leftovers and pantry staples to create a delicious snack or meal!

Serving size: 4-6 people as a main dish, 6-8 people as a side dish

Ingredients for Egg Fried Rice

  • 4 cups cooked rice – day old is best
  • 1-2 Tablespoons of oil
  • 1 small onion, chopped
  • 1-2 cups vegetables chopped (fresh, frozen, or canned are fine – just drain excess liquid)
  • 2-3 Tablespoons soy sauce (more or less to taste)
  • 4 eggs (1-2 eggs per person)
  • ½-1 Tablespoon of garlic powder(more or less to taste)
  • ½-1 Tablespoon of black pepper (more or less to taste)
  • ½-1 Tablespoon of chicken bouillon powder (more or less to taste)
  • 2 Tbsp optional seasoning/toppings


Notes from the author:
I used brown rice, half of a large onion, two carrots, and four butter pats repurposed from various event leftovers. The dry seasonings are optional and could be replaced or combined with cayenne pepper, paprika, onion powder, mushroom powder, or omitted as desired.  If you want to add meat, fish, or vegetarian protein substitutes, factor in about half to one cup of protein. Note that if you add raw meat or fish, you should chop, cook, and season with salt and pepper before you add the vegetables, rice, etc. Finally, I used sweet chili sauce as an optional topping, but chopped green onions or toasted sesame seeds are also tasty options. 

Instructions for Egg Fried Rice

  • Preheat a large frying pan or wok over medium heat. Add oil of choice.
  • Chop vegetables as needed

chopped onions and carrots

  • Note that you can save vegetable scraps and make vegetable broth
  • Add veggies and dry seasonings to the pan and cook until tender

chopped vegetables in skillet

  • Push the vegetables to the side, and crack the eggs onto the other side.

scramble eggs on one side of skillet

  • Scramble the eggs and then mix eggs and veggies together
  • Add the rice to the veggie and egg mixture 2 cups at a time.

add rice in portions

  • Pour the soy sauce on top.

add soy sauce slowly to fried rice

  • Stir and mix rice until warm
  • Serve with desired toppings

serve fried rice and enjoy warm


If you have any leftovers, they’ll last about 1-2 days in the fridge, depending on the age of the leftover rice

Article by Bion Hawkmorr, HSRC Events & Programming Coordinator 2017-2018

Photo credit: Bion Hawkmorr 2018

HSRC PRESENTS: COOKING CLASSES!


Eating is one of life’s greatest pleasures. In an ideal world, healthy and delicious food would be all around and easily accessible to everyone. But we all know that it is not a perfect world and there are several barriers keeping us from eating nourishing food. Money and time should not be among the reasons. As college students with very busy schedules and not a whole lot of money, making delicious and healthy meals can be challenging.If you can gain a few more kitchen skills, you can be creative with the ingredients available to you and make some healthy and fun meals.

The cooking classes this Spring at the HSRC are FREE and focused on empowering the participants with basic cooking skills. The recipes that will be used are easy, cheap and quick, because yes, we always have tons of homework and deadlines to beat, but of course we need to eat healthy yummy food too!

Rice Every Which Way- April 17th, 5-7pm.

Versatile ingredients save meals time and money! Rice is definitely one of them. Boiled rice on its own is not very difficult to make, but it can be pretty bland and definitely get old. In this class we will be playing around with herbs, spices and vegetables (more vegetables=more flavor) to make rice healthy, tasty and fun. The other amazing thing about rice is that you can make a lot of it over the weekend and make different meals from it, all week long to save a lot of time. Rice is one of those staples that you can have for breakfast, lunch or dinner.

Ramen Revamped-May 3rd, 5-7pm. 

We have all lived off one too many Ramen bowls at one point in our lives. They are quick and easy, and don’t require any cooking skill but most of all they are cheap! while we have certainly come to accept Ramen as part of ‘the college experience,’ we can have fun making it  healthier, tasty and more nourishing.


Knead Bread?  May 15th, 5-7pm.

When you consider the simple ingredients that form the foundation of all breads—flour, yeast, salt and water—it’s truly remarkable how many varied products can be made from it. Bread baking can often seem very intimidating and complicated. This class will be focused on stove top breads, which can be an easier and cheaper alternative.We want to empower you to feed yourself, and take your baking skills to the next level!


Cheap and Gourmet- May 31st, 5-7pm.

Good and cheap! Eating healthy and tasty food while on a budget can be a real hustle. This class is designed to explore ways you can create an amazing meal with simple affordable ingredients. Improvisation is the soul of great cooking! Our hope is after this class you will be able to tailor things to your taste and preference all while on a budget!

Registration is recommended not required. Click here to sign up!  The classes will be held at Avery Lodge.  

We are looking forward to cooking with you!

Breakfast with a tinge of color

We wanted to bring to you some delicious, quick and simple recipes that can be made with little cost. A bonus is that many of the ingredients used for these recipes can be found at the Oregon State University, Human Service Resource Center food pantry. We decided to play with color and make blue cornbread and vegetable scrambled eggs

To make our cornbread, we chose to use blue cornmeal. This ingredient, one of the lesser grabbed items at the food pantry, served to give our cornbread an interesting blue tinge! To pair with the cornbread, we decided to make some scrambled eggs. As students we usually have a hectic morning, rushing to make a quick breakfast of just eggs. Scrambled eggs with veggies, is a                delicious and healthier alternative to your regular plain ol’ scramble.  

We began with making cornbread, the ingredients included:

Download a PDF of this recipe:  Blue Corn Cornbread – Fifteen Spatulas

  • ¾ cup of butter, at room temperature
  • 1 cup of sugar
  • 3 regular eggs
  • 1.5 cups milk                                           
  • 2 cups of all purpose flour
  • 1 cup of blue corn meal
  • 4.5 tsp baking powder
  • 1 tsp salt

As you prepare your ingredients, preheat the oven to 400℉.

To prepare the ingredients you will need 3 bowls.

In the first bowl  mix together butter and sugar. Do not worry if you didn’t have enough time to let your butter melt to room temperature. We decided to heat it in the microwave until partially melted.

In the second bowl mix together your eggs and milk.

In the third bowl sift together your flour, blue cornmeal, baking soda and salt.

Add ⅓ of the flour mixture to the sugar/butter mix in the first bowl, then add ½ of the egg/milk mixture. Mix this until all ingredients are absorbed.


Repeat this step until the remaining flour mixture and egg/milk mixture are added into the first bowl.

* We did not have an electric mixer, however a fork or whisk were able to serve the same purpose. We do recommend using an electric mixer, as it was quite exhausting trying to mix the ingredients with a fork.

Grease the pan with butter, or pam (if you already have it).

Once mixed, pour the cornbread mixture into a 13 x 9 x 2 inch pan. Or any large pan you have available.

Bake for 22 to 25 minutes. To check that it is cooked stick a toothpick or fork through the middle. If the fork comes out clean, then it is cooked all the way through

Once it’s ready, let it cool off.  We couldn’t wait to eat it, and found out that while still hot it could be quite crumbly.

-This recipe was adapted from Blue Corn Cornbread by Joanne Ozuq at 15spatulas.com

We then prepared the egg recipe: 

Download a PDF of this recipe: Colorful Scrambled Eggs

  • 8 regular eggs
  • 1 large green pepper
  • 3 tomatoes
  • 1 large onion
  • Pepper (to taste)
  • Salt (to taste)
  • 1 cup of milk
  • 1 tbsp of vegetable oil

Start by cubing your tomatoes, onions and green pepper. Then mix in a bowl.


Break the eggs in a separate bowl and add 1 cup of milk.


*We later found out that 1 cup was too much and recommend using ½ a cup.

Mix the eggs and milk, then pour the mixture into the vegetable bowl.

Add salt and pepper to taste into the mixture.

Heat a large pan and add vegetable oil.

*We did not have a specific temperature to heat it to, so we started on low and gradually increased it.

Once hot, add mixture and scramble with a spatula until ready.


Here’s a picture of the delicious, complete product!


_____________________________________________________________________

Final thoughts from Fatuma and Nikita, two Spring 2018 volunteers:

Volunteering with the food pantry started as a great way to earn service learning hours for a class, but it turned into an eye opening experience. We were able to learn how the food pantry functions, and the great ways it has impacted food insecurity in our community. We were excited for this blogging opportunity to not only expand our knowledge about how the food pantry items may be used, but also share our experience making some interesting recipes. In the future, we look forward to opportunities to experiment with food products we might have overlooked in the past and encourage others to experiment themselves!