I’ll admit, the project my team has been working on these two terms has proven to be a bit of a climb (maybe more of a rappelling adventure). Rather than choose from some of the more familiar projects offered in the EECS Project Portal, I thought it would be interesting to choose one that would drive me to learn new topics. To this end, the project has served as a demonstration of, and exercise in, the software engineering mindset that I’ve been developing throughout my attendance at Oregon State University, more so than as some synthesis of accumulated computer science knowledge.
My teammate and I have been working on an Embedded System Digital Audio Loop Station, similar to a guitar “looper” pedal but much more fragile, and certainly not built for stomping on. Personally, this project appealed to me because I’ve always liked digital signal processing (DSP) from afar: I’d dabbled in audio production and synthesis, but always through various tools and dashboards, and I told myself that one day I’d learn the why and how of it all. At the same time, I was interested in learning more about computer hardware, and microcontrollers seemed to be good media for doing so.
I realize that DSP and electrical engineering are two huge fields, and I wasn’t setting out to bridge both chasms in a single project. It did, however, serve as a crash course in the domains, while at the same time allowing me to demonstrate project management and problem solving skills I’ve learned. To this point, some of the earliest decisions our team made concerned the acknowledgement of our gaps in knowledge in these areas: given (a lot) more time, we could have developed our own audio libraries and hardware abstraction layers, but we decided to use the platform libraries created by the creator of the Teensy microcontroller himself, admitting that he might have a better grasp on the requirements. The corresponding code examples and learning materials employed the Arduino framework, so we adopted the same for our project, and although we didn’t bring in any more libraries, these took care of the bulk of the very low-level logic. That being said, it took a lot of research to figure out what to use and how to put it together; I’ll discuss a few things I learned below.
1. Soldering
Most of the components purchased were already assembled, but the team (initially) opted to solder the pin headers and auxiliary memory chips onto the microcontroller. The purpose of soldering isn’t to create a bond that’s as strong as, say, welding or brazing, but to create a connection that properly conducts electricity, so it’s important to choose metals that achieve this end. Copper is commonly used as a “host metal” in combination with lead/tin solder. In the process, a chemical reaction occurs, and the solder alloys with the host metal, known as wetting. Oxidation is one of the arch-nemeses of wetting, so flux paste or rosin-flux core solder is used to clear off any surface oxidation, while also forming a protective barrier and helping the solder flow over the surface.
While this connection may not be as strong a welded bond, I found out that it’s still stronger than you might think, for better or worse: a cooled solder connection doesn’t simply pry off, at least not without damaging surrounding components, so a cheap solder pump is handy to have around when you need to remove excess solder or an excess component. Here’s another tidbit: attach memory chips before header pins.
2. Prototyping
Closely related to the last point, prototyping involves planning pin connections before permanently soldering them, i.e. “measure twice, cut once”. Learning to prototype connections with a breadboard was a bit of a lesson in basic circuitry, but learning to read a pin chart was a much bigger task. I ended up creating a personal dictionary with all the acronyms encountered in this project, which helped a lot.
Midway through this term, my initial prototype stopped reading any audio input. There wasn’t time to investigate the issue, and there certainly wasn’t time for more hardware mistakes, so I took the safe route and purchased a prototyping board that had the necessary connections and memory pre-soldered.
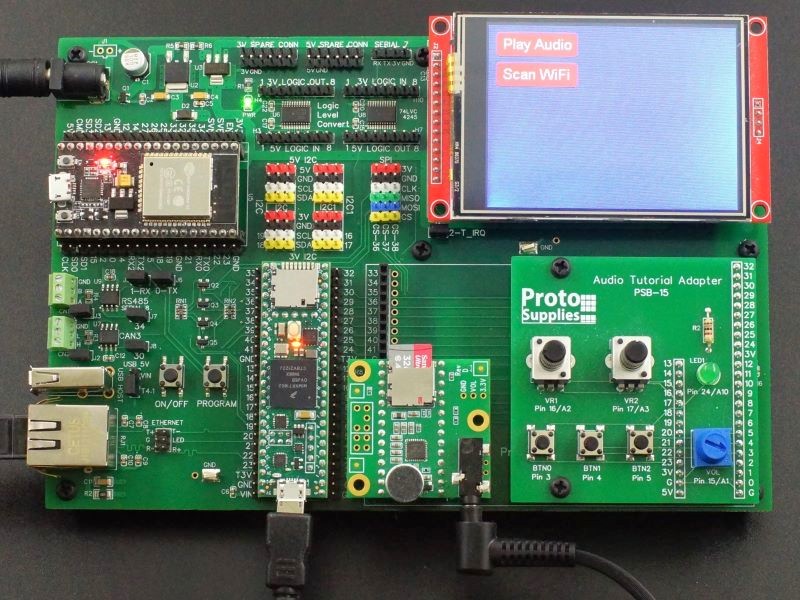
This board included the microcontroller and audio adapter used in the initial project prototype, as well as a few other buttons and knobs. Additional pin headers allowed us to attach more buttons via a breadboard, which may later be transferred to a permanent prototyping board.
3. Digital Signal Processing
In the project’s planning meetings, some audio effects were selected for definite implementation, others were thrown out, and a few were given low priority, which is to say that we would implement them if we had time. One of these “back burner” effects was pitch shifting: it may first sound like an easy task, but it takes some serious processing to do it without getting the “chipmunk effect”, and some serious engineering to pull it off in real time, hence the proprietary pitch-shift effects on the market.
We did not end up having the time to include this effect, but I learned a lot about DSP while planning how we might have done it. Without going into too much detail, it’s interesting to note that a “windowing” technique is commonly used when applying the Fast Fourier Transform to an audio signal, and this “windowing” is similar in effect to processing audio samples in blocks, rather than sample-by-sample: block processing amortizes the performance costs of processing samples, just as windowing writes off the costs of discretizing a continuous audio signal.
4. Memory Utilization
Yes, I see you over there idly playing solitaire with 64 GB RAM, but the Teensy doesn’t have that luxury, so it needs to run a tight ship. My teammate and I installed a whopping 8 MB of external RAM, but this still isn’t much memory when working with uncompressed audio. The initial plan was to save completed “loops” to SD storage, but it turned out that file “buffers” were necessary for currently recording tracks, too. This required us to account for several affordances: what memory did we have at our disposal, and how could we best access that memory in real time? It turns out that SD cards nowadays are quite fast, with an ultra high speed (UHS) class 3 card touting a 30 MB/s minimum write speed. We’d installed serial flash memory onto the prototypes, but opted for the SD memory in the end. Even with the high speed chips, though, it was still important to choose the right RAM buffer sizes. Too little and latency would be audible, but too much and there wouldn’t be room for the rest of the program.
5. C++
I’ve certainly gained some experience in C and C++ throughout my career at OSU, but to be honest, all but a handful of courses called for Python or JavaScript. This was the first sizable project I’ve worked on that used C++ exclusively, and this was emphasized by the lack of access to most standard libraries. The platform libraries included a few core printing functions, but for the most part the focus was on using C++11 language features as efficiently as possible. A few features that greatly aided memory safety, type safety, and the fight against null pointer exceptions were ranged-based for loops, list initialization, enum classes, and auto type specifiers.