All Maps Are Not Created Equally

For this, the final blog post of the Capstone project, I’ve decided to utilize this space and time to gain a deeper understanding of maps and, more specifically, the boost container called flat_map. 

Recently in the Mahjong codebase I’ve been working with nested maps and accessing data stored in a nested map structure. Although maps were obviously a topic covered throughout my CS coursework, I honestly didn’t reach for them too often in my own projects and it took a fair amount of brainpower to unpack both what was in the nested map structure I was looking at and how to get the data from it that I needed.

Fast-forward through conversations with engineers, cppreference reading, and a supremely helpful video about maps in C++ from the Cherno and I succeeded in strengthening my understanding of maps, how to use them, and when to reach for them. But then, as often happens, my mentor/sensei asked me, “why do you think we’re using a boost container flat_map instead of just std::map?” to which, in the moment, I could only make assumptions and guesses around optimization, but nothing concrete. Back to the books for me!

First off, what the heck is a boost container flat_map? A flat_map is “an associative container that supports unique keys and provides fast retrieval of values of another type T based on the keys” (source). That sure sounds like a map… 🧐 Like std::map, flat_map also supports random access iterators.

Where I started to uncover some differences is in the following:

  • flat_map <Key, T> has a value_type of std::pair<Key, T> whereas std::map<Key,T> has a value_type of std::pair<const Key, T>
  • flat_map is implemented like an ordered vector, which means that insertion of new elements will invalidate previous iterators and references
  • Random insertion into a std::map is faster than random insertion into flat_map (source)
  • Random search between the two containers is comparable, though there is some debate that flat_map can be made faster and std::map cannot (source)

None of this necessarily answered my sensei’s question of why use a flat_map vs. a map. Thankfully though, a thorough and multiply cited above Stack Overflow post uncovered the answer to my query!

One very important, significant advantage of a boost container flat_map over std::map is the speed with which a flat_map can be iterated over. Although a std::map would work for the specific use case in our Mahjong game where we use a flat_map, the fact that our nested map structure needs to be iterated over in a couple of different places in the game to get the data we need, a flat_map is a much better choice because that iteration can be optimized.

Of course this is part of the job of a software engineer, however it’s still amazing to me that someone knew to or at least took the time to look into making that design decision. I am such a novice and constantly humbled by the intelligence and experience of my colleagues. It’s an incredible honor to work and learn from them, and I am eternally eager to continue growing in this field.

Let’s Talk About Buttons

Last week with the delivery of the Project Plan, I had developed a strong sense of what I wanted the Board Editor UI to look like and generated a few prototypes to lean on as visual guides. 

The first key to getting into the Board Editor involved doing away with the Game View, so that the designer was presented with a clean, empty backdrop rather than the view of a Mahjong game to be played. By making a call to an existing MakeDirtyRecursively() function and setting up some logic for when to display the Game View or Board Editor View, I was able to get the Board Editor button in the Main Menu to result in an empty backdrop. 

With this small victory, I began going full tilt on getting the UI elements in my prototype to display in the Board Editor with the intention of fleshing out the actual implementations of those elements (i.e. export button when pressed fires the actions necessary to export the text file of the board design) later. 

The bulk of my time in this pursuit was spent examining other implementations of buttons in our game. I began with reviewing the Toolbar files and the way each button was created and added to the view hierarchy. Essentially I needed to determine if the app was in the Board Editor configuration and if so, if the user was in the Board Editor. If the user was in the Board Editor then a Save button  and Export button needed to be pushed onto the view, otherwise push the Hint button and Undo button onto the view.

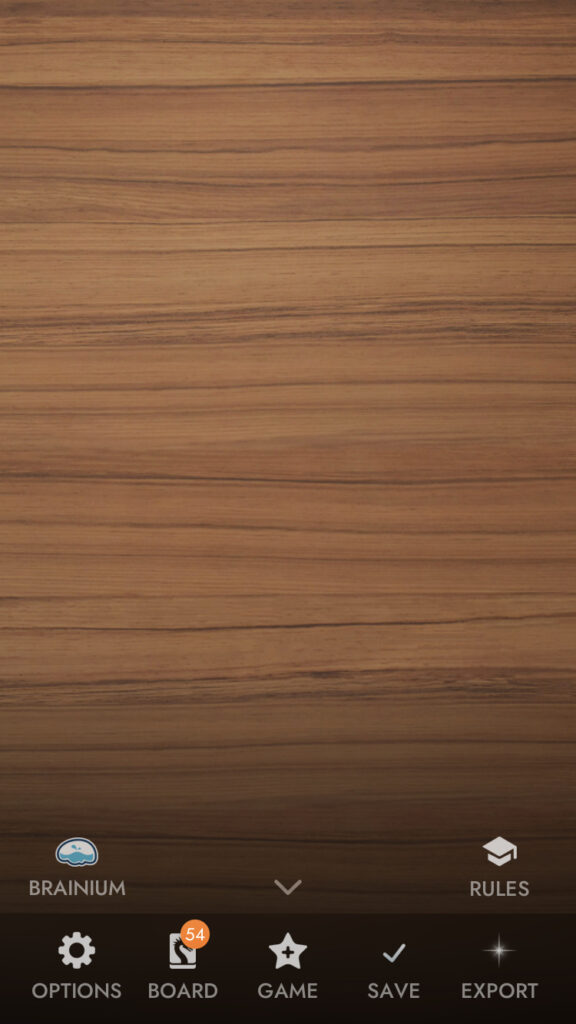
As with each button element of the toolbar, the Save and Export buttons needed to have a texture/icon, a handler that would do whatever actions needed when pressed, and text for the button label, and pass these params to the ToolbarButton constructor. For now I left the handlers empty as I would write the actual functionality for these buttons later. For the textures, I opted to use pre-existing textures in our codebase for now and will add the exact textures I want for those buttons later on if time allows. Finally, for the text I simply passed the following strings: “SAVE” and “EXPORT”. In the end, this generated a Toolbar that closely matches the intended UI:

Toolbar from inside the Board Editor

Next up, I focused on getting an ADD button to the screen, which will eventually be the component to signal that the Board Editor is in add mode and taps to the screen should run the necessary functions for adding a tile in the touched location. To get this button added to the screen, I started reviewing implementations of PillButtons in other classes like MainView and EndOfGameScreen. There were a few functions I knew I needed to write based on reviewing these other classes. For starters I would need a function for getting the button rect (its positioning on the screen), one for getting the size of the button, and one for getting all of the button params to pass to the PillButton constructor.

After getting these functions written out and the code to successfully build, I was expecting to open the Board Editor and see a large blue button with a plus sign texture and the label “ADD”, but alas there was nothing displaying on the screen. Reviewing my code and comparing it to other buttons that were generated in other views, I grew increasingly frustrated and confused: where is the addTilesButton? I solicited the assistance of one of our software engineers who gave me an incredibly useful walk-through of the debug tools in Xcode, which allowed me to set breakpoints and ensure my functions were actually getting run by the program, and sure enough they were. This engineer was also now confused and curious–we had to crack the case of the missing pill button!

Both of us were thinking that either I needed to include a render function in my BoardEditorView (wrong!) or that the button was actually being rendered, we just weren’t seeing it because it was out of view (nope) or somehow hidden (much warmer).

At lunch I checked in with my mentor to see if they could take a look at what I’d implemented and see if they had any idea what steps to take next. We immediately set breakpoints and they confirmed that all of my functions were being properly called and that a button should be in the upper left corner of the screen. He then suggested removing the backdrop entirely and re-running the code. Sure enough, with the background texture removed, there was the missing addTilesButton in the top left corner, right where I placed it.

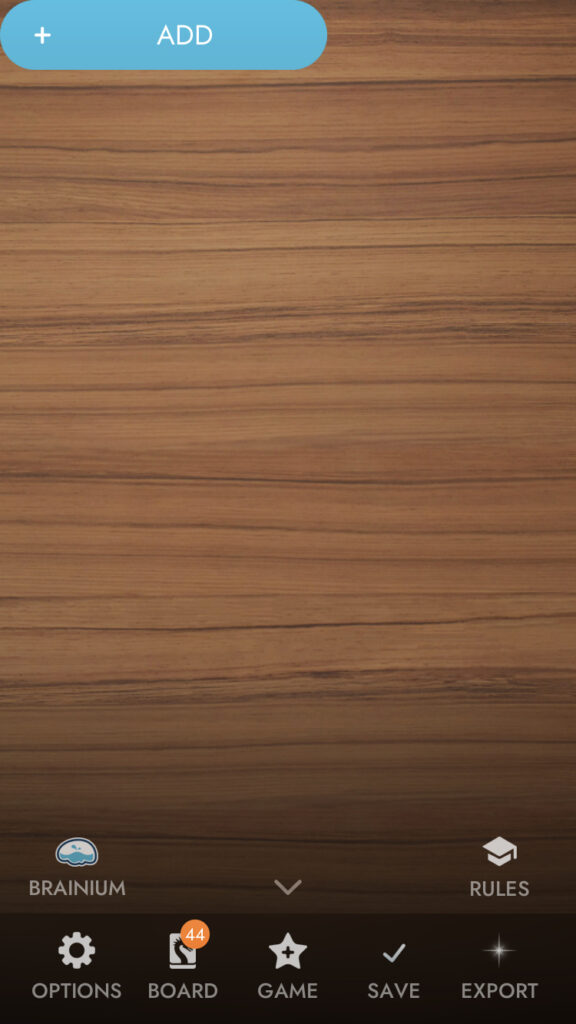
Apparently the BoardEditorView needed to be assigned to a DepthGroup in our game that set it at the same level as the GameView and by simply adding this to the BoardEditorView constructor, the addTilesButton displayed exactly where I told it to:

Stage 1 of creating the addTilesButton

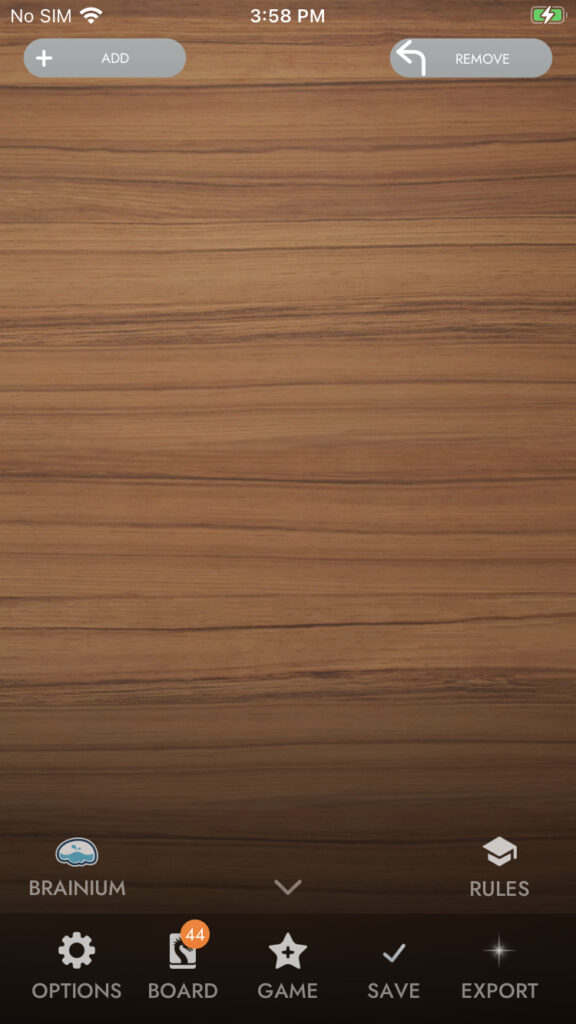
Having implemented the addTilesButton, getting the removeTilesButton to the screen was quick work and with some tinkering of button params and adjustments to the button rect, I was able to get both buttons to the screen in a position that allows for the status bar to be displayed:

addTilesButton and removeTilesButton displaying in the Board Editor

I’m still working on getting a counter label to display and to have the add and remove buttons to update their color when selected/deselected, but for now I’ve at least started to hack away at getting some UI elements to display and that feels really good.