Increasing Access to Programming Education in US High Schools

It is no new fact that computers have become a huge piece of the classroom, especially in the post-pandemic world that we live with remote learning. Computers are now an integral part of academics within the United States. Their use has accelerated and streamlined teaching of subjects from Mathematics to English. But this leaves us a question, what about the subject of the device they use for those other subjects?

When I was in high school from 2008-2012, there was no access to a “Programming” class. The closest class that was available was your standard “Microsoft Office” class where you could automate your “Excel” sheets with formula and that is it. Upon checking the current curriculum guide for the high school, a basic programming class is not offered yet. I have also seen this reflected in other high school curriculum in my area, while some private schools do have introduction courses. So what are the challenges to this that could explain the absence of curriculum, and what can be done to increase adoption.

Challenges that face US high schools for adoption of Computer Science programs are mainly wrapped around Computer Science’s greatest strength, cost. It can be argued that most of a Computer Science curriculum could be taught with Open Source technologies that effectively bring the cost of software to zero. Great! Sounds promising! Not quite… While the software could be reduced, it is where the hardware comes into play. School systems nationally have been tasked with getting a large amount of students connected properly through the use of a number of tools. The greatest asset to school systems have been Chromebooks. Chromebooks are like any other computer. They run an operating system. They run applications. They connect to a network. Though, they have an Achilles heel for programming. They don’t have quite the freedom of a “full” operating system for the user. Most programming experiences will be either browser-based or half-baked applications. You can use browser items to accomplish simple coding, but this can be extremely limiting once you build larger programs. Fortunately, it seems there have been attempts by Google to open up the operating system to run a bash shell with access to Debian underneath, but a school system isn’t about to put money into a curriculum with beta use. What will need to come from this will need to better in browser coding experiences to offset experiences on all platforms for further adoption in a limited ecosystem. The next part of cost is faculty. According to Salary.com, the average salary for an entry level Software engineer in the US is $72,049. The average high school teacher salary is $63,001. That is an $11,000 dollar difference and does not take into account other benefits and costs associated with the two fields. There is also higher growth in the industry rather than teaching for Computer Science. While the upstart costs of these programs could look promising, it could face long term costs..

What is a school to do about these challenges to offset costs? Luckily, there are quite a few ways around this. Going back to Chromebooks. I hope you didn’t think I was giving them grief, because they really are a great solution to a problem. (If their slow specs and limited support time window are great for the environment remains to be seen though.) Though, you definitely can access a better way to create larger products. With virtualization technology at its current level, it would be very easy to create a large group of remote desktops that students could access further resources to develop and code on. This also would allow the teacher access to their coding environments as well so they can help students diagnose issues. Increasing access to new technologies to implement in the curriculum would be an easy way to do so. As far as salary is concerned, well that is quite a bit different of a challenge. A good short term would be creating interest for current teachers to expand their knowledge to cover Computer Science. Teachers that currently teach items like Physics or Engineering would perhaps already have some exposure to programming and able to develop a suitable introduction curriculum.

While it should not be instituted to make programming a mandatory skill, allowing further access to Computer Science and Programming at the high school level would be beneficial to increasing the available interest in the topics for students. This would prepare students going into degree programs at a better rate than others. By eliminating further barriers, you could help all demographics of students in the country as well.

Sources:

https://www.salary.com/tools/salary-calculator/software-engineer-i

https://www.salary.com/tools/salary-calculator/high-school-teacher
Using Chart.js with Vue.js v3

Introduction

I recently needed a way to integrate a charting utility into a Vue.js project of mine and needed to find a way to do so. I really enjoyed the flexibility of Chart.js, but at this time, there is no integrated implementation of Chart.js into v3 of Vue.js. I experimented with some npm packages with no luck. So it was time to get dirty and fake it until I made it work.

In this post, I will be showing a quick way to make a Chart.js component that can react to props for re-usability multiple times in your Vue.js projects.

Prerequisites

To complete this tutorial, you will need the following:

  • Node.js and NPM package manager installed locally
  • Basic Knowledge of Vue.js components (I recommend using the Vue CLI to create a project)

This tutorial is being prepared with Node v14.17.1, @vue/cli 4.5.15, npm 8.3.1, and Chart.js 3.7.0.

Step 1 – Creating Your Vue Project and Install Chart.js

Let’s create our project directory using Vue CLI and use default to use Vue 3

$ vue create vue-chart --default

Then let’s change to the directory.

cd vue-chart

Now, we can install Chart.js into our project using npm package manager.

npm install chart.js

At this point, we have created our vue-chart sample project and installed our Chart.js dependencies. Let’s get to the fun work now!

Step 2 – Create a Vue Chart Component

I will provide our sample data later in this tutorial, but lets immediately get into creating the Vue component that we can import to other components in our Vue application.

Under your src directory, you will have a components directory. You might notice it has the default HelloWorld.vue file if you used the Vue CLI as before in step 1. In this folder, create the file Chart.vue.

Now, we will want to properly format our component into what Vue likes to see including our template and script elements. We will also include the canvas element with a specific id that Chart.js relies on and import it into our component. It is also a good idea to wrap our canvas component into a div for Vue to properly operate.

<template>
 <div>
  <canvas id="chart-example"></canvas>
 </div>
</template>

<script>
import Chart from 'chart.js/auto';

export default {
  name: "Chart"
}
</script>

At this point, you have created the base Vue component. Now what? Well, we will need to add just a few more lines to allow Chart.js to do its thing and Vue to accept props from parent components.

Let’s first take care of props, Vue’s way of sending data to child components so we can make this truly reusable.


<template>
 <div>
  <canvas id="chartexample"></canvas>
 </div>
</template>

<script>
import Chart from 'chart.js/auto';

export default {
  name: "Chart",
  props: ['chartData']
}
</script>

chartData will be our general prop that we import to provide Chart.js the data it would like to create our graphs. The power of usability!

Now, our canvas chart element needs that linked to our prop. This is where a lot of functionally breaks down if we do not properly link them. For this, we are going to use vanilla JavaScript and DOM manipulation in conjunction with Vue’s mounted lifecycle hook to make sure it is updated when Vue renders our component instance.


<template>
 <div>
  <canvas id="chart-example"></canvas>
 </div>
</template>

<script>
import Chart from 'chart.js/auto';

export default {
  name: "Chart",
  props: ['chartData'],
  mounted() {
    const chart = document.getElementById('chart-example');
    new Chart(chart, this.chartData);
 }
}
</script>

Okay, we just added a lot there. What essentially is happening is during the mounted hook of Vue, the chart variable now points to our canvas element that Chart.js can use. This is all we have to do now for our component. If this is your first time making a Vue component, congrats! You just made your first reusable component in Vue!

Step 3 – Import Your Chart Component

At this point, we want to display our component on our Vue app. You will want to navigate to App.vue in the src directory. This is your main parent component if you are new to Vue. If you used Vue CLI, you will have a populated page. We do not need any of this. Let’s make some changes to App.vue by removing the “HelloWorld” component, import, and element to make sure we do not have any extraneous items.

<template>
  
</template>

<script>


export default {
  name: 'App',
  components: {
    
  }
}
</script>

Looks similar to our Chart.vue component base template right? Now let’s start importing our Chart.vue component.


<template>
  <Chart/>
</template>

<script>
import Chart from "@/components/Chart";

export default {
  name: 'App',
  components: {
    Chart
  }
}
</script>

Awesome! You now imported your created Chart.vue component to your parent component. Time to give it some data to create a chart now!

Step 4 – Feed Your Chart Some Data

You cannot have a chart without some data, so let’s build an object that we can feed our Chart.vue component to digest!

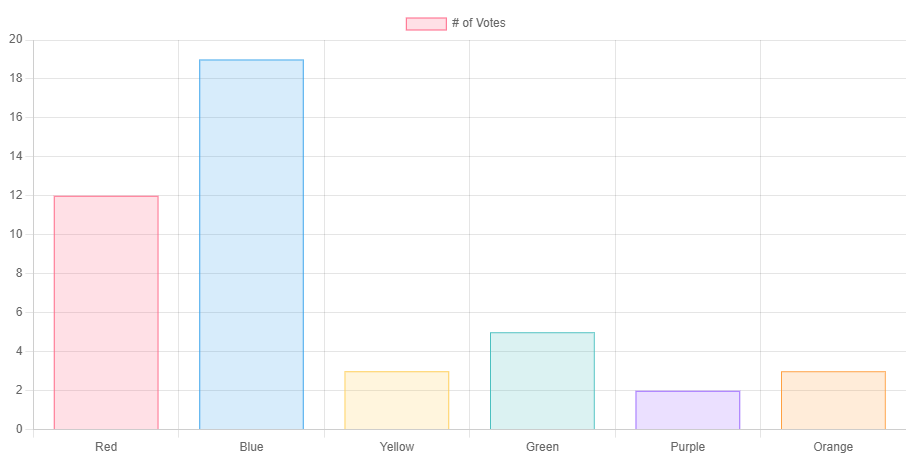
For Chart.js, when you make a chart object, it requires an internal data object that has arguments that can be populated. In the interest of time, I would recommend going through the Chart.js documentation to learn more, but because we built our Chart.vue component to be reusable, you can change anything! Line graph, bar graph, animated graph, doesn’t matter!

Now let’s use Vue’s powerful data() property to store objects and return data in conjunction with v-bind to send this chart internal data object through our prop earlier. For our chart data, I am just going to use the provided example on Chart.js.

<template>
    <Chart/>
</template>

<script>
import Chart from "@/components/Chart";

export default {
  name: 'App',
  components: {
    Chart
  },
  data() {
    return {
      chartObject: {
        type: 'bar',
        data: {
          labels: ['Red', 'Blue', 'Yellow', 'Green', 'Purple', 'Orange'],
          datasets: [{
            label: '# of Votes',
            data: [12, 19, 3, 5, 2, 3],
            backgroundColor: [
              'rgba(255, 99, 132, 0.2)',
              'rgba(54, 162, 235, 0.2)',
              'rgba(255, 206, 86, 0.2)',
              'rgba(75, 192, 192, 0.2)',
              'rgba(153, 102, 255, 0.2)',
              'rgba(255, 159, 64, 0.2)'
            ],
            borderColor: [
              'rgba(255, 99, 132, 1)',
              'rgba(54, 162, 235, 1)',
              'rgba(255, 206, 86, 1)',
              'rgba(75, 192, 192, 1)',
              'rgba(153, 102, 255, 1)',
              'rgba(255, 159, 64, 1)'
            ],
            borderWidth: 1
          }]
        },
        options: {
          scales: {
            y: {
              beginAtZero: true
            }
          }
        }
      }
    }
  }
}
</script>

And now, let’s use v-bind on our <Chart/> tag. This will take our parent component data and give it to our Chart.vue component. Essentially, the parent has the data, but doesn’t know how to make a chart; the child knows how to make a chart, but doesn’t have the data. We now get to combine them to complete it! (I am also going to wrap our Chart in a <div> so we can give it an inline style of max-width so our chart is manageable when we serve it.)


<template>
  <div style="max-width: 900px">
    <Chart :chart-data="chartObject"/>
  </div>
</template>

One thing to note if you are new to Vue bindings, our child element has the prop “chartData” if you remember from Step 2. How does this relate? Well, HTML inline attributes must be kebab-case so when you have to pass with a v-bind to a prop that is in the lowerCamelCase that Vue uses, Vue will automatically convert that from “chartData” to “chart-data” in this instance. Cool huh? More create and less syntax drama.

Alright, last step is next. Let’s see that creation!

Step 5 – Serve Your Chart!

At this point, everything will be connected and ready to serve! If you have a Vue background, you know the magic words, if not, go back to your terminal that has the project directory from Step 1 and enter the magic words.

$ npm run serve

Open up a browser to see your Vue application. By default, Vue will serve locally at port 8080.

http://localhost:8080/

What you should see is this in your browser!

Our Vue application is alive! You have successfully made a reusable Vue component with Chart.js accepting any data prop you give it.

Conclusion

So what, you made a chart you might be thinking? Well, let me close on some hidden superpowers that your Chart component possesses. First, you get all the power of Chart.js that will not break as you build out your Vue application. It is isolated to its own component. Second, you can use Vue’s power of rendering to change the Chart without changing the web page! There are various conditions under which a component will re-render. I will link Michael Thiessen’s blog post on this topic. It has a lot of information on this for re-rendering a component. It will work directly with this if you want to start building methods on your parent component to alter data, say for a dashboard of some sort.

And there you have it! A quick and dirty way to integrate arguably the best chart Javascript library into your Vue.js 3 projects without Chart.js support out of the box!

The Art of Vue.js

Much like Sun Tzu’s The Art of War, the documentation is a collection of skills on how to create a simple and quick single page application. I recently took an open source class in our Computer Science curriculum at Oregon State where you can focus on one or multiple FOSS projects. I slowly have been working to deepen my knowledge of front-end frameworks and I decided to go with Vue.js for its appeal in the open source community compared to its arch-rival, React.js. (Technically, open source under Facebook so…) It was through this time to interact with the open source community behind Vue is when I discovered my absolute love for Vue and the ecosystem around it for creating single-page applications. I want to use this post to tell you some simply awesome things Vue offers for anyone wanting to learn it and add Vue to your war chest.

First thing is first, lets talk about the ecosystem and how easy it can make getting started. You should immediately install the Vue CLI (Command Line Interface). Some IDEs will automatically do this, but with the simple “vue create” within a directory, it will completely setup your environment to get you right off the ground. Then you can continue to use the CLI to install things like Vue Router which is a powerful tool to take care of all the routing in your web application. You can build a full web application within a few lines of code so you can get right to it.

Secondly, the use of components will make your life much better. This is a lot of other framework’s basis, but Vue makes it very simple. You do not need to worry about importing and exporting specific variables. You can get anything done within the Vue component. Then, you can go down the rabbit home of importing components within components. Everything is reusable. You don’t have to rewrite a whole component to import it into anything else.

Thirdly, integrating it into other code. You can easily integrate Vue into other projects. I have built a full profile website in Github Pages with routing and everything within one HTML file. It makes life easy and simple. You can build a web application within anything. It is great and highly flexible. A tenet of Vue is that it is “Progressive” so you can implement it in bursts.

These are only a few of the great points of Vue.js and why I love it. It can do just about anything you want. I won’t even go into binding inline styles and classes to allow everything to be dynamic.

What led me to Computer Science and where do I want to go?

Like everyone, you don’t just wake up one day instantly knowing what you want to do or what your interests are. It is always a gradual progression of being introduced to something. For me, computers have always been a part of my life and identity.

I owe most of my interest into computers to that family Dell Dimension that every family had. It ran games like The Sims easily enough. It wasn’t until my older brother bought a new game called FEAR to play on it that I started to learn how PCs work. It was playable, but it was on the lowest settings possible. Why I wondered? I started to research more and more into PC specs and figured out that our Dell was not enough. As any nine year old(Yes, my parent’s did not know the game was rated M.), I couldn’t convince my parents to buy a new family computer or upgrade it. I knew there was only one way to play it and all it’s glory, to build one. It took me a few years of saving so unfortunately I couldn’t buy one to play FEAR immediately, but I finally was able to build my first computer. This allowed me to introduce my friends to building PCs and make new friends from it. Computer hardware was always my jam.

So easy decision to start a career in computers right? Not really. I viewed computers as my hobby and I didn’t want to mix that with my life. I decided to purse a career track to be a physician assistant out of high school. I earned a degree in Biology and started working in a hospital laboratory to get patient hours. I started to realize that it wasn’t meant for me and experienced real burnout. I liked patients and staff I worked with, but I wanted something different. I wanted to ultimately go back to school, but try something different. I wanted to do something I never tried out, building software. I found Oregon State’s online degree and knew it was the perfect match for me. It came at the right time right when the pandemic started so being locked in the house was a good reason to start online classes. Though the program, I found that I enjoy software development as much as I love the computer hardware side.

Currently, I have really delved into full stack development and starting to get into mobile development. I have become a huge Vue.js junkie and know the documentation like the back of my hand. Honestly, learning how to use Vue.js has accelerated my learning in other subjects. I am hoping to really delve into React and React-native to get more into the world of front-end, but also new ways to enable a solid back-end. I really want to purse a future in full stack going forward.