This week I added some background music to each level. Each of the three tracks I selected are from Eric Taylor’s Royalty-Free Music Pack, which he has generously provided to the game development community under the creative commons license. These tracks are great for cranking up the drama in each level.
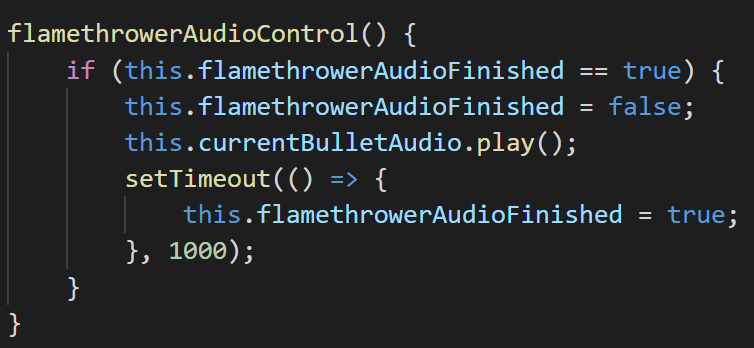
The old flamethrower sound effect sounded a little broken, so I picked a new fire sound and changed how the file played. It used to play the sound as each flame bullet fired, which caused a stuttering sound when fired rapidly. Now when a flame bullet is fired, it first checks if the flamethrowerAudioFinished flag is set. If true, it resets the flag, plays the audio, and sets a timer to reset the flag again in one second. Trust me, it sounds great.
Wahwa-wahwa-wahwa-wahwawhoosh
One of my teammates wanted to implement an ammo type with a cool-down charge. I thought it would be cool to display this in the UI as an arc that moves around that ammo icon. Right after it’s fired, a red circle surrounds the icon and the icon itself dims to show that it’s not yet ready to fire again. As the cool-down timer ticks down, the circle changes to an arc that retracts counter-clockwise around the icon. Then when it’s done, the icon lights up again.
Cool-down timer around an ammo icon
Lastly, I updated the UI to accommodate 4 different base ammo types and 3 different turret types.
We’re almost done with this project! All that’s left is to squash some bugs and add a bit of last-minute polish. I’ve had a lot of fun working with my group and have learned a lot about game design. This team has put in some great work.
I’ll end this blog with a little game trailer I made for our project last weekend. While the game isn’t finished quite yet, it showcases much of what we’ve accomplished.
For me, this week was all about sound effects and making improvements to the UI.
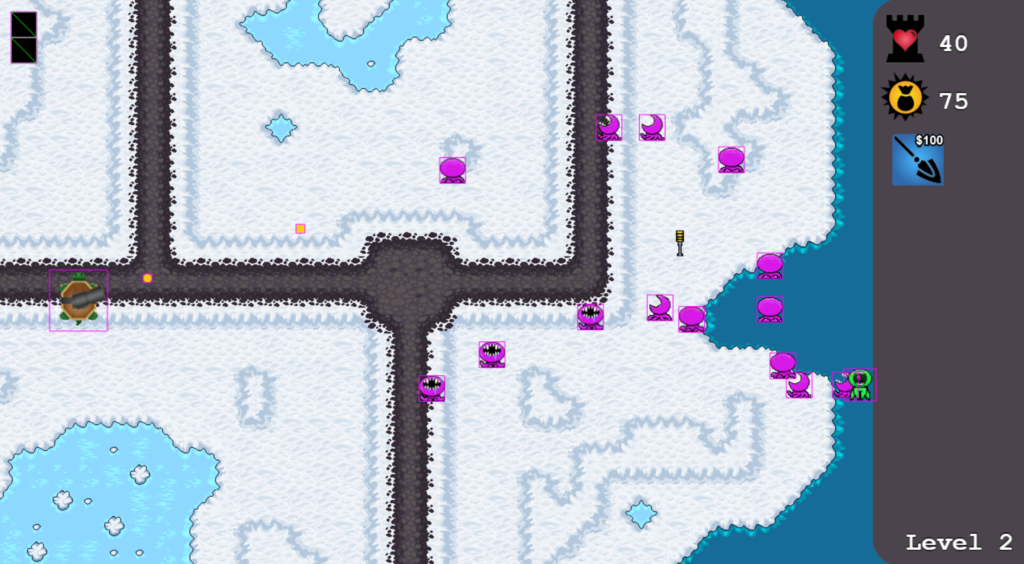
Map 2 with an updated UI
SFX
It seems like a good time to start adding sound to our game. I found some free, nicely organized Kenney sound packs . Unfortunately, there aren’t many gunshot noises there, so I used a percussive footstep sound for the normal bullet type instead. Now whenever the player shoots a bullet from the base turret, the game plays a sound specific to the current ammo type.
The flamethrower sound is still a work in progress. The current sound file is a single whoosh, but because A) it plays with every bullet event and B) flamethrower ammo works by sending out a line of tightly-spaced bullets, the result is a weird “w-w-w-w-w-w-w-w-whoosh”. I might be able to fix this by writing some special code that will play the full file in a loop, starting with a mouse-down event and ending on the mouse up event, or whenever the flame bullets stop firing.
Oh, also toggling between the two ammo types by pressing Q or W will now produce a switch-click sound.
UI update (prepare for some boring details)
Each element in the UI needs an x and y coordinate (represented as an integer number of pixels), so that it shows up in the right spot on the screen. Note that the default origin of an element is in its top-left corner. Rather than hard-coding the coordinates as “magic numbers”, I tried to create a better system with variables and equations.
So for example, in order to find the coordinates for the bee turret icon (shown below as a beehive) I had to make the following calculations.
It should appear in the first column of icons. We’ll make a variable col1X = 1148 and set the bee icon x coordinate to col1X.
We need some more variables for the y coordinates. Let’s make the top UI margin UIMargin = 32, the height of each icon iconSide = 64, and the margin between icons iconMargin = 8.
From the top we have to fit the tower health icon, the money icon, and the “Buy & Place Turrets” header, which is about as tall as an icon.
Thus, we can express the y coordinate for the bee icon as UIMargin + ((iconSide + iconMargin) * 3)
This system mostly works. I found that in the end I still had to add a few magic numbers to make everything look right. For some weird reason, I had to change the UIMargin to 64 even though it appears to be only 32 pixels from the top of the screen. It’s not as elegant as I wanted but hopefully this system will make it easier to make changes in the future.
We finished our prototype game this week and turned it in for the project midpoint archive. It contained all the basic elements working together including:
The first map
The player-controlled base turret with two ammunition types
Two different kinds of animated enemies that enter in waves
An interactive UI
Plus a title and end scene
I’m proud of what we’ve accomplished so far and excited for what’s to come.
Map 2: Arctic Beach
This week I worked on the second map for our game. Hard-coding the paths for my first map proved to be rather tedious for my teammates. So I hoped there was something I could do to make this process easier the second time around. I remembered hearing in one of the Tiled map editor tutorials that you could draw out paths as objects, embed them in map, access them in Phaser, then program enemies to move along those paths.
Unfortunately, the narrator doesn’t actually explain how to do this. After reviewing the videos and Phaser documentation (not to mention a substantial amount of googling) I did learn how to drop named points as objects in the map and reference them in Phaser. But getting a sprite to follow a line object and animate correctly was just beyond my reach.
Instead, I kicked curves to the curb and just made a map with straight lines. At least it includes point objects at path vertices to make the hard-coding way easier.
Map 2 in tiled with embedded point objects. The UI is omitted here but still shows up in the game.
I also started writing the framework to transition between levels in the game. Now it can load the appropriate map, reset game values at the beginning of a level, display the current level on the screen, and still transition to the title or game over scene at the appropriate time. The enemies on level two still follow the paths from the first map, but we’ll fix this when we configure the new paths.
With our midpoint prototype due next week, our team got to work on adding more art assets and stitching together different elements into one cohesive game.
Custom Sprites
We needed to add some art assets for our enemies, turrets, and ammunition. I spent a while browsing through sprite sheets on free art sites, but nothing really jumped out to me. Fortunately, my search led me to Piskel, which allowed me to make my own sprite sheets.
Pink alien sprite sheet
Green alien sprite sheet
The two aliens I made have frames that show them walking in four directions (towards, away, left, and right). To make them walk around in the game, I added a function that creates animations by mapping each walking direction to each set of frames. I added another function that mapped each animation to the directional keys, which won’t be a part of the game, but it was a nice way to test how the animation looked.
Integration
Until this week, some of the game elements like turrets and ammunition were isolated from the main branch. Now we’re really seeing it all come together. Abraham added his player-controlled tower turret that can toggle between regular bullet and flamethrower ammunition. Cliff added his enemy wave system plus title and end scenes. Nam’s turrets aren’t functioning quite yet, but soon the player will be able to buy turrets and place them on the map to automatically pick away at enemy waves.
Here’s what our game looks like now
So far this game is looking great. By next week we’ll have a working prototype with all the basic elements of a tower-defense game. After that, we’ll be able to spend our time on fun stuff like more maps, enemies, ammunition types, a more responsive UI, and sound effects.
In our last weekly meeting, our group made a decision about the display size of our game, choosing to aim for the commonly used “widescreen” 16:9 ratio. I created a new version of the map that is 1280 pixels wide and 704 pixels high. Sharp-eyed readers may notice that the height should be 720px for a true 16:9 ratio, but since 720 can’t be divided evenly by 32px tiles, we thought 704px would be close enough.
A new user interface
I added a shiny new UI to the map this week, taking up a vertical strip of space on the right side of the screen. It looked absolutely terrible in the beginning because I had made the buttons as clickable text objects. Then I stumbled on this invaluable resource that provides thousands of standardized, editable game icons for free. I picked out four and implemented them as health and money indicators, plus two kinds of “buy turret” buttons.
Latest version of map 1 with a user interface!
Now when you run the game, you can click on those two blue icons to “buy a turret” which will decrease the player’s money by the advertised amount. They also take on a grey tint when the pointer hovers over them.
Small additions to the back-end
My teammate Cliff wrote the skeleton code to set up Phaser scenes for our game. I added some class variables to keep track of things like player hit points, money, and turret prices, plus a couple functions to update these values.
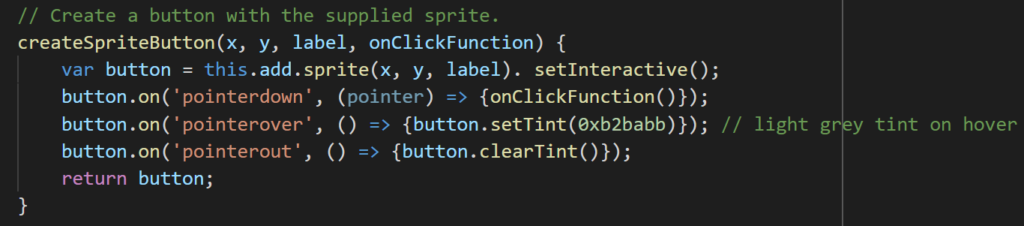
It’s important to keep our code as modular as possible so that we can easily make changes and incorporate new features. I wrote a new create-button function with this in mind.
Add a button by calling createSpriteButton.Just supply the x and y coordinates, the name of the preloaded asset (in this case the .png of a button), and whatever function you want to call when the pointer clicks down.
All buttons created with this function will have the same hover-over action. Later, I think I want to modify this so that on “pointerdown”, the user can drag a turret to where the want to place it. Then on “pointerup”, if the mouse is hovering over an available map tile, it will place the turret and withdraw money. Otherwise, it will do nothing.
Now to bring it all together
I feel really optimistic about our game at this point. Everyone has been making great progress and we’re almost ready to merge our separate parts into one cohesive prototype. Next week we’ll be integrating, working out the bugs, and preparing a basic working demo.
There are lots of helpful tutorials and example files for Phaser 3. Since I had never worked with this game framework before, the first thing I wanted to do was to see if I could get one of the example games working on my local computer. But, these files are not quite plug-and-play. I needed to make a web server first.
By remembering what I learned from my web development class, I wrote a simple server.js file like so:
A simple web server using Node.js and Express
Then I added the example files, made double sure that the file paths pointed to the correct locations, ran the server with Node.js, and voila! It worked. I had seen the inner workings of an example game and proved that I had everything I needed to run it locally. I could now move on to the specifics of our own game.
First try at map-making
One of my main tasks in the group is to create the maps for each level of the game. At this point, we still hadn’t decided on a specific art style. So, I browsed OpenGameArt for the best looking tile set and settled on this one, which is from an open-source art competition called the Liberated Pixel Cup.
Terrain tile set created for the LPC. Attribution found here.
I imported the tile set into Tiled (a free open-source map editor with a great tutorial series here) and created a draft of the first map.
My first draft of the first level of our tower defense game.
In this level, enemies march in from the right towards the tower, which will sit in the dirt clearing on the left side. They can choose either the high road or low road, but they must stay on the path. Players can place turrets in any open field. I left some empty space on the right side so that UI elements can appear there in a vertical strip. A couple small elements like health and money indicators can sit in the top-left corner too.
Some things to figure out
Before I go any further with this map, I’ll need to discuss some things with my group. One big concern is figuring out the right resolution and aspect ratio. I had to start somewhere to get some practice with the Tiled software, so for this map I chose the following dimensions:
Tile size: 32×32 pixels
Map size: 800×608 pixels or 25×19 tiles
Aspect ratio: roughly 4:3
It isn’t too difficult to change the map at this point, but it’ll be harder once things like collision boundaries are coded in. We’ll also have to agree on where exactly UI elements will appear, so that enemies and turrets don’t get lost behind a button.
The results are in. I’ll be working on the HTML5 tower defense game for my capstone project! This was my first choice out of five project proposals, so I’m very excited to get started.
The Project
This will be a single-player game wherein the player must defend their “towers” against waves of enemy units. There will be at least three different levels with at least 10 enemy waves per level. Enemies will come in at least three different types. Defeated enemies will provide some benefit to the player (like coins or energy) that they can use to build more towers. Lastly, each level must be challenging (a brand-new player shouldn’t be able to beat it), but winnable within 10 minutes. More details found here.
The Team
There are three other students in the team: Cliff, Nam, and Abraham. We’ve already hammered out our team standards document, which determines stuff like how we’ll communicate (Discord chat and weekly voice calls), work standards, conflict resolution, etc. This week we’ll be focusing on creating our project plan.
The Plan
Our instructor posted an impressive example plan created by students in a past term. It laid out almost all aspects of their game design and a week-by-week task list for each team member. I hope we can achieve a similar level of detail in our plan by next Monday.
This is what I have in mind so far (final decisions pending team discussion). We know our game will run on a browser, so we’ll be programming it like a webapp with Node.js on the OSU engineering servers. We’ll use Phaser 3 as our game framework. Maps will be created using Tiled, then exported as JSON files. We can use open-source art assets from OpenGameArt.org. We can even make some custom art assets if needed (I’ve been drawing, painting, and making digital art since I was a kid).
We haven’t decided on a theme yet. Right now, I think everyone is focused more on the game mechanics and how we will share the workload. It would be great if we could figure this out later after we’ve looked at the available art assets. Fantasy and sci-fi settings are popular. We could go that route or try something entirely new. But we may need to make that decision soon so that we can include it in the project plan.
We’ll have all these details hammered out (and more) by next week.
Hello and welcome! My name is Casey Cheek and I’ve created this blog to document my progress through Oregon State University’s computer science capstone project.
First, some context
I’m originally from Alaska which is where I got my first degree in biology. Back then, I collected insects for a living. I’m quite good at identifying them too, so if you see a weird bug, send me a picture and I’ll tell you what it is!
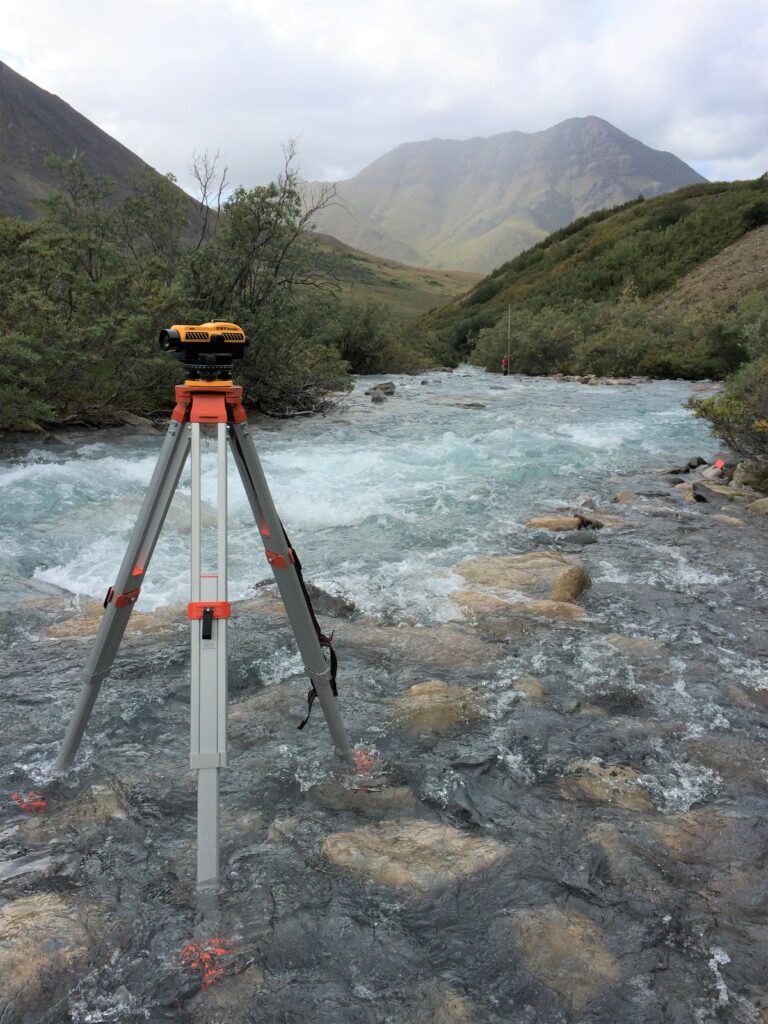
I also used to do stream surveys for the Bureau of Land Management, which is how I was able to take cool pictures like this:
An especially beautiful stream survey
But after a certain point, I realized that the years were ticking by but I wasn’t making much money, had no job security, nor benefits. I needed to try something different.
A fresh start in computer science
This degree program has been a fantastic experience so far. I find that learning to program has rewired my brain so that I can think about problems in new ways. I’ve always enjoyed scientific writing so I love that I can use those principles to write clean, modular, approachable code. And I love understanding how all the technologies that we depend on everyday work.
Over the break between summer and fall term, I completed a five week internship at a patent and prototyping company. There, I gained valuable experience both designing and coding the user interface for two separate products. I think I really excelled at the UI stuff and hope I can continue doing that in future jobs.
Which brings us to now
I’ve just taken the “Choose Your Project” survey and am excitedly waiting for my project and team assignment. Going into this class, I worried that I would be stuck with an uninteresting project, but the OSU project page is full of very cool ideas. As my top five choices, I picked one citizen science app and four different games.
I know I have the skills to make an excellent citizen science app, because I’ve worked on projects before that help the general public be involved in active science. These projects must be carefully designed to both be accessible to folks of diverse backgrounds, and to be able to produce valuable, reliable data. With insect monitoring for example, it can take extensive training to accurately identify a bug down to the species level. We can get around those technical barriers by asking for different kinds of data, i.e. photographs instead of identifications. Even if I don’t end up working on this particular app, I think I’d to try building another citizen science app in the future.
Choosing the game proposals felt almost like a guilty pleasure. It’s just… I would really love to learn how to make games. I know this class isn’t so much about teaching a specific technique and more about providing support, but I think I need the structure and pressure of a class to learn this stuff rather than tackling it all on my own. It does seem a bit cliche to start getting into computer science and then immediately jump into “I want to make games for a living!” Sure, it makes sense. Playing a video game is often the first time a person associates a computer with pleasure, whereas doing “work” on a computer (writing an essay, doing your taxes, filling out spreadsheets) is associated with discomfort. Also there are probably more important areas to apply a CS degree (healthcare, public infrastructure, scientific software) but you know the video game industry could really use more female voices and… maybe I could help?
For now it’s out of my hands. In the next post, I’ll have heard back from the instructors, so I can tell you all about my new project and team!