I started this week wanting to do something fairly simple. Like almost anything with CS, I began by thinking “It can’t be that hard”. Three days later, and I finally figured it out.
What Am I Doing?
I’m building a React application as part of my capstone project. The React project is build right now so that when a user wants to see something related to their contacts or skills, they do so by navigating between various “pages” through a react-router. This is fine for MVP type stuff, but this is capstone, right? Shouldn’t we have a more polished and professional presentation? I thought so, so my idea was to load this info in a “feature-pane” that slides out on the right hand side.
My vision was this: a user has a main homepage that displays an overview of their data. When they want to edit some part of that data, they click on it in the homepage. After clicking, a window would slide out from the right that would contain detailed information about that specific piece of data. The user could edit it in this window and hit “submit”, and then the window would slide back and become hidden again.
My Approach
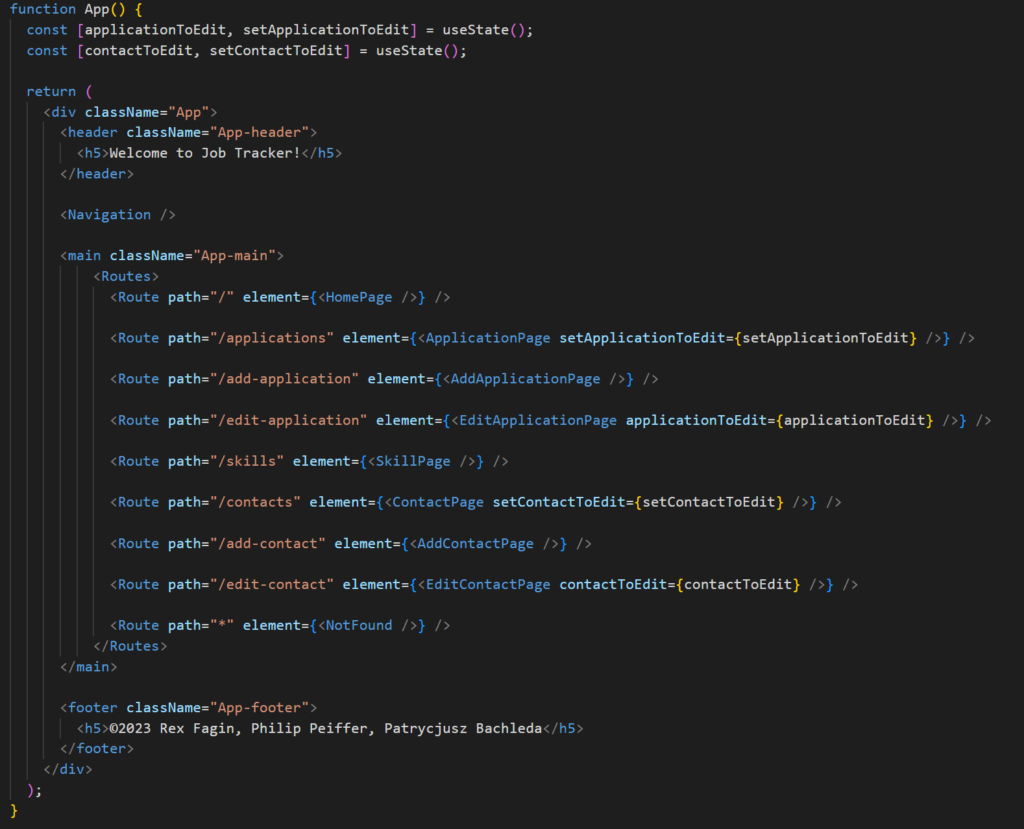
The figure below gives you an idea of how our App is structured currently. You’ll see that we have a top level div, under this we have a header, a navigation bar, and then we finally get to our main content. The main area is where our pages load when different routes are visited. We’re not actually visiting new pages with these routes, we’re just replacing what’s in the DOM with these React functional components. So anyways, my two main questions at this point were – 1) where do I put the hidden window, and 2) how do I make it so that this window slides out from the right and overlays the current window (i.e. everything doesn’t slide around when it pops out)?
I’m going to start with #2. Some quick googling found some tips around CSS animations. Basically, what you do is, on the component that you want to slide in/out, you create a class name that’s unique to that component. From there, I defined that class in CSS as having the following properties:
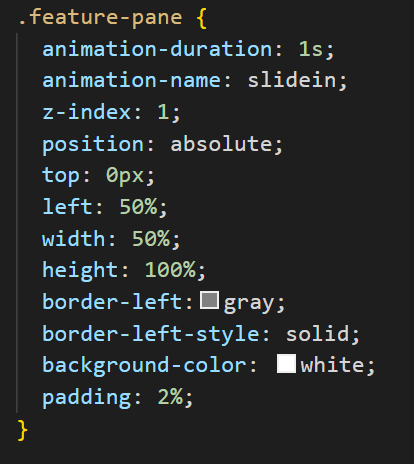
The definitions are pretty self explanatory, but the important ones with regard to animation are animation-duration, and animation-name. The animation-name property is then tied to a CSS keyframe, which defines aspects of the animation. There are a lot of in-depth explanations floating around online, but here’s how I defined my CSS keyframe. Note that the @keyframe is followed by the animation-name.
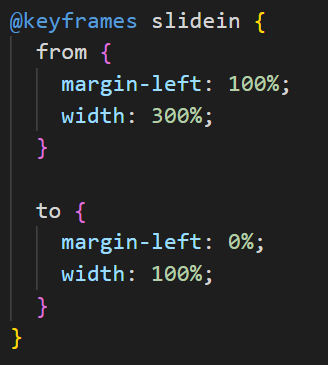
The phrases from and to in the keyframe are short for time=0s to time=end. So basically, at time = 0s, the margin-left of the component with the animation is at 100%. This means that the component will be off screen right. Great, now at time = end, the margin-left will be at 0%, meaning the component will be visible.
I still had to figure out how to get it so that it looked like the window was above the rest of the screen, however. To do this, I started looking into stacked contexts in CSS. To create a stacking context, you need to have positioning of your page elements be something other than static (the default). MDN has a great article for understanding the details, but the main thing to take away is that stacking doesn’t work out of the box. You have to intentionally define positioning for it to work. You can see in the CSS clip above that I chose absolute, which means that my component will be positioned at the exact coordinates that I pass it. What are those coordinates in reference to though? Great question, the coordinates that you pass it are from its closest positioned ancestor. It’s confusing, I know.
It took me a while to figure out what this meant and the subtle implications that it has. Basically, if you have something like this:

Then when you try to position your “stacker”, the position isn’t going to be from the top left corner of the parent container. Instead, it’s going to be from the top left corner of the grandparent container. This is because the grandparent is the first ancestor that doesn’t have a position of static. In other words, it was the first ancestor that was deliberately placed on the page. Therefore, the CSS developers decided that this should be your reference point when passing coordinates for positioning. It makes sense once you see it in this light.
Once I understood this, then it was a matter of laying out my components properly so that my sliding container’s parent was the top level div. The top level div is the first element to be positioned, so my positioning of the sliding pane would be with respect to the top left corner of the screen. This is the answer to #1!
I still have some more to go on #2 though. Now the question became, how do I toggle this slider? If I were to just slap that class on the slider component, then every time I loaded the App the slider would slide on out. This isn’t what I wanted. Instead, I wanted it to remain hidden until I clicked something.
Enter Conditional Rendering
This isn’t really conditional rendering per-se. Instead, it’s using state in the component to control the class name that’s given to a JSX element. What I decided to do was use the useState hook in React to store my class name, and give it an initial value of “hidden”.

I then injected that value of state into my JSX element like so:

Using useState means that I can change that class name to whatever I wanted throughout my app by calling the setter function that’s returned from useState.
By doing it this way I can pass the setter function to various components in my app. Then, when I want to change the class name I can simply call the setter and pass a new class name. This will re-render the App and change the class name, which if the class name matches feature-pane will trigger the animation.
Conclusion
That was a wild ride, and it took a lot of trial and error to figure out exactly how to get it done. Here’s what the final code looks like, you’ll notice that I put the feature-pane right underneath the top most div, so that my positioning is correct:

There’s still one more gotcha that I didn’t explain that has to do with how you set your display in CSS on the initial class. You have to use hidden or else you’ll encounter a strange flash of a component that then disappears right before starting to slide out from the left. I’ll leave it to you to figure out why this is occurring because I think we learn the best by troubleshooting issues. It’s a pretty easy issue to figure out once you understand the mechanics. In any case, I hope that you enjoyed learning this with me.