

So, what’s the deal?
If you’ve ever used React as a frontend framework in any full-stack project, you’ll already be familiar with the concept of components and state (no, not geography). Among many other things, React allows developers to create components that can then be rendered out for display in a web page. Components are pieces of code that can be reused throughout your application. A good way to think of these is like a function or a method from your programming language of choice. However, instead of sorting an array or performing binary search, a component in React will return HTML used to represent things like a navigation bar, a login form, a button, etc. The beauty of React components is that once defined, a developer can then use them throughout their application without needlessly re-writing code. Furthermore, components can take props as an input. Again, think of props as parameters defined in a function or method definition. As an example, a button component could have button text that can be defined via the component’s props. So, whenever the developer wants to use the button component they could pass in “login” or “signup” depending on the context of the button.
From this, we move on to state. Importantly, components have state. This means that as a user interacts with the different components rendered on a web page, they will be changing pieces of information about the component they’re interacting with. A developer can then use the new state of a component to update other pieces of state or trigger events within the application. Let’s say a web page has a toggle switch that can be used to put the web application in light mode or dark mode. The toggle switch would be the component and the state of the toggle switch might be something like “toggled” or “not toggled”. When a user interacts with the toggle switch component we can use the toggle switch’s state to change the state of the entire application to light mode or dark mode. In other words, the “toggled” state would trigger dark mode and the “not toggled” state would trigger light mode.
Easy enough right? Well, not necessarily. In React, state can only be passed down the DOM tree. So, in the example above let’s say that the following tree represents my React app. It’s a simple application with three pages that a user can visit – the “app” node would be the root node for the application:
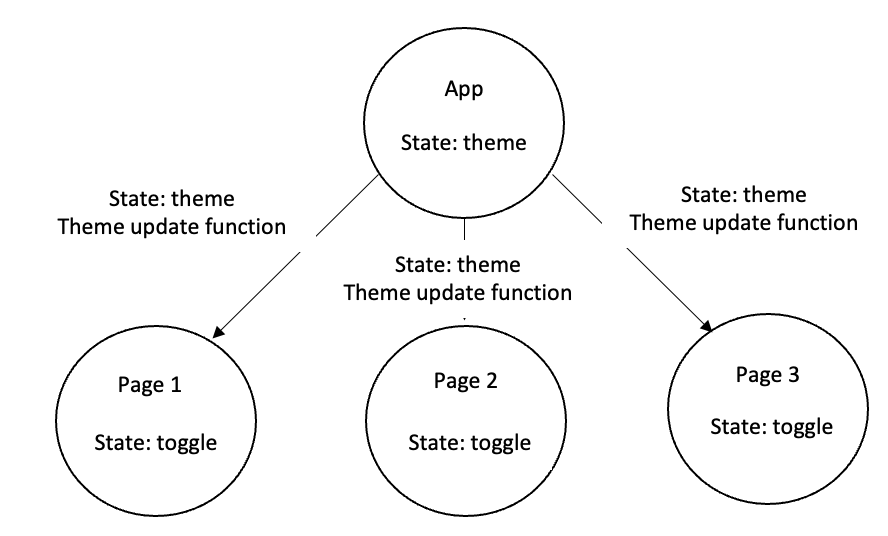
In the above tree, the “app” node would maintain the state for light mode and dark mode – let’s refer to this state as the “theme”. This “theme” state value would then need to be passed down to each of the “page” nodes so that their color scheme could change if the web application “theme” changes. But, the “theme” can only change when the toggle switch is interacted with and the toggle switch component would live within page 1, page 2, and page 3. So, how do we change the “theme” value in the “app” node from our “page” nodes? To do this, the “app” node must also pass down a function that will update the “theme” state value when the toggle switch is interacted with. When the toggle switch in any of the “page” nodes is toggled, the theme for the entire application can be updated using the function to update the “theme” state value. The new “theme” state will then be able to be passed down to each “page” node in the application. Remember, since state must be passed down there isn’t really a better way of handling this situation with React by itself.
Enter Redux
In all honesty, the above situation is pretty manageable. But, consider what happens as our application expands and we have multiple components on multiple pages all with their own state. This can very quickly become messy and difficult to manage as state and associated functions to update state need to be passed up and down the DOM tree to allow all of our components and pages to be working with the same state values.
The solution? Redux! Redux essentially stores all state values in a centralized location and removes the need to pass state all over our application. Using Redux, our above application schematic would now be:
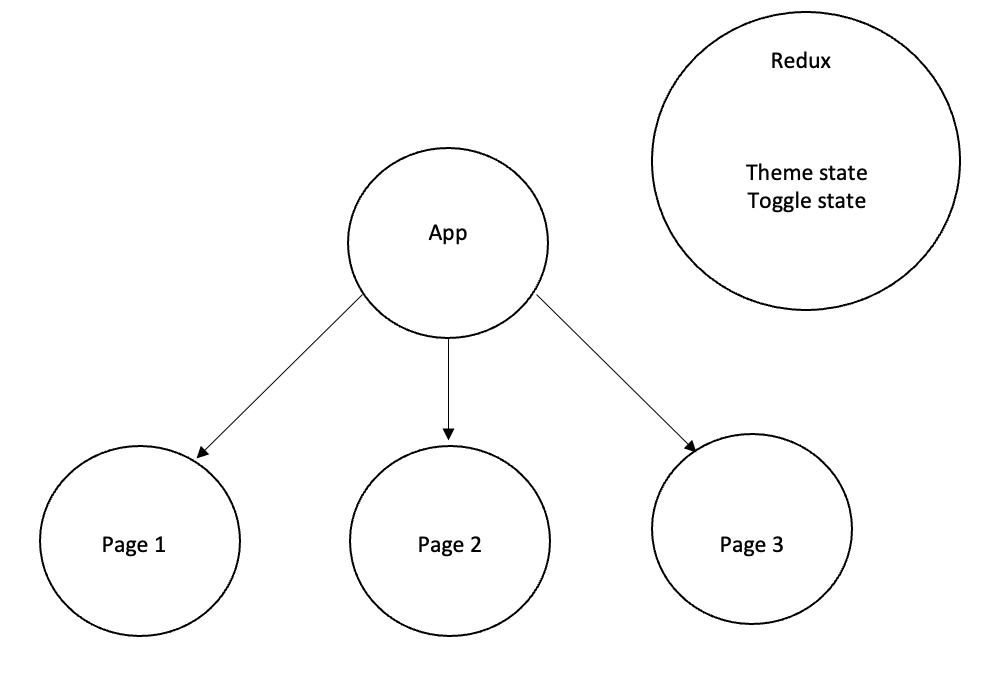
With Redux, you can see that the components and pages in our application no longer store any state value. Instead, the state values are all stored within Redux and any page or component can look into the Redux store to get the current value of a specific piece of state. Furthermore, since Redux is a centralized location for our state values, there isn’t any concern that components are working with incorrect or stale state values.
Redux works by processing dispatched actions which are then resolved to specific values of state using reducers. The reducers are combined in a Redux store which is then used to pass all application state down from the root node of the application. With React, we would start by creating a Redux store. This would involve combining all of our reducers, defining any initial state (maybe something stored in local or session storage), and finally creating our store using the createStore redux function:
import {
    legacy_createStore as createStore,
    combineReducers,
    applyMiddleware
} from 'redux';
import thunk from 'redux-thunk';
import { composeWithDevTools } from 'redux-devtools-extension';
import { themeReducer } from './reducers/themeReducers';

const reducer = combineReducers({ theme: themeReducer });

const initialState = {};

const store = createStore(reducer, initialState, composeWithDevTools(applyMiddleware(thunk)));

export default store;
Next, we can wrap our application’s root node in a Provider tag from react-redux and give it the store we created above as its prop value. Again, this allows all components to have access to the state values stored in our Redux store:
import React from 'react';
import ReactDOM from 'react-dom/client';
import App from './App';
import reportWebVitals from './reportWebVitals';
import { Provider } from 'react-redux';
import store from './store';

const root = ReactDOM.createRoot(document.getElementById('root'));
root.render(
  <Provider store={store}>
    <App />
  </Provider>
);
Next, we can define our reducers. In our example, we’re just using a theme reducer, but in a real-world application there will be reducers for each piece of state. Generally, a reducer is just a function that takes two parameters: an initial state value and an action. The action will be passed in when it is dispatched from one of our components or pages in React. Actions are generally objects with two keys: a type and a payload. The type key defines the type of action and is used by the reducer to resolve the specific action that was dispatched. The payload key is the state value that will be updated when the action is resolved. A reducer itself is just a simple switch statement used to resolve the action based on the action type. In the following reducer, if the action type is a theme change request, then the updated value of state will be taken out of the action payload. In any other case, the state parameter value provided will be returned:
import { THEME_CHANGE_REQUEST } from '../constants/themeConstants';

export const themeReducer = (state = { type: 'light' }, action) => {
    switch (action.type) {
        case THEME_CHANGE_REQUEST:
            return { type: action.payload };
        default:
            return state;
    }
}
To dispatch actions, we use the useDispatch hook from react-redux. When a change is detected in the toggle switch, the following function could be executed:
const handleCheckedEvent = () => {
        setChecked(!isChecked);
        isChecked
            ? dispatch({ type: THEME_CHANGE_REQUEST, payload: 'light' })
            : dispatch({ type: THEME_CHANGE_REQUEST, payload: 'dark' });
    }
Here we can see that if the toggle switch is checked, then we dispatch a theme change request action with the payload being “light”. Conversely, if the toggle switch is not checked, then we dispatch a theme change request action with the payload being “dark”. This action will then be resolved by the above reducer and the payload value (“light” or “dark”) will be used to update the application theme.
With this in place, we can then use the useSelector hook from react-redux to pull out any piece of state from our Redux store:
const App = () => {
  const theme = useSelector(state => state.theme);

  return (
    <div id={theme.type}>
      <Router>
        <Routes>
          <Route path='/' element={<Navigate to='/login-signup'/>}/>
          <Route path='/login-signup' element={<LoginSignup/>}/>
        </Routes>
      </Router>
    </div>
  );
}
In our App component we get the value of our “theme” state with the useSelector hook and use that to set an id value on the outermost div. The value of this id can then be used to trigger light mode or dark mode css styles for the entire application.
Interested in learning more?
To get started learning more about Redux check out the “Getting Started” and “Tutorial” sections on their website: https://redux.js.org/introduction/getting-started and https://redux.js.org/tutorials/essentials/part-1-overview-concepts
Brad Traversy of Traversy Media is another great resource for all things related to web development. He has a knack for making complex topics very understandable and he has an excellent tutorial for Redux on his YouTube channel: https://www.youtube.com/watch?v=93p3LxR9xfM
Sources and References
Brad Traversy and Udemy. MERN eCommerce From Scratch. Retrieved from Udemy: https://www.udemy.com/course/mern-ecommerce/
Dan Abramov and the Redux documentation authors. Redux Essentials, Part 1: Redux Overview and Concepts. Retrieved from Redux: https://redux.js.org/tutorials/essentials/part-1-overview-concepts