
Our team has just completed implementing the 50 opcodes necessary for our emulator to run Space Invaders. But how did we determine that our bare-bones CPU was complete and free of error? And what are the next steps now that we’re reasonably certain our CPU implementation is correct?
As to the first question, our team has been following the advice of the emulator101 blog. The first thing that was suggested was to check the output of our Space Invaders ROM, to ensure that the assembly instructions outputted matched up with that found on the detailed rundown on ComputerArchaelogy. The disassembler portion of our code, which reads in a ROM and regurgitates 8080 instructions, proving that our Space Invaders file has the correct data.
Now that we know our ROM is correct, how did we determine that our CPU instructions are working properly? It turns out that if you run the Space Invaders ROM on our bare-bones CPU, there is an infinite loop that occurs around 3 addresses:
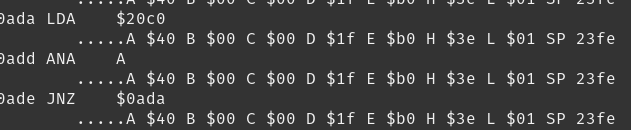
As we can see, the program is looping through these three addresses. It seems that it’s waiting for memory location $20c0 to get a value of zero. Since this isn’t the case, and this loop alone won’t resolve this problem, it seems that there’s a part of the arcade cabinet hardware, OUTSIDE of the CPU, that needs to be implemented.
Timing is everything

It turns out that memory location 0x20c0 is partially responsible for the timing required for the game to properly run. The original Space Invaders game ran on a 2Mhz CPU, and since our modern day machines are much much faster, our team will need to properly time the execution of instructions. Proper timing of the game is related to two other things that need to be implemented: graphics and interrupts.
Interrupts are designed to let processors handle time-sensitive tasks like I/O. The processor can be running a program, and when an interrupt instruction occurs, the CPU will stop executing the program and do something else. In our implementation, the 8080 CPU has a variable called “int_enable”, which determines whether the CPU is in an interrupt state. Two 8080 instructions in particular will likely trigger; the IN instruction, which is an 8-bit piece of data moved to register A, and an OUT instruction, which places the contents of A on an 8-bit bi-directional data bus for transmission to some specified port.
Handling interrupts for the 8080

The way interrupts work on the 8080 is like this:
1.) The interrupt source (external to the CPU) sets the CPU’s interrupt pin. This manifests as an IN/OUT instruction to the CPU.
2.) When the CPU acknowledges the interrupt, the interrupt source can put any opcode on the bus and the CPU will see it. Often this is the RST instruction. Keep in mind the CPU has stopped executing any further instructions on this point except as they relate to the interrupt.
3.) The CPU executes the opcode on the bus. If it’s an RST, that’s equivalent to a CALL instruction to a fixed low memory location. It pushes the current PC on the stack.
4.) The code at the low memory location handles whatever the interrupt is trying to tell the program. Once the handling is over, RST will end with RET.
So, before graphics, audio, or any other hardware external to the CPU can properly work, we need to implement an interrupt function. The video hardware for the original game generates 2 interrupts: an end of frame, and a middle of frame. Both execute at 60 Hz, or every 1/60 of a second.
This is trivial to implement. In our main program loop, which executes one instruction each loop, we take the difference of the current time and the last time an interrupt occurred, if this difference is greater than 1/60, then we check if int_enable is true for our 8080 CPU. If int_enable is true, we generate an interrupt according to rules 1-4 above, and store the current time as the last time an interrupt occurred.
Now that we have a working interrupt function, we can attempt to write functions that handle display of our program and controls. We’ll take a look at how to implement this next week!