Creating a Microsoft Teams Bot – Part 4: Bot Commands

This is the fourth post in a series of posts documenting the creation of BeaverHours, a Microsoft Teams bot which handles office hours queueing.

In the last installment, we learned how the bot processes input with its onMessage event handler. Now, we’ll learn how to populate the bot’s command menu to offer suggestions to the user about what commands the bot will process. The command menu, seen in the screenshot below, offers an intuitive way to signal to the user what the bot can be expected to do.

Searching the contents of the code reveals two places where this particular command menu is defined: templates/appPackage/manifest.local.template.json and templates/appPackage/manifest.remote.template.json. Intuition tells us (and the docs confirm) that these are configuration files for local and remote deployment; that is, local behavior will be defined by manifest.local.template.json and remote behavior will be defined by manifest.remote.template.json. In these files, the key property that is of interest to us is the bots array, which holds bot objects which take the form:

{
  "botId": <string>,
  "scopes": ["personal", "team","groupchat"],
  "supportsFiles": <boolean>,
  "isNotificationOnly": <boolean>,
  "commandLists": [
    {
    "scopes": ["personal", "team","groupchat"],
    "commands": [
      {
        "title": "welcome",
        "description": "Resend welcome card of this Bot"
      },
      {
        "title": "learn",
        "description": "Learn about Adaptive Card and Bot Command"
      }
    }
  ]
}

Clearly, commandLists.commands is the property of interest here. It takes the form of an array of { title, description } objects. Let’s try replacing the commands here with the hello command we wrote in the previous post.

{
  "botId": <string>,
  "scopes": ["personal", "team","groupchat"],
  "supportsFiles": <boolean>,
  "isNotificationOnly": <boolean>,
  "commandLists": [
    {
    "scopes": ["personal", "team","groupchat"],
    "commands": [
      {
        "title": "hello",
        "description": "Echoes the user's input."
      }
    }
  ]
}

It works! We now have a way to signal to the user what commands are available in the bot.

Using the command menu along with the onMessage handler, we were able to define bot behavior and advertise that behavior to the user. In the next installment, we’ll implement some in-memory structures to preserve state in the bot between messages.

Creating a Microsoft Teams Bot – Part 3: Bot Operations

This is the third post in a series of posts documenting the creation of BeaverHours, a Microsoft Teams bot which handles office hours queueing.

Previously, the architecture of a Microsoft Teams bot was inspected and found to be a REST API endpoint wrapping a TeamsBot object. In this post, we’ll explore the class that object is an instance of and how it handles commands.

Inspecting the boilerplate code, the TeamsBot class is defined in bot/teamsBot.ts. The example bot comes with two built-in commands: “welcome” and “learn”; searching the source file for these words reveals that the handlers are defined in the constructor, which looks something like:

constructor() {
    this.onMessage(async (context, next) => {
      let txt = context.activity.text;
      // some text sanitizing here

      switch (txt) {
        case "welcome": {
          const card =
            AdaptiveCards.declareWithoutData(rawWelcomeCard).render();
          await context.sendActivity({
            attachments: [CardFactory.adaptiveCard(card)],
          });
          break;
        }
        case "learn": {
          this.likeCountObj.likeCount = 0;
          const card = AdaptiveCards.declare<DataInterface>(
            rawLearnCard
          ).render(this.likeCountObj);
          await context.sendActivity({
            attachments: [CardFactory.adaptiveCard(card)],
          });
          break;
        }
      }
      await next();
    });
}

By inspection, it appears that the onMessage event handler fires when the bot receives a message and provides a context object, describing the received event and the contextual state, and a next function which the handler is expected to pass control to when it’s finished. In this way, the message handler is much like standard middleware in common backend frameworks. The true meat of this function is the switch statement on the variable txt, which contains the sanitized value of context.activity.text, the body of the received message.

Using the existing cases as a guide, we can change the body of the switch statement to handle the command we want. The context.sendActivity method appears to be what prompts the bot to send a reply, so we can use that, in conjunction with txt, to create an echo bot.

switch (txt) {
  case "hello": {
    await context.sendActivity(`Hi there! You sent "${txt}".`);
    break;
  }
}

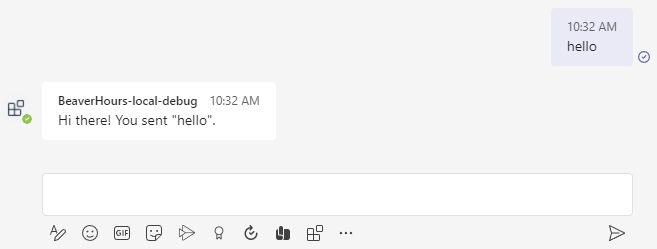
The result:

It works!

Next time, we’ll dig into adding commands into the command menu and implementing more complex logic in commands.

Creating a Microsoft Teams Bot – Part 2: Setup

This is the second post in a series of posts documenting the creation of BeaverHours, a Microsoft Teams bot which handles office hours queueing.

With the decision to make a chatbot made, the next step was to find out how to create the bot and set up the appropriate development environment. Luckily, Microsoft makes quickly starting up a project for Microsoft Teams very convenient with the use of Teams Toolkit, an extension for Visual Studio Code which spins up preconfigured Teams projects much in the way of tools like Create React App. After following the easy quick start tutorial in Microsoft’s docs, we were able to generate a scaffolded Node.js app in TypeScript.

While the Teams Toolkit makes it easy to get a project up and running and even provides a seamless way to run locally developed bots on test servers, it actually pulls together several services to get a development bot running on Teams. The core functionality is the bot itself, which, by inspection of the code, is simply a REST API wrapping some bot processing logic. The following code snippet makes this clear:

// Create the bot that will handle incoming messages.
const bot = new TeamsBot();

// Create HTTP server.
const server = restify.createServer();
server.listen(process.env.port || process.env.PORT || 3978, () => {
  console.log(`\nBot Started, ${server.name} listening to ${server.url}`);
});

// Listen for incoming requests.
server.post("/api/messages", async (req, res) => {
  await adapter.processActivity(req, res, async (context) => {
    await bot.run(context);
  });
});

Teams Toolkit configures the development environment to deploy the bot locally to a Teams workspace by simply running the debugging workflow: in Visual Studio Code, that’s set off by pressing F5. In doing this, a series of actions is fired off, as evidenced by the resulting terminal windows which open, shown in the picture below.

The Tasks which are run when debugging.

These tasks, in sequential order, are starting ngrok, which exposes a public endpoint to the REST server in the code snippet above, authorizing the bot to the target Microsoft Teams workspace, and starting the bot (i.e., server) itself.

At this stage, it’s clear that the desired bot logic should be defined by altering the TeamsBot class, as the REST server is simply a wrapper for the TeamsBot.run() method. We’ll dive into that in the next installment.

Creating a Microsoft Teams Bot – Part 1: Inspiration

This is the first post in a series of posts documenting the creation of BeaverHours, a Microsoft Teams bot which handles office hours queueing.

Chat-based bots are a large part of advanced server functionality on instant messaging platforms. Those familiar with Twitch probably know Nightbot, which allows streamers to manage their chat moderation, is ubiquitous on the platform; in broader terms, the top Discord bots boast installs on millions of servers. It’s clear that bots are a good tool for automating administrative tasks in chat servers, which is why I and my partners, Jack Donkers and Rohit Chaudhary have decided to build a bot for Oregon State University’s official communication platform, Microsoft Teams, which helps TAs and professors manage queues of students and questions during office hours.

The problem we have each encountered was that virtual office hours have a lot of room for improvement from an organizational standpoint; busy chatrooms scroll by faster than they can be read, questions go unanswered unless they’re repeated by the asker several times, and sessions commonly end with outstanding unanswered questions. Having an ordered system by which instructors may take questions is crucial to keeping office hours on track and relevant to student learning outcomes.

This was the motivation for BeaverHours, our team’s proposed Microsoft Teams chatbot. Our goal was to increase transparency and reduce administrative overhead in office hours by creating a bot that efficiently fields and queues questions for course staff and allows them to focus on the true reason for office hours: sharing knowledge and helping students get past sticking points.

An example of how the BeaverHours bot may function. Accountability and transparency in the administration of office hours are core tenets for our bot.

At the time of writing, the implementation details for BeaverHours are still being planned out; ultimately, it’s the team’s true hope that our project be used wherever students attend office hours in droves.