

Recently I’ve been tasked with onboarding new hires for my current company. I’m a senior engineer on the Java team, and it goes without saying that all my teammates need to quickly and reliably get a modern JVM running on their systems.
All new hires are given M1 Macbook Pros. No knock on that – it’s great hardware and it is extremely power efficient, requiring no fans whatsoever (finally, silence). However, we do not run a paid/licensed Oracle JDK. This means we have to hunt and gather open-source Java to run our platform upon both locally and in the cloud. We also have several third-party open-source tools that rely on Java as well, most importantly for our various login integrations (Okta->DUO->AWS, OneLogin->WebApp, etc) that we need to be able to do just about anything for our jobs.
And so with this mix of a fresh M1, our required tooling, their dependencies, and our local development environment, the fun truly begins.
hardware is hard
The M1 itself is an ARM-based SoC (System on a Chip). It’s their first RISC (Reduced Instruction Set Computing – and no pun intended). It has both a CPU and GPU on the same block. Its architecture differs drastically from the old Intel-based Macbooks. These are breaking and significant changes which occurred in the span of just a single generation – the entire JDK had to be ported very quickly for compatibility. Additionally, any Java libraries that touch hardware (I’m looking at you JavaFX, which can use hardware acceleration), would need their own port as well.
And so it stands to reason that we need to pay alot of close attention to any Java installations, and we can expect a bunch of issues to pop up if we try to blindly recreate an Intel-based Macbook Java environment within our new M1.
enter the jenv
It’s not some fancy acronym. It’s just short for “Java environment manager”. It’s an open-source tool that will allow us to manage several JDKs on Linux-type systems, macOS being one of them. And so we need to immediately put this in our toolbelt and get it installed.
Note that this assumes you have Homebrew installed and are running the default macOS Z shell (zsh) that comes with all post-Mojave flavors.
$ brew install jenv
$ echo 'export PATH="$HOME/.jenv/bin:$PATH"' >> ~/.zshrc
$ echo 'eval "$(jenv init -)"' >> ~/.zshrc
You guys like Maven right? It even has a plugin for that. There’s probably one for Gradle too. This will make it so that your mvn commands will call the same JDK version that you have configured with Jenv.
$ jenv enable-plugin mavenAnd that’s it. Now we’re ready to install a functional version of the JDK and add it to our Jenv.
choose your jdk wisely
LTS? Bits? Native Alpine? There’s alot to consider. But I’ll try and distill it down to the simplest happy path.
You can run the latest version of the JDK as they have full backward compatibility down to version 8 (as of the time of writing in 2022 here). To avoid any unforeseen issues, you also want to have as much “Java stuff” supported in the distribution that you do install. Your chosen distro also must be compatible with ARM 64-bit v8 (as we discussed earlier, this is the M1 chip’s arch). For additional hardware support, we also want to include the Java FX package (aka JDK FX).
For these reasons, I recommend the Azul Zulu Java 17 (LTS) with JDK FX package. For the ultimate convenience, use the .dmg installer to get it running on your Mac. The team at Azul really does a great job at keeping the installation as easy as possible. You can see a comparison matrix here which breaks down the differences between most of the modern JDK distributions. It’s easy to see why Azul is my recommendation, they specifically target the M1 it seems.
Important: DO NOT DELETE THE SYSTEM JDK. I know it’s tempting, especially for neat freaks like myself, but never, ever, ever delete any of the bundled system libraries that come with your macOS installation. Whether it be Java, Ruby, Python, C, anything – just leave them alone, and install other stuff in parallel. You will cause all sorts of crazy problems for yourself if you try and delete them. I believe macOS now will try to reinstall them if it detects the deletion, but do you really want to be the one to test that out on your shiny new workstation?
toss it into jenv
Now that you have the recommended JDK installed, you need to configure Jenv to use it. Thankfully, the tool makes this quick and painless with a few commands:
% jenv add /Library/Java/JavaVirtualMachines/zulu-17.jdk/Contents/Home/Now let’s verify that Jenv sees it:
% jenv versionsYou will see some output as follows:
% jenv versions
* system (set by /Users/myuser/.jenv/version)
  17
  17.0
  17.0.2
  zulu64-17.0.2
Okay great, we see zulu64-17.0.2 in there, that means we were successful. Now let’s make our system and shell use that version always:
% jenv global zulu64-17.0.2
% jenv shell zulu64-17.0.2
Now we check again to verify that we are now no longer using the system version and using our awesome new Zulu version instead:
% jenv versions
  system
  17
  17.0
  17.0.2
* zulu64-17.0.2 (set by JENV_VERSION environment variable)
It worked! Now let’s make sure we always use this version every time we open our terminal by adding this to our Z shell user profile:
% echo 'jenv shell zulu64-17.0.2' >> ~/.zshrcNow your terminal and system calls (including maven if you installed the plugin) will use the same JDK version as we installed and then set in Jenv. You’ll also be able to render graphics and touch hardware (e.g. a browser window with hardware acceleration) because we installed JDK FX as well!
IDEA TIME
Bonus: Do you use IntelliJ IDEA like a huge amount of Java devs (myself included)? Here’s how to add your new JDK install to IntelliJ:
- Use the keyboard shortcut
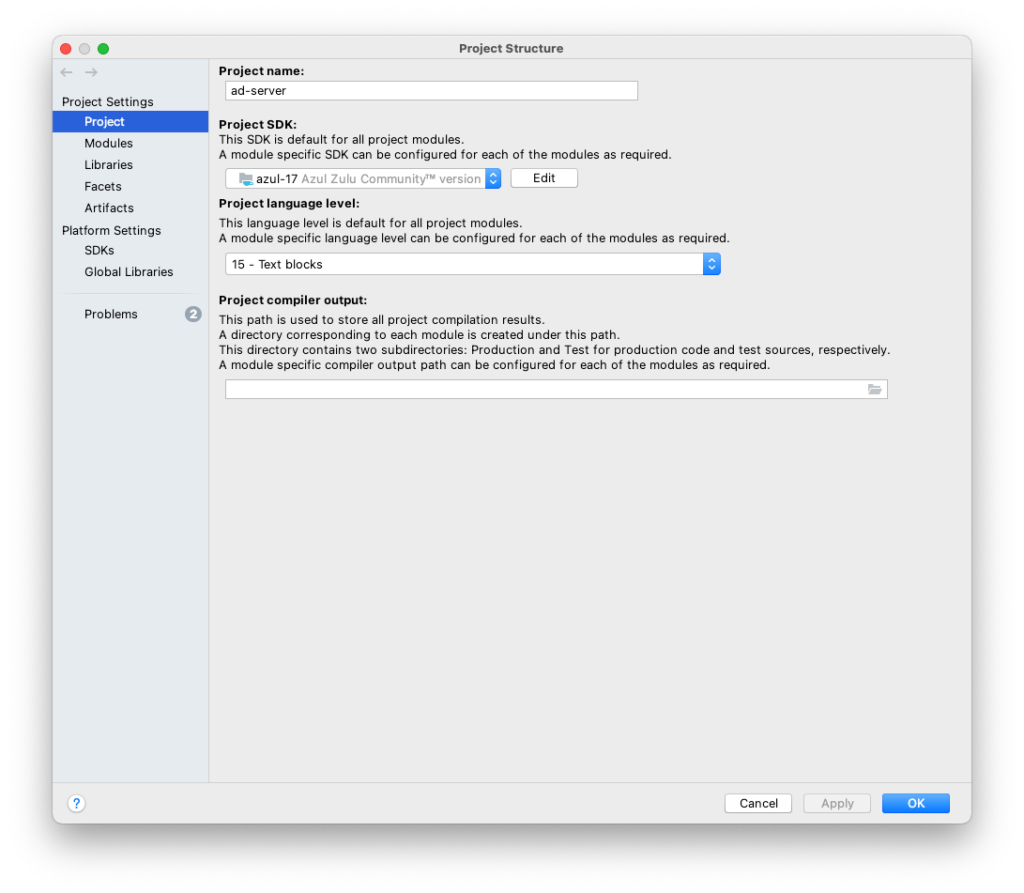
⌘;(Cmd+Semicolon) or use the menuFile->Project Structureand you’ll see this screen:
2. Click the Project SDK dropdown menu and then “+ Add SDK” -> “JDK…”
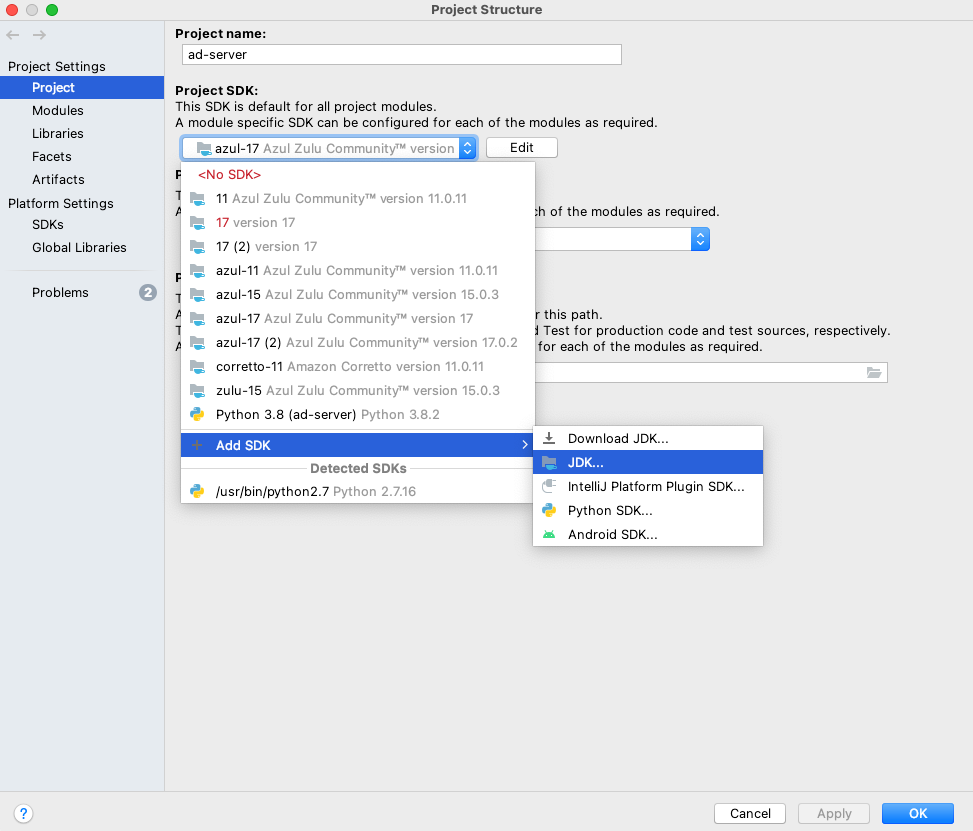
3. Select the directory with the new installation: /Library/Java/JavaVirtualMachines/zulu-17.jdk/

4. Click “Apply” when you’re back to the Project Structure screen. That’s it – now your IDE is using your new Java installation.
5. If you need different versions for different projects or modules in IDEA, you can configure those in the same Project Structure screen there as well, without having to use Jenv to configure your system/shell JDK versions.
That’s it! I hope I made at least 1 developer’s life a little easier with this walkthrough.