Categories
Uncategorized

The Bleeding Edge

Edges are very useful features of an image. They relay quite a lot of information to the viewer of the image, be they human or computer. They allow us to separate an image into different objects, which makes reasoning about the image much easier.

What do I mean by “edges”? You probably understand what an edge is intuitively; put simply, it’s where one thing stops and another begins.

Image(s) source: https://en.wikipedia.org/wiki/Canny_edge_detector

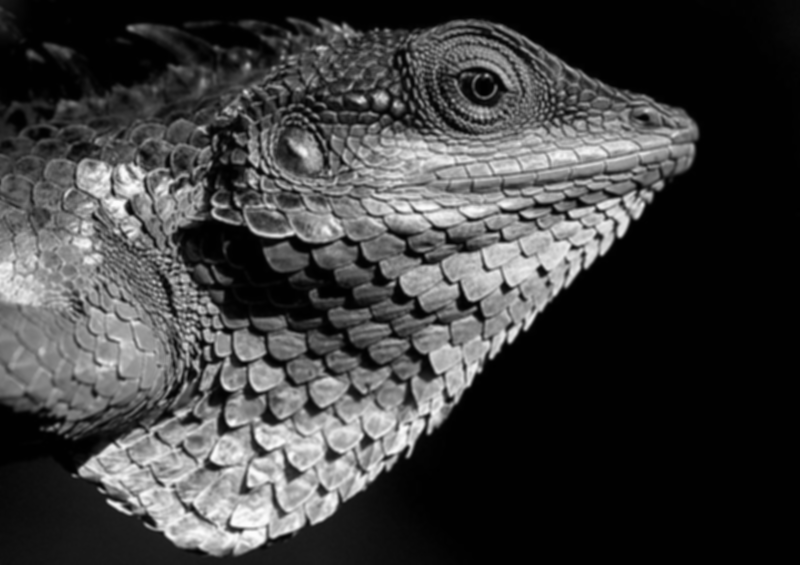
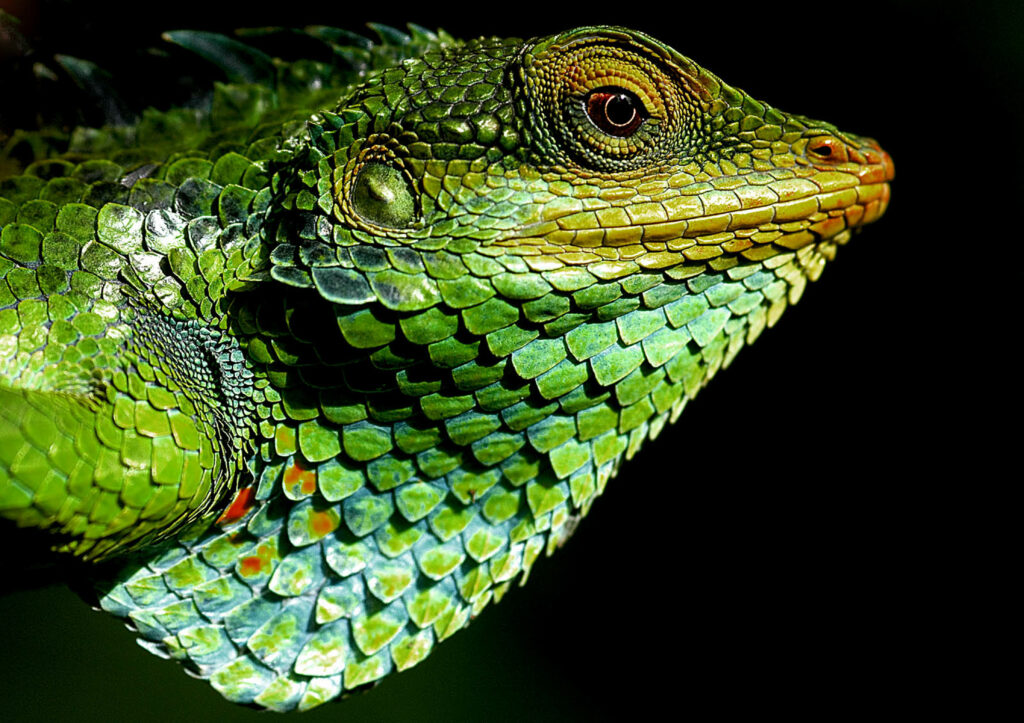
We can glance at the image above and easily understand where the edge of each scale is. But how can a computer determine where these are?

Computers detect edges by looking for sharp changes in brightness present in an image, and presume that these sharp changes should correspond to meaningful information on the edges present in an image. From https://en.wikipedia.org/wiki/Edge_detection:

It can be shown that under rather general assumptions for an image formation model, discontinuities in brightness are likely to correspond to:

* discontinuities in depth,
* discontinuities in surface orientation,
* changes in material properties,
* variations in scene illumination.

Canny Edge Detector

A common algorithm for edge detection is the Canny Edge Detector, invented in 1986 by John Canny. While the algorithm is now less used in it’s original form, with some small improvements it has remained a part of the state-of-the-art in edge detection. Helpfully, the stepwise transformations that it performs are instructive of the ambiguities that must be resolved in identifying edges in an image. Let’s follow Canny’s edge detection algorithm as the steps are applied to the above image.

Step 1. Desaturation and Denoising

First, the image is converted to grayscale. This is done since the following steps don’t operate on color information in the image, only on the intensity (or brightness of the light) of each individual pixel.

Then, denoising is performed on the image. This increases the accuracy of the algorithm by reducing the number of “false positive” edges that are found due to random noise. There are many approaches to denoising, but Canny’s original algorithm employs a relatively simple technique: Gaussian blur.

Original image converted to grayscale, with Gaussian blur filter applied

Step 2. Intensity Gradient

The second step is to derive the intensity gradient of the image, which is a map of how starkly the brightness of each pixel is changing by comparing it to the brightness of its neighbors.

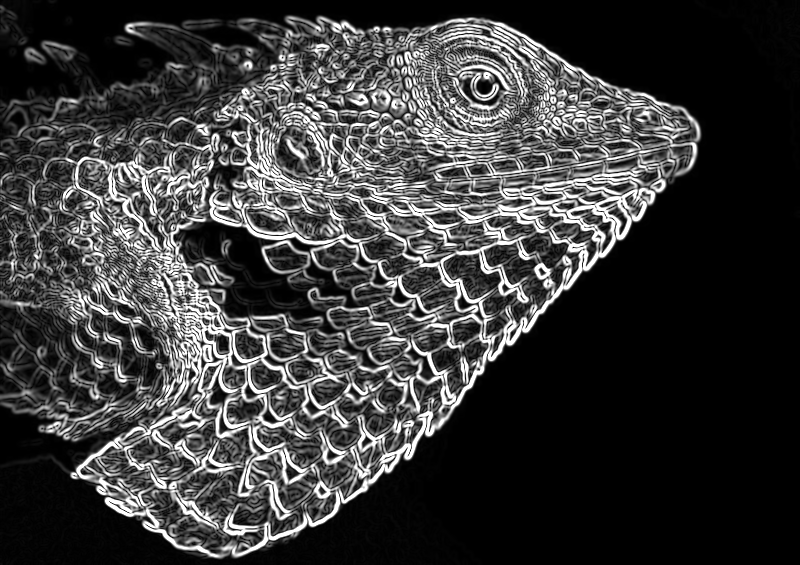
Here we can start to see the edges forming. Comparing this to the previous image, we can see that the bright areas no longer correspond to the direction of the light source in the original image, and the bright areas we are left with correspond with where there were sharp changes in brightness in the original image.

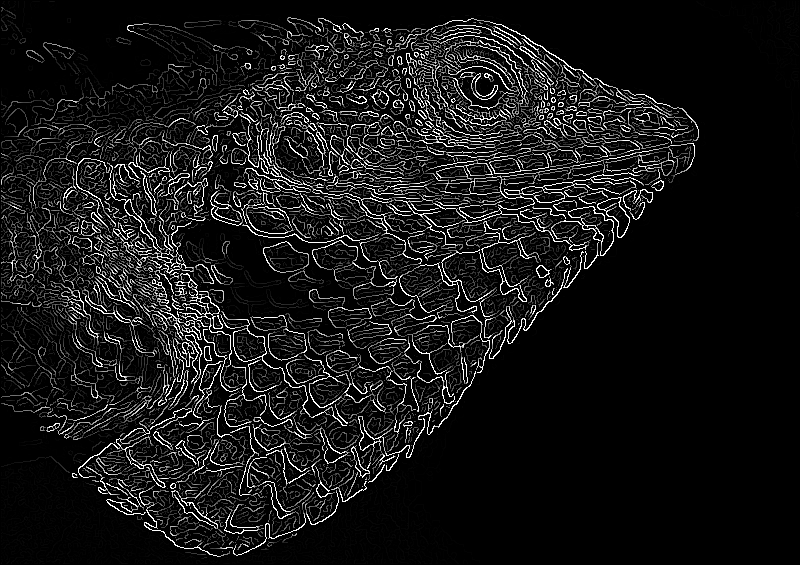
Step 3. Edge Thinning with Non-Maximum Suppression

Now that we’ve identified where in the image the brightness is changing, but some of the areas of brightness change are pretty thick. To say we’ve really found the “edges”, we need to determine where exactly the edge exists among those larger sections.

To do this, we apply Non-Maximum Suppression. This entails looking at each pixel, and determining if it is at the point along the intensity gradient where the intensity is changing the most. If a pixel is not where the maximum change is occurring relative to it’s neighbors, that pixel is “suppress” and it’s intensity information is removed. The result is only the pixels where the highest (local) change in intensity was occurring, leaving us with the thinner edges below.

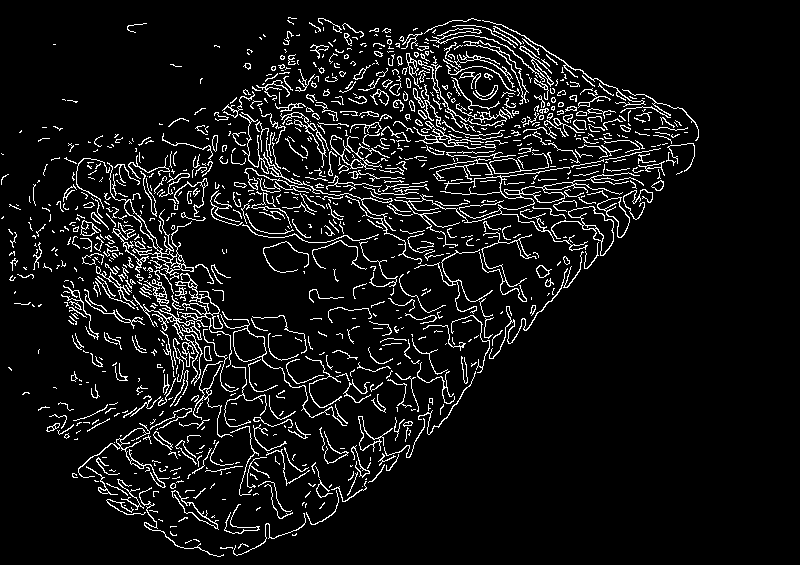
Step 4. Double Threshold

Among the remaining identified areas are edges that are more and less likely to be significant. Now, we choose an upper and a lower threshold for intensity gradient. Each pixel is then binned into one of three categories:

  • Pixels above the upper threshold are categorized as “strong edges“. These edges will all be present in the final accounting of edges.
  • Pixels below the strong threshold, but above the lower threshold are categorized a “weak edges“. These will be decided on in the final step.
  • Pixels below the lower threshold it is “suppressed“, and the intensity information is lost/removed.

Here we can see that we are left with only 3 values. Black pixels contain no edges, grey pixels are weak edges, and white pixels are strong edges.

Step 5. Hysteresis

All strong edges identified so far will be kept in the final image, but we need to determine which weak edges to keep. The heuristic that Canny used to decide on weak edges was whether or not the weak edge was connected to a strong edge. Weak edges that are connected to strong edges are considered to be more likely to simply be artifacts of a “true” strong edge.

In this final step, weak edges are subjected to blob analysis, to determine how connected the weak edge is to adjacent strong edges. Weak edges that are highly associated with strong edges are culled.

Most of the weak edges from our prior image were associated strongly enough with strong edges that they were removed, leaving us with the final result:

And compared to the original image…

While the result may not be perfect, we can see it did a remarkable job at identifying the most significant edges in the original image.

Categories
Uncategorized

Images as Functions

This Computer Vision stuff is taking some time to get comfortable with. Most learning resources seem to expect you to have some background in image processing. Maybe that is typically a reasonable assumption to make on their part, but it’s something I am not particularly familiar with. This has meant spending some time brushing up on the basics.

To this end, after some searching, I found this course on Udacity. The lecture videos were recorded by Dr. Aaron Bobick (then at Georgia Tech). I’ve found Dr. Bobick’s enthusiasm for the subject matter infectious and I would recommend this course to anyone who might be interested in Computer Vision.

In an early lesson you learn about how, for the purposes of Computer Vision, images should be thought of as functions. I didn’t understand what this meant at first, but it seems key to understanding how Computer Vision algorithms work. I’ll try to relay what I’ve learned.

Here’s a simple image function:

f(x,y) => i

The function takes an x and y coordinate, and returns a value the describes the intensity of the light at that position in the image.

So, this image:

… could also be described like this:

We can see that the places in the image where the light intensity changes quickly will create large peaks and valleys. This allows us to see (and think about) the image in different ways than we typically might at a first glance.

Here is a look at a blurred version of the image, and it’s associated 3D topological brightness-intensity map:

The topology map allows us to see just how much smoother the transition between peaks and valleys is. Viewing the blurred image in this way makes it more obvious what effect, mathematically, a blurring algorithm is having on the pixels’ brightness values, and makes imagining the ways we might need to manipulate the image when performing feature detection more intuitive.

Categories
Uncategorized

The Gauntlet: Endgame

I described my experience of the New Grad Software Engineer job-hunting process in an earlier post, titled The Gauntlet. For reference, Wikipedia’s definition of “running the gauntlet” is as follows:

To run the gauntlet means to take part in a form of corporal punishment in which the party judged guilty is forced to run between two rows of soldiers, who strike out and attack them with sticks or other weapons

https://en.wikipedia.org/wiki/Running_the_gauntlet

The process really has felt like that sometimes; each company expecting you to put on a good show 5 or 6 times in a row as the interviewer actively dissects your performance (with the answer sheet sitting in front of them). And even if you do so, providing “optimal” solutions to each of the 6-12 leetcode puzzles they ask over the full course of the process, you may still earn only a terse rejection email with no feedback on your performance.

Even when all of the interviewers are exceedingly amiable, helpful, and professional (and the large majority of mine have been), it feels like being in limbo, never knowing how you’re doing or when the job hunt will end.

I, finally, know when mine will end: today! I got a good offer at a company I’m excited to work for, and so I’ve accepted. I felt I performed about as well with this company as with any of the others I’ve applied for, but despite this company being seen as having a relatively more selective interview process they gave me an offer when others didn’t. I really didn’t know if I had a shot and I still don’t know what to make of it. I advise anyone currently going through the process to apply for the best jobs that you can and not to sell yourself short. Though, maybe that advice reads as survivorship bias.

In any case, I am relieved to be finished with interviewing (for now, and hopefully for at least a few years) and can now look forward to starting my new career this summer. My wife and I will have to say goodbye to family and friends since we are moving across the country, but that’s not for nearly 6 months, so for now I look forward to getting to focus on my remaining coursework and take a breather.

Thanks for reading.

Categories
Uncategorized

Right Around the Corner

The architecture of the program that is my capstone project is pretty simple so far. An input video is loaded. Then the program enters the main loop in which some processing will be done on/to each frame of that video. After processing, each frame of the video is displayed.

I’ve got the main loop set up and video frames loading in successfully, and have now started to implement some of the processing. The game board will tilt during play, but we want the computer to “see” the board as if it’s facing it head on during processing.

Here, I am in unknown territory as I don’t have previous experience with Computer Vision techniques. But with some direction from my project sponsor, Andrey, and from the OpenCV-Python documentation, I’ve learned that corners are great “features” to try to detect. So, first order of business is to try to detect the corners of the game board. From there, it should be relatively simple to adjust the perspective of the board in the video.

So, I naively attempt to run OpenCV-Python’s built-in Harris Corner detection algorithm. Detected corner should show up in red.

Uh oh… It’s detecting corners pretty much everywhere except where I need it to.

After some more investigation, it seems we may need to make some adjustments to the lighting or the camera settings so that the corners of our game board aren’t getting washed out. Andrey will be taking new videos with the adjusted lighting, and maybe next week I’ll have some extremely detected corners to show off.