Some Static Malware Analysis.

Static analysis is the safer kind of analysis when it comes to malware. Static meaning that we are not running the malware binaries on our systems, but instead we are just looking at the code itself and the files’ characteristics. It is important to note here that the malware I’ve been using is for running on Windows XP, which is lovely. Even though this operating system is dated, there are still a multitude of tools that can be used for static analysis, including: VirusTotal.com, Md5deep64, Strings, PEiD, upx, Dependency Walker, PEview, and IDA Pro. Typically, many of these tools will show some of the same things, but that can be used to your advantage to confirm your findings and provide multiple sources to prove your claims.

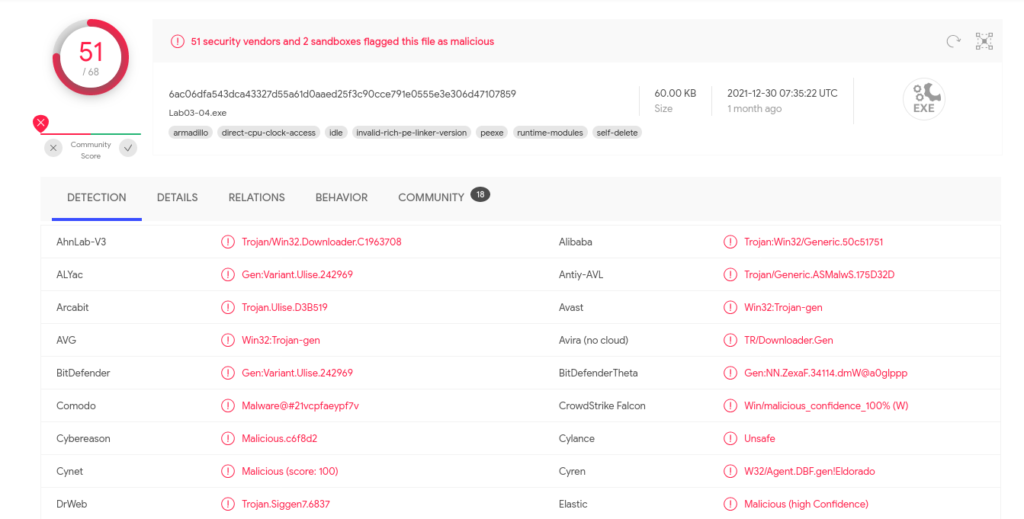
So, let’s try taking a look at a file called “Lab07_01.exe”. First, always ensure you have a snapshot of your VM totally clean to revert to when needed. Next, VirusTotal.com is a great resource to check if your file gets picked up by different anti-virus software. For this file, I found that it has indeed been able to be flagged by many vendors as malicious:

VirusTotal.com: “Lab07_01.exe” flagged by 51 security vendors and 2 sandboxes.

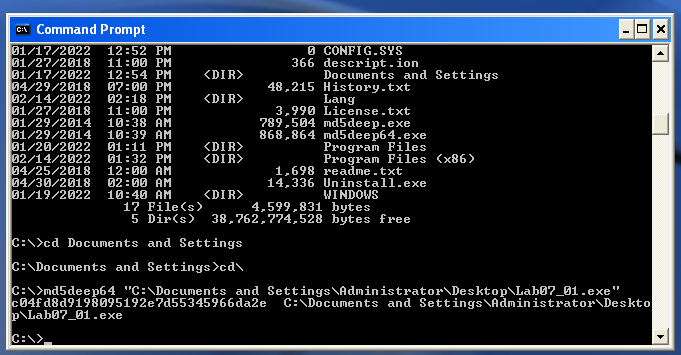
On VirusTotal, under details, I was able to see the MD5 hash, which was: c04fd8d9198095192e7d55345966da2e. I tend to confirm the hash on my own VM as well using the md5deep64 hashing program, which produces the same hash (in this case):

md5deep64: “Lab07_01.exe” MD5 hash

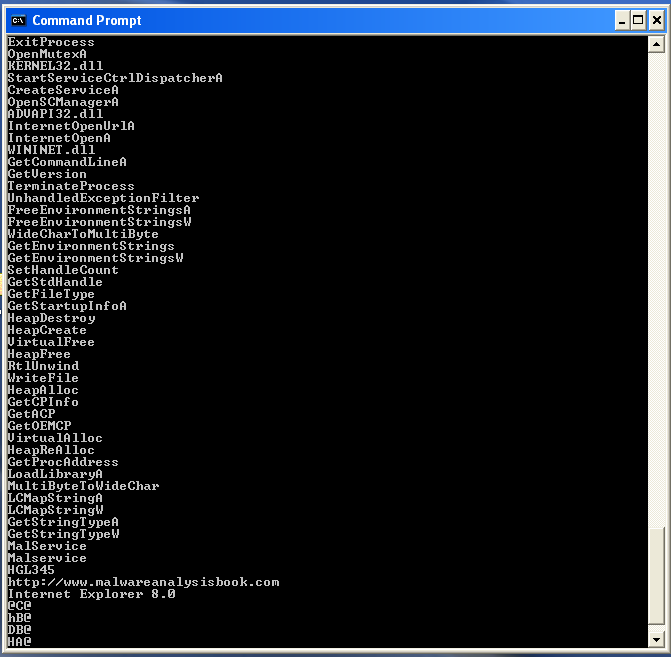
Strings is a really interesting CLI program on Windows that searches an executable for any strings in either ASCII or Unicode format in the hopes of getting hints about the executables functionality. When run, it outputs a lot of strings. Some are complete nonsense and can be ignored. For “Lab07_01.exe”, some of the interesting strings we see are “OpenMutexA”, “CreateServiceA”, “Malservice”, and “http://malwareanalysisbook.com”. This could suggest the file opens mutexes, creates services, and tries to talk to a web server.

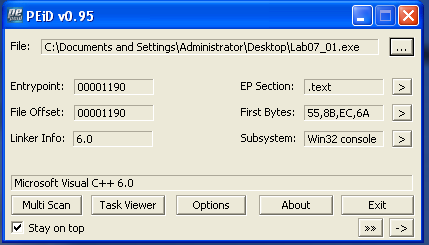
Now, I want to ensure the file we are analyzing is not obfuscated or packed in any way that could prevent me from getting information from it or running it. Since I got so many strings back in the Strings program, I can assume it is not packed. However, there are other programs that can confirm the file is not packed. PEiD can detect the compiler or packer of a program if it exists. In this case, we see the compiler is Microsoft Visual C++ 6.0, meaning although this file was compiled, it does not appear to be packed.

PEiD: “Lab07_01.exe” not packed

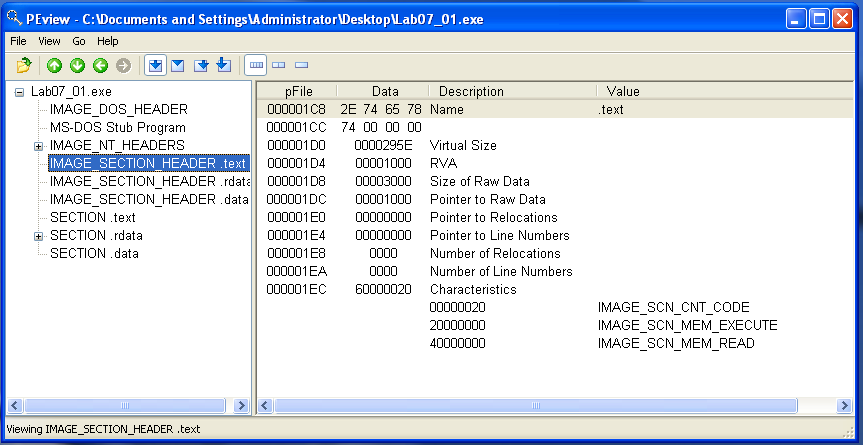
We can take this another step further to confirm the file is not obfuscated/packed in PEview. We can look at each section header to compare the Virtual Size and Size of Raw Data. If they are similar in each header, then it is likely the file is not packed/obfuscated. In this case, these sizes are pretty similar, which backs up the file not being packed.

PEview: “Lab07_01.exe” virtual size vs size of raw data

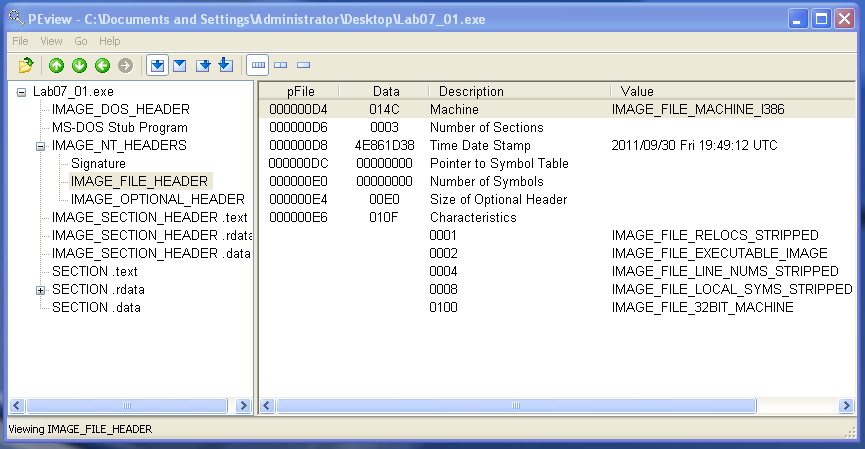
Another cool thing we can see in PEview is when the file was compiled. In the IMAGE_FILE_HEADER, we can see the Time Date Stamp: 2011/09/30 Fri 19:49:12 UTC.

PEview: “Lab07_01.exe” time/date compiled

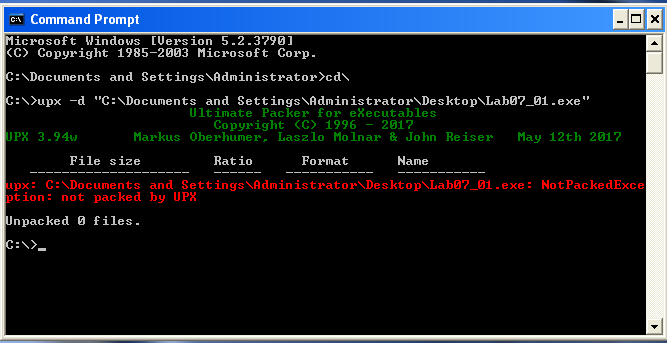
The last program I will use to confirm we are not dealing with a packed file, we can always attempt to unpack it using upx, the command line utility on Windows. Since the unpack using upx was unsuccessful, I can say it was not packed. I’ll stop boring you all with this part 🙂

upx: “Lab07_01.exe” not packed

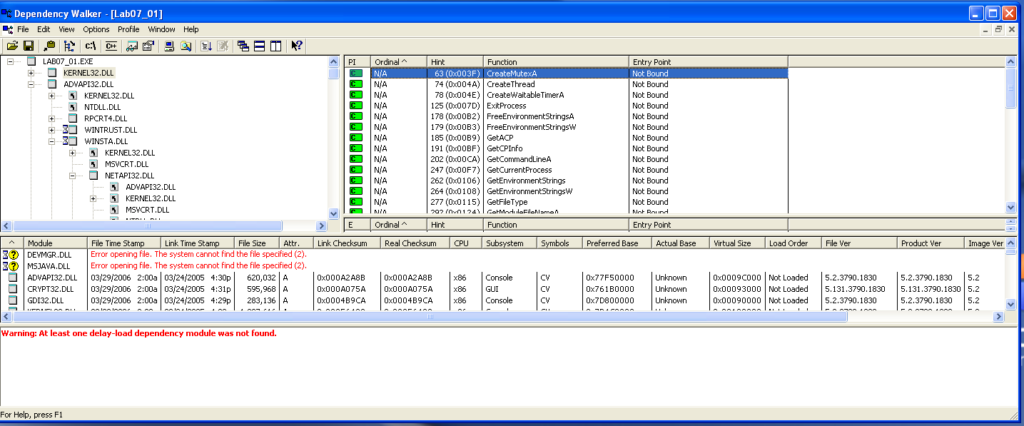
Moving on, I want to find out what dynamically linked functions are called by this malware file in Dependency Walker. These functions can tell me what kind of behavior the malware file has when it is executed. In “KERNEL.DLL”, I can see the core functionalities which include: creating and opening a mutex, getting strings, getting processes, sleeping, and setting a timer. 

Dependency Walker: “Lab07_01.exe” “KERNEL.DLL” functions

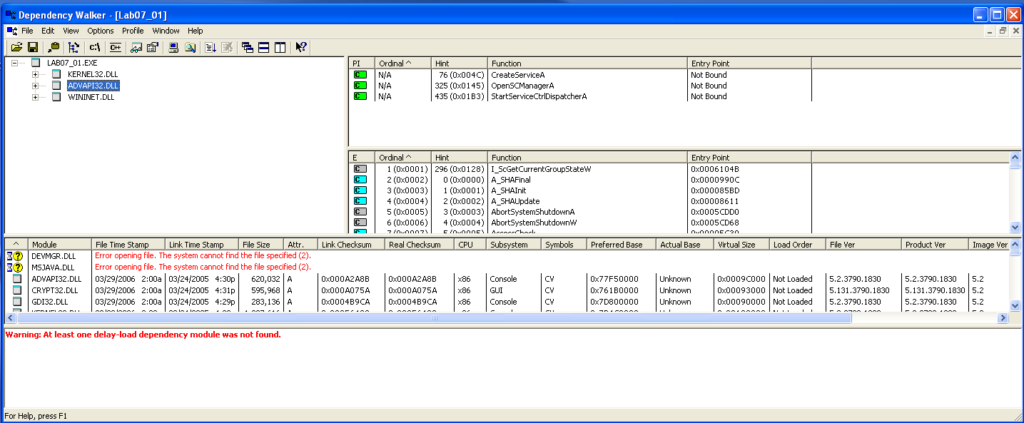
Next, the “APVAPI32.DLL” which shows advanced core Windows components, shows the functions: “CreateServiceA”, “OpenSCManagerA”, and “StartServiceCtrlDispatcherA”, which suggests this file is itself a service. 

Dependency Walker: “Lab07_01.exe” “APVAPI32.DLL” functions

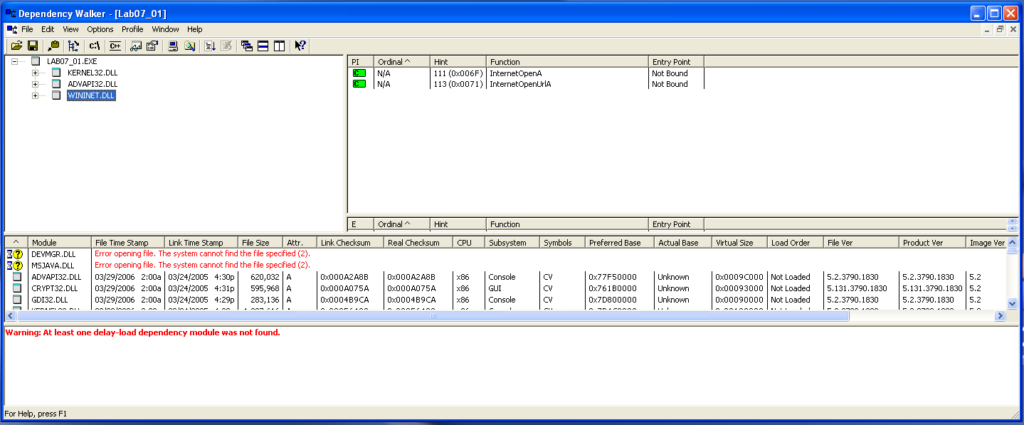
“WININET.DLL” contains higher level networking functions that implement protocols like FTP, HTTP, and NTP. The functionalities I find here include opening the internet and opening the internet to a specific url.

Dependency Walker: “Lab07_01.exe” “WININET.DLL” functions

So I can see what some of the functionality this file has, what about the files code? Well, I can use IDA Pro to view the static assembly code and trace execution. We first find the main function and start following calls to other functions.

IDA Pro: “Lab07_01.exe” main function

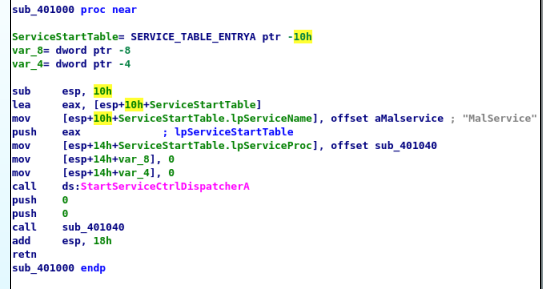
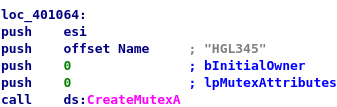
This main function calls “StartServiceCtrlDispatcherA” which is a function used to implement a service (and also the same function found in Dependency Walker) and specify the function the service control manager calls, which is the function at sub_0x401040. Following this function, I found the program creating a mutex named HGL345 which ensures only one copy of this executable file runs at a time.

IDA Pro: “Lab07_01.exe” mutex creation

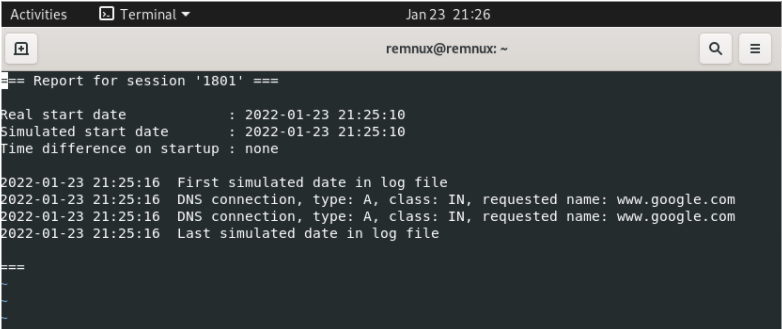
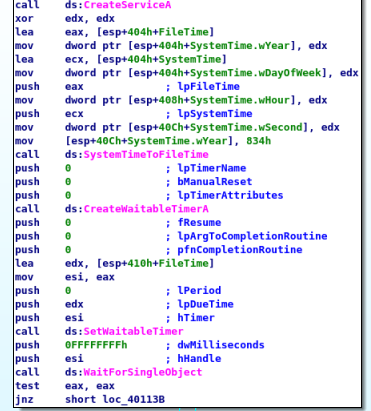
Continuing to follow the code, we can see “OpenSCManager” (program can add/modify services) is called , “CreateServiceA” (creates the service) is called, a date/time is set as January 1, 2100, “CreateWaitableTimerA” (create timer) is called, “SetWaitableTimer” (timer set) is called, and finally “WaitForSingleObject” (wait until set time) is called and set. This tells us that this program waits until January 1, 2100 to proceed in execution.

IDA Pro: “Lab07_01.exe” new service and set execution time

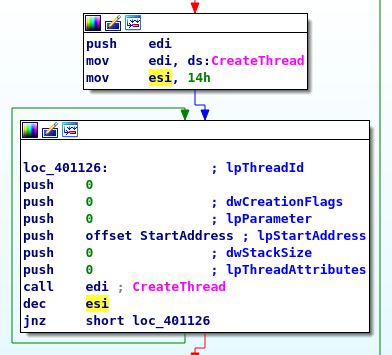
Now, at address loc_401126 I can see that 20 threads are created in a loop.

IDA Pro: “Lab07_01.exe” 20 threads created

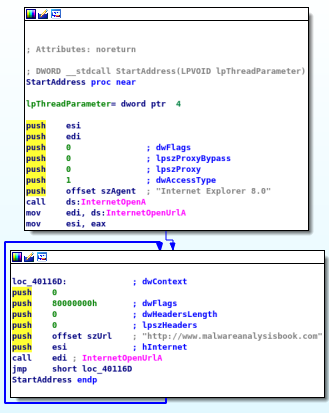
Following “StartAddress”, I can see that “InternetOpenA” and “InternetOpenUrlA” are being called with the destination being “http://www.malwareanalysisbook.com”. The jmp toward the end enforces a loop that will last forever. Meaning, each thread will continually download “http://www.malwarenalysisbook.com” forever.

IDA Pro: “Lab07_01.exe” threads download “http://www.malwareanalysisbook.com” forever

Now, from what I could find in just the static analysis of this malware file, I can say this file gets installed on a system, creates a service so that it runs every time the host is booted, only allows for one copy of itself to run at a time (due to a mutex), triggers at January 1 2100, and launches a DDoS attack against “http://www.malwareanalysisbook.com”.

We were able to find all this through just static analysis, where I did not run this file at all, but only looked at its characteristics and code. To ensure what I found is indeed correct, it would be useful to continue this analysis using dynamic analysis…but that’s for another day.

Sometimes You Need a Fake DNS.

After getting the virtual network set up, I was able to provide a contained environment for malware analysis. However, what happens when you want to study the behavior of malware that attempts to contact outside endpoints via the internet? Should you just allow it access to the internet? How can we know what/who it is trying to contact? The answer for this setup is utilizing a tool like iNetSim, which is a software suite that can simulate common internet services.

So, this takes some configuration in your VM’s (that you’ve already set up in an isolated virtual network). One VM should house iNetSim, which you can download here: https://www.inetsim.org/downloads.html. For every VM that you’d like to consider a “victim” to the malware as it runs, we need to configure which DNS server internet requests get directed to. For this example, I’ll be using a Windows XP VM.

To get to the DNS server configurations, in your victim Windows XP VM, navigate to Control Panel > Network and Internet Connections > Network Connections > right click on your Local Area Connection > Properties > double click Internet Protocol (TCP/IP). A window will pop up and look like this:

Window to Configure DNS server for Victim VM

To configure the DNS server settings, select “Use the following IP address” and enter the IP address you want to use on the victim machine. I configured my virtual network subnet to be 10.1.2.0/32, and so the IP 10.1.2.100 is within this subnet. Add in the subnet mask, and then add the IP of the VM you are using iNetSim on (in this case 10.1.2.1) as the default gateway. Next, select “Use the following DNS server addresses”, and enter the same IP for the VM running iNetSim as the preferred DNS server. This will route all internet requests to the 10.1.2.1 IP address where iNetSim is listening. This prevents the malware from actually accessing the internet.

Configured DNS server for Victim VM

Now, let’s test it! First, let’s get iNetSim running on its VM:

sudo inetsim : iNetSim is listening!

Then, let’s try to navigate to google.com from our Windows XP victim VM:

Request google.com on WinXP victim VM redirects to iNetSim default page

This redirects to a page set up by iNetSim as a default page. We can then stop iNetSim by entering Ctrl-C and open the log file that iNetSim wrote for each DNS query to a website:

DNS Query Log from iNetSim

So we can see that there were two DNS queries for google.com! This means if we have a piece of malware that attempts to access the internet, we have a fake DNS server listening that our victim VM is configured to send these attempts to. We can then see and log each query for a site on the internet, gaining proof of the malware’s behavior!

References

Brian, “Adventures with inetsim,” Brian T. Carr, 04-Jan-2021. [Online]. Available: https://www.briancarr.org/post/adventures-with-inetsim. [Accessed: 25-Jan-2022].

What exactly is Malware Analysis?

Take it easy. Let’s start with what malware is first. It’s malicious software, or “malware” for short. It is intrusive software that can take many forms and result in many different consequences. Malware can steal information, damage computers and systems, overwhelm servers, assuming control of computers, etc. It also has many different types like viruses, ransomware, worms, trojans, and spyware. [2], [4] On top of the abundance of variation in malware, it is always changing and new malware is always being created. This is overwhelming, and makes security professionals’ jobs complicated.

One way we can learn about malware to help us build better systems, products, and response is through malware analysis. Malware analysis helps us learn the behavior, purpose, and scope of a piece of malicious software [1]. In addition, throughout the process, indicators of compromise (IOC’s) can be uncovered. These IOC’s can be used to improve detection and alerts to the presence of a piece of malware on a system.

When are you presented with a piece of malware to do an analysis, there are different techniques use in the process: basic static analysis, basic dynamic analysis, advanced static analysis, and advanced dynamic analysis [3]. The most simple difference between these is that static analysis does not involve running the code, while dynamic analysis does involve running the malware executable. In further blogs I’ll go more in depth here, as these topics and techniques deserve their own spotlight.

So what exactly is our goal for this capstone project? Well, we will be using example malware binaries on a isolated virtual network. Through static and dynamic analysis, we hope to find how each piece of malware behaves, how we can detect that malware on a network, and how we can contain the damage. Finally, and most importantly, this will produce a report with all our findings and recommendations for the malware files we analyzed. And now, step 1: basic static analysis.

References

[1] “Malware analysis explained: Steps & examples: CrowdStrike,” crowdstrike.com, 13-Jan-2022. [Online]. Available: https://www.crowdstrike.com/cybersecurity-101/malware/malware-analysis/. [Accessed: 18-Jan-2022].

[2] McAfee, “What is malware and why do cybercriminals use malware?,” McAfee, 26-Nov-2019. [Online]. Available: https://www.mcafee.com/en-us/antivirus/malware.html. [Accessed: 18-Jan-2022].

[3] M. Sikorski and A. Honig, Practical malware analysis: The hands-on guide to dissecting malicious software. San Francisco: No Starch Press, 2012.

[4] “What is malware? – definition and examples,” Cisco, 29-Sep-2021. [Online]. Available: https://www.cisco.com/c/en/us/products/security/advanced-malware-protection/what-is-malware.html. [Accessed: 18-Jan-2022].

Pro Tip: Don’t do Malware Analysis Directly on your Machine.

Some exciting news: the topic I will be focusing on for the Capstone project is malware analysis. This will be a great opportunity to dissect some malicious software, learn from it, gain experience using analysis tools, and report my findings and recommendations. This is all fine and dandy, but there’s an issue here. Interacting with malware and even having it on your machine could be very harmful and dangerous. So what do we do?

Well, Using virtual machines is not new to me, so I’m familiar with setting up a VM with VMware. Just doing this is not sufficient due to the risk of the malware escaping to the network your own machine runs on. But after some research, I was able to find a way to define a virtual network separate from my local network with multiple virtual machines. This separate virtual network has not connection to my local network, preventing malware escape.

To set this up, VMware should be installed (you can also create a few VM’s with your OS of choice). You need to navigate to the Virtual Network Editor either via the search bar in Windows,

Search for Virtual Network Editor App

or in VMware via Edit > Virtual Network Editor.

Virtual Network Editor App via VMware

Now, it’s really important to either choose a network not being used, or add a new network we can edit the specifications of. Here, I decided to add the VMnet4 network via Add Network:

Select/create VMnet not currently being used

Now, we can edit the VMnet information and specifications to fit our use case. First, selected Host-only to ensure the virtual network does not connect to the external local network. Second, uncheck Connect a host virtual adapter to this network as it is not needed. Lastly, we want to make sure Use local DHCP service to distribute IP address to VMs is checked so that IP’s are assigned automatically to our VM’s via DHCP (Dynamic Host Configuration Protocol). Select OK to setup this new virtual network.

Edit options for custom VMnet

So the network is set up, but we need to assign the VM’s that we have created to use that network, and that network only. In VMware, before starting a VM, go to VM > Settings:

Navigate to VM Settings

This will bring up a Settings window where you can navigate to the Network Adapter menu. In this menu, under Network connection, select Custom and the virtual network we just set up (in this case VMnet4). Select OK, and the VM is now on our custom virtual network!

Select custom VMnet to run on

We can now feel confident that our VM is on a virtual network that is isolated from our local network and that the malware we will be interacting with will stay on this same virtual network.

References:

L. Zeltser, “Virtualized network isolation for a malware analysis lab,” Lenny Zeltser Content, 09-Feb-2015. [Online]. Available: https://zeltser.com/vmware-network-isolation-for-malware-analysis/. [Accessed: 13-Jan-2022].