RecyclerView, Data Binding, and Parse

Think about the most popular apps that contain a feed, such as Twitter or Instagram. The more you scroll, the more posts you’re shown. Although the posts have different content, the overall layout of each post is identical to the next, this is RecyclerView. RecyclerView is used to efficiently display large amounts of data on android applications. The entire RecyclerView is known as a ViewGroup, and the individual “post” layout is known as View Holder.

The fragment class is where the actual adapter is instantiated, and the ViewModel class is where the actual database call is made. In the example below, we use the Parse Database.

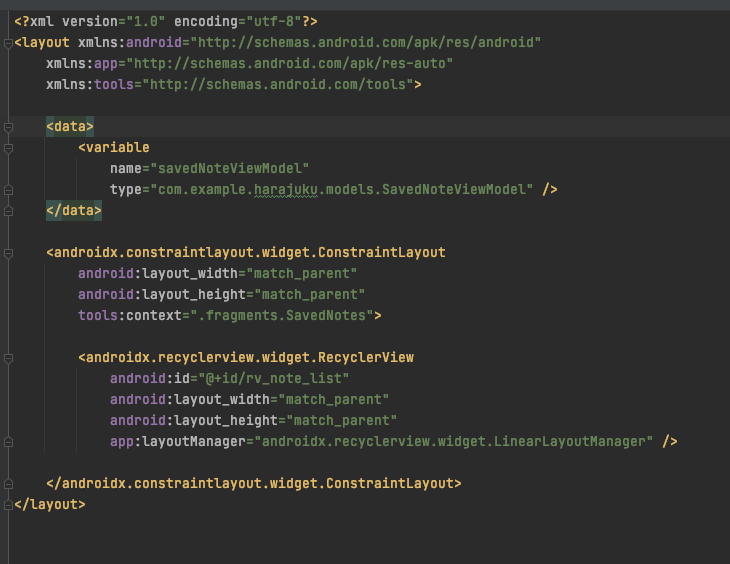
This is the code for a fragment that contains a Recyclerview. You’ll notice the data binding in the layout file, with the data element in the view root element
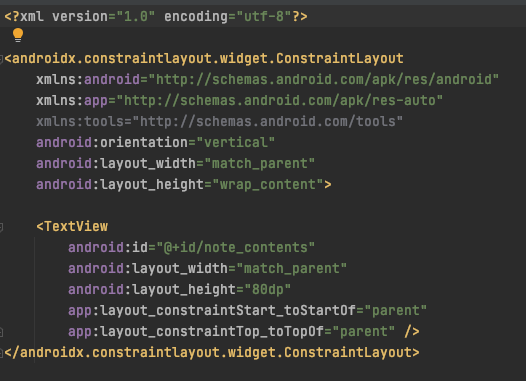
The individual item (e.g. one tweet) has a separate layout file. This is what each individual data item will be binded to.
RecyclerView binds the individual view holder to its data, this is done in the adapter class.
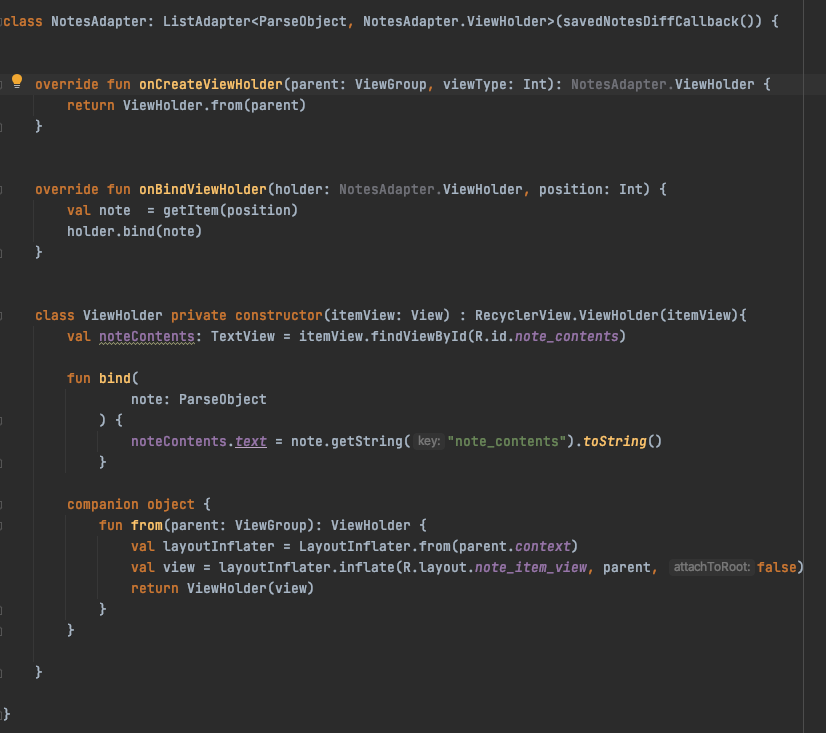
The adapter contains the onBindViewHolder function, where the viewHolder is bound to an item. In the above example, we have a list of notes. The onBindViewHolder takes a note at each index (or position) and binds it to the viewHolder.

The fragment class contains a function, onCreateView, where the adapter is instantiated. You’ll notice it also creates a new savedNoteViewModel.
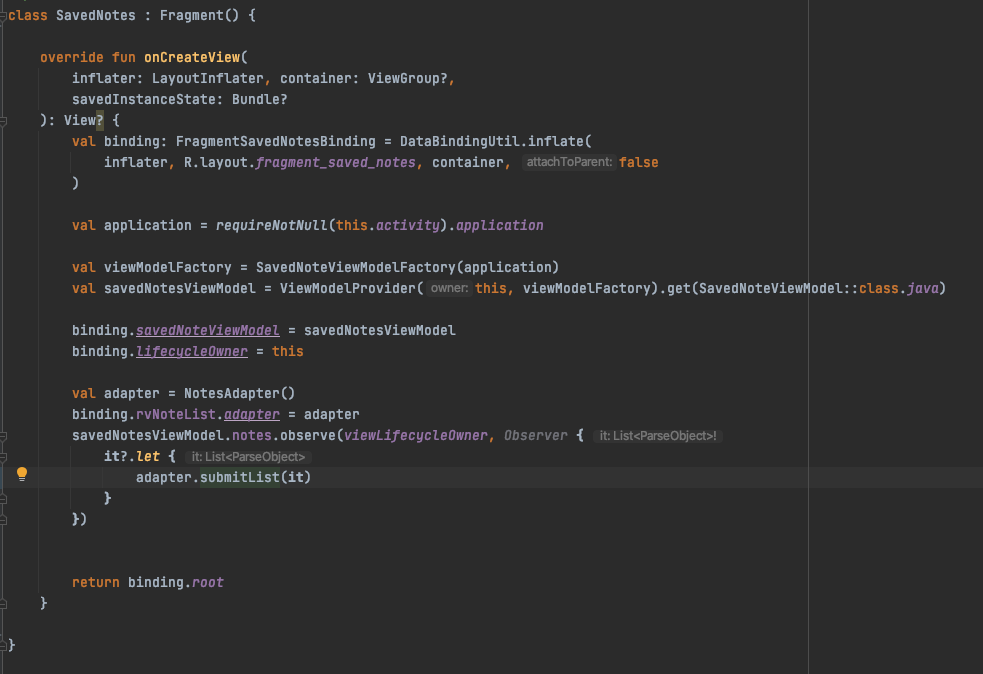
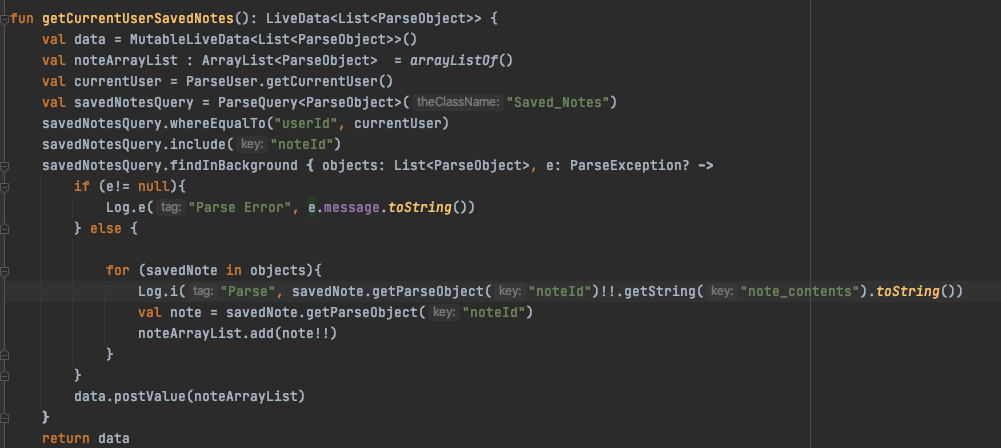
The savedNoteViewModel sets out “notes” to the actual data that it receives from making the database call:

In this example, we use the Parse database. This function shown below queries the user’s saved notes, along with the actual data for each note. Then the list of notes is returned.
Once you run your app, you should see something like this:
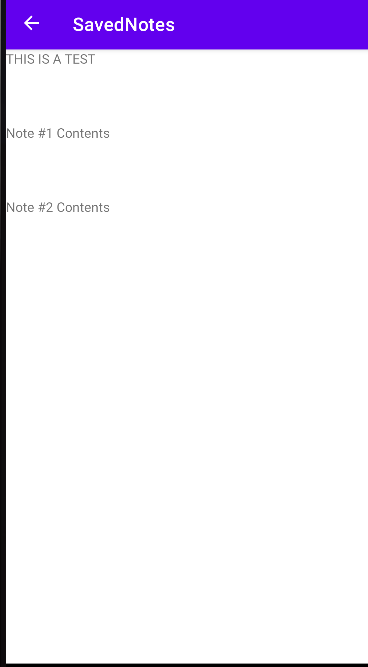
And there you have it! A short example using recyclerView, Data Binding, and Parse
Video tutorials for beginners

This week I made my first video! Although I don’t think I’m going to be the next big youtube star, I really enjoyed getting to create on a new medium and found a way to create and edit videos easily.

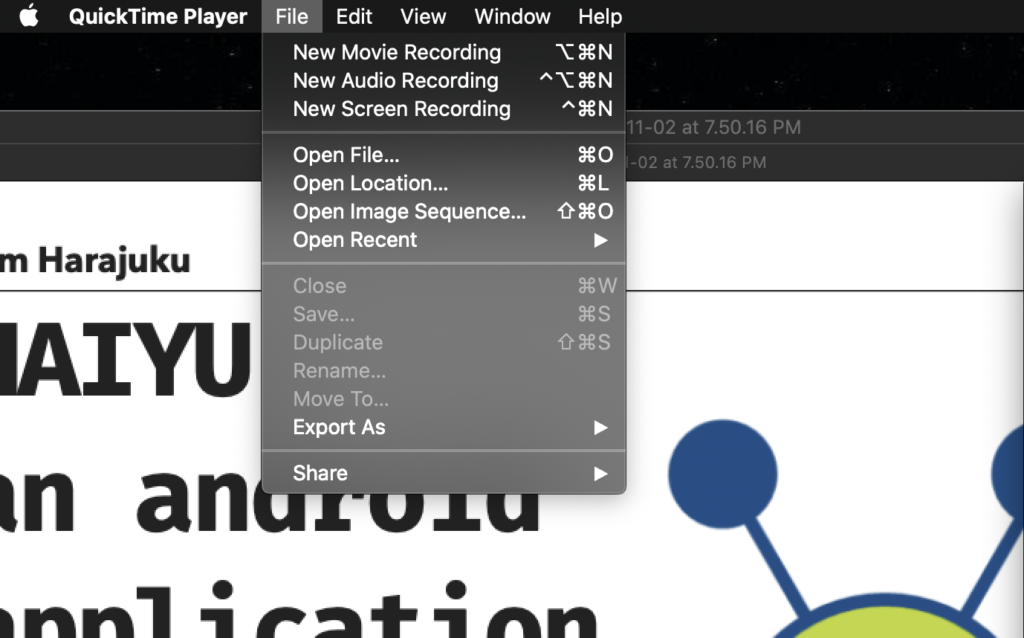
To record my video, I used QuickTime on mac, and to edit my videos, I used OpenShot Video Editor, which is free and open source.
Once QuickTime is opened, you can access the recording options in the File menu.

For my video, I used the Audio Recording and Screen Recording options.
If you want audio recorded while you do a screen recording, you have to open the options menu and click a microphone source:

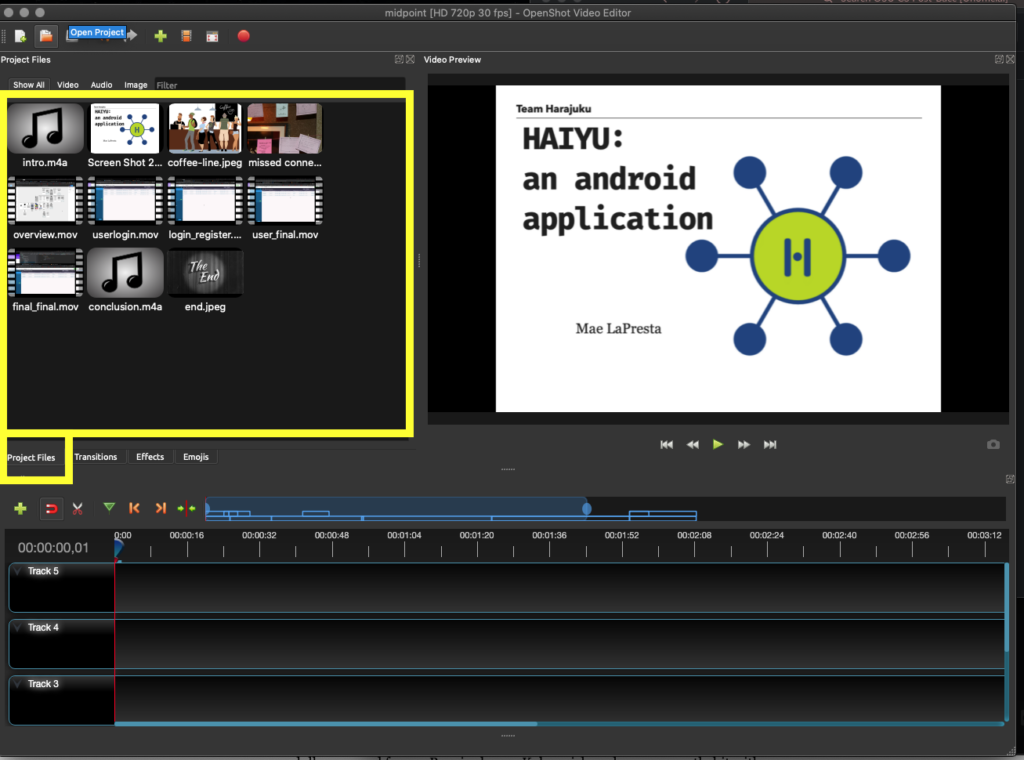
Once you have your recordings, you’ll want to open OpenShot and create a new project. You can add your video, audio, and even image records by dragging these into your project tab.


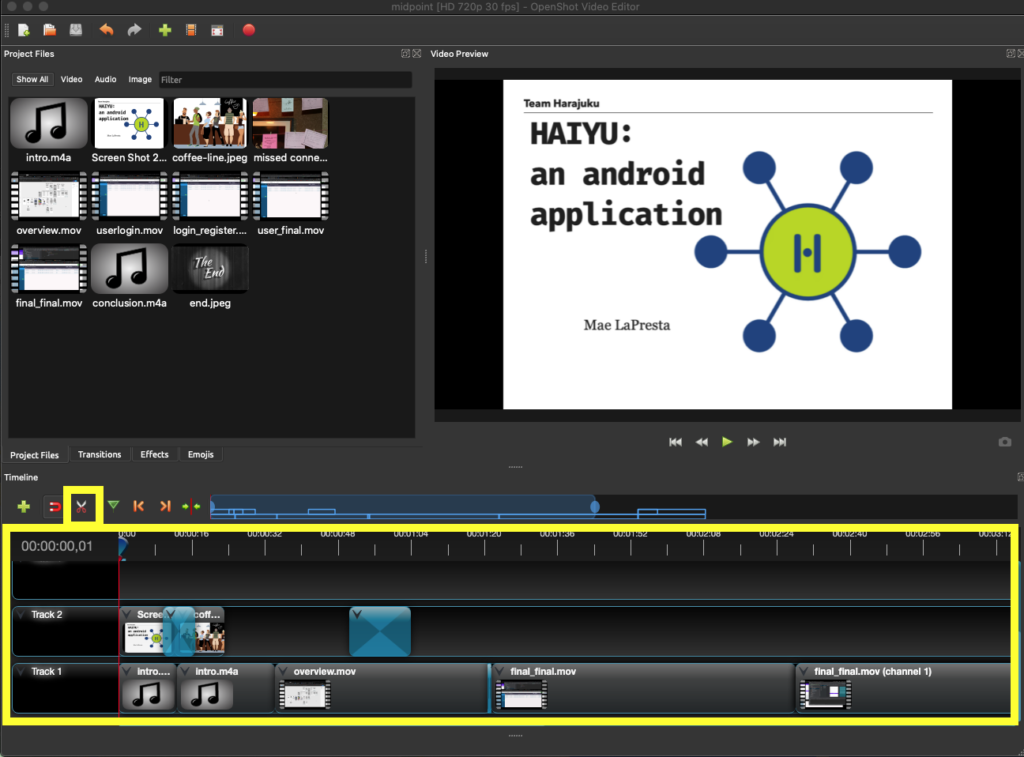
Adding the media from your project files to your final video is as easy as dragging them into different tracks. You can use the cut tool if you need to split up videos and/or delete sections. If you want to add transitions, effects, and emojis, you can access these next to the project files.


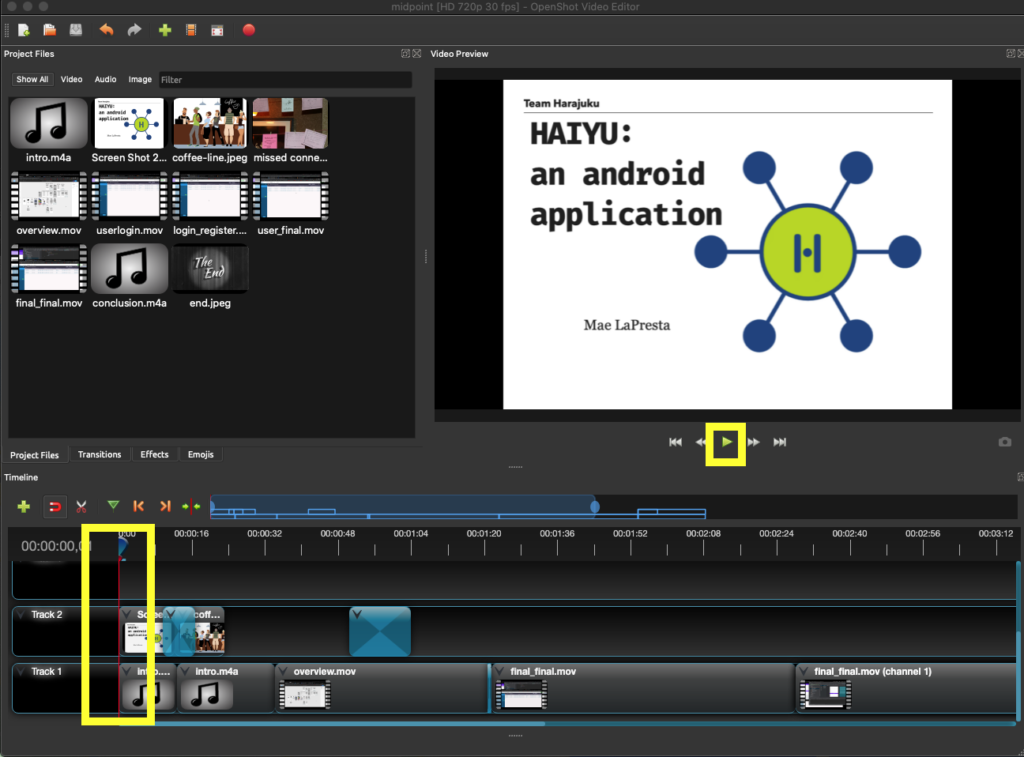
If you want to check out what your video looks and sounds like, pressing play will start the video from the beginning of the slider.

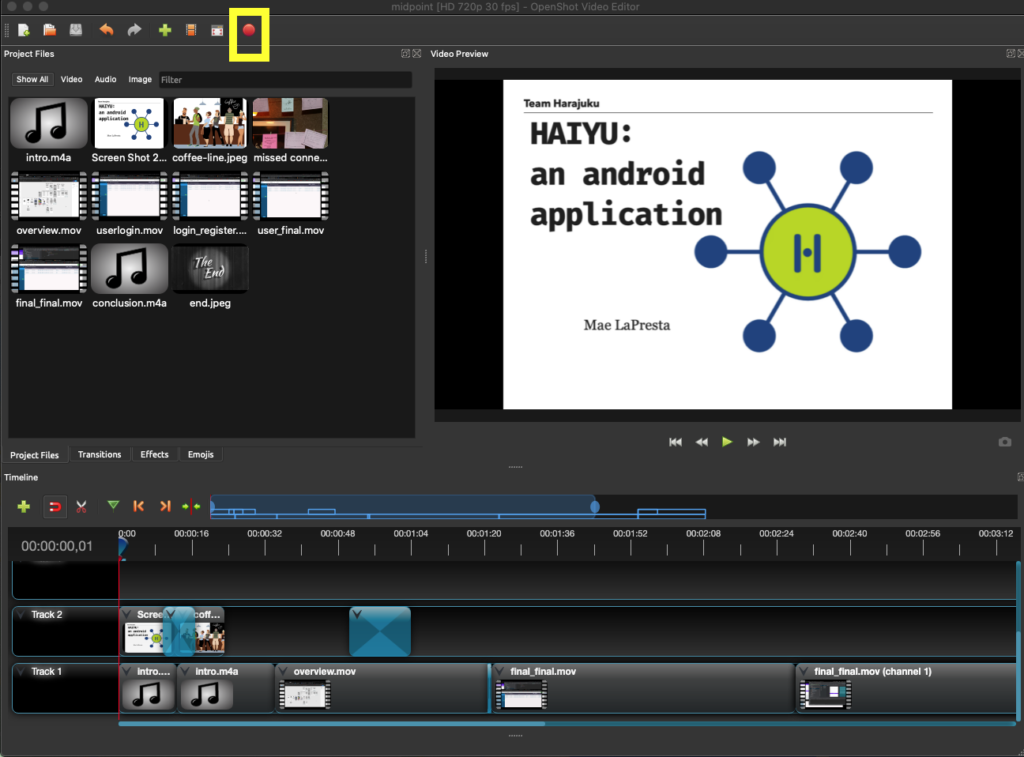
Once you’re happy with your video, press the export video button, and voila! You are on your way to winning a Youtube Creator Award!!

Productivity: Timeboxing

This summer I balanced a full-time internship, taking a class, and throwing two wedding showers and being a MOH in my friend’s wedding. I would say that I’m a pretty organized person, and I’m going to use this blog post to talk about a few techniques that I use to stay on top of things.

Planner: Although I think any planner will do, I use Notion to keep track of my daily activities and what I have coming up. I previously blocked my time out, however, for my personal calendar I have since switched to using a daily to-do list. I start my day by setting my intentions: What 3 big things do I need to get done today, and what 3 things would be nice to get done today? Then I try to do as much as I can.

Time Boxing: While working, I utilized timeboxing to ensure that I had at least a few hours a day of interrupted time to do work. For me, the best way to do this was to block off blocks of time on my calendar, so if people were scheduling meetings with me they weren’t spread throughout the day. Context switching can be very expensive and losing your train of thought can cost hours a day or productivity.

Time Boxing (Part 2): Sometimes I would get stuck on a task, and it would drive me up the wall for hours. I found the most effective way (if I was feeling hard-headed) was to timebox the amount of time I was willing to keep trying to get my way to work. If I reached the end of my timebox, I either had to: try an alternative way or ask for help. Starting out with a maximum amount of time to spend on something ensures you don’t get stuck in a black hole of doom.

Sometimes you just have to set things on fire (metaphorically)

I’ve always been a bit stubborn, in that I like to believe that with a bit of hard work and elbow grease, almost every problem can be solved. Last week, I ran into a bit of a blocker with Android studio and would like to share my experience along with some lessons learned:

As a student, I haven’t had the most experience with “new” languages, and generally speaking, upgrading an IDE that I’m using has been more or a leisurely stroll down the beach (I’ll do it if I remember) than ASAP PANTS ON FIRE.

Thus, I was kind of taken aback when I ran into issues after creating my project in a slightly older version of Android studio that I had previously installed on my computer. Initially, my project seemed fine and I could get the initial “hello world” screen up and running. As I was working on installing some external packages, I ran into issues with my Kotlin version. I tried just installing the Kotlin plugin version from the Jetbrains website, however, I had no luck actually loading it into android studio. Total dead end. I realized I had to upgrade my IDE and then upgrade the Kotlin version. While upgrading, I ran into issues while my android studio tried to piece itself together, in its newer and (supposedly) sleeker form. I wasted a bunch of time retrying to upgrade individual parts that were failing and ultimately ended up deleting android studio and installing the new version from scratch. Once I finally had a new version, I had to make a bunch of changes in my project build files to get it up and running.

This lesson was somewhat painful and ended up being the culmination of several days of work, but now with a much clearer head, I can reflect on the experience and hopefully remember these takeaways the next time I’m in a similar situation:

  1. Error messages are your friend
  2. Sometimes you have to just run things and see what happens
  3. It’s good to try to fix something, but occasionally you will run into an issue where the solution is much more painful than just starting from scratch. It’s ok to toss in the towel, especially if you end up in the same exact spot. (Note: This doesn’t mean you should erase your coworker’s or legacy code because you don’t understand it)

Picking up a new language…

Throughout the past ~2.5 years, I’ve been able to pick up and work with C/C++, Python, Java, Javascript, and a few other languages. I’m also currently picking up Kotlin for my capstone project. After picking up the fundamentals in your first language, I feel like the subsequent languages are a lot easier. However, here are some tips and tricks that I’ve used:

  1. Start out by covering the fundamentals (like what’s the syntax for a function? what primitive data types are available? And how do I write a for loop). I like going through classes where they are more structured, however if you already know one language I definitely recommend saving yourself some time by focusing on a class geared towards programmers or something labeled as a “bootcamp”. These will be faster paced and will focus more on the syntax than the fundamentals.
  2. Get a comparison to programming languages that you already know. There are tons of articles online that will cover these differences. Take note of these, and keep them in your head for the next part:
  3. Build something, even if it’s something that you’ve already built! This will cement the syntax of the language in your head, and give you something to show for it at the end!
  4. Teach someone else. The best way to learn is to mentor someone else, and by doing so, you may even make a new friend or connection.

Here’s the class I’m using for Kotlin, I definitely recommend either taking it if you’re interested or looking over the topics. I would expect almost all language classes to have a similar syllabus:

https://classroom.udacity.com/courses/ud9011

A case for writing

When I was growing up, kids could either be “Math” kids or “English/writing” kids. Now that I’m older, I find this notion silly — the skills for both are very similar. Being able to critically think, break down large problems into understandable chunks, and having a decent memory are all skills that would benefit you in both areas. Back in the day though, the rivalry was real.

I’ve really found value in well-written documentation, especially in the tech world. In fact, if there’s a code package out there that doesn’t have good support in the form of understandable written documentation it’s an automatic “NO” from me. Trying to comb through the source code of the package and stack overflow for implementation examples is fine if you have a really rare particular problem, but not if you’re just trying to figure out how to install the package!

On the project side of things, I really believe that having written documentation is key to having a successful project. Sometimes it’s hard to focus on the writing and planning portion of a project because it doesn’t give the immediate gratification of building something or fixing a bug. It also takes time, and taking the time to write things down may feel like a slow down. However, I really feel like just the practice of having to explain your thoughts in a document is well worth the effort, and having a design document that your entire team has read, reviewed, and agreed on can be the difference between a success and a failure. Deciding on architecture upfront can save you from trying the headache of integrating parts of your code ahead of time. And you can stay flexible! If you’re writing down your reasons for choosing to do something a certain way, switching will be easier to justify if you compare it against the original reasons.

I know it can be daunting, especially when you’re just starting out but writing is like a muscle. The more you practice, the easier it becomes over time.

Finally! 🎉

Hi there! My name is Mae!

I started my journey to becoming a computer science student almost 3 years ago (January 2019), and I am proud to say that I am finally taking my capstone this quarter.

Three years ago I was an electrical engineer working at a steel manufacturing plant in Illinois. Although I really did love my job (I had the opportunity to work on the upgrade of 2/3 of the controls systems in my area) I wondered where I would go next and what I would do once everything was upgraded. After all the hustle and bustle, could I stay and maintain the systems for another 20 years? Did I want to move on to a larger management position? Doing those projects made me realize that I loved any and all of the programming I got to do for the job. The controllers I worked with used various types of function block programming and solving a problem felt like figuring out a puzzle.

Looking back on my journey, I sometimes wonder how I had the nerve to do it. I had a very stable job where I had built up a good reputation and was succeeding in my field. Giving it all up and starting over was difficult. With the amount of (literal) sweat (summers were HOT in the mill) and hours I put into my job, it was hard not to feel a loss of identity and self as I started over. I really cannot thank my husband enough for being the sole breadwinner and supporting us while I pursued my dreams. I’ve put so many hours into classwork, maintaining my GPA, trying to become marketable by doing projects and studying for interviews, and will be graduating with 4 internships under my belt. I keep telling myself that one day I’ll slow down and relax but I can’t think of another way to live other than the constant push for success. I have always loved a good struggle.

Now that I’m at my capstone, it feels like reading the last chapter of a treasured book. I’m sad to finish, but I feel like this isn’t the end of my school journey! 😉 And the best part of finishing a good book is picking the next one to read. I’m excited to see what this quarter brings (my group has a really exciting project idea that we turned in and was approved) and excited for what the future holds. Welcome to Mae’s Days!

<3

Mae