Card Creation
One of the most interesting parts of this capstone project is allowing users to create cards that are then saved to a database and used to build custom playing decks. Naturally, I volunteered for this assignment. Most of the card creation system implementation is straight forward. I set up text information for card statistics and flavor text information. I added images that change based on a card’s characteristics. This information is saved via an HTTP request to the server (which part is still under construction).
However, there was one very difficult requirement to get working. The project specification allowed a user to upload an image and then use that image in the card design. Initially, I thought this would be something readily built into Unity. I was wrong. Very wrong.
There is a lot of complexity surrounding this one little command:
Uploading Images
Uploading local images in Unity during a game’s run time is surprisingly complex considering this is a common Window’s task. The complexity must be why so many games allow users to pick skins from a predefined list. Accessing predefined information in Unity is pretty straight forward. Simply access the “Resources” folder and load the asset into the project, assigning the loaded asset to the desired UI element. You cannot use the “Resources” folder approach if the information needed is not known before compiling the program.
Unity has logical reasons for making loading local assets a difficult task. First, Unity is designed to support multiple platforms. The different platforms do not share a uniform System.IO object, meaning that the windows-type file I/O is not a universal solution (c# – Attempting to upload .png file to web directory – Stack Overflow). Second, there are concerns about copyright and needing to monitor what images are uploaded. I can see why this a concern for commercial developers. The concern is almost zero for a class project.
Non-Solutions
I was surprised that the Unity community forums contained only a few good ideas on how to solve this issue. Most of the answers I found are examples of how to work with files when you already know the file location. If you know the location, you can use the UnityWebRequest object to load the file and use it in the project. Despite the name, the UnityWebRequest object can read local files across platforms.
Other suggestions used the deprecated www object in combination with the Unity EditorUtility. For example: Unity – Manual: Uploading raw data to an HTTP server (PUT) (unity3d.com). These solutions used Unity’s EditorUtility to open a file and read the information using www tools. This works great…in theory. Unfortunately, EditorUtility only works in editing mode and will not work with deployed code, making the solution impractical for the final product. The real answer is: “There is no built in file browser for the player, so you would need to roll your own using the .NET frameworks classes for file system access” How do I let the user select a local file for my application to use? – Unity Answers
The Real Answer
Frustrating, right? At this point, I became very worried about the project’s scope. Writing a new .NET application seemed like a capstone project by itself. I didn’t think the team could create both a new application and develop a game. Frustrated, I was about to move on to a different part of the project. Luckily, I remembered the unity asset store. Eureka!
Searching the store finds a few different option. The free one I used is:
https://assetstore.unity.com/packages/tools/gui/runtime-file-browser-113006
This plugin allows you to load multiple files, save files, and specify search criteria. Likely overkill for what I need, but the price sold me.
Getting It Working
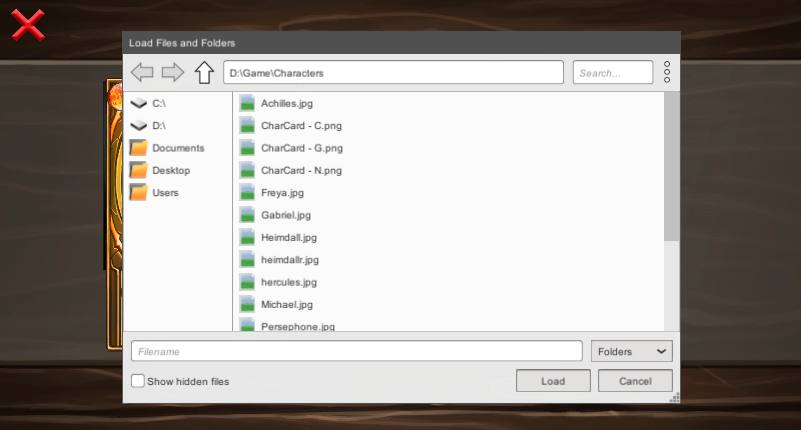
When I first imported the plugin, I could not get the tool to work. This was my mistake, and I failed to import the C# script into the project library after importing the package from the asset store. This failure caused Unity to replicate a similar script in the resources location and crash when run, stating that two assets were detected with the same name. To get the plugin working correctly, I needed to import the plugin into my C# code before testing. I also had to delete the created file. After fixing my installation issues, the plugin worked great and included very comprehensive user documentation. You can see it working below.

Yay! The code to make this work is a small modification on the example implementation.
	private void GetPath()
	{
		FileBrowser.SetFilters(false, new FileBrowser.Filter("Images", ".jpg", ".png"));
		FileBrowser.SetDefaultFilter(".jpg");
		FileBrowser.SetExcludedExtensions(".lnk", ".tmp", ".zip", ".rar", ".exe");
		FileBrowser.AddQuickLink("Users", "C:\\Users", null);


		FileBrowser.ShowLoadDialog( ( paths ) => { path = paths[0]; },
								   () => { Debug.Log( "Canceled" ); },
								   FileBrowser.PickMode.Folders, false, null, null, "Select Folder", "Select" );

		// Coroutine example
		StartCoroutine(ShowLoadDialogCoroutine());
	}
Conclusion
In retrospect, the first place I should have looked for an answer to my problem is the asset store. Being new to unity, the idea didn’t occur to me. I thought of the asset store as a place to buy sprites and images, not useful tools. Turns out the asset store is a real boon to the community and filled with useful items. The biggest takeaway from this headache is that when you get stuck, look at the asset store. There’s a good chance someone already solved your problem.


