In Dr. Freeman Hrabowski’s TED Talk “4 Pillars of College Success in Science”, he told the story of Nobel laureate Isidor Isaac Rabi’s mother’s famous question: Did you ask a good question today? Let’s pause for a minute and reflect: What is a good question? What questions do you ask most frequently? What questions do your students or children ask most?
Question
Types of Questions
Teachers usually encourage students to ask questions. Dr. Peter Liljedahl, author of “Building Thinking Classrooms in Mathematics” and professor of Mathematics Education at Simon Fraser University in Canada, however, points out that not all questions need and should be answered directly. According to Liljedahl, there are three types of questions and only one type of questions requires direct answers. Liljedahl categorizes questions in K-12 mathematics classrooms into the following three types:
Proximity Questions
Stop Thinking Questions
Keep Thinking Questions (Liljedahl, 2020)
Building Thinking Classrooms Book Cover
Proximity questions refer to questions students ask when the teacher is close by, as the name suggests. Liljedahl’s research showed that the information gained from such proximity questions was not being used at all. Stop-Thinking Questions are questions students ask just to get the teacher to do the thinking for them, with the hope that the teacher will answer it and they can stop thinking, such as “Is this right?”, “Do we have to learn this?”, or “Is this going to be on the test?” Unlike the first two types of questions, keep-thinking questions are often clarification questions or about extensions the students want to pursue. According to to Liljedahl, if you have an authentic and level-appropriate task for students to work on, 90% of the questions being asked are proximity questions or stop-thinking questions and only 10% of questions students ask are keep-thinking questions. Liljedahl pointed out that answering proximity questions and stop-thinking questions are harmful to learning because it stops students from thinking.
Next, how could teachers differentiate the types of questions being asked? Liljedahl offers a simple solution to separate keep-thinking questions from the other two types of questions: Are they asking for more activity or less, more work or less, more thinking or less?
After differentiating the types of questions, what should teachers do with these proximity questions and stop-thinking question? Ignore them? No, not at all! Liljedahl emphasizes that there is a big difference between having students’ questions heard and not answered, and having their questions not heard. How should teachers answers these proximity questions and stop-thinking questions then?
Ten Things to Say to Proximity And Stop-Thinking Questions
Liljedahl provides the following list of ten responses to a proximity or stop-thinking question so that you are not giving away the answer and taking the thinking opportunity away from students. Basically, you turn the questions back to your students!
Isn’t that interesting?
Can you find something else?
Can you show me how you did that?
Is that always true?
Why do you think that is?
Are you sure?
Does that make sense?
Why don’t you try something else?
Why don’t you try another one?
Are you asking me or telling me? (Liljedahl, 2021, p. 90)
Cross-Discipline Nature of Good Questions
“Building Thinking Classrooms“ is recommended to me by some college biology teachers in the US. Biology teachers recommending math teaching book, isn’t that interesting? The reasoning behind this recommendation is that the techniques being taught in this book could be easily applied to any other teaching context to get your students engaged in thinking, whether it is K12 education or college education, math teaching or teaching of another subject.
Asking Good Questions for Management and Education Administration
If you are not directly involved in teaching and learning, but in administrative or management role in an organization, Dr. Amy Edmondson has some practical suggestions for asking good questions to keep organization growing healthily. Dr. Amy Edmondson, author of “The Fearless Organization”, Novartis professor of Leadership and Management at the Harvard Business School, states that good questions focus on what matters, invite careful thought, and give people room to respond. Edmondson also suggests three strategies for framing good questions:
To broaden the discussion. For example: What do others think?
What are we missing? For example: What other options could we consider?
How would XXX (such as our role model, our mentor, or our competitor) approach this? For example: Who has a different perspective?
With the above tips for asking questions, are you ready to ask a good question today?
References
Edmondson, A. (2018). The Fearless Organization: Creating Psychological Safety in the Workplace for Learning, Innovation and Growth. Hoboken, NJ: John Wiley & Sons, Inc.
Bringing Critical Language Awareness to Instructional Texts and to How You Evaluate Student Writing
Instructional designers spend a lot of time working with words – they’re the raw materials that instructors share with us in the development of their online courses – but it’s often unclear what liberties we should take with instructors’ writing, and, on a related note, how we should coach instructors to assess their students’ writing. If inclusivity and equity are central values in course design, how might that be reflected in the seemingly mundane act of copyediting instructional texts or in setting up an instructor’s rubric to include “standard” grammar as a criterion? When the instructional designer copy edits the instructor’s words, or the instructor assesses a student’s writing proficiency, what raciolinguistic dynamics does that enact? Critical Language Awareness gives us the insight that our “language conventions and language practices are invested with power relations and ideological processes” (Wendt and Apugo), so the work we do with instructors’ and students’ words should be understood in the context of those power relations. What follows is a letter addressed to instructors that I hope will spark conversation on these issues, in the hopes that all the participants in the course – those who design, facilitate, and inhabit the spaces created by these texts – can reach their goals while using their own voices.
How would you like me to approach copy edits and other confusions?
Dear instructor,
Let’s start first with the practical and (seemingly) neutral question of how I handle your instructional texts, as I will read all the course materials you share with me. A common agreement I reach with instructors is to let me correct any obvious typos, misspellings, and punctuation issues, but to require I check with you in all other cases. Sometimes, as a colleague of mine has shared, instructors will ask the instructional designer to leave typos untouched, because they want to model authenticity, vulnerability, and a focus on meaning over surface perfection. This can serve as an invitation to students to let go of the fear and shame associated with making mistakes – so I’d be glad to help you towards this goal, as well, provided your intended meaning is still clear. Keep in mind that Ecampus students have expressed concerns when they notice a pattern of spelling or grammatical errors in a course, citing the typos as evidence of lower-quality, less credible course materials or a lack of instructor presence (McAlvage and Racek). But if you consider the imperfections in your writing to be a feature rather than a bug, you should make that explicit to students; let them know in what ways it’s intended to serve as a model for their own writing or for their overall approach to your course. Typos aside, I will also ask about instructions that you find obvious (and that may be pretty clear to me, too), because I am trying to anticipate all the ways your instructions could be misunderstood by others. So if it seems that I am being a bit obtuse about what something you wrote means, that’s the reason! A related question is on tone – are you open to receiving my feedback in this area? Our instructional design team encourages you to use a welcoming tone; students turn away from instructors when a “punitive” or commanding tone is used in a syllabus by, for example, seeking their support less often (Ishiyama et al. qtd. in Roberts 47). If you agree, I can help you spot those areas that feel less welcoming. For my part, I will strive in my communications with you to adopt a collegial tone, but should you find that is not the case, please let me know.
Now that we’ve thought through some of the practical questions on how I’ll work with your words, I’d like to ask you to reflect more broadly on your relationship to your writing and language use. How did you learn to write in your field, and what experience would you like your students to have with your use of language in your course? What do you expect of your students’ writing, and is it something that your outcomes assess? As you think over your responses to these questions, let me share a bit about my relationship to language and writing and how it affects my work.
Who are you to correct me?
My father used to tell a joke about a guy touring a college campus who stops to ask a student, “Where’s the library at?” and is told in response, “You should never end a sentence with a preposition.” He then rephrases his question, “Where’s the library at, [ jerk ] ?” My father taught writing, after earning his PhD in English literature, and later wrote books, so I grew up believing a command of “good” written English was my genetic inheritance. But now I can see that my mastery of a particular language standard has mostly to do with my immersion in a socioeconomic group whose language practices are privileged through white supremacy. So while the joke shows that correcting other’s language can open you up to counterattack – Who are you to correct me? What makes you right and me wrong? – many will not be empowered to answer back. Nor does this language privilege typically operate on the level of overt interpersonal confrontation, as in the joke – it’s usually invisible – “a product or effect of assessment systems and structures, our [standard operating procedures] in classrooms and other places where language is judged, despite anyone’s intentions, that produce political, cultural, linguistic, and economic dominance for White people” (Inoue 7). Enforcing language standards is an oppressive practice, a way to gatekeep who can succeed and who cannot, and in the case of the joke, who is subject to judgment for the simple act of asking directions to the library.
The joke also gives us the insight that language standards are a self-replicating system of oppression, as each student who is coached to evaluate language in this way internalizes the standards and is then given license to impose them on others. As a result of my own immersion in and sense of “ownership” over standard English (Whiteness as Property), I brought into my instructional design practice a certain unexamined confidence about my ability to critique and correct others’ writing. I wanted to help instructors present instructional texts that were clearer, more succinct, error-free – more like the way I wanted the writing to sound than the way the instructor had written it. I had to stop and ask myself whether that was doing instructors a service or not. For example, in the case that a course shell was designated for a single instructor (and should rightfully showcase their voice), a colleague felt the edited text misrepresented the instructor to their students – there would be a disconnect between the “corrected” writing in the static course shell versus the writing that would appear once the term got underway. My corrections were also potentially an erasure of the instructor’s identity and the imposition of a certain language standard that wasn’t desired.
Where do you see yourself, if at all, in my approaches to correcting others’ writing? And what role would you play in the linguistic power struggle set up by my father’s joke? Are you the guy who asks for directions, the college student who corrects him, a bystander, or perhaps a mediator of some sort? I hope these anecdotes have helped you to reflect on your own positionality and how that shapes your approach to your students’ writing, and, specifically, to its evaluation.
How will you evaluate and respond to your students’ writing?
Before you answer, tell me, does your course devote time to teaching students to write according to a particular standard? Are there specific lectures, learning materials, or learning activities that scaffold how to write in this way? No? Putting aside the issue of how you’ll assess students’ writing given the raciolinguistic considerations, we generally don’t assess students’ skills in areas that aren’t part of the course itself, and we are compelled to align our assessments to show mastery of the stated outcomes of the course (What is alignment within a Quality Matters framework?). If written expression doesn’t appear in your outcomes, should you penalize students when surface features of their writing don’t match your understanding of what is standard?
Another consideration when you assess students’ writing is your own mastery of academic and dominant language standards. Respectfully, I have observed quite a few assignments in which the very instructions exhorting students to polish their writing and produce grammatical, error-free texts themselves contain spelling and grammar errors. I have even seen a grading rubric that spelled grammar as “grammer”! So, I would invite you to think about your own writing and whether you feel comfortable determining your students’ mastery of these language standards. If you do find your approach reflects a perfect or nearly perfect achievement of standard writing, how did you come about that position, and is it legitimate to wield your knowledge of dominant language practices in the way you are planning?
Who is served by your attention to students’ writing, and who is disadvantaged?
You might very well respond that college students and professionals need to write using the dominant standard as a practical necessity, since they will be judged if they do not, and their life prospects will be impacted (in much the way you and your course may be judged if students find a pattern of typos or grammatical idiosyncrasies). This may be true, but we must acknowledge how it puts “the onus on language-minoritized students to mimic the white speaking subject.” Where would you like to focus your attention? On compelling your students to meet a standard, when achievement of that standard will not wholly shield them from discrimination, or on compelling yourself to “imagine and enact alternative, more inclusive realities” (Flores and Rosa 155, 168)?
Rather than positioning yourself as the students’ judge, you might instead be their supporter, connecting them to resources like a writing center that will help them produce more polished writing. You can promote these services in your syllabus, announcements, or, for example, directly alongside an assignment’s grading criteria:
Your final draft should show evidence of having been edited and revised for clarity and organization. Reach out to the Writing Center for an appointment if you would like their feedback on global aspects of your writing or would like coaching on specific areas of grammar and punctuation. If you are a multilingual writer, the center offers Multilingual Support.
Keep in mind that, depending on the approach of the writing center, your students may end up being coached to conform their writing to the dominant standard. If you’ve decided to forgo judging students’ writing on the basis of its surface conformity to these standards, you might make it clear through a rubric which outcome-related knowledge and skills you will instead evaluate for evidence of learning. I acknowledge this is hard work to do, hard work to let go of language standards you may have invested a great deal of time in mastering, and which feel important to your discipline. But it is possible, as I’ve seen in the approach taken by OSU’s gateway English Composition course, WR 121, in which students achieve outcomes related very specifically to writing, while the focus of evaluation is primarily on the time and labor invested in their writing process, rather than on the perfection of their final product.
Turning back towards the work I do with your course, I am challenged by the same raciolinguistic considerations, so, to conclude, I would like to remind both you and me that writing and proofing services are something I can provide – but it’s not required that you make use of them in your course development. In the same way that you probably shouldn’t assess students’ writing if it’s not a part of the stated course learning outcomes, I also shouldn’t attempt to shape the writing and language in your course without your express permission, because this is not a part of my unit’s guiding standards for course design, the Ecampus Essentials and Exemplaries. And, because more broadly, when we focus on the ideal of a standard English, we perpetuate racial hierarchies. You are entitled to your own voice, form of expression, and approaches toward writing (and you might consider how your students have this right, as well).
Thanks for reading this! I hope this has given you an opportunity to reflect critically on some of the language practices that so many of us in higher ed engage in. I look forward to hearing your reactions and coming up with an approach that meets your pedagogical goals while also being concordant with your values.
Finding alternatives
I have raised considerations in this post about how, and if at all, you should assess your students’ writing, without doing much to ideate alternatives, so I’d like to share a few resources. To learn more about how you can create an equitable environment for culturally and linguistically diverse students, read my colleague Nadia Jaramillo’s post, Dimensions for Culturally Responsive Learning Design. For a compelling take on alternatives to grading writing based on a white supremacist standard, which informs the approach of WR 121, read Asao Inoue’s book Labor-Based Grading Contracts. For a quicker read, I also recommend you review the three main approaches to grading the writing of multilingual writers – each with unique benefits and drawbacks – which might help you to clarify your current practice and to be more intentional in the future. Finally, if you, like me, are working to undo many of the lessons you’ve learned and absorbed about dominant writing practices, you might also be interested to read about a related concept – how perfectionism, seemingly a race-neutral value that drives the pursuit of excellence, is instead a feature of white supremacy.
McAlvage, Katherine, and Brittni Racek. “How do you approach (if at all) grammar corrections with your instructors?.” Received by Ecampus ID team, 18 May 2022. Slack channel exchange.
Since the first post in the series appeared a few months ago, we have received plenty of feedback from other instructors who are actively engaged in online education. Some of the stories shared by them reiterate the points we discussed, and others included tips and techniques that have worked particularly well for them. Almost all of them agreed that teaching well online remains a challenging task.
“I love the notes on proactive student support … especially the notes on checking in with those who are behind. Sometimes all they need is a little empathy!”
Vic Matta, Associate Professor, College of Business, Ohio University
“I regularly incorporate each of these in my relationships with my students, to include weekly zoom “what’s up” meetings with my students. I check in on them if they’re behind on assignments…Yes, it takes effort; but my mission is to help these students find the greatness within themselves to succeed.”
To quickly recap what we have discussed in Part 1, we touched on how to employ empathy statements in communications with students, restructure and promote the office hours, provide personal feedback for students, and periodically check in with students who are behind. You may also refer to the first article here: Improving Student Engagement and Connection in Online Learning: Part I, Proactive Support.
Continuing from the first post, Part II will revolve around six specific practices that I have found particularly helpful for online teaching and learning.
Practice 1: Adopt a variety of communication methods
I provide assignment instructions and guidance using a variety of communication methods including texts, diagrams, images, and short video clips. I have learned that instructions with screenshots and videos tend to be better in explaining complicated procedures than text alone.
Video Tutorial Example: Creating a random sample using XLSTAT
Practice 2: Create a Q&A Discussion Board
I have a separate discussion on Canvas for students to address issues with the class in general (content questions, technical issues, deadlines). Instead of emailing the instructor regarding issues other students may also have questions about, students are encouraged to use this forum so that all can benefit from the questions and answers. I usually wait for a few hours for students to answer each other’s questions first before I provide mine.
When students email me questions that are a good fit for the Q&A Discussion Board, I’d respond through email first and then recommend the students submit the questions to the discussion board so that other students can learn from the questions and answers. This discussion board also creates an inviting and engaging learning environment for the students who don’t get to meet their classmates in a face-to-face setting.
Practice 3: Estimate the amount of time taken for each assignment
I was skeptical of this at first as the time taken would vary drastically for each individual. However, student feedback indicates that estimated times helped them plan for the week and set aside an appropriate amount of time. We don’t need to worry too much about making the estimates accurate for everyone as students will automatically adjust given their own work styles. A workload calculator that I have found helpful is developed by the Center for Advancement of Teaching at Wake Forest University, called the Workload Estimator 2.0.
This practice is obvious, but difficult to do when one is teaching multiple sessions with hundreds of students. For online classes, timely replies make students feel as though they are taking an in-person class with all of the built-in support and resources. I understand that we all have different teaching priorities and schedules, however, it all comes down to figuring out how to most efficiently organize our days so that we can be available to students.
Setting aside a couple of times a day for handling emails has worked quite well for me, e.g., the first thing in the morning, after noon, and before the end of the day. I try my best to respond to students’ emails within 24 hours and check my mailbox at least once every day on the weekends.
The timely replies in discussions were super helpful. It really felt as though I took this in person with all of the built-in help and support.
Student quote
Practice 5: Synchronize assignments with Canvas calendar
I have also synced all assignments and my office hours (renamed as Ask Me Anything Hours) on Canvas so that there are office hours available around when assignments are due. This proves to be incredibly convenient and useful for both students and instructors.
Practice 6: Reorganize course content
Here are several Canvas LMS tips that have helped in organizing the course content and saved my time. I try to organize everything in modules. Under each module, all items are split into two main components: resources and to-do lists, so students know exactly what assignments they would need to complete for each module. I also adopt a fixed set of systems for titling Canvas items. Items within modules are indented to help with organization.
Weekly agenda and announcements are also hyperlinked to guide students with the course navigation. I could not emphasize enough how much I value the internal messaging in the Canvas grade book that was briefly discussed in my previous post. This feature allows instructors to message students who haven’t submitted yet or who scored less than a certain point. Definitely a slick way to send quick emails to a target group.
Recently, I have been experimenting with a range of visual cues (e.g., emojis) to categorize course content. An example is provided below.
It’s always best to keep an open mind when trying out new teaching practices and adapt them to your individual style and subject matter.
If you have any online teaching practices that you’re fond of, please feel free to contact me at Xiaohui.Chang@oregonstate.edu as I will be very excited to hear them and test them out.
According to the 2020 Brandon Hall Group Team Development Pulse Survey findings (Werder, 2021), at least half of work is currently done in teams in over seventy percent of companies. Global Human Capital Trends (2016) confirmed that this trend is continuing, with over 7000 organizations moving towards more team-based designs. However, the success of team collaboration is not a guarantee and requires diligent planning and hard work. Tannenbaum and Salas (2020) suggest that there are seven “Cs” (or drivers) of teamwork, namely: capability, cooperation, coordination, communication, cognition, coaching, and conditions.
To contextualize and apply each of these 7 “Cs”, I’ll use a recent team collaboration I participated in as an example. A team of four staff from Oregon State University Ecampus gave a virtual presentation on the role of instructional designers in research. Speaking of the first C – capacity, thanks to the selection of team members, this team had the perfect mix: the facilitator was in charge of setting up the stage and engaging the audience with an opening poll and scenario. A second team member was assigned to cover the institutional level, a third team member was assigned to cover the team level and the last team member was assigned to cover at the individual level. Capability: checked ✅!
Cooperation: During the preparation for the presentation, each of the four team members worked individually on our own parts. When we met again, we reviewed each other’s parts, felt comfortable voicing any concern or areas that could use improvement. We each revised our individual parts and met again to review. At this point, we felt we had the content nailed down. Laurie, Tianhong and Heather already know each other very well since we all work in the same instructional design team at Ecampus. Naomi opened herself up and welcomed us to give her feedback and ideas for improvement up front, which is very helpful for Laurie, Tianhong and Heather to connect with her, and built trust for working together on this project. Viola, Cooperation: checked ✅!
Coordination: During the two rounds of peer review sessions, we made many changes, based on feedback from team members. Naomi opened up with a poll of attendee roles and a scenario to illustrate why instructional designers need to be involved in research. Laurie demonstrated diligence and surveyed the entire instructional design team at Ecampus and was able to present some solid data on our team composition in terms of degree/education, and years of career in instructional design. Laurie also provided Tianhong with two prepared slides on areas to be covered as a suggestion. Tianhong conducted comprehensive research and her findings demonstrated that over 50% of instructional designers at Ecampus have participated in research activities with support from Ecampus. Heather’s storytelling of her research involvement was rich and fascinating. So she had the pleasant struggle of cutting down her content to fit within a nine minutes time frame. And we all put scripts of what we plan to say in the notes area of the google slide we were collaborating on, which help us to stay within the limited time and allow us to have discussion time with all participants. Since each of us diligently completed our individual work as planned, the whole presentation is full of data and stories. Coordination: accomplished✅!
Communication within the team of four presenters was relatively easy since we use slack as a communication tool internally and we used calendar invites and emails for scheduling purposes. Our slack messages were quite active throughout the preparation and on the day of the presentation and after the presentation with many suggestions, encouragement, and compliments! Communication: accomplished✅!
Cognition or shared understanding among the team members is vital. In my opinion, this should be the first C on the list! For our team project, Naomi hand-picked the three panelists to join her on this collaboration because she sensed that all three of us share a common understanding on the value of instructional designers being involved with educational research. This common understanding and vision is visible the entire time while we worked on this project. Cognition: checked✅!
Coaching: Does leader and/or team members demonstrate leadership behaviors? Yes, Naomi is a great leader in this project. It was a pleasure to work under her leadership since the role of each panelist is very clear, and we started the collaboration early enough so that we have plenty of time to review, revise, practice and practice again before the actual presentation. Laurie also demonstrated leadership by offering help to cohesively formatting and beautifying each of our slide decks into one presentation file. Coaching: accomplished✅!
Conditions: Does the team have favorable conditions such as resources and culture? Yes, each team member brought with them expertise in their own roles, we were also able to use existing tools such as slack and google slides, and ecampus presentation template for this collaborative presentation. Naomi could have done it all by herself. But she invited a panel of three instructional designers to collaborate with her on this presentation. Our combined effort makes our story stronger, richer and more impressive because we work as instructional designers and we have experience doing research as instructional designers. Conditions: checked✅!
On the day of the virtual presentation, Laurie and Tianhong were presenting from campus offices housed inside the campus library while Heather and Naomi were presenting from their remote offices. In the middle of the presentation, there was a 🔥fire alarm in the library which required everyone to evacuate from the library. Laurie and Tianhong moved to a nearby building and logged back online and re-joined the presentation within 10 minutes. We are so thankful that the four of us are presenting from different locations so that the fire alarm did not stop us from presenting. This is how virtual team collaboration saved our work during a fire alarm emergency. And this is how the 7 Cs led us to a great team collaboration. The next time you sit down to plan a team project or initiative, you might benefit from reflecting on these following questions:
Does the team have the right people with the right mix? (Capability)
Does each team member have constructive attitudes about their team? (Cooperation)
Does each team member demonstrate necessary teamwork behaviors? (Coordination)
Does each team member exchange information effectively with each other and outside? (Communication)
Does each team member possess a shared understanding? (Cognition)
Does leader and/or team members demonstrate leadership behaviors? (Coaching)
Does the team have favorable conditions such as resources and culture? (Conditions)
I hope I have encouraged and convinced you a tiny bit in your next decision for teamwork and have fun collaborating and doing effective teamwork!😊
References: Werder, C. (2021). How to develop a winning team. Brandon Hall Group. Retrieved from https://www.brandonhall.com/blogs/how-to-develop-a-winning-team/
Global Human Capital Trends. (2016). The new organization: Different by design. Deloitte University Press. Retrieved from https://www2.deloitte.com/content/dam/Deloitte/global/Documents/HumanCapital/gx-dup-global-human-capital-trends-2016.pdf
Tannenbaum,S.I. & Salas, E. (2020). Teams that work : the seven drivers of team effectiveness. Oxford University Press.
Relationships matter for successful collaborative work. Yet, when it comes to online/ blended/hybrid course design, development often begins with a focus on course content, assuming that the collaborative relationship between faculty and instructional designers is secondary to the design process (Tate, 2017). If we care about student success, we must turn our attention to the ways in which effective collaborative relationships among design partners contribute to the course feel — that is, the online learning environment as perceived by students. In our recent OLC presentation, we proposed an interactive strategy for developing collaborative relationships between faculty and instructional designers based on curiosity, enthusiasm, and mutual respect.
Faculty and instructional designers often find themselves at cross-purposes. The design process expects two groups of experts to bring their unique perspectives and skill sets together in course creation, without providing instruction or support for the kinds of intentional shared knowledge transmission and production necessary for collaboration (Richardson, J. C., et al., 2018). In fact, faculty buy-in to a collaborative working relationship ranks as the number one obstacle to instructional designers’ success (Intentional Futures, 2016, pp. 3, 15). Institutional frameworks must be in place that set up faculty-instructional design teams for success, so that together they in turn can set up students for success.
We suggest that fostering curiosity in each other’s disciplinary norms and approaches serves as an igniting spark for establishing effective instructional designer-faculty autonomy supports. In this way, relationships begin with trust, mutual respect for professionals’ expertise, and socioemotional growth.
ID-Instructor Cooperative Instrument
To aid in this process, we developed an ID-Instructor Cooperative Instrument for individual, flexible needs of both parties. Through a series of definitions and short prompts, users can see similarities and differences between their viewpoints on topics like student success, well-designed courses, and course feel. Feel free to use the spreadsheet linked above or this list of questions:
Course feel: Name up to 5 keywords that describe how you want the course to feel.
Student interactions: List the kinds of interactions your students will encounter in your course. Feel free to list them in order of importance, or to modify the categories.
Teacher ⟷ Student
Content ⟷ Student
Student ⟷ Student
Definitions:
How do you want students to define success in this course?
How do you define success in this course (for yourself and/or students)?
Working Together:
Name your best course — one you have designed, taught, taken, etc.
Name a course activity you are proud of, or one you would like to be proud(er) of.
Identify 3-5 keywords or phrases that describe your working style.
Anything else you would like to note?
Initial Feedback
In our OLC presentation, some session attendees were purely instructional faculty, while others worked full-time in instructional design. Many people served in joint roles, including some administrative responsibilities for facilitating course design, or had started their careers in one area and then switched roles. Despite these different backgrounds, almost everyone agreed with our assertion that lack of mutual respect between faculty and instructional designers negatively impacted their ability to create and deliver high-quality courses.
During the presentation, we enjoyed seeing the enthusiasm and excitement from participants wanting to share their own stories and experiences. Working through the instrument questions as a group for this session was engaging for both participants and for us as presenters. Participants were able to quickly and clearly pick up the instrument and begin to share their ideas right away. Feedback both during the interactive presentation and during the Q&A suggests that our instrument serves the purpose we created it for: to get faculty and IDs excited about talking with one another about teaching and course design.
Conclusion & Getting Started
We advise other faculty and ID teams to rethink their working relationships, starting with curiosity about each other’s experiences and hopes for the course and their future students. Administrators — who often need to increase faculty buy-in to course development programs, and help instructional designers meet faculty where they are in their pedagogical experience and comfort levels in online instruction and design — can play an important role in encouraging design teams to take the time to work through the kinds of questions and conversations outlined in this tool. The road to pedagogical expertise is often varied, windy, and complex, for everyone involved. When the course design process focuses on growth and learning for the faculty and ID, it leaves a positive mark on a course that reverberates for the students experiencing that online space.
We invite faculty and IDs to get curious about their counterparts. If there is not currently an intake meeting for faculty and IDs at your institution, you could share this instrument either for a one-on-one meeting, or with a dedicated pedagogy session through your Center for Teaching and Learning and discuss how it could be a starting point for a collaborative working relationship. If there is already an intake meeting that is part of the course design process, think about bringing in aspects of this instrument that might be missing from that session.
If you are an administrator, suggest that your faculty or IDs spend some time at the beginning of a project getting to know one another. You might even help spark some curiosity by including a professional introduction — what excites you about having a particular instructional designer or faculty member working on a specific course or program? What can you share about the unique experiences of your faculty or IDs that would help start that initial conversation?
We hope that this instrument will be a tool you can use as new course developments begin, whether you are working with a new collaborator or wish to get to know someone better that you have worked with previously. We would also be interested in continuing to learn about faculty and instructional designer relationships. If you have feedback, comments, or experiences you would like to share, we invite you to leave a comment on this blog post or reach out to us via email.
Lately I’ve heard from a number of faculty whose students have expressed stress or overwhelm at the workload in a course. Further, students as well as faculty have had to adjust to a new routine or pace in their lives in recent months. All of this change gives us a chance to examine the workload and pace of a course so that it is manageable for both students and instructors. To that end, I offer three simple things that faculty can do to make their workload more manageable:
Manage expectations
Post time estimates for each activity
Consider your own availability
Manage expectations
One of the most effective ways to help students understand how much they should plan to do each week in the course is to be explicit and specific about the workload, early in the course. Refer to the credit hour policy to help students understand expectations. At OSU, it is expected that students engage with course materials and activities for 3 hours per week for every credit hour. So for a 3-credit course, students should expect to work about 9 hours each week on reading, studying, assignments, discussion boards, and other activities. This information is generally listed in the syllabus, but it’s nice to highlight this in an announcement early in the course, or perhaps even in an intro video or weekly overview video. Being explicit early in the course sets expectations for everyone, builds trust, and cuts down on negative emotions from students who feel there is too much (or not enough) in a course.
Post time estimates for each activity
One complaint that students occasionally have is that there is an uneven workload from week to week. One way to address this is to post estimated times for each activity for the week. This could appear in a task list on a weekly overview page, for example. This helps in several ways. First, it helps students who struggle to manage their time effectively. If they know that the assignment takes about 2 hours to complete, they can plan for that chunk of time in their week. Moreover, perhaps there are six readings posted in one week, but each reading is only about 5-10 minutes long. Posting this helps students understand that there are a number of short readings this week. That way students don’t assume each reading takes too long and decide to skip some of them. Moreover, being explicit about time estimates helps students know that you are sticking with the credit hour policy as well, which is another way to build trust.
If you find that the tasks you’ve outlined exceed the credit hour policy, let your learning objectives for the course guide your decisions for what to keep and what to cut.
Consider your own availability
Lastly, consider your own availability. Be explicit with students about when you are available so that you can be sure to carve out time to recharge your batteries. For example, if you like to have a bit of time to relax on the weekends, you might have your weekly assignments due on Monday of the following week for each module, rather than Sunday. That way, if students have questions about an assignment that they are wrapping up over the weekend, you still have Monday morning to get back to them instead of scrambling to answer multiple emails on Sunday evening.
Connecting with our students is essential, but how do we do it? Well, I guess it depends on what you mean by connected. Zoom works to see one another on a screen, you can attend activities on campus and possibly see some of your students, or we can take a deeper look into what connected means. When I think of education, connecting could be students to each other, students to the material, the material to real life, you to the student, etc. I’ll focus on the last one here: You to the student.
Think back to a time when you were in school and you had a “favorite” teacher or professor. What was it about them that made them your favorite? Did they open up their classroom at lunch to play cards with students? Did they give you a “good luck” note for a sporting event? Maybe they came to your choir concert, attended a theater production you were in, or maybe they made themselves available in a time of need. Whatever it is, that’s what connects you. What made them your favorite is because of the connection that you formed.
Effective connection is:
Being available
Caring (and showing it)
Treating the student with respect
Being a trustworthy confidant
Showing belief in students
Acting warm and welcoming
Showing compassion
Being on the student’s side
Exuding love for teaching
Showing true interest in students
Being a great listener
Accepting every student
For me, there were lots of teachers I liked and many I’d say were “favorites” but looking back, one made that huge impression and connection. How? By giving me a cut up straw on a string. Yes, you read that correctly, a cut up straw on a string. That teacher listened to what I was saying when she asked a question about how a track meet went. If it was not so good of a meet, I’d reply “I sucked from a big straw.” When it came time for an important meet that year, I got a good luck card with a straw I couldn’t suck from. That was over 20 years ago and I still have that cut up straw. Now that’s a connection!
Connection Do’s and Don’ts.
DO
Be available
Care (for real!)
Treat students with respect
Be a trustworthy confidant
Show belief in students
Be warm and welcoming
Show compassion
Be on the student’s side
Exude love for teaching
Show true interest in students
Be a great listener
Demonstrate acceptance
DON’T
Try too hard to be liked
Gossip about students
Fail to set boundaries
Fail to set high expectations
Be unable to say no
Be sarcastic
Pamper students
Fail to follow through
Pretend to care
Run through the lists and think of a way you can make the do’s happen and ways you can keep the don’ts from happening. Was there a specific example from your examples that really stood out? Use that to help guide you in the other examples. Perhaps you remember a time where you failed to set high expectations, what happened? Reflect on why you thought you had (or know you didn’t) and what you’d like to do differently next time.
Want to know more? Read “You’ve Gotta Connect: Building Relationships That Lead to Engaged Students, Productive Classrooms, and Higher Achievement” by James Alan Sturtevant, 2014
The Ecampus multimedia team researches emerging tools, and works with our sibling team of Instructional Designers to help support instructors. So lets take a moment to peek at tools we all might be using in the coming years for communicating with teammates from a distance.
Multimedia developers primarily use a paid tier of Slack (for instant messaging), Outlook (for email), and Zoom (for meetings with live video or audio). While we play around with many other emerging tools, I believe we’re using the same basic trio as most everyone else. Just wanted to be clear that I don’t have a revolutionary new secret tool in my back pocket which you must start using today. We’re all in the same basic boat at the moment.
CDT shares files through a variety of different online services. Documents are usually shared through Box, with Google Drive as a backup. Videos usually end up on Kaltura through OSU’s MediaSpace, but works in progress start out on Frame.io to leverage some handy features for time stamped feedback. We manage our team’s projects through Asana, and store final deliverable files with a wrap-up note in a private internal database tool (that our team created and maintains). So those are handful of tools that might be mentioned when working with us. You may have already been sent a Box folder to upload files into, or a frame.io link to comment on a video.
As we all settled into home office work back in March, there was an interest in new tools for social interaction. I was particularly interested in applications that were connecting Virtual Reality users with phone and desktop users. Mozilla, the creators of the Firefox browser, are quietly building up Hubs, which strikes me as the most promising tool in this space. It’s free, easy to learn, and offers a ton of excellent functionality. Stop by the experimental space I set up for my team. It features a 3D model imported from our sketchfab account, and a video from our YouTube account.
One of the developers of Hubs recently laid out the secret plan for this tool: to build up a persistent global 3D network to rival the world wide web. Exciting stuff for all you fans of the scifi metaverse, and the freedom of early web pages.
There are other interesting tools bubbling around at the moment in the VR space. Facebook is letting anyone sign up for the beta of a shared social universe for Oculus VR users called “horizon.” Microsoft acquired AltspaceVR, which mixes VR users with desktop users and has already hosted multiple conferences during the quarantine. If you’ve invested in a VR headset, it might be worth checking out the bustling communities in VR chat or Rec Room. The makers of Second Life tried out 2 approaches to VR (Sansar and High Fidelity), but recently changed course. My team is currently trying to schedule a time to try out Sketchbox in different VR headsets. I stumbled across “Somnium Space” while writing this blog post. It’s kind of crazy how many things are being developed, but… aren’t quite ready for mass consumption just yet.
There is a cognitive load problem with all the new tools bubbling up in these cauldrons around the world and begging for attention. While Mozilla Hubs is my favorite, it does take a few minutes to go through it’s tutorial and learn what all you can do. These days that’s a lot to ask of people who just seek the simplicity of walking into a room to meaningfully interact with other humans in a natural way. More and more I’m nervous about suggesting new tools to colleagues, because I know they’re already dealing with a lot. And I see a lot of folks casually making a notable pile of work for others without seeming to notice the strain. As a designer, I enjoy walking through a new tool, and once I determine it’ll be useful for others it is hard to appreciate how exhausting it might also be for them. I think the key mistake is to require others learn a tool before they can get back to whatever task they set out to do in the first place. Hopefully we can find ways to design simpler tools, and to help people enjoy learning useful new third party tools. Wait until you’re ready to jump into the ones I’m mentioning here, and take it easy on your coworkers.
Suggestions? Want to meet up and talk about this further, perhaps inside one of the tools mentioned above? Please just leave a comment, or send us an email – we’d love to hang out with you and explore what the world is cooking up!
Flexibility is an inclusive practice. Structure is an inclusive practice. Both of these statements are true–yet, many people might wonder how to reconcile these seemingly opposite approaches in their course designs. How does one build a course that is both flexible enough to accommodate the diverse needs of their students, yet structured in a way that is clear and unambiguous? In a practical sense, what do these words really mean?
First, let’s define these terms and consider why each of these approaches are critical to student success. What do we mean by flexibility and structure and why are they both important features of course design and facilitation?
Flexibility
Flexibility is getting a lot of press right now, due to our global pandemic. We are all encouraged to be flexible and understanding of one another and to recognize that most of us, especially right now, are dealing with increased responsibilities. As a student myself, I recall how much relief it gave me to read in a note from my professor that this term is “all about flexibility” along with detail around what this means in the context of our course.
For those of us familiar with online learning, accommodating students with full-time jobs and child or eldercare responsibilities, for example, is not new. However, even for our online students, these responsibilities are compounded by school closures and other distancing measures. Everyone needs additional flexibility, understanding, and support right now. Even you, reader! Let’s be explicit and honest about this in our communications with students and each other.
In the context of our online or remotely taught courses, how do we communicate this to students? Here are a few ideas and suggestions to get you started:
Flexible policies: Saying you will be flexible is not enough. Build flexibility into your policies. For example, if students are required to do field observations for a report or lab, are the guidelines for these observations too restrictive? Might students with mobility challenges or high-risk health considerations be unable to spend extended periods of time outdoors? What alternatives can you provide to these students?
Student choice: Providing your students options will increase their autonomy and engagement. Choice is especially important now because it will allow students to make decisions based, not only on their personal and professional interests, but also based on their individual circumstances, which may have drastically changed in recent months.
Communication: Keeping the lines of communication open is essential. Frequent communication builds feelings of connection so that student needs are more likely to be articulated.
Structure
Building structure into your course means removing ambiguity and avoiding assumptions about your students. Structure does not mean being inflexible. You can be explicit and unambiguous without being rigid.
Two helpful tools for adding structure to your course are rubrics and models, or examples. Rubrics will help you to communicate with your students and will allow you to identify your expectations along with how each criterion will be evaluated. Model assignments will help students to interpret your expectations.
When you don’t have enough structure built into your course, when your expectations are ambiguous, your underrepresented students are disproportionately impacted. This level of ambiguity often results from assumptions about your students’ prior experiences. Assuming they know how to use an LMS or that they have reliable WiFi at home, for example, puts students who don’t have these resources at a disadvantage.
When you don’t have enough structure built into your course, your students will be forced to make assumptions, correctly or incorrectly, about your expectations. Some students may ask questions, but others will do their work and hope for the best. This results in a clearly unequal playing field, exacerbating existing inequalities.
Balance
Given that both flexibility and structure are needed in course design and teaching, whether online, remote, on-ground, or hybrid, how does one balance these competing elements?
Too much structure, and your students will lose agency and motivation. Too much flexibility, and your students may feel ungrounded and directionless.
Here are some tips for finding balance:
Give choice, but include clear parameters for evaluating student work.
Provide multiple lower stakes assessments and stage your course projects, so that students have multiple opportunities to get feedback, correct misconceptions, and earn course points.
Welcome student questions and concerns and share your feedback with the whole class. If one student is asking a question, many others are thinking about asking it and would benefit from the same communication.
Don’t wait for students to request alternatives: odds are high that only your most privileged students will feel comfortable asking for accommodations such as more time or additional feedback. If one student requests an accommodation, others who need similar considerations, may not be asking for them. Why not proactively offer these options to all students?
As a final thought, both structure and flexibility are essential ingredients in the recipe for exemplary teaching. When you find the perfect blend of these elements, all your learners will benefit!
References
Parker, F., Novak, J, & Bartell, T. (2017). To engage students, give them meaningful choices in the classroom. Phi Delta Kappan 99 (2), 37-41.
Sathy, V. & Hogan, K.A. (2019). Want to reach all of your students? Here’s how to make your teaching more inclusive: Advice guide. Chronicle of Higher Education. Retrieved from https://www.chronicle.com/interactives/20190719_inclusive_teaching
Do you ever get the sense that students posting in their online discussions haven’t really engaged with the reading materials for that week? One way to encourage active engagement with course readings is to have students annotate directly in the article or textbook chapter that they are assigned. While it is common to see students annotating in their paper copies of their textbooks or readings, these aren’t easily shared with their peers or instructor. Of course, students could snap a photo of their handwritten annotations and upload that as a reading assignment task, though that does require additional steps on the part of both the student and instructor, and there is no interaction with others in the course during that process. However, it is possible to have students annotate their readings completely online, directly in any article on the web or in their ebook textbook. With this process, the annotations can also be seen by others in the course, if desired, so that students can discuss the reading all together or in small groups as they are reading an article or book chapter online. The benefit to this type of annotation online includes components of active learning, increased student interaction, and accountability for students in engaging with the course materials.
Active Learning
The shift to active learning is a bit like going from watching a soccer game on TV to playing a soccer game. Likewise, reading passively and reading to learn are two different activities. One way to get students actively reading to learn is to ask them to make connections from the course materials to their own lives or society, for example, which they then make into annotations in their readings. Annotation tasks require students to take actions and articulate these connections, all without the pressure of a formal assessment. Furthermore, many students arrive at college not knowing how to annotate, so teaching basic annotation practices helps students become more active and effective learners (Wesley, 2012).
Interaction
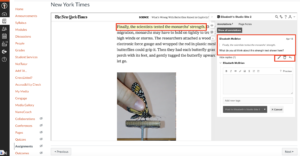
“Individuals are likely to learn more when they learn with others than when they learn alone” (Weimer, 2012). Discussion board activities are often where interaction with others in an online course takes place. However, rather than having students refer to a particular reading passage in their discussion board activity, they can simply highlight a passage and type their comments about it right there in the article, no discussion board assignment needed. Others in the course can also read participants’ annotations and reply. With some creative assignment design in Canvas, this can also be set up for small groups. Students may find this type of annotation discussion more authentic and efficient than using a discussion board tool to discuss a reading.
Above, the online news article is embedded in the Canvas assignment. Students simply go to the assignment and can begin annotating. In the image above, a student highlights a passage to show what the annotation refers to. For a collaborative activity, students can reply to any peer’s comment. Alternatively, the instructor can set the annotations to be private, for more independent tasks.
Accountability
A popular way to ensure that students have done the reading is to give them a quiz. However, this is a solitary activity and is higher-stakes than asking students to make targeted annotations throughout a reading. It may make more sense to guide them through a reading with specific annotation tasks. Being explicit about what pieces of the reading students should focus on can help them understand what they need to retain from the reading assignment.
Possible Activities
Student-student interaction: Replace a discussion board activity with a collaborative annotation activity where students can annotate the article as they read. Then they can go back later in the week and reply to each other.
Activate prior knowledge: Ask students to include one annotation related to what they already know about this topic.
Evaluate sources: Find a pop-science article in your discipline that includes weak support for arguments or claims, for example. Ask students to identify the sources of support in the arguments and challenge the validity of the support. Perhaps they could even be tasked with adding links to reliable sources of support for your discipline in their annotation comments.
Nuts and Bolts
Two popular annotation tools are Hypothesis and Perusall. I would encourage you to test these out or ask your instructional designer about your needs and whether an annotation tool would be a good fit for your course learning outcomes.