Are you looking for something to “spice up” your online course? Connect with students? Show them what your lab looks like? Take a look at what Oregon State University Ecampus is including in courses in our Course Demo.
Media elements in courses help students to visualize sometimes difficult concepts, connect with their instructors, and hear from professionals in the field. The Ecampus media team along with the talented instructors and instructional designers, work together to create custom media ranging from videos to augmented sandbox experiences. Do you have something in your class that could benefit from adding in media?
Adding elements doesn’t have to be hard. Start with something small – interesting images with alt-text, something you can do on your own, or collaborate with someone who’s done media you saw and liked and ask for their guidance and benefit from their experience.
Open Pedagogy Part 1 – What is the value of going ‘open’?
By Ashlee M. C. Foster, Instructional Design Specialist Oregon State University Ecampus
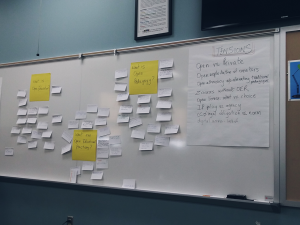
Figure 1: A list of challenges and strategies associated with designing the “right” assignments. This list is a result of a collaborative activity generated by the Critical Open Pedagogy cohort at the Digital Pedagogy Lab 2019. Photo courtesy of Ashlee Foster
Are you committed to broadening access to education and knowledge, acknowledging and mitigating barriers, fostering social justice, and designing authentic and renewable learning experiences that contribute to the greater good? Do you employ pedagogical approaches that focus on student agency, collaboration, community, and connection to the public and world at large? If so, you may be an open educator at heart!
This is a three-part blog which will introduce the potential value of open pedagogy (part 1), critically examine considerations and strategies for implementation (part 2), and explore current practitioner examples and design approaches (part 3), which I hope will help you envision open assessments for your courses.
You may be thinking those two little words encapsulate a great deal, and you would be right! I have learned that this is a complex question with various evolving answers among practitioners. Recent literature indicates that there is a shift occurring from Open Educational Resources (OER) centered pedagogy to pedagogy that is focused on the potential impact, collaboration, connection, democratization of education, and the critical inquiry of systems and technology. Both leaders in the field, Robin DeRosa and Rajiv Jhangiani define open pedagogy as, “access-oriented commitment to learner-driven education AND as a process of designing architectures and using tools for learning that enable students to shape the public knowledge commons of which they are a part.” It may help to contextualize this pedagogy by examining your perceived value of the approaches, consider what excites you most, and identify how you personally connect with the pedagogy. Let’s begin by exploring this together!
What values underpin open pedagogy?
Figure 2: A whiteboard with questions posed. The questions include “What is open pedagogy?”, “What is Open Educational Practices?”, and “What is Open Education?” Cohort members co-generated answers to these questions and posted them to the board. Photo courtesy of Ashlee Foster
I had an invaluable opportunity to attend the Digital Pedagogy Lab Critical Open Pedagogy track, facilitated by Rajiv Jhangiani. Throughout the intense week, our cohort engaged in meaningful discussions centered on what is it that makes someone an educator, open pedagogical approaches, public scholarship, educational technology, the democratization of education, and how open pedagogy can foster social justice. Rajiv asked participants to review his 5Rs for Open Pedagogy and then write a personal interpretation of the values. Specifically, he asked, “What brings you (or others) to this work?” In the spirit of openness, I have shared my initial perception of the values which continue to evolve as I learn more about the field.
Recent literature surveyed educators and asked them to describe how going open impacts their pedagogical approaches. Educators indicated that the open approaches prompted them to find innovative ways for students to obtain and share knowledge, use of new methods and platforms, diversify learning materials to include multi-perspectives, actively teach open literacies, move to a participatory model of teaching and learning from one that was top-down, and to engage in critical inquiry around entrenched knowledge structures.
Additionally, educators shared their perceived value for creating learning assessments that:
go beyond a single course (renewable),
are broadly relevant (inclusive),
allow for student choice when demonstrating learning (agency),
connect to the real world and the learner’s personal interests (relevancy),
amplify multi-perspectives from broad global voices (liberate),
empower students with the knowledge and skills to participate openly (freedom), and for educators and learners to collaborate (participate)!
What are students saying?
These are valuable insights from practicing educators, but what are students saying about open approaches in their classes? In a recent study, 173 students were asked to compare the educational value of open pedagogy to traditional approaches, to identify the types of learning outcomes associated with this approach, and if they preferred open pedagogical approaches to traditional. Out of 169 respondents, 53% of students preferred open pedagogical approaches to traditional classroom teaching practices. Students shared that the open approaches led to increased knowledge of the material, synthesis of information, consideration for the relevance of information, how to bring information together in a meaningful way for diverse audiences, application to real-world issues which they personally connect with, and they found the approaches to be more engaging. However, 20% of students preferred traditional pedagogy. This highlights that the integration of varied approaches may be optimal. I have learned that open pedagogy is not necessarily a silver bullet that can remedy all barriers and challenges associated with closed systems. Rather, it seems to be a tool that can be leveraged to foster social justice, engagement, participation, collaboration, co-construction of knowledge, the democratization of education, and to increase global access to education.
With all that said, let us circle back around to the question posed in the Critical Open Pedagogy workshop, what brings you to this work? I encourage you to reflect on this question. You may even find it helpful to write out your interpretation of the values of open pedagogy and share those with the community. If you feel comfortable to do so, please feel free to share in the comments of this blog. Do you find yourself inspired by this pedagogical approach? If so, I invite you to revisit this blog for Open Pedagogy Part 2 – Critical Considerations for Implementation and explore the resources below.
Is there such a thing as a “typical” college student? The evidence suggests that no, there is no such a thing as a typical college student. According to the National Center for Education Statistics, 2015 Report, 74% of all undergraduates are “nontraditional” students. This means that they have at least one or more of the following characteristics: having one or more dependents, working full time, attending school part time, taking a gap between high school and college, and completing a GED instead of a high school diploma. It is simultaneously exciting and challenging that higher education has become more accessible to an increasingly diverse student body. The challenge for instructional designers and faculty, therefore, is to keep up with how to design courses that welcome and support all students.
Do we design for the majority or for the “extremes”?
If we design courses for the most common student situations, we end up serving students who already have advantages, who can already see, hear, and pay tuition with ease. When we design for the extreme situations, however, we support students who may have uncommon or specific strengths, as well as potential barriers such as disabilities or financial strain. Furthermore, when we design for the extremes, the outcome benefits all students, thus aligning our course with the principles of Universal Design for Learning (UDL). The quintessential example of this is, of course, closed captioning: Closed captioning was designed to help people with hearing loss, but it was quickly discovered to be useful for all kinds of people for various reasons, including English language learners, for example. This same schema of the benefits of closed captioning can be applied to other solutions where we design for extreme situations. The result of designing for extremes is that the experiences for all users are enhanced.
Personas: What are they, and how are they used?
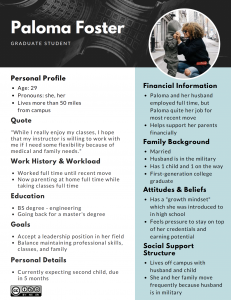
One approach to designing inclusive courses is to use personas in the course design stage. A persona is fictional representation of a user group and is intended to foster empathy for that particular user group whose needs resemble the fictional persona. A persona may include a photo of a fictional individual (provided by Unsplash, for example) as well as information related to the design challenge. In this case, my colleague Heather Garcia and I have developed a set of personas for use in designing online undergraduate and graduate courses. The student data that we included in each persona are based on quantitative and qualitative national and local demographic information. The personas that we created focus on students who may bring unique strengths to the course or find more barriers in their educational journey compared to “traditional” college students. With these diverse personas, we grow our empathy and can be efficiently guided into designing for nontraditional students who are based in reality.
Okay, I have a set of personas. What next?
This persona is from “Personas for Course Design” CC BY NC SA, linked below, created by Elisabeth McBrien and Heather Garcia
Here is an exercise using personas for the purpose of designing inclusive courses:
Get to know your “students” represented in the personas.
With your course in mind, ask yourself the following questions:
What strengths do these personas bring to the course?
What barriers do you anticipate these personas will face?
What design decisions would you make to support all personas as they work to meet the learning outcomes?
The answers to the above questions can help you make design decisions that create an inclusive course, one in which all students are welcomed and supported.
How did it go?
One way to include this exercise in your design practice is to keep a deck of printed personas, like a deck of cards, nearby as part of your design toolbox. That way, instructional designers and instructional faculty can then do a personas design challenge during the design stage of each course.
Have you used personas in your course design? Please leave a comment and let us know how it went!
As described in an earlier post, Use a Mix Map for Blended Learning, the blended learning mix map is a widely used tool to visualize and design hybrid (or “blended”) courses that integrate scheduled face-to-face meetings with online elements. The two overlapping circles in this planning template provide space to list online learning activities, face-to-face learning activities and possibly activities that occur in both learning environments.
Where Does Learning Actually Occur?
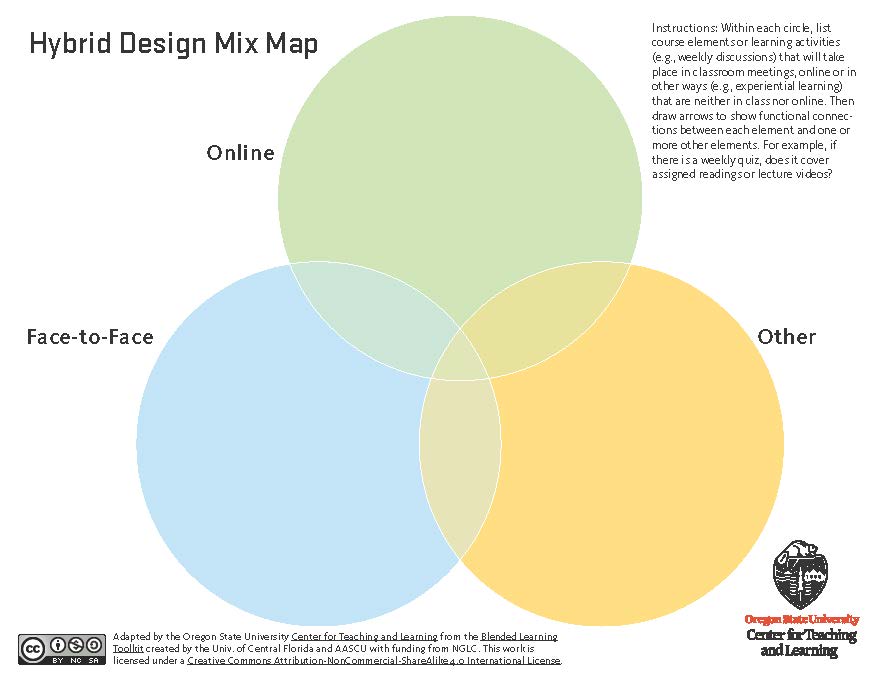
Oregon State University faculty have found utility in drafting mix maps while in the early phases of hybrid course development. Many of those faculty suggested that the traditional two-circle mix map needed one improvement, namely a third circle! In response, the Center for Teaching and Learning and Ecampus created the Three-Disc Hybrid Design Mix Map.
Does your blended course have learning activities that extend beyond the online and classroom environments (for example, service-learning, field or clinical experiences)? If so, this three-disc mix map is an ideal course planning tool. The “Other” circle is the place to list learning activities that principally take place somewhere other than the classroom and the online course site.
Sketch a Three-Disc Mix Map in Three Steps
You could create one mix map for your entire course, but many instructors prefer to focus on a single representative week of the course. There are three steps to sketching out your blended course vision on the three-disc mix map:
1 – List each learning activity in the appropriate circle. Consider these activities from the student perspective. For instance, collaborating on a group poster project, taking a quiz or making a presentation. Be sure to include “other” learning that occurs beyond the online and in-class environments. Consider the balance between learning activities in the three circles.
As to which learning activities fit where, that’s a topic to carefully consider and to converse about with your teaching colleagues as well as an instructional designer. For instance, think about the positioning of weekly discussions in your course. In terms of student learning outcomes, do discussions work best for you and your students in the classroom, online or possibly in both places? Can discussions be structured to bridge the gap between learning environments? Remember to consider how the timing of discussions will be woven into the broader, ongoing flow of blended learning in your course. And remember that classroom meeting time is finite and measured to the nearest minute in a hybrid course, so be judicious in using that time strategically!
2 – Use arrows to draw functional connections between the learning activities. For example, a weekly quiz is based on narrated online lectures, or an in-class discussion applies information from online readings. Aim to link every activity to at least one other activity. Be especially attentive to linkages between the online and face-to-face activities.
3 – List the average amount of time per week that you expect students will spend on each learning activity. For instance, two hours of reading or 90 minutes of problem solving. Check to see if the weekly total make sense in light of the Oregon State University credit hour policy, which states, “One credit is generally given for three hours per week of work in and out of class.”
Speaking of time expectations, 15 minutes is a reasonable amount of time for you to create a first draft of a mix map.
Mixing and Remixing
I recommend that you periodically revisit—and possibly redraw—your mix map, perhaps a week later, then a month later, to see how your blended course vision has evolved. A mix map is a malleable vision of a blended course at a given moment in the course design and development process; it’s not an end point. As the design and development process moves forward, remixing the map comes naturally.
In working with mix maps and more broadly with blended course design and teaching, focus on deeply interweaving the various course elements. Hybrid courses can truly be “the best of both worlds” of online and on-the-ground teaching and learning, by building on the strengths of each of these educational modalities, but only with intentional design that explicitly, and seamlessly, meshes the online, in-class and “other” elements of the course!
The other day, my six-year-old asked me what the word “industrious” means, and I was overcome with pride and, moments later, mild panic as I tried to answer his question and couldn’t clearly articulate the meaning of the word.
This experience ended well (thanks, Alexa), but prompted me to think about how often we use words without fully understanding what they mean. We don’t question the meaning of these words when they are used in our work or daily interactions. We may use these words ourselves on occasion–or with regularity–but when we stop and try to define these words, the proper associations and descriptions don’t come immediately to mind.
In my work as an instructional designer, it’s common to talk about universal design or inclusive design, and in many cases, to use these descriptors interchangeably, when talking about design that is usable by a wide range of people. To a lesser extent, accessibility is used in a similar way, but, I think, our shared understanding of this term is more reliable.
For this blog post, I would like to spend some time defining and distinguishing these terms and grounding them in a historical context to more fully convey the nuances and layers of meaning ascribed to each term. I’ll wrap up with some strategies for designing courses to better meet the needs of all learners.
Accessibility
According to the Web Accessibility Initiative (WAI), “Web accessibility means that websites, tools, and technologies are designed and developed so that people with disabilities can use them.” It’s clear from this definition that accessibility is intended to address the needs of users with disabilities, so let’s consider disability.
Prior to 2001, the World Health Organization (WHO) defined disability as a personal health condition. This definition placed emphasis on the individual. However, in 2001, the WHO redefined disability as a mismatched interaction between a person and their environment. This new definition places emphasis on the environment, rather than the individual. As a result, the onus is no longer only on the disabled individual to manage their health condition; rather, those who have influence over the environment need to make changes to the environment to better accommodate everyone who is interacting with it. In our case, the learning environment is the web, or more specifically, online courses.
Unlike the other two design approaches we’ll consider, accessibility is intended to address the needs of users with disabilities. Another distinguishing feature of accessibility is that it describes an end goal. Our web content should be presented in such a way that the end result is an accessible website or technology. While this post will not go into the how of making web content accessible, here are some elements you may be familiar with: alternative text (alt tags), headings (H1, H2, H3, etc.), color contrast, captions and/or transcripts, reading order, keyboard navigation, and descriptive URLs are all examples of accessibility elements. All of these elements define what our design should look like, not how to get there.
Another distinguishing feature is that accessibility is required by law. We won’t delve into the specifics here, but it’s important to recognize that accessibility is a legal compliance issue.
Universal Design for Learning (UDL)
While accessibility addresses specific features of a website or online learning environment, Universal Design for Learning (UDL) takes a broader approach. UDL guidelines still emphasize accessibility, but the emphasis is not solely on making disability accommodations or complying with the law. The goal of UDL is to provide the greatest degree of access and usability for the widest range of individuals.
UDL includes a framework with three general principles, each of which includes multiple guidelines and checkpoints for actual practice. A UDL approach is structured and practical and, similar to accessibility, UDL defines an end goal: a product that is usable by the widest range of individuals possible. The framework, however, emphasizes the design, which is only one aspect of creating an online course.
To broaden our understanding of UDL, it’s important to understand that UDL emerged from universal design, which is an architectural concept. Architecture, unlike the web, is physically fixed, and as such, the emphasis is on a single design that works for everyone.
Inclusive Design
While UDL emerged from architecture, inclusive design was “born out of digital environments,” and, while architecture is fixed, the web is flexible and ever-changing. As such, inclusive design emphasizes flexibility and process. Inclusive design is iterative. With an emphasis on iteration and process, inclusive design cannot be separated from the lived experience of actual users. In other words, if the users (in our case, students) are contributing to and evaluating the design, then we can no longer separate the design and delivery–the creation and facilitation activities.
With a focus on process, inclusive design emphasizes co-creation and frequent feedback from multiple developers as well as end users. In particular, seeking contributions from excluded communities during the entire design and evaluation process is critical to an inclusive process.
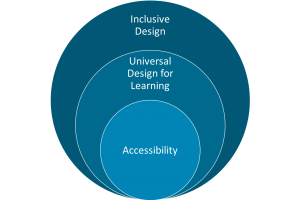
Unlike accessibility and UDL, inclusive design is focused on process and iteration. To help illustrate how we see these three design approaches working together, my colleague, Elisabeth McBrien and I created the figure below (figure 1).
Figure 1. An inclusive design process will always include UDL and accessibility as end goals.
We see accessibility compliance as core to any design. UDL goes beyond the requirements of accessibility to meet the needs of all users. In an inclusive design process, UDL and accessibility are always the end goal, but inclusive design emphasizes the importance of feedback and iteration. We can always improve and we always have more work to do.
In Practice
Now that we have a better understanding how accessibility, UDL, and inclusive design work together to contribute to a learning environment that meets the needs of all learners, how do we apply them and improve? Ecampus has many guidelines and templates that help us to meet the goals of accessibility and UDL, but how can we be more inclusive throughout this process?
Here are some inclusive approaches that you might consider integrating into your course facilitation and teaching:
Build rapport with students. This is accomplished by infusing instructor presence whenever possible. Respond to Q&A questions and emails within 24-48 hours. Share resources. Deliver feedback promptly. An important element of rapport and presence is showing your personality, so consider using video to welcome students and to encourage them throughout the course.
Solicit feedback. One of the easiest ways to solicit feedback from your students is to use a survey. Keep surveys short and consider asking students to share in a few words how the course is going or what they find most challenging.
Establish clear criteria and structure. Rubrics, templates, examples, and consistent naming and organization of course materials are just a few ways to provide clarity and structure.
Acknowledge student contributions. Praise is an instant confidence booster. Do you have a student–particularly, an underrepresented student–who did an exceptional job on one of your assignments? Let them know. Consider sharing their work as an example–with their permission, of course.
Feature counter-stereotypical examples of people in your field. One common barrier to success for underrepresented students is that they don’t see themselves reflected in a particular discipline. Make sure your readings, examples, and other course materials represent a variety of identities. If there’s a lack of diversity in your field, find a way to acknowledge this to your students.
Promote student agency and autonomy by giving them choice, whenever possible. Providing choice and promoting agency allow students to connect your course to their own experiences and values.
Emphasize real world applications of course work. Often, we assume that our students understand the purpose of course activities, but this is not always the case. Sharing real world applications will help students to see the value and greater purpose of their studies.
Final Thoughts
We’ve covered a lot in this post, and I hope that we’ve come away with a better understanding of disability, accessibility, Universal Design for Learning (UDL), and inclusive design. One of the most important takeaways is that inclusive design is an ongoing process of feedback and iteration. As our student body changes, so do their needs. In an upcoming blog post, Elisabeth McBrien will share more details about student needs and how you might use student personas to design more inclusively.
As we continue the challenging–yet meaningful–work of creating welcoming online learning environments, it’s important that we have a shared understanding of what that work entails, what work we have done, and what work we have yet to do.
About halfway through earning a master’s in education, I took a summer session class on digital storytelling. It ran over the course of three half-day sessions during which we were required to complete two digital stories. I had no great academic ambitions in my approach to these assignments. I was trying to satisfy a degree requirement in a way that worked with my schedule as a single mother of two teenagers working full time while earning a graduate degree.
My first story was a self-introduction. I loved this assignment. Even though I had one evening to complete it, I spent hours tweaking it. I enjoyed learning the tools. I enjoyed sharing my story with my classmates. Even after it was graded, I kept finding ways to improve it.
After completing the course, I began to study the use of digital stories in education. My personal experience had shown me that in completing my assignment I had to become comfortable with technology as well as practiced my writing, speaking and presentation skills. I also felt a stronger connection to my classmates after sharing my video and watching their videos.
Literature
The research on digital storytelling echoes my own experience. Dr. Bernard Robin, an Associate Professor of Learning, Design, & Technology at the University of Houston, discussed the pedagogical benefits of digital storytelling assignments in a 2016 article,The Power of Digital Storytelling to Support Teaching and Learning. His research found that both student engagement and creativity increased in higher education courses when students were given the opportunity to use multimedia tools to communicate their ideas. Students “develop enhanced communication skills by learning to organize their ideas, ask questions, express opinions, and construct narratives” (Robin, 2016). Bernard’s experience also finds that by sharing their work with peers, students learn to give and accept critique, fostering social learning and emotional intelligence.
Digital Storytelling as Educators
Digital Storytelling in online education shouldn’t be thought of as only a means of creating an engaging student assignment. Educators who are adept at telling stories have a tremendous advantage in capturing their student’s attention. In the following short video, Sir Ian McKellen shares why stories have so much power. Illustrated in the form of a story, he shares that stories are powerful for four reasons. They are a vessel for information, create an emotional connection, display cultural identity, and gives us happiness.
McKellen is a compelling narrator with a great voice. This story is beautifully illustrated. It reminds me of how I want my learners to feel when they are consuming the content I create. Even if for a moment, so engrossed, that they forget that they are learning. Learning becomes effortless. As he points out, a good storyteller can make the listener feel as if they are also living the story.
Digital Storytelling Assignments
There are lots of ways to integrate digital stories across a broad set of academic subjects. Creating personal narratives, historical documentaries, informational and instructional videos or a combination of these styles all have educational benefits. One of the simplest ways to introduce this form of assessment to your course is to start with a single image digital story assignment.
Here’s an example I created using a trial version of one of many digital story making tools available online:
Digital Story Making Process
The process of creating a digital story lends itself well for staged student projects. Here’s an example of some story making stages:
Select a topic
Conduct research
Find resources and content
Create a storyboard
Script the video
Narrate the video
Edit the final project
I created an animated digital story to illustrate the process of creating a digital story using another freely available tool online.
Recommended Resources & Tools
You will find hundreds of tools available for recording media with a simple search. Any recommended tool should be considered for privacy policies, accessibility and cost to students.
Adobe offers a free online video editor which provides easy ways to add text, embed videos, add background music and narration. The resulting videos can be easily shared online via a link or by downloading and reposting somewhere else. While the tool doesn’t offer tremendous flexibility in design, the user interface is very friendly.
Audacity is a free, open-source cross-platform software for recording and editing audio. It has a steeper learning curve than some of the other tools used for multimedia content creation. It will allow you to export your audio file in a format that you can easily add to a digital story.
Padlet allows you to create collaborative web pages. It supports lots of content types. It is a great place to have students submit their video stories. You have a lot of control during setup. You can keep a board private, you can enable comments, and you can choose to moderate content prior to posting. Padlet allows for embedding in other sites – and the free version at the time of writing allows users to create three padlets the site will retain.
Storyboarding Tools
A note first about storyboarding. Storyboarding is an essential step in creating a digital story. It is a visual blueprint of how a video will look and feel. It is time to think about mood, flow and gather feedback.
Students and teachers alike benefit from visualizing how they want a final project to look. It doesn’t have to be fancy. It is much easier to think about how you want a shot to look at this stage than while you are shooting and producing your video. A storyboard is also a good step in a staged, longer-term project in a course to gauge if students are on the right track.
This is a storyboard creation tool. The free account allows for three and six frame stories. In each frame, you can choose from a wide selection of scenes, characters, and props. Each element allows you to customize color, position, and size. Here’s a sample I created:
Start with Matthew Dicks. Dicks is the author of Storyworthy: Engage, Teach, Persuade and Change Your Life through the Power of Storytelling. He is a teacher. He is a five-time winner of the Moth GrandSlam championship.
His book is wonderful, but to just get a taste, start with the podcast he cohosts with his wife. Each week they include a well-vetted and rehearsed story told during a competition. They then highlight the strengths and areas for improvement. You will walk away with ideas and the motivation to become a better storyteller. Here’s the first episode, and one of my favorites.
Conclusion
When pressed for time to develop course content, we tend to over-rely on text-based assignments such as essays and written discussion posts. Students, when working on Digital Storytelling assignments, get the opportunity to experiment, think creatively and practice communication and presentation skills.
For educators, moving away from presenting learning materials in narrated bulleted slides is likely to make classes more engaging and exciting for their students leading to better learning outcomes. Teachers work every day to connect with students and capture their attention. A good story can inspire your students and help them engage with the content.
I was uncomfortable when I received my first digital storytelling assignment. I didn’t really know how to use the tools, wasn’t confident I knew how or what to capture. I was sure it would feel awkward to narrate a video. But These assignments turned out to be engaging, meaningful, and the process is pretty straight forward. Introduce digital storytelling into your courses, even by starting small, and you are sure to feel the same way.
The use of PowerPoint and other similar presentation software, as a visual foundation for recorded narrated lectures for use in online courses is pretty common. These slide-based presentations typically present a series of individual slides that contain titles, visuals, and descriptive text or lists of bullet points with an accompanying voice-over recording. Using this approach to online content presentation seems familiar as it is a technology enabled extension of the traditional slide-based presentations instructors have used in a live classroom lecture. But narrated lecture for online presentation has some structural differences.
Whether transitioning a classroom lecture, or creating a new narrated lecture for online use, instructors at Ecampus are also encouraged to rethink their slide-based presentations. The recommendation is to create highly focused content and keep the duration of an individual narrated lecture presentation to about 10 minutes. This means a typical 50 minute classroom lecture may transition to several online narrated slide presentations as it is distilled down to 2-3 highly focused segments.
Including voice-over with a slide-based presentation builds instructor presence in an online course. Narrated lectures also incorporate best practices in accessibility, copyright, and visual formatting. In essence, this process takes a PowerPoint presentation, incorporates best practice elements, and adds narration. This new instructor narrated presentation becomes a multimedia learning element for their course that is delivered in video format.
Multimedia Learning Theory Redux
On the surface, all the previous work in creating a narrated lecture seems sufficient. However if we incorporate research on multimedia learning we may choose to do more with this staple of the online course; the narrated lecture.
In my previous article on the value of images in online learning I explained how online presentations that combine text, images, and titles are considered multimedia-based learning objects. Using written words with images on a PowerPoint slide with voiceover is also a form of multimedia learning. Given this it may be useful to revisit theory related to multimedia learning to see how it related to narrated lecture design. The model below illustrates how the Cognitive Theory of Multimedia Learning (Clark & Mayer , 2016) informs our understanding of multimedia-based learning.
Figure 1. Model of the Cognitive Theory of Multimedia Learning
The model indicates that people (i.e., learners) have two channels of cognitive processing: 1) for processing visual/pictorial material and 2) one for auditory/verbal material. Additionally, humans can only process a few bits, or pieces, of information in each channel at the same time. Learner engagement with pictorial and verbal information is linked to an individual’s ability to parse information from the multimedia and ultimately integrate it with prior knowledge…creating new learning. That parsing is linked to two things:
How we structure and deliver information during the design of multimedia and
The learner’s ability to engage the information in a way that compliments learning.
Let’s stop here for a moment.
Now think about what you just did in reading the text above and looking at the illustration provided. In this instance you called upon a single information channel, the visual channel of cognitive processing, to interpret the meaning of the text description of the visual model. Was that an easy process for you?
How hard would it be for students to process similar information acquisition through one channel….vision only? With the cognitive theory of multimedia learning in mind ask yourself this…How would adding audio narration impact cognitive processing? How would that impact learning? Let’s explore these ideas in the context of narrated lecture design.
Five Guiding Multimedia Principles
In an article titled Information Design with Teaching and Learning in Mind, Rune Petterson and Maria Avgerinou (2016) identify 12 important principles teachers should take into account when designing multimedia-based learning experiences. I have organized these multimedia-based learning principles into three sections in the table below. As you read through these 12 principles it becomes clear that not all of these apply to narrated lecture design.
Figure 2. Twelve Principles of Multimedia – Based Learning Design
Principles 1-4 address more general, or global, understandings about multimedia design and learning. Principles 5-7 address design factors directly related to combining text and images without narration in multimedia-base learning. The last five principles (i.e., 8-12) address how the spoken word is best integrated into multimedia design to be consistent with the cognitive theory of multimedia learning. Although all the principles are important to multimedia design for learning, the last five guiding multimedia principles are the most salient for narrated lecture design.
From Theory To Practice
Remember, the goal for instructors is to develop narrated lectures that enhance the multimedia-based learning experience. It is not simply to create a replication of the in-class lecture. Let’s look at the five guiding multimedia principles and how the ideas in the principles might shape how you can prepare your narrated lectures as online multimedia learning elements.
Temporal Contiguity Principle
This principle suggests that the most effective designs using narration and graphics place those two elements in temporal proximity. They are seen and heard at the same time. Seems obvious. But you must think through this principle and plan the sequencing and duration ofslides and narration accordingly. You must know what you want to say and when to say it in the context of the visual elements you have on your slides.
Modality Principle
This principle affirms that presenting words as audio narration is more impactful than written text in describing graphics on a slide. They are particularly impactful when paired with animations.
In essence this principle helps guide design that takes advantage of both channels of information processing. This also helps manage cognitive load by freeing learners from trying to interpret written text and images via the visual channel only. If you absolutely have to use text with graphics on your PowerPoint slides keep text in short phrase form to avoid extensive reading and any potential cognitive overload.
Redundancy Principle
This principle proposes addresses presenting narration and written text that says the same thing combined with images. The redundancy principles guides designers to select either narration or written text with the image on a slide for the best learning experience. Choose one method of delivering the word-based description of the image. Don’t use both.
Once again this principle is about managing, through design, the cognitive load of the media element. There are some complex scenarios where text only is a best option…see the Control of Processing definition.
Coherence Principle
This principle simply states that adding interesting, but non-essential, visual or word content can hurt learning. Narrated lecture design should avoid placing funny phrases, decorative images, excess lines, colors and sound effects and music that does not directly relate to the learning at hand of any particular slide.
Instructors should know what they want to say and design to maintain keep cognitive focus on that learning. We sometimes think these extra element keep attention but actually the opposite is true…they clutter and create distracting cognitive load.
Sometimes this principle is not fulfilled through good intentions. It often occurs when instructors wish to have multiple images of something on the same slide. Then they talk about each image individually in narration. It is much better design to put those extra images on a new slide and talk about it when it is the focus of the learning. This avoids visual overload and helps keep the pace of your presentation moving.
Personalization Principle
Creating a social conversation with learners softens the experience of learning via devices. It also helps build instructor presence in a lesson and the course. One of the best ways of achieving this via narration is to use a conversational tone.
Conversational tone in everyday life comes from an interaction that is authentic and casual. That is difficult to achieve in narration. Professional actors train to do this. Faculty at Ecampus are often provided with narration tips to help in this regard. Narrators are encouraged to have notes that guide their presentation but not encouraged to read a script verbatim. Not surprisingly, reading a narration is easily detected by the listener’s ear. You can personalize your narrated lectures by knowing what you want to say, practice it so you know when to say it, then just be yourself and let your personality come through.
Applying the personalization principle in design means thinking through and planning your conversation with the remote audience. Then practicing the delivery so it feels conversational. Learners will benefit from this narration design strategy.
Final Thoughts
Earlier in this article we posited that new learning is predicated upon the structure and delivery method of information to learners as well as the learner being able to engage with the provided information in a way that supports learning. In a very simple way we are saying that good design for learning presents content clearly and does not create barriers to information engagement by leaners.
Instructors are correct that it is good to focus initial narrated lecture design on the slide presentation preparation that reflect best practices in accessibility, visual formatting, copyright, and more. It is also valuable to think through the narrated lecture design in terms of cognitive load, potential barriers to learning, and how to positively impact the learner’s information processing.
The five guiding principles for narrated lectures help instructors identify ways in which they can design and intentionally use audio narration with text and images that compliments an understanding of cognitive learning theory. In doing so they create online narrated lectures that are more effective as multimedia-based learning experiences.
References
Clark, R. C., & Mayer, R. E. (2016). E-learning and the science of instruction : Proven guidelines for consumers and designers of multimedia learning. Retrieved from http://ebookcentral.proquest.com
Rune Pettersson & Maria D. Avgerinou (2016) Information design with teaching and learning in mind, Journal of Visual Literacy, 35:4, 253-267, DOI: 10.1080/1051144X.2016.1278341
As online educators, we strive for a balance of learning activities that incorporate three types of engagement: learner-to-content, learner-to-instructor, and learner-to-learner. The learner-to-learner component is often filled through discussion boards or group projects, but an underutilized and undervalued option is peer review.
Empower students to take responsibility for and manage their own learning.
Enable students to learn to assess and give others constructive feedback to develop lifelong assessment skills.
Enhance students’ learning through knowledge diffusion and exchange of ideas.
Motivate students to engage with course material more deeply.
More broadly, the authors of The Knowledge Illusion argue that our individual capacity for knowledge is often much more limited than we realize and that our true depth of knowledge is held collectively. They remind us that, “when you put it all together, human thought is incredibly impressive. But it is a product of a community, not of any individual alone” (page 5). In our increasingly complex world, some evidence of a shift towards building knowledge collectively can be seen in research. For example, in the MEDLINE database, “the average number of authors per article has nearly quadrupled from about 1.5 in 1950 to 5.5 in 2014” (page 226). This is just one of many examples the authors use to illustrate how essential collaboration and relationship skills have become. In nearly every field, students need to be prepared to be more than individual achievers, but rather to contribute effectively to a group. Peer review provides students an opportunity to give and receive feedback with the goal of creating a better end product, but it is also an opportunity for students to practice and build their teamwork skills.
Moreover, International Society for Technology in Education (ISTE) Standard 3b emphasizes the need for students to, “evaluate the accuracy, perspective, credibility and relevance of information, media, data or other resources.” Peer review is a great way for us to meet this standard and to combat against misinformation, by teaching students to evaluate and challenge claims. In Weaponized Lies: How to Think Critically in the Post-Truth Era author Daniel J. Levitin shares strategies for how we can think more critically and evaluate the trustworthiness of what we are being told. He notes that, “sometimes the people giving you the facts are hoping you’ll draw the wrong conclusion; sometimes they don’t know the difference themselves” (page xx). If your students are in either of these groups, it benefits them to have an attentive reader review their work and provide respectful suggestions for improvement prior to a final assignment submission. This may help you as the instructor to avoid catching errors too late in the process when students cannot revise their work.
The Explanation
However, students may not see the value of peer review on their own. The Teaching Center at Washington University in St. Louis describes many reasons students may express uncertainty around peer review as, “Many students do not perceive feedback from peers as relevant to the process… students are likely to assume that it is only the instructor’s feedback that ‘counts.’” Therefore, it is important that we explain to students why we are asking them to engage in peer review explicitly.
It can be helpful to explain specifically how this will relate to industry or field of study requirements as a student advances as a professional and scholar – it looks different for a researcher than it does for a project manager, so motivate students by sharing with them how they will engage in similar activities in the future as this gives them an opportunity to practice what Starting Point: Teaching Entry Level Geoscience describes as, “key skills such as abstracting, developing arguments, describing, assessing, criticizing, analyzing, and reviewing.” As Faculty Focus advises, we can’t assume that students will implicitly understand the purpose of peer review. When we craft a peer review assignment, we need to think carefully about how we will articulate the benefits of the process to students. It can be helpful to answer questions like, “Why am I having students do this?” and “Why should students be excited about this process?” Or, to take it a step further, we can anticipate the questions from our students’ perspective and proactively address the purpose and logistics in the assignment description, by answering questions like, “Why am I doing peer review?” and “How am I supposed to review my peer’s work?” Make sure the technology needed and processes are clear and that resources are provided for students that need more guidance.
The Process
Remember, knowing why students are peer reviewing and being able to peer review are two totally different skills. If you are an Ecampus instructor, talk with your instructional designer about strategies that can help your peer review process be more successful. Some of the best practices suggested by Center for Instructional Technology & Training at the University of Florida include:
Clarify expectations in advance
Check your students have all the tools they will need
Provide enough time in the peer review process so that students can meaningfully engage – this may span more than one module
Model the type of feedback you want your students to use
Create a quality rubric as a guide
Your instructional designer can also talk to you about digital tools or strategies that can be used to introduce students to peer review. For example, you can discuss whether it makes more sense to use Canvas Peer Review or another tool, like Peerceptiv, which is research-validated peer assessment technology available for Ecampus courses.
Remember, students need opportunities to practice peer review, as they may never have done it before. That means they have to get familiar with both the tools and the process. It’s best if they can practice with the technology on a low stakes assignment before using it for a high stakes assignment, so that they can familiarize themselves with a peer review process without the added anxiety of a major grade on the line. It will also take time for you as the instructor to get familiar with the process, but it is a completely worthwhile investment!
I invite you to consider some concluding thoughts from Levitin, “Information gathering and research that used to take anywhere from hours to weeks now takes just seconds… The implicit bargain that we all need to make explicit is that we will use just some of that time we saved in information acquisition to perform proper information verification” (page 253). Let’s reinvest some of the time our students saved researching to engage them in verifying claims, evaluating evidence, offering commentary, and incorporating feedback – all of which support the development of a stronger student work and the building of a collective knowledge.
Every college student registers for classes, hoping for academic success. However, college study can be challenging, even for those students who often get As and Bs in elementary and secondary schools (Macalester University, n.d.). Research tells us that lack of time management skills, life challenges that are out of students’ control, content challenges, and not knowing how to learn are among top factors contributing to academic failure in college. (Fetzner, 2013; Texas A&M Today, 2017, Perez, 2019) In this blog, we will examine the importance of teaching college students time management skills, and how we should teach them those skills.
Why should we teach college students time management skills?
Fetzner (2013) reported top 10 ranked reasons students drop courses in college, after surveying over 400 students who dropped at least one online course:
19.7% – I got behind and it was too hard to catch up.
14.2% – I had personal problems (health, job, child care).
13.7% – I couldn’t handle combined study plus work or family responsibilities.
7.3% – I didn’t like the online format.
7.3% – I didn’t like the instructor’s teaching style.
6.8% – I experienced too many technical difficulties.
6.2% – The course was taking too much time.
5.0% – I lacked motivation.
4.3% – I signed up for too many courses and had to cut down on my course load.
3.0% – The course was too difficult.
Student services staff at Oregon State University Ecampus also confirm, based on their daily interactions with online students, that many college students lack time management skills (Perez, 2019). Now that we have realized that many college students lack sufficient time management skills, do we leave it for students to struggle and learn it on their own? Or is there anything we can do to help students develop time management skills so they thrive throughout their college courses? And who can help?
Who can help?
Many higher education professionals, including instructors, instructional designers, advisors, student success coaches, and administrators can help students develop time management skills. For example, at New Student Orientation, there could be a module on time management. Perez (2019) raised a good point that usually New Student Orientation already has too much information to cover, there will be very little room for thorough/sufficient time management training, even though we know it is an area that many of our students need improvement. Advisors can help students with time management skills. Unfortunately, with the current advisor/college students ratio and 15 minutes per student consultation time, that is very unlikely to happen either. Last but not least, instructors can help students with time management skills in every course they teach. If instructors are busy, instructional designers can help with templates or pre-made assignments to give students opportunity to practice time management skills.
How can instructors teach students time management skills?
How could instructors and instructional designers help students from falling behind? A couple crucial solutions are teaching students time management skills and giving students opportunities to plan time for readings, quizzes, writing original discussion posts, responding in discussion forums, working on assignments, homework problems, papers, and projects. Regarding self-hep materials for time-management skill, there are abundant resources on how students could improve time-management skills on their own. Apps and computer programs can help us manage time better. Sabrina Collier (2018) recommended over ten time management apps, including myHomework Student Planner, Trello, Evernote, Pomodoro apps, StayFocused, Remember the Milk, and more.
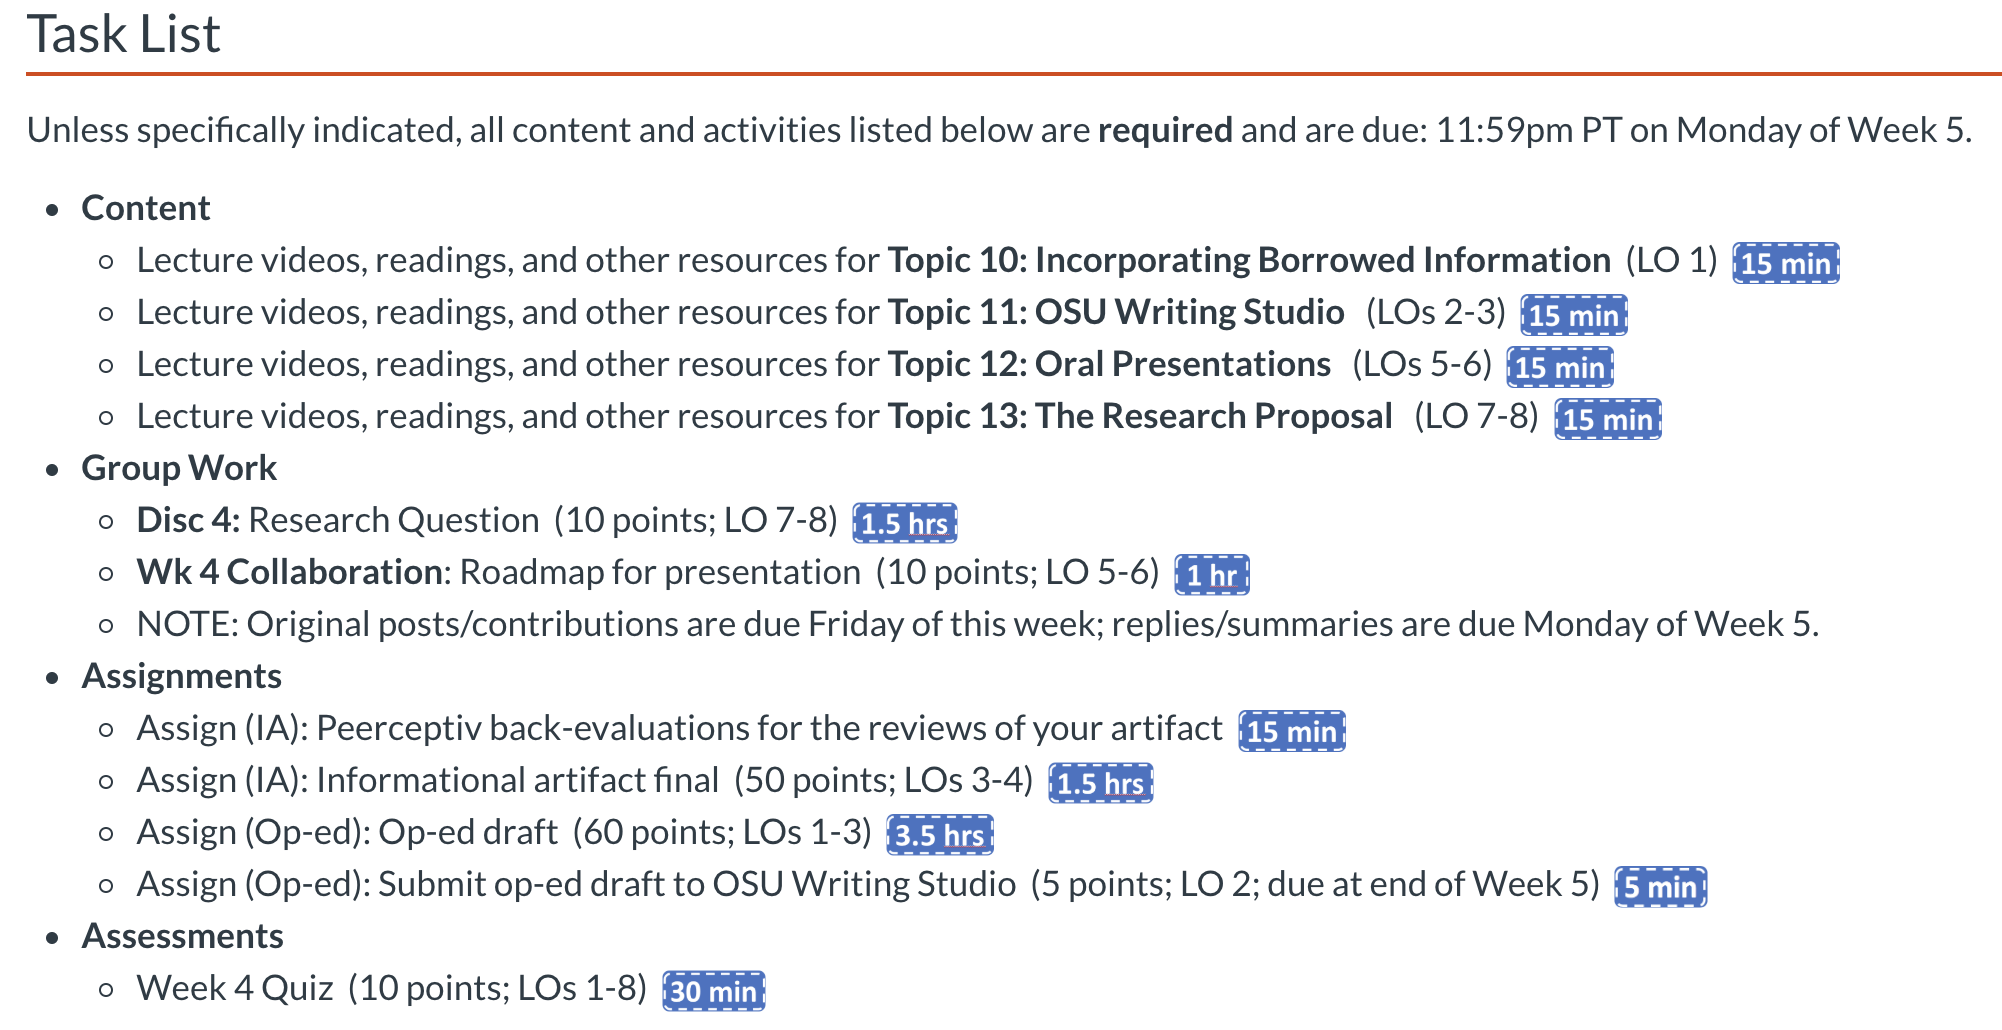
I personally use outlook calendar, google calendar, and word document to create my personalized study at the beginning of a new term. Rice University’s Center for Teaching Excellence provides an online tool for course workload estimation that is worth checking out. Read-O-Meter by Niram.org will estimate reading time for you if you copy and paste the text into text input window. In Canvas Learning Management System, to help students plan their total study time needed, instructors could help students visually and visibly notice time needed for study, by stating estimated time for each and all learning activities, such as estimated reading time, video length, estimated homework time, etc. The following is an example Dr. Meta Landys used in her BI 319 online course.
Image 1: Task Time Estimate and Visual Calendar of the Week in BI 319 “Critical Thinking and Communication In the Life Sciences” online with Instructor Dr. Meta Landys.
At program and institutional levels, keeping important dates visible to students will also help students stay on top of their schedule and not miss important timeline. At Oregon State University, a user-friendly calendar is created for parent and family of our student population, which includes important dates regarding academic success and fun campus events. For example, on the page for October 2019, the calendar shows October 6th as the last day to drop a fall term course with a 100% tuition refund, and the last day to add a fall term course online without departmental approval. These important dates could also be added to Canvas course modules or announcements, just as friendly reminders to students to make relevant decisions in time.
Image 2: Oregon State University Parent & Family Calendar with important dates such as last drop to drop a course with 100% tuition refund; first date to register for a course for the coming term, etc.
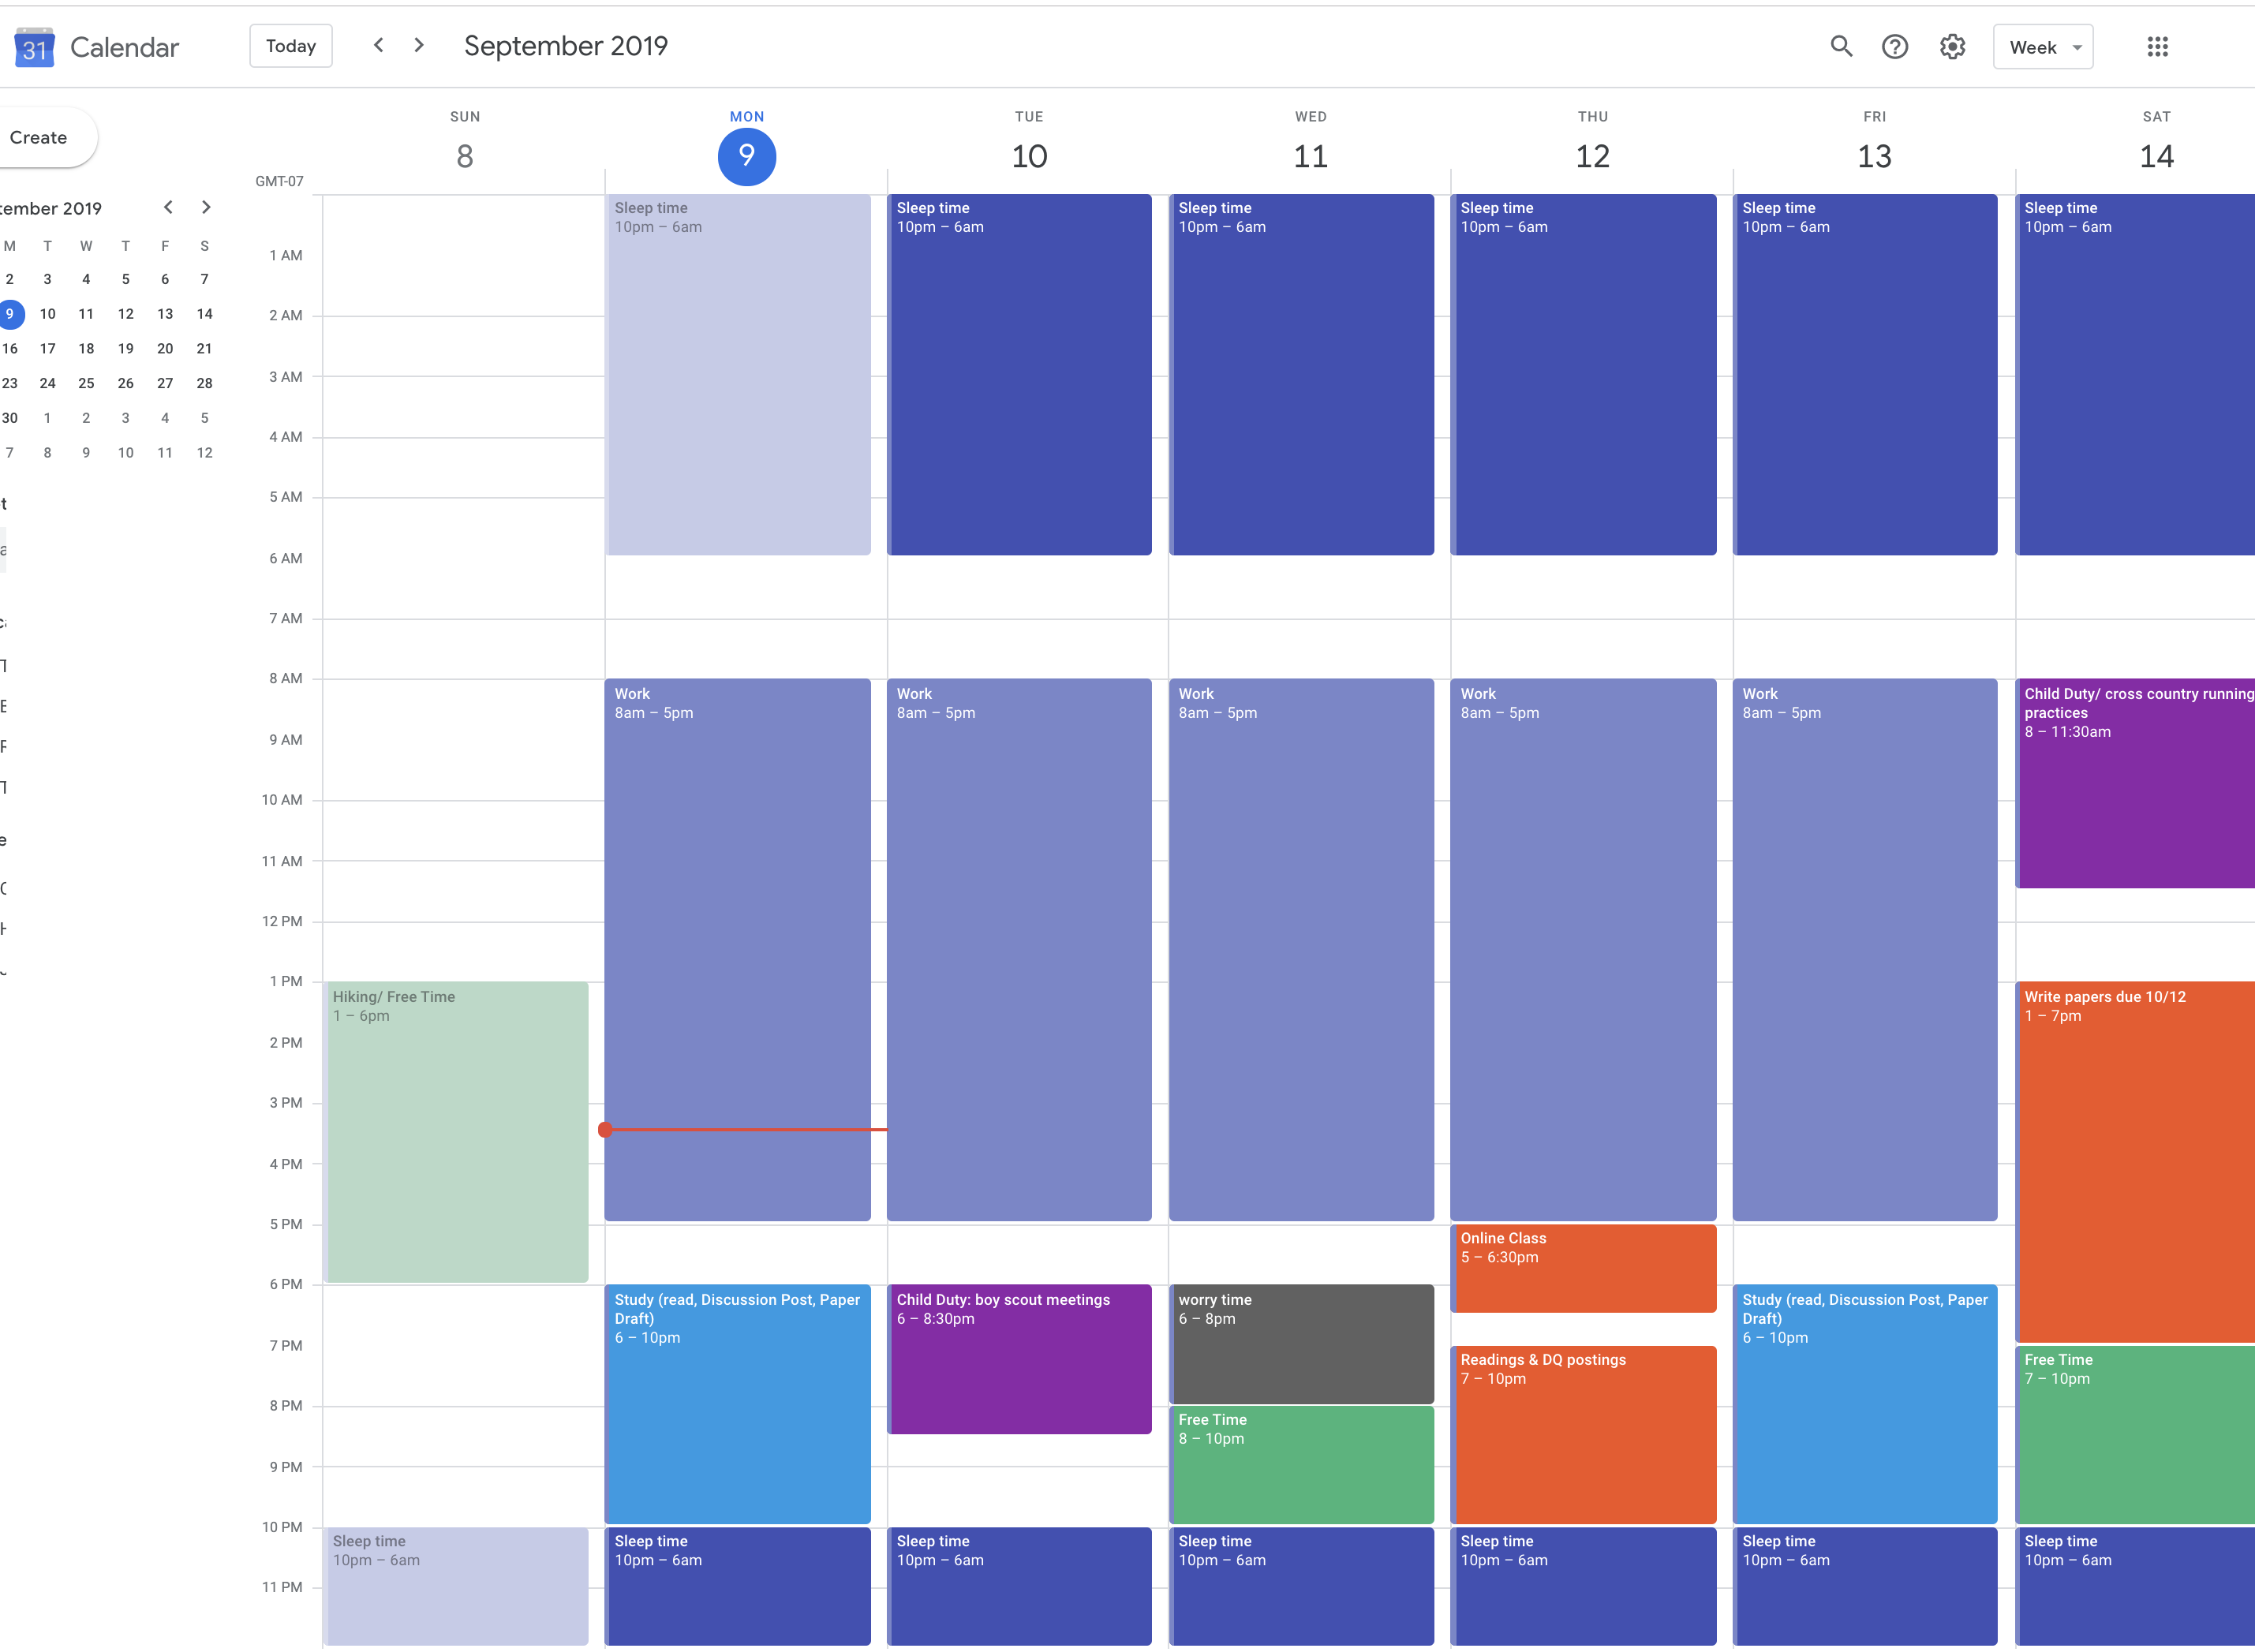
It is true that there are plenty of resources on time management for students to learn by themselves. However, not all students know how to manage their time, even with the aid of digital tools. The problem is that when students are not required to make a detailed schedule for themselves, most of them will choose not to do it. The other side of the problem is that there is very few activities which students are required to show instructors that they have planned/scheduled time for readings and all other study activities for the courses they are taking. In Canvas, to train students in time management skills, instructors could give an assignment in week 1 to have students plan their weekly learning tasks for each of the 11 weeks. Students can use a word document, excel spreadsheet, apps, or google calendar to plan their time. Charlotte Kent (2018) suggests asking students to include sleep time, eat time, commute time, worry time, and free time and four to eight hours of study time per week per course. Yes, scheduling worry time and free time is part of the time management success trick!
Image 3: A color-coded google calendar example of scheduling study time for a student taking two courses online while working full time and raising children.
To sum it up, there are many ways instructors can help students to develop time management skills, instead of assuming it is individual students’ responsibility to learn how to manage time. Instructors could make estimated study time for each learning activity in a module/week. Instructors could require students to plan study time for the entire term at the beginning of the course. And instructors could recommend students to use apps and tools to help them manage time as well! If you have other ways to help students manage time well, feel free to contact me and share them with us: Tianhong.shi@oregonstate.edu.
References
Collier, Sabrina. (2018). Best Time-Management Apps for Students. Top Universities Blog.
My interest in learning about motivation in education began many years ago when I started learning about motivation in game design. In order to better understand motivation, in a classroom, while playing a game, and in an online learning environment, I am turning to the body of research that has grown from Edward Deci and Richard Ryan’s Self-Determination Theory (SDT). This blogpost will be a continuation of my previous SDT Primer and an excellent companion to Chris Lindberg’sGames as a Model for Motivation and Engagement series of posts.
While I had intended to use this entry for discussing grades and assessment, an important piece of SDT and its application is understanding the different types of motivation explored by the SDT community of researchers. This post will define and expand on the numerous types of motivation in preparation for a discussion on grades and assessment.
Before we begin, take a brief minute to explore and reflect about what moves you to do something? As an example, what moved you to open this blog post and begin reading it?
The Autonomy-Control Continuum
The types of motivation you might be most familiar with are intrinsic and extrinsic motivation. Intrinsic motivation refers to doing something because it is inherently interesting or enjoyable, while extrinsic motivation refers to doing something because it leads to a separable outcome. I might be moved to read a chapter of a novel over lunch because it is inherently enjoyable (intrinsic), or I might be moved to run errands over lunch because of external factors, like visiting the bank or post office due to their limited open hours (extrinsic). While these opposites are often displayed and discussed as an either-or, they are really just two ends of a spectrum that contains more nuanced gradations.
(Gagné & Deci, 2005, p. 336)
The autonomy-control continuum (Ryan & Deci, 2017) is an outgrowth of the intrinsic-extrinsic spectrum, representing the spectrum between autonomous regulation, or a feeling of complete volition and controlled regulation, or a feeling of being externally or internally compelled to act. While intrinsic motivation would fall under the category of autonomous regulation, extrinsic motivation can sometimes come close to the autonomy end of the spectrum for personally important or valued tasks, or can swing all the way to the controlling side with external rewards or punishments for tasks. And on the extreme opposite end of the spectrum from intrinsic motivation is amotivation, or the complete absence of intentional regulation. Ideally, we hope that students will feel autonomous motivation, which has also been shown as optimal for learning.
Internalized Motivations: External vs. Internal
Now let’s explore some of the murky gradations between feeling autonomous and controlled. The first step is to compare two degrees of controlled regulations: external vs. internal regulations. External regulation is motivation that is controlled by external factors—a student might experience external regulation when they have to complete a group project in a course. External factors, the instructor in this case, dictates that students collaborate in groups for this project. Internal regulation (or introjection), occurs when internally controlling factors are at play, e.g. shame, guilt, or fear. Continuing with the group work as an example, a student might feel moved to complete a task for the group project by placing internal pressure on themselves, resulting in feeling guilty if they don’t perceive that they’re pulling their weight, or shame in being the last group member to respond to a discussion assignment, or fear that their lack of activity will punish everyone in the group with a lower grade. In both cases, the student feels controlled, either by an external factor or internal pressure.
Identified & Integrated Regulations
As we move closer to the autonomy end of the spectrum, we run into identified regulation, or the acceptance of extrinsic value. Our student from the example above might feel extrinsically motivated to complete the group project, but through the use of a rationale statement from the instructor, might accept the value of this group work, thus feeling more of a sense of autonomy than with external or internal regulation. Lastly, and moving even closer to autonomy, is integrated regulation, or adding the value of a task to one’s own beliefs or sense of self. Perhaps through reflection or a particularly well designed group project, a student comes around and now believes that group work is an essential part of their desired educational experience. While integrated regulation is not the same as feeling autonomous, you might be able to imagine a situation where an identified or integrated regulation would feel more motivating than an external or internal regulation.
How to Begin Thinking About Grades
In a recent Q&A with Richard Ryan, one of the authors and lead researchers of SDT, responded that “there has been no empirical justification for why we have grades in schools at all.” My next blog post will dive deeper into the role that grades and assessment play in SDT and motivation. In the meantime, I would like to pose some questions to get you started thinking about how you use grades in relation to motivation in your courses:
Do you use grades to create external regulation of behavior in your course?
Are you grading a behavior or the demonstration of a skill?
Do you want to emphasize performance goals or mastery goals?
Are there ways to help students identify and integrate the activities and assessments in your course?
Do you need to grade this activity/assessment/task?
These are big, difficult questions! And thinking about motivation in terms of a spectrum is complicated! If you find yourself wanting to continue the discussion of motivation in course design, check out the companion blog series mentioned in the introduction above, contact your instructional designer, or keep an eye out for other opportunities to continue the discussion at various upcoming Ecampus events!