NDAs and Open Pedagogy

One of the principles upheld by the open pedagogy movement is that the role of the learner must be active and the tasks that they engage in must be meaningful. These are not new ideas by any stretch, but as we move toward a more open pedagogical environment, it becomes necessary to examine the types of assignments that we create and assign. How do these tasks contribute to efforts to democratize education and increase learner autonomy, engagement, and freedom? What makes an assignment open? To answer these questions, this post will explore the relationship between open pedagogy and open assignments. 

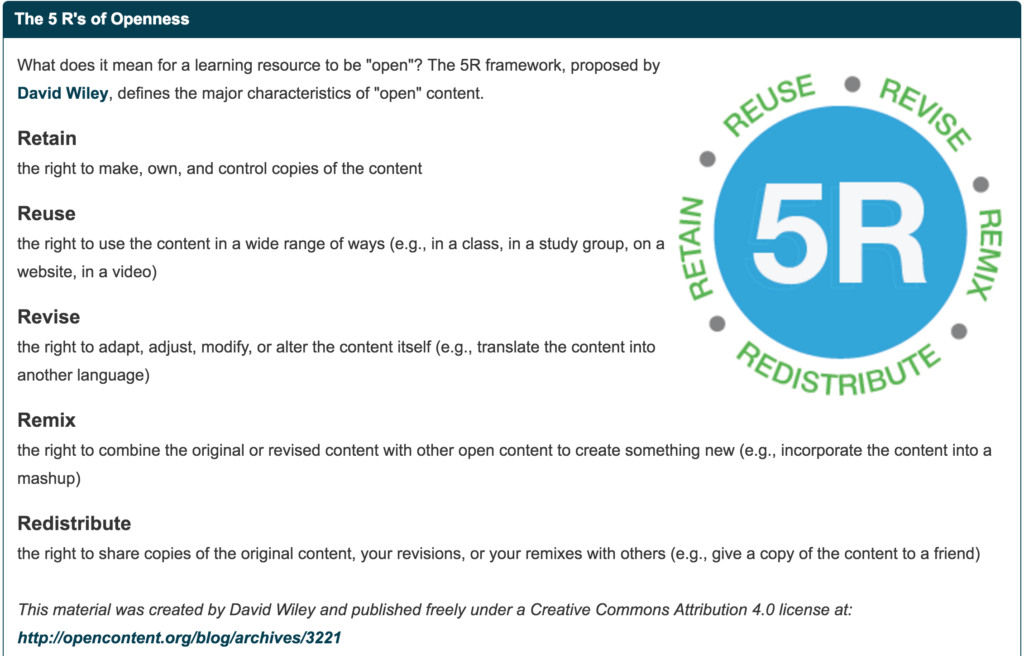
While interest in the topic of open pedagogy has steadily gained steam in the roughly 50 years since its inception, definitions of and familiarity with the concept of today’s open pedagogy vary among educational practitioners. Some discussions focus on the expansion of the use of these resources. You might be hard-pressed to find an instructor who hasn’t at least reused open content (See 5R framework of Open Content) or encountered such materials as a student. Other conversations emphasize the remix and revise aspect of open content and pedagogical practices, and the number of faculty-created Open Educational Resources (OERs) intended to replace the traditional textbook is ever increasing. Still others have turned their attention to implementation of open pedagogical practices that put students in the role of content creators rather than passive beneficiaries of innovations in open content. In our efforts to create tasks that accomplish this shift in the role of the learner, we must first ask what the value of the task is for the student, peers, and the larger community, and what life will such a task have after its completion. To answer these questions, we can look to the non-disposable assignment (NDA). 

Non-Disposable Assignments (NDAs) 

To define the characteristics of this type of assignment, it is helpful to first define what we mean by “disposable” assignment. It is safe to say that we are all familiar with these types of assignments: typically they include one-off or busy work tasks designed to be filed away and forgotten as soon as completed and graded. In his article What is Open Pedagogy (2013), David Wiley described the disposable assignment in this way: 

These are assignments that students complain about doing and faculty complain about grading. They’re assignments that add no value to the world – after a student spends three hours creating it, a teacher spends 30 minutes grading it, and then the student throws it away. Not only do these assignments add no value to the world, they actually suck value out of the world.

Online learning within the confines of a learning management system (LMS) is particularly ripe for these types of assignments. In fact, one could argue they are designed for this type of task. In an online course, instructors create and post the assignment, students complete it, instructors grade it, the course ends, student work is deleted, the course is rolled over, and the next crop of students begins the cycle again. The work is designed to be contained within the LMS for the duration of a course, not to be shared with a broader audience of students or colleagues. 

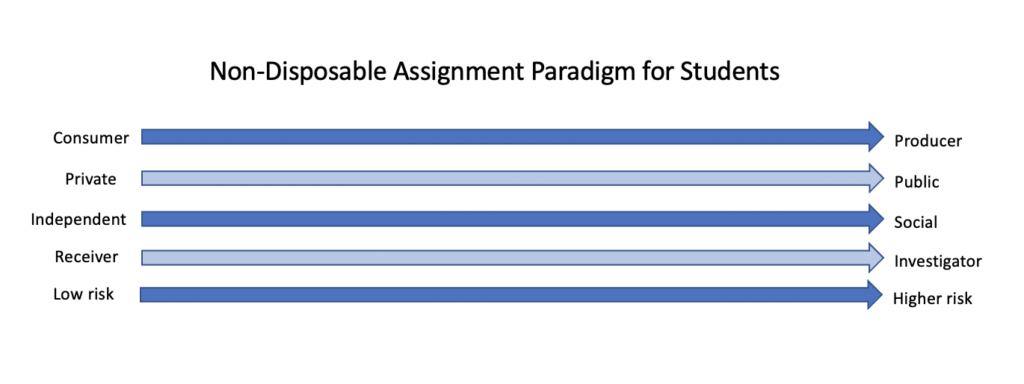
As an alternative to the disposable assignment in favor of more meaningful tasks, Wiley coined the term Non-Disposable Assignment. The NDA (also referred to as a renewable assignment), in contrast to its binworthy counterpart, is an assignment that “adds value to the world.” Later definitions, no doubt influenced by the growing open pedagogy movement and the promotion of the use of OER materials, go further and hold that an NDA ought to produce a resource that is openly published so that “others can find, use, and if desired, repurpose or update the work,” (Jhangiani, 2015; Wiley, 2013; Wiley et al., 2017; Wiley & Hilton, 2018). Such assignments put the learner in the role of creator and impact or benefit an audience beyond the instructor and student. Because the premise of the NDA is that it can not only be shared widely, but also revised and reused without permission by both instructors and students, the content should be openly licensed. Considering the role of learners as authors of the content, they should have a say in determining the type of open license appropriate for their work.

In the article A Conceptual Framework for Non-Disposable Assignments: Inspiring Implementation, Innovation, and Research, Seraphine et al (2019) provide a set of principles NDAs must adhere to. The Five Principles are summarized as follows: 

  1. NDAs fundamentally involve information collaboration and exchange.
  2. As forms of responsive and responsible pedagogy, NDAs involve communication throughout and opportunities for revision, creativity, modifying key terms and objectives, etc.
  3. While NDAs might not necessarily involve communal assembly, the resulting product or practice must always be shared outside the teacher-student dyad, creating opportunities for communal access of the NDA as an information resource 
  4. NDAs produce learning through cooperative critique.
  5. Because they are not exams or isolated writing assignments, NDAs involve innovation as a fundamental concept.

Benefits and Value of NDAs

Apart from their ability to reach a broad audience, NDAs increase student motivation, engagement and autonomy resulting in improved achievement of learning outcomes. (Ariely, Kamenica, & Prelec, 2008; Chalofsky & Krishna, 2009; Pink, 2011). While this claim may be at least in part anecdotal, it follows that when students know that their work may be used by peers, faculty, and colleagues across their field in the future, investment in the quality of their work increases. Non-disposable assignments and authentic assessments have the potential to add value in other areas by:

  • promoting community engagement.
  • fostering innovation. 
  • interrogating and dismantling systems of oppression by centering experiences of historically marginalized groups.
  • providing opportunities for culturally rich content (inject identity, student influence over content). 
  • cultivating information literacy skills.  
  • increasing accessibility to educational resources.
  • helping students communicate in writing to a general audience.
  • offering opportunities to collaborate with peers around the world. 
  • increasing self-regulated learning and autonomy.

Despite their numerous benefits, NDAs are not without challenges and risks. For example, some students may be resistant to the exposure and the vulnerability inherent in creating open content for broad use. In such cases, instructors must provide alternative assignments or options not to share. Because student-generated content requires substantial metacognitive skills, instructors must ensure that NDAs involve significant scaffolding at multiples stages in the learning process (Zimmerman, 1990; Zimmerman, 2002). Furthermore, the open nature of student-generated content presents a quality control challenge that instructors must anticipate and address by providing multiple opportunities for revision and peer review

NDA Design and Students as Producers

Implementing assignments that have the potential for broad impact beyond the typical instructor-student dyad can seem daunting. After all, conceptualizing and creating tasks that effectively revise the role of student from a passive one to actual content creators is no small feat. However, it is important to remember that the scope can vary widely. Indeed a well-crafted discussion between two students might form the basis for a renewable assignment. Other examples may include experiential connections such as student-generated podcasts; the production of flyers, guidelines, or materials for local community organizations; or even collaboratively created and maintained global resources such as wikis like the Chemistry Library. Whatever the scope, NDAs can—and arguably should—be iterative allowing for innovation and adaptation to various contexts. 

With the role of the student as producer in mind and an understanding of the potential pitfalls that an open assignment might present, faculty can then turn to the conventional principles of backward design to develop meaningful student learning experiences that add value for learners and their peers while also promoting community engagement.

Instructors should consider the role of students as they develop non-disposable assignments to put students in the role of content creators. Source: The Non-Disposable Assignment: Enhancing Personalised Learning – Session 1 Slideshare, CC Attribution-ShareAlike


Examples & Resources 

References 


Over the last couple of terms, I joined a series of reading sessions with instructional design colleagues to read Alfie Khon and Susan Blum’s book Ungrading. Why Rating Students Undermines Learning (and What to Do Instead) and discuss the practices and implications of this approach to reconceptualize assessment design and the place of grading. This two-part blog aims to capture the takeaways from those discussions including the main concepts, approaches, types of activities, implications, and challenges of adopting ungrading practices. This first part of the blog covers a brief overview of the concept of ungrading, its major benefits, and design considerations; and the second blog will include a summary of the types of ungrading practices and challenges to implementation ––all derived from the authors’ extensive arguments and examples. For a detailed review and summary of the book chapters, you can also check the blog Assessment Design: Ideas from Ungrading Book.

Overview of Ungrading

The concept of ungrading is sparking widespread interest only recently even though educators have been studying and using ungrading approaches for quite some time. The foundational premise of ungrading is to move away from a focus on grades that judge, rank, sort, and quantify student learning to adopting an approach that focuses on using alternative and authentic means to assess learning such as self-evaluation, reflection, student-generated questions, peer feedback, to name a few. Along with that premise is the questionable ranking that comes with grading which makes students compete with one another in an artificial way. Sorensen-Unruh (chapter 9) sees ungrading as a conversational method that facilitates the communication between instructors and students about how students perform in the class. If, as underscored by the authors, grading and the fact of assigning point values to students’ performance makes more harm than good, then, why use grading? Considering that grading is rooted in our educational systems, many of these authors conclude that it becomes inevitable to grade student learning as it is currently done today.  

A clock and a checklist

Several scholars and instructors consider grading to be problematic. First, grades are not good indicators of learning. Blum (chapter 3) argues that grading assumes all students are the same, does not provide accurate information about student learning gains, is consequential, adds fear and avoidance of negative consequences, and is arbitrary and instructor-led. Second, the overemphasis on grades can lead to a decrease in intrinsic motivation, students’ excessive anxiety, and the complexity of quantifying how learning happens (Stommel, chapter 1). Third, it can also decrease interest in learning, students may feel inclined for easier tasks, and critical thinking is lacking (Alfie Khon, foreword). Fourth, grading makes students be fixated more on their grades than on the process of learning, leading them to believe that grades are all that matters in school (Khon & Blum; Talbert, 2020). And finally, too much focus on grades can be detrimental to students’ mental health (Eyler, 2022). However, ungrading does not mean dismissing grades altogether. Instead, Stommel proposes creating a learning space that fosters critical thinking, reflection, and metacognition– all skills that are valuable for 21st-century education. Likewise, Alfie Khon contends that grading can be participatory since it does not require a unilateral decision, and thus, students can also propose their own grades (with the instructor’s reservation to accept them). 

“Ultimately ungrading— eliminating the control-based function of grades, with all its attendant harms— means that, as long as the noxious institutional requirement to submit a final grade remains in place, whatever grade each student decides on is the grade we turn in, period.”

(Khon, 2020, p. xv)

While ungrading may be an innovative approach to assessments, it should be thought of carefully and adopted with a clear objective. Ungrading, as pointed out by Katopodis and Davison (chapter 7), needs a structure to be effective, allowing students to envision themselves as authoritative, creative, confident, and active, thus achieving a high impactful goal. As ungrading requires instructors to evolve in their approach to assessment, it does too for students who are expected to engage in a process of self-evaluation, self-assessment, and reflection. This requires engagement in metacognitive practices that many students might not be ready to embark on or don’t know how to do it. In addition, while ungrading is believed to be student-centered, it can deepen equity gaps if guideposts are entirely removed. Sorensen-Unruh (chapter 9) believes that ungrading is a matter of social justice –going beyond the expected student agency and aiming at having students exercise their voice and participate in assessment decisions. 

As a whole, Blum (introduction chapter) provokes us all to rethink the nature of grading considering that students’ learning conditions vary, with many enduring inequities at many levels. Blum wants us to keep focused on how “varying assessment and feedback methods contribute to the real learning of real individual learners, rather than imposing an arbitrary method of sorting.” (p. xxii); all for the sake of healthy learning. 

These are a few key points about the arguments for ungrading. While this assessment practice is taking force in higher education, there are also many critics and skeptics. The purpose of this blog is not to enter into the discussion and controversy of ungrading, but to share a few perspectives and takeaways after an intense and well-structured book club discussion. In the following section of this part-one blog, I will share considerations for designing for ungrading. 

Assessment Design Considerations

Tasks and activities from a laptop computer

The educational system requires all instructors to submit grades at the end of every term. There is dissatisfaction with the current grading practices among many instructors and students as explained at large in the book. Here is where the ungrading movement takes force to provide alternative ways to account for evidence of student learning. Riesbeck (chapter 8) argued that by implementing ungrading practices, students can focus more on the content and feedback than on the grades. The use of critique-driven learning allows for more easily quantifiable efforts, progress, and accomplishment. Each ungrading consideration is dependent on a myriad of factors that may or not apply to each instructor’s context. The bottom line in ungrading is re-envisioning the teaching and learning process, engaging students in active learning, and active self-assessment through feedback. The following are design considerations:

Decenter grading and communicate (un)grading practices

Instructors can encourage students to focus on the process of learning, instead of talking about grades, Blums says, we should talk about the purpose and goals of the activities with students. These conversations can help develop relationships with students to encourage them to own their learning and have a voice in that process. Decentering grades also involves having an ongoing conversation with students, colleagues, and administrators about assessment decisions. Although each instructor exercises their academic freedom, it is also essential to share assessment practices that work and possible changes to implement.  In these conversations, it is also important to carefully use language that conveys a clear understanding of the concept and practice of ungrading to avoid confusion, anxiety, misunderstandings, and reactions that prevent its implementation. Having these kinds of conversations can help shift the mind from a grade-focused to a learning-focused approach. A key element in these conversations is to ensure that the pedagogical reason behind the adoption of ungrading practices is not only clear but well understood (and this may take time).

Set a structure for ungrading

As with other elements of exemplary course design considerations, the structure of assessment practices is necessary. Adding a structure for ungrading assignments gives students a clear objective, steps, and flow that allow them to be consistent and accountable to their own learning goals and strategies. 

Reflect on pedagogical and assessment practices

Instructors are invited to examine more in-depth their grading policies, why they grade in the way they do, what they are grading, and how they grade. In many cases, the path to ungrading is a response to dissatisfaction with grading policies. Aaron Blackwelder (chapter 2) says that, over time, he turned into a gatekeeper; he lost focus and was more interested in meeting institutional and “rigor” requirements than building relationships with students. His students had turned into competitive grade seekers. He questioned what a grade really suggests and posits that grades fail to communicate learning. The fact that grading allocates a specific number or letter that can bring some negative feelings to students, can also negatively affect the potential for learning. Sackstein (chapter 4) calls for a change in mindset to identify the way in which learning can be communicated and understood beyond the traditional use of numbers and letters.  While Blum also argues for assessing the entire learning experience (with portfolios, for example), Sacksatein suggests considering changes in the language of grading which can provide students with an opportunity to shift the way they feel and think about their own learning. 

Teach students to view mistakes as a necessary step in the learning process

Instructors are invited to reflect on how traditional grading practices are punitive, dehumanizing, and demotivating. Gibbs (chapter 6) points out that a system that punishes students for making mistakes reinforces the notion that all learning is flawless and therefore mistakes need to be avoided. Ungrading, on the other hand, aims to implement and cement the idea that learning is a process that needs constant feedback for that learning to be consolidated. Therefore, students need to be given opportunities not only to learn from their mistakes but to act on them in an interactive way. This requires instructors to plan for assessments that include steps for review (e.g., self, peer) to help the student build their skills, and knowledge over time.

Care for students and their learning

Instructors are also invited to demonstrate more explicitly that they care and validate students’ work. Further, Gibbs (Chapter 6) argues that her teaching philosophy is better summarized by the word “freedom”, the freedom that learners have to learn and grow at their rhythm and the freedom to make mistakes and learn from them. The role of the instructor is then to be supportive in that process through feedback and empathy. Ungrading, as it is overall discussed throughout the book, does not mean that there are no assessments or grading at all. On the contrary, the assessments should focus on helping students build their knowledge and understanding in less stressful ways, allowing students to build learning habits, develop creativity, become better communicators, and connect to their lived experiences and contexts. Caring for students also involves valuing their identity as learners and what they bring into the learning environment.  

Be aware that ungrading can increase student anxiety and uncertainty

It is critical that instructors who are considering ungrading be cognizant that it involves a high level of anxiety and uncertainty on the part of students. Let’s recognize that students are so used and “conditioned” to grades that they will find it confusing not to have a grade associated with each assignment in the course. Many students consider being successful if they score a perfect grade which can be overwhelming and obscure the value of learning. Instructors who adopt ungrading should explain why and how ungrading will be done in certain classes. This will add transparency to the expectations and assumptions that instructors have about students.

Implement student voice and choice supported with personalized feedback

Instructors can help students take ownership of their learning through hands-on, real-life activities that allow students to use the content they are learning in projects of their interest, conduct research, and solve problems. Students can choose their topics and projects and the instructors can guide them to narrow topics and ensure the projects are feasible within the course timeframe. Consider feedback as a formative assessment approach that enables students to make choices about their learning strategies and needs to improve their learning tasks. Sackstein (chapter 4 ) suggests teaching students to collect feedback and identify the strategies that work for different kinds of assignment revisions. This way, students can develop better strategies that move them from lower-thinking to higher-thinking processes. 

Since ungrading promotes the use of student-self assessment and reflection practices, it implies that instructors will need to personalize and tailor feedback to meet students where they are. In addition, instructors can consider setting a culture of feedback (Gibbs, chapter 6) where instructors teach students to use feedback to improve their work, provide peer feedback effectively, and see the value of learning from their mistakes. 

Promote peer support

Authors of several chapters in this book have posited that students are more likely to give each other better feedback in the absence of grades. This kind of feedback can allow students to help each other, learn from one another, expand their awareness of their own understanding, and develop skills for life. Peer support will also help students build their confidence and autonomy to learn from each other. 

Trust students

One critical aspect of assessment is trust –trust that students do the work they are expected to do by themselves. Instructors have legitimate reasons to express their concerns and create course policies about academic integrity that lead them to adopt plagiarism systems and surveillance tools to monitor and proctor students’ work. In adopting ungrading, trust is fundamental to change the way learning and performances are assessed. It involves helping students think differently about what it means to learn. Instructors can help students evolve in their approach to learning to move away from grades to focus on their learning by including in assessments strategies for building capacity for metacognition, confidence in their skills, life-long learning goals, and owning their learning. 

Ungrading does not mean instructors don’t grade and students don’t receive grades on their work. Ungrading, as posited by the authors in the Ungrading book, is a mindset to approach student learning differently. In the second part of this blog, I will share the types of ungrading practices, implications, and challenges as presented in the book. 

References

Project

By: Ashlee M. C. Foster MSEd, Instructional Design Specialist | Oregon State University Ecampus

Did you know a pedagogical approach exists that positively impacts student academic achievement and engages them as active participants in learning? Great news…there is! Let me introduce you to the world of Project Based Learning (PBL). 

What is PBL?

PBL is a student-centered pedagogical approach where students, both individually and within small groups, engage with meaningful, relevant, and authentic projects which result in a product. Oftentimes, PBL is commonly associated and/or thought to be interchangeable with Problem Based Learning. However, there is a distinction between the two. The principal focus of PBL is on the active construction of knowledge. Additionally, student autonomy, beliefs, values, and motivations are situated as a fundamental driving force of the instructional approach.

What are the characteristics of PBL?

The essence of PBL is anchored in attributes, which foster high-quality learning experiences. Direct instruction is no longer the principal mechanism for delivery. Negotiation of knowledge between the educator and the students occurs through an exchange of ideas, questioning, inquiry, considerations, and perspectives. PBL often engages students in an ongoing process consisting of investigation, collection, analysis, prototyping, testing, peer/instructor feedback, revisions, and reflection. Learner autonomy is key in that students make their own decisions about various aspects of the projects (i.e., line of inquiry, collaborative processes, application of feedback, types of revisions, solutions).

Is it effective? Prove it!

As reported by Chen and Yang (2019), a positive impact on student achievement has been observed across 20 years (i.e. 1998-2017) of PBL peer-reviewed literature. The researcher’s principal investigation was to compare traditional instruction with that of PBL. Traditional instructional delivery was found to prompt students to apply low-level cognitive processes (e.g., understand, remember). Whereas, PBL can encourage the development of (HOTS) Higher Order Thinking Skills (i.e., analysis synthesis) and metacognitive skills (i.e., regulation, monitoring, self-directed learning, evaluation, assessment). According to the meta-analysis, the aforementioned benefits were found not to be impacted by academic discipline, educational stage (undergraduate, post-baccalaureate, graduate), or geographic location. This is great news for our distance and hybrid learners!

How do I get started?

When considering PBL there are a few questions to reflect on before implementing this practice. First, ask yourself, is this a best-fit approach? Consider the academic discipline, subject content, course learning outcomes, your instructional style, student attributes, and the intended goals to answer this foundational question. A word of caution is to use PBL in a way that is relevant, authentic, and collaborative in nature. Steel clear of using projects as a shiny solution. Lastly, contextualize the project. Doing so will help students connect the project to their academic career, professional development, and personal growth. Remember to share the ‘why’!

Project Examples

Here are a few project examples to spark some ideas: 

  • solve a problem (e.g., uninformed voting) 
  • generate a plan (e.g., foster sustainability)
  • create a product (e.g., computer/mobile application, oral history interviews)
  • seek valid answers and recommend solutions (e.g., electing national officials) 
  • engage with a persistent issue in a tangible way (e.g., advocating, protesting, public speech) 

Do you have an example to share?

Respond in the comments if you currently use, have used, or intend to incorporate PBL in your course. Do you have any tried and true strategies for effective projects? Have you experienced any wins or challenges? Share with the community and join the discussion. Make sure to return to read Project-Based Learning (Part 2) – Mindful Design for practical implementation tips! 

References

Adapted from Leo Babauta’s excellent Zen to Done, (itself a remix of sorts of David Allen’s Getting Things Done), this guide has been extremely helpful for my ever-growing to-do list over the years. Whether you’re an instructional designer, faculty member, student, or administrator, I hope this list helps you in your day-to-day tasks!

  1. Collect: Have an idea? Remember something that needs doing? Get it out of your brain!
    This tool should be simple and something handy, like a small notebook or a trusted app. Look for something that is portable that you’ll usually have on hand and don’t mind keeping with you. You’ll also want something you’re comfortable with—you’re more likely to use it if you like using it. The simpler and faster you can get those ideas collected for later, the better! Also think about where other items collect on their own—email inboxes, phone messages, etc. How many inboxes do you have?
    • What do I use? A mix between a Moleskine notebook for analog capture and Todoist on either my laptop or phone for digital capture, plus my email inbox.
  2. Process: What do you do with all those things you’ve collected and all your various inboxes? I schedule time (usually first thing in the morning as I’m getting started with my day and in the afternoon after lunch) and go through each item in each inbox and follow the ZTD suggested order for making decisions about each one as I process each individual inbox (no need to compile, since anything leftover will be added to a to-do list):
    1. Do it (if it takes 2 minutes or less): quick email replies, simple and short tasks, etc.
    2. Trash it: newsletters after reading, junk email, information I no longer need, etc.
    3. Delegate it: tasks for assistants, tasks I need assistance with, etc.
    4. File it away: information I need to hold onto, but don’t need at the current moment—bookmarks, files, etc.
    5. Put it on my to-do list: the things I need to schedule time to do!
      I usually allow for around 30 minutes for each process session so I have ample time to attend to everything, including those short tasks, without feeling rushed.
  3. Plan: Now that your list is narrowed down to larger to-do list items, can you identify 1–3 “most important tasks” (MITs) for your current day? How long do you think each task will take? Can you prioritize your MITs for earlier in the day? The more experience I get with this step, the more accurately I can guesstimate how long certain tasks will take and create a daily schedule. On days when I already have a lot of meetings and other obligations, it can be tricky to get a lot done in the small pockets of time between events, so I try to have a prioritized list that I can chip away at as I have time. Anything that doesn’t get done that day is rescheduled for the next as an MIT.
  4. Do: Arguably the most important part of this list, actually doing the tasks you’ve selected is next! Now that inboxes are sorted, this is the perfect time to turn on do-not-disturb, close distracting apps and windows (and all those notifications!), and focus on your selected task(s). If you do get distracted, remember to collect those thoughts/ideas for later so you can get back to the task at hand.
    • What do I use? I really like the Pomodoro technique for tasks I expect to take 2+ hours, mostly because it schedules in short breaks that I am prone to skip without it.

There is a lot more to both ZTD and GTD, but these four steps are a great start for taming an unruly to-do list. In the process, you might also find it possible to achieve “inbox zero” (at least during each process step) and reduce some digital clutter and stress in your day-to-day activities.


This past February, I was putting together a proposal for the 2022 Distance Teaching & Learning (DT&L) Conference, and I shared my draft with a couple of my colleagues for feedback.

Typically, when requesting feedback, our team relies on Google Docs, which has a nice feature set for suggesting edits.

However, I was not using Google Docs. I explained that they would be viewing my formatted document on HackMD, a collaborative web-based Markdown tool.

One of the colleagues I had asked for feedback responded:

What are the pros and cons compared to a google doc, may I ask?

That question inspired this blog post.

What is Markdown?

Markdown is a plain text format with a simple syntax to add formatting elements (headings, lists, quotes, bold, italics, etc.). It is easy to convert Markdown files into other formats, such as PDFs, HTML, and rich text. One of the primary uses of Markdown is creating content for the web, which can be done with almost no knowledge of HTML. The first Markdown specification was developed by John Gruber and Aaron Swartz in 2004 and released as Open Source.

What Are the Advantages of Writing in Markdown?

It Is Easy to Learn and Fast to Write

Most markdown syntax is intuitive. Perhaps you are writing a document, and you decide you want to emphasize some text using bold or italics styling. In Markdown, you can surround the words with underscores or asterisks rather than select content and apply a style from a menu or keyboard command. For bold text, add either two asterisks or two underscores before and after the word (your choice, most editors support either syntax):

**bold**
__bold__

For text that you want to be displayed in italics, use one underscore or asterisk before and after the word:

*italics*
_italics_

Creating hyperlinks in documents, a somewhat tedious process in a word-processing program or HTML, is as easy as putting a descriptive link text in brackets and then an address immediately following in parenthesis, like this:

[OSU Canvas Dashboard](https://canvas.oregonstate.edu/)

which in my document becomes: OSU Canvas Dashboard.

It Is Just a Text File

A Markdown file with the extension “.md” is just a plain text file. Storing information in plain text files has several advantages:

  1. Text files are future-proof. You can open a plain text file with any editor on any platform. You are not hostage to the proprietary format chosen by an application developer. You are not dependent on any particular software program still being around to open your Markdown files.
  2. Text files require very little storage. This blog post, written in Markdown, was almost 250% larger once converted to a Microsoft Word document.
  3. Text files are platform-agnostic, making them easy to share with other people or multiple devices. A text file can be opened on a Mac, on Windows, in Chrome OS, in a web browser, on an ios or Android smartphone, or on a Linux machine.
  4. If you open up one of your Markdown text documents in platforms like Box or Dropbox, it automatically renders the HTML.

Markdown is Highly Portable

One of the most significant advantages to writing in Markdown is how easy it is to convert Markdown into virtually any other file format:

  • HTML: With no knowledge or experience in web development, you can quickly convert Markdown to HTML. There are many ways to convert Markdown to HTML. You can use a web-based tool such as Markdown2Html or StackEdit or work in a text editor with support for exporting Markdown in various formats like Brackets.
  • RTF: An RTF file keeps basic formatting, such as links or emphasis, while retaining a text file’s flexibility and small size.
  • PDFs: Many Tools support applying CSS-based styles during a conversion. On my Mac, I use Marked 2 and several of the Marked 2 – Custom Styles to create beautiful PDF files.
  • Word: Markdown formatting information (titles, headings, quotes, paragraphs, lists, etc.) is retained during conversion. Suppose you convert a document from Markdown to Word. You can then apply any of the built-in styles available in Microsoft Word to format your file instantly.

For a much longer list of the supported conversion file types, explore Pandoc, a universal conversion utility. Using Pandoc, I have converted markdown files into a slide deck, a mind map, a Google Doc, and a Microsoft Word doc, but there are dozens of additional options.

It Is Easier to Read and Write Than HTML

Let’s look at a numbered list with some simple formatting. I have applied bold to item 1 and italics to item 4:

  1. Analysis
  2. Design
  3. Development
  4. Implementation
  5. Evaluation

Here is what that list looks like in Markdown:

1. **Analysis**
2. Design
3. Development
4. _Implementation_
5. Evaluation

If you were to write that same list in HTML, it would look like this:

<ol>
<li><strong>Analysis</strong>
</li><li>Design</li>
<li>Development</li>
<li><em>Implementation</em></li><li>Evaluation</li>
</ol>

Even if you are comfortable coding in HTML, writing the list in Markdown is much quicker and can be quickly converted to HTML at any time.

You Can Write Without Distraction

Using Markdown, I can focus on content rather than the formatting. I can indicate how something should be formatted (as a hyperlink, heading, paragraph, etc.) and then let a MarkDown tool transform my document to numerous other file types. I don’t have to look at dozens of text and paragraph formatting options on a ribbon toolbar or interrupt my writing to apply them.

What Do You Need to Get Started?

A Text Editor

You can write Markdown in any text editor. However, many tools provide a real-time preview of your formatted document and give you several export options. These web-based Markdown tools are free options worth exploring:

  • Dillinger is a great place to start. You can experiment with the syntax and instantly preview your content without installing any software on your computer. StackEdit works much the same way. Both are free, and both support export to HTML and PDF.
  • HackMD is another web-based tool, also free, which has collaborations options.

If you prefer working in a desktop application, there are also many options. Here is a nice write up of several Markdown Editors.

Learning the Syntax

After choosing your editor, you need to get familiar with some basic syntax. The most common and helpful Markdown syntax is very easy to master. You saw bold, italics, and a Markdown link earlier. Here are a few more examples:

Headings

To place a heading in the document, precede the text for the heading with one or more hashtags. Here’s a level two heading:

Level Two Heading

In Markdown, you would write it like this:

## Level Two Heading

Many Markdown editors also support the use of an id in a heading:

### Level Three Heading {#custom-id}

When converted to HTML, this will give you an anchor that you can use to link directly to that heading.

<h3 id="custom-id">Level Three Heading</h3>

Lists

Lists look much like they would in any other document. Here is a numbered list:

  1. trumpet
  2. french horn
  3. tubal
  4. trombone

which in Markdown is:

1. trumpet
2. french horn
3. tuba
4. trombone 

and an unordered list:

  • cymbal
  • drum
  • marimba
  • tambourine
  • xylophone

looks like this in Markdown:

- cymbal
- drum
- marimba
- tambourine
- xylophone

Or you can use the single * with a space to make a list of items like this:

* string instruments
    * cello
    * violin
    * harp

Note the support for indenting lists using spaces in the example above, which would work with either * or -. The Markdown list above would render like this:

  • string instruments
    • cello
    • violin
    • harp

Hyperlinks

To make a hyperlink in Markdown, you write a descriptive title in brackets, followed by the URL in parenthesis, as mentioned above. You can even save yourself the trouble of manually creating markdown links through the use of one of the many available browser extensions like this one for Chrome or this one for Firefox, which allow you to copy a website address as a Markdown link.

Rather than document the complete set of Markdown formatting options, I will refer you to the Markdown Basic Syntax Guide or in Markdown:

[Markdown Basic Syntax Guide](https://www.Markdownguide.org/basic-syntax/)

MultiMarkdown: An Expansion of the Language

The Markdown language is Open Source. Since its inception, other developers have enhanced the language to include options beneficial to academic writers. These include:

  • tables
  • blockquotes
  • citations
  • footnotes [^1]

Adding specific examples of these items is beyond this basic Markdown blog post. Instead, I recommend reviewing the MultiMarkdown v6 Syntax Guide. As you will see, the syntax for the new items follows the same spirit of being easy to add to a document and relatively intuitive syntax.

Advanced Tools and Applications

If you want to do a deep dive on Markdown, here are a few resources you can explore:

Yes, But What Are the Cons?

You may recall that my colleague asked about the pros and the cons. So, as much as I love writing in Markdown, I should be transparent about the limitations I have encountered.

  1. Collaboration. Both Microsoft Word and Google Docs support providing feedback on documents using the review or suggestion features. I have yet to find a Markdown editor that supports this type of collaboration. When I want to have a document reviewed, I convert the Markdown document to one of those other formats and then convert it back after implementing the feedback. Converting from Markdown to something, as I have said, is something most markdown editors already do. Converting from some other format to Markdown may take more effort. In this case, I used a Google Doc add-on, Docs to Markdown.
  2. Citation tool support. When writing in academia, I use an integrated tool for citation. Zotero, when installed as an add-on to Word or Google Docs, will help generate bibliographies and inline citations. I have managed to integrate Zotero integrations into my Markdown editor of choice (Visual Studio Code), but it was very fiddly. I followed the setup described in this video: Setting Up a Scholarly Writing Environment With Markdown, VSCodium, and Pandoc. Not for the faint of heart, with a very detailed how-to, step-by-step video, it still took me the better part of a Saturday, with reasonably in-depth knowledge of Markdown, Zotero, and my editor.

Conclusion

To begin your Markdown journey, I suggest starting here: Markdown Guide. The easiest way to learn Markdown is to start using it; you can learn the basics in minutes. Once you do, you will find broad application and support. You can use Markdown to write HTML, draft blog posts, create documentation, and post messages on messaging platforms or forums such as Reddit, Discord, and GitHub.

[^1]: It seems worth mentioning, in a footnote, that I wrote this blog post entirely in Markdown. Feel free to download it and take a look. To see it with the formatted HTML, try pasting it in the online markdown editor Dillinger.

By Susan Fein, Ecampus instructional designer

If you use slide presentations to deliver information and then provide a digital version of the slides to support learners, this post is for you!

Instructors teaching online or who use a companion LMS or website to accompany in-person classes often upload the slide file to aid students in notetaking. However, you may not be aware that digital files are not automatically accessible to those using assistive technologies, such as screen readers. Following a few simple and easy guidelines will improve accessibility of your materials for all students and demonstrate your thoughtful attention to inclusivity and equity.

Who Benefits from Accessibility?

Everyone, not only those with disabilities, benefit from accessible learning materials. The U.S. Census Bureau estimates that there are more than 40 million people in the U.S. with a disability, so odds are good that some of them will be in your courses.

Accessibility practices support all learners, not just those who require them. In 2016, the OSU Ecampus Research Unit conducted a nationwide survey about student use of video closed captions. In that study, 70% of respondents who did not self-identify as having a disability used captions at least some of the time.

I asked OSU’s disability access center how many online students request disability-related accommodations. So far this year, 23.9% of those served by their office are Ecampus students. Last year, nearly 40% of all Ecampus courses had at least one student with an accommodation, and nearly 15% of all online-only students used a disability-related accommodation.

To ensure equity, regardless of who does or does not depend on accessibility support, it is vital to make all learning materials compliant with accessibility standards. When educators intentionally create fully accessible materials, we more equitably serve all online learners.

What Can You Do?

Here are five easy-to-follow tips that elevate your commitment and ability to create accessible materials.

Tip #1. Use a template. Templates are important because basic formatting for accessibility is already built in. By inserting your content into designated sections, you preempt some accessibility issues without any extra effort. For example, when you insert the topic of each slide into the designated title field, the slide structure maintains the correct sequence in which a screen reader encounters the various elements on the slide. If you are concerned about being too constrained or predictable, these designated fields accommodate your creativity! It is okay to reshape, resize, or reposition a field if you do not like its default appearance or location.

Regardless of which end of the design spectrum you lean, always start with a template. If you are not fond of colorful designs or fancy formats, there is a basic, unadorned template you can use. If you are a fan of fun, frivolity, or fabulous, select one of many free template options found online to suit your theme or topic. Check out the different templates Ecampus has developed with college-specific themes. One of them might be a good fit for you.

Tip #2. Enter a unique title on each slide. Each slide in your presentation must have a unique title. This permits a screen reader to navigate easily from one slide to the next. What happens when you have segments of the presentation that require two or more slides to fully deliver the information? No problem! There are various ways to address this.

When several slides focus on a different aspect of the primary topic, use that in the title. For example, you are creating a presentation about Health and Wellness and have multiple slides on the topic of Cooking. You want to introduce the topic, describe meal preparation, and offer ideas for healthy snacks. Since these are three distinct subtopics, a good approach is to label the slides as Cooking: Overview, Cooking: Meal Preparation, and Cooking: Healthy Snacks. Repeating the main topic in the title helps the learner connect each segment but still delineates separate subtopics.

If the subject matter does not neatly break into clear subgroups, it is fine to use a sequential number, such as Cooking Part 1, Cooking Part 2, etc. Since most creators develop a presentation’s content, sequence, and flow thoughtfully and logically, if you take a moment to consider why you grouped together specific ideas, the unique titles will likely emerge.

Tip #3. Follow best practices. If you search online for guidance about how to create effective slide presentations, you will discover that many sources offer similar suggestions. Most of these include recommendations about text (contrast, font size, font style), use of images, page structure, and so on. Use this short list as a helpful reminder of these other accessible-friendly best practices.

  • Text should be easy to read, with good contrast. Black text on a white background is ideal and classic. Be cautious of templates with too subtle contrast. They might not meet accessibility guidance for visually disabled learners. Use 18-point (or larger) sans serif font for readability.
  • Use images judiciously. Pictures convey themes, present an idea, or evoke a mood. However, too many can detract from the message, be confusing, or appear unprofessional. Aim for a “less is more” approach. (Learn more about accessibility for images in the next tip.)
  • Include adequate white space to separate and group content. Bullets are optional. Keep slide structure simple. Use phrases or a few words rather than full sentences. Break up content into multiple slides to avoid crowding.

Tip #4. Create alt-tags for images. A screen reader recognizes the presence of an image but it cannot discern the content. To be accessible, that information is provided as a text description or alt-tag.

If you have images in your slide deck, each must have an alternate text description. The alt-tag describes and explains the content of an image. Usually it is not accessible or helpful to use the file name. And beware of tools that try to divine the content of an image and insert descriptions. These are usually wildly inaccurate and unhelpful.

The majority of images in an effective presentation should be essential to the learner’s experience; the image is required for accurate comprehension of the content. The are images such as charts, graphs, photos, maps, or data. Other images may be optional or decorative; nice to have but not essential to the learning and, if not seen by the student, do not impede the learner’s ability to grasp the material.

For essential images, write a brief (1-3 sentences) text description. No need to include lead-in words like “this is an image of…” Describe the key educational value of that image. What about it is important to the learner? What is the essence of the information you want the learner to know about that chart, graph, or photo?

Screen shot of alt text box for an image from Office 365 PowerPoint
Screen image from Office 365 PowerPoint

Decorative images have two options: enter a description or skip over the image. To skip, enter null text (“ ”) as the alt tag or, if available in your version of PowerPoint, select the “decorative” option. Both choices direct the screen reader to ignore the image. If you prefer to tag a non-essential image, use a simple description, such as “team logo” or “Professor Kumar.”

Understand that writing good alt tags is a challenging skill that takes time and practice to master, so do your best. You may want to confer with the Disability Access Center, an instructional designer, or other faculty support group if you need assistance.

For more information about how to write effective alt tags, refer to these or other resources.

Tip #5. Use meaningful text to format links. Please do not insert a full URL on your slide. Screen readers recognize a URL link and read aloud every individual letter and symbol, often in a monotone mechanical voice, depending on the specific assistive tool. Think about how frustrating, confusing, and unhelpful that is. Instead, format each link using meaningful text, as demonstrated in this post. For example, the two resources linked above use the article’s full title as the meaningful text. Also, avoid the over-used, too generic “Click here for more information,” with the word “here” formatted as the hyperlink. Instead, select text that specifically identifies the URL content, such as “Visit the Disability Access Services web page for more information.”

Accessibility Supports Equity

Demonstrate your commitment to equity! With just a few extra minutes, you can easily meet minimum accessibility standards by following these tips and using the accessibility checker tool built right into PowerPoint!

Reference

Linder, K. (2016). Student uses and perceptions of closed captions and transcripts: Results from a national study. Corvallis, OR: Oregon State University Ecampus Research Unit.

Tricks to creating a syllabus students want to read

In December 2021, CNN published a news story that went viral, featuring a Tennessee professor who hid in his syllabus a combination that led to a locker with a crisp $50 bill for the taking. When he announced at the end of the term that not a single student had claimed the prize, few were actually surprised. Hiding an Easter egg of this sort in the text of your syllabus is certainly a fun idea and a nice bonus for the most diligent student(s) who might find it, but there are other ways to get students to read what could arguably be the most important document in your course. 

A course syllabus has traditionally served many overlapping purposes. From an institutional perspective, a syllabus is a vehicle for sharing important policies, rules, and resources available to students. At some institutions, syllabi can be considered contracts between the instructors and students. For the instructor of the course, the syllabus serves as a published planning document, typically listing important information about the course such as dates, times, and locations of classes, office hours, required and supplemental materials and texts, course schedule and activities, learning goals or outcomes, descriptions of grading, and course or departmental policies. In addition to listing basic elements of the course, syllabi often include instructor contact information and explicitly provide course expectations and how to succeed in the course. One inclusion that has recently become important for OSU instructors to remember when creating syllabi is the recently passed Oregon Bill requiring schools to publish all materials costs and fees associated with a course. 

As students generally receive the syllabus in advance of or at the beginning of a course, it often serves as an introduction to the class and the professor. Students might get their first impression of the course and instructor based on this single document and it may weigh heavily in a student’s decision to register for or drop a course. Students often return to this foundational document throughout the course for guidance, and as such, it is important to make it easy to access repeatedly. Yet despite the fact that a syllabus is such an important document, unless there is a syllabus quiz they must take, students often merely skim or even skip reading it altogether. However, there are a few tips you can follow to make your syllabus more attractive and increase the chance that it will be read. Making your syllabus more visually appealing, providing a video tour or infographic, and using inclusive language with a warm tone are three student-friendly ways of increasing the likelihood of students reading the full document, and, coincidentally, have a positive effect on student impressions of the instructor. 

Student-friendly Strategies for Increasing Readership

1- Make it Visually Appealing

One way to increase the likelihood of your students actually perusing your syllabus at length is to make it visually appealing. If your syllabus could have been created with an old fashioned typewriter, you are missing out on a chance to use new tools to make a more modern and interactive document. 

Most students today already spend up to several hours a day reading, watching, and responding to online social media content, so asking students to read a text-heavy document can backfire due to overload. Enticing readers to take a closer look with interesting images and visuals such as graphs or diagrams, along with visually appealing organization, can be an effective strategy. Take a look at the sample redesigned syllabus above to see how one professor, Dr. Jenks, changed the format of hers to make it more visually appealing and readable. You don’t have to be a great designer to redo your own syllabus, as there are plenty of free templates available online (see resources below).

A beautifully designed syllabus can often open the door, encouraging text-weary students to take a look, but design alone will probably not keep them reading for long. Strategies employed in teaching reading are relevant in the discussion of syllabus language and design. Just as you would in an essay, writing a great opening or ‘hook’ can grab the reader’s attention and motivate them to continue reading. When deciding how to design a syllabus, instructors may want to consider using signaling (visually reinforcing important concepts), segmenting (chunking information into smaller units for better comprehension), and weeding (ridding of extraneous information), all of which can help create a concise yet effective document. Placing the most important information first for those inclined to give your document only a cursory glance is another great idea. Also, remember to ensure that your design does not interfere with and preferably increases accessibility. Additionally, some students might need a purely text document, so providing your syllabus in several ways is best practice.

If you have experience building Canvas pages, you could try out using some in-Canvas tricks to create a more visually appealing syllabus page, such as this example of a creative syllabus page design in Canvas: CS 271, Computer Architecture & Assembly Language.

2- Turn it into a Video or Infographic

You are probably already aware that if given the choice, many students tend to choose to view videos more often than read text documents. Recent research suggests that students increasingly expect video content to be part of their learning experience. You can use this to your advantage by recording a video tour of your syllabus to supplement the digital or physical document. Especially in Ecampus asynchronous courses where most of the work will be performed in Canvas, walking through the highlights of your syllabus and connecting what is written there to the pages, modules, and assignments in the Canvas course can help students gain a big picture view of the course and prevent questions later.

Especially in Ecampus asynchronous courses where most of the work will be performed in Canvas, walking through the highlights of your syllabus and connecting what is written there to the pages, modules, and assignments in the Canvas course can help students gain a big picture view of the course and prevent questions later. Using a video to introduce your course can help students better comprehend and remember the important parts of your syllabus by activating both the visual (pictorial) and auditory (verbal) processing channels that working memory uses. The same strategies mentioned as important for designing a visual syllabus can be employed (signaling, chunking, and weeding) to ensure viewers are not overwhelmed. This is one of the most effective ways to introduce your course to new students, with the added value of enhancing your instructor presence. It’s not as difficult as you may assume- OSU’s Canvas LMS has a built-in video recording tool, Kaltura Capture, with which you can create a screencast video.

Another option is to try something completely new- turning your staid, static syllabus into an infographic. Infographics have become more popular with the advent of quite a few online tools that provide a multitude of templates with simple drag and drop functionality, enabling instructors to reimagine how their syllabus information is presented (see below for resources). Infographics are appealing as a supplementary document even when a text version is evident, as they distill the elements of a course into easily presentable and understandable chunks, highlighting important information and saving longer descriptions for later. 

Infographic representing the important concepts in this article
Sample infographic based on this article

3- Consider your Tone and Wording

Another way to encourage students to read the entire syllabus in your course is to consider how the tone of the text is understood from the students’ perspective. Writing your syllabus in a warm (student-focused) tone communicates to students that you care about them as individuals and are rooting for them to succeed, which in turn motivates them to want to succeed, whereas writing in a cool (content focused)  tone can negatively impact students’ perceptions of the instructor and the course. There may be some hesitancy among instructors to shift from what is typically considered ‘proper’ academic language due to a conception that a syllabus should model this type of language. Some may be concerned that using informal or conversational language may muddy power dynamics, preferring an instructor-as-expert approach and mirroring that in their syllabus. 

While this may be the established norm, there are compelling reasons to tweak your writing style when drafting this first contact between instructor and students. Whereas in past decades teachers might have been expected to produce standard syllabi with purely academic, formal language, the more recent focus on concepts such as inclusivity, promoting diversity, and working toward equity has spurred many to take a closer look at how their syllabus language and presentation affects students and their sense of belonging when accessing higher education. Interestingly, using warmer language in your syllabus can actually impact how motivated students perceive YOU to be as well. Research from Richard J. Harnish and K. Robert Bridges determined that “a syllabus written in a friendly rather than unfriendly tone evoked perceptions of the instructor being more caring, more approachable, and more motivated to teach the course.” Recent research from OSU’s own Regan A. R. Gerung and Nicole R. Galardi supports this, finding that syllabi written in a warm, friendly tone rather than a cooler, more academic tone tend to be viewed more positively (and resulted in more positive teacher ratings in evaluations). Instructors are often missing out on a wonderful opportunity to invite students into a mutually respectful class experience by distancing themselves by using an overly cold and academic tone in their syllabus.

OSU has expressed a strong commitment to using inclusive and affirming language, recognizing that how we use language reflects how we view the world and impacts others’ sense of belonging.One of the first things to consider is your audience- are you teaching a freshman level intro course, where students may be entering the world of formal academia for the first time? Many OSU Ecampus students identify as first generation college students or non-native English speakers, which might impact how they interpret the writing in your syllabus. If your syllabus uses language that seems cold, distant, formal, or unwieldy due to overly complex structures and style, students may fail to understand, become disinterested, and/or discontinue their reading of your syllabus. Are you teaching graduate students who might have a better comprehension of academic language? Even if you are, your syllabus may not be the place to showcase this type of language, which can impact comprehension. 

In addition to how friendly your tone is, consider the underlying message sent by how you choose to discuss subjects, especially aspects that are traditionally the sole purview of the instructor, such as the turning in of work, granting extensions or incompletes, and grading policies. If a syllabus contains frequent mentions of the penalties students will face, punitive measures that will be taken, or absolutes that will be enforced, students may be put off and decide the instructor is authoritarian, controlling, or overly strict. A lack of flexibility can seem particularly uncaring, causing students to be less likely to reach out if they encounter difficulties that may impact their ability to turn in work on time and participate fully. Instead, consider how you could offer more student friendly policies that offer students flexibility, choice, and empathy for students’ complicated lives.

The key, as in most areas of life, is finding the right balance that represents what you want to convey to students. The image below, taken from the OSU Center for Teaching and Learning publication Pedagogical Pragmatics (P2): Writing a Warm SYLLABUS, shows some examples of cool vs. warm syllabus statements. Small changes in wording can be enough to convey warmth and friendliness.

Examples of warm versus cool syllabus language in a chart
8/2021 This work is licensed under a Creative Commons Attribution -NonCommercial 4.0 International License  WEB: Ctl.oregonstate.edu; TWITTER: @OSUteaching; BLOG: https://blogs.oregonstate.edu/osuteaching

Looking to improve your syllabus? Check out these resources:


Sources and Resources

A professor hid a cash prize on campus. All students had to do was read the syllabus – CNN

Accessible Syllabus

Creating the Foundation for a Warm Classroom Climate

Effect of syllabus tone: students’ perceptions of instructor and course Richard J. Harnish ·K. Robert Bridges

Newly passed bills require Oregon public colleges to publicize information on student fees, other costs – OPB

Principles of Multimedia Learning 

Sample Visual Syllabus

STATE OF VIDEO IN EDUCATION 2019 

Syllabus Tone, More Than Mental Health Statements, Influence Intentions to Seek Help – Regan AR Gurung, Noelle R. Galardi, 2021

Using a warmer tone in college syllabi makes students more likely to ask for help, OSU study finds | Oregon State University

Utilizing Inclusive and Affirming Language | Institutional Diversity 

Would a Course Syllabus Be Better as an Infographic? 

The following is a guest blog post from Meilianty Gunawan. Meili completed an Instructional Design internship with OSU Ecampus during Fall 2021.

Have you ever driven a car on a highway with no streetlights in the middle of the night? Your first instinct is to turn your car’s high-beam lights on to give you greater visibility on what lies far ahead of you. You are probably fine just by relying on the car’s low-beam lights, but you will not be able to get a clearer picture of the far end of the road as you would get from the high-beam.

Bloom’s Taxonomy is a framework used by instructors to develop course learning outcomes. It lays out six cognitive domains (from basic to more advanced) and examples of measurable action verbs along with those domains.

When course learning outcomes are set from the point of students’ knowledge and skills deficiency, students are inadvertently deprived of the greater things that they were able to achieve after completing the course. Lower-division courses (100- and 200-level courses) generally focus on the lower-order cognitive processes in Bloom’s Taxonomy. However, there are expectations for the upper-level and graduate-level courses to focus more on the higher-level of cognitive processes.  This expectation was clearly spelled out in the Upper-and Lower-Division course policy that was approved by the OSU Faculty Senate Curriculum Council in April2021.

Therefore, instead of looking at the knowledge or skills students are lacking, try thinking along the following lines to stretch the course learning outcomes into the higher-level thinking processes:

  • What can the students do after they have met the lower-level portion of the learning outcomes?
  • What if all my students scored “A” in their prerequisite course(s) or they are so academically prepared to take the course?
  • What if all my students had mastered the lower-level skills required and they liked problems that are more challenging?
  • How can my students apply the skills and knowledge from the course to their professional work?

When courses aim for the higher-order cognitive domains in their learning outcomes, it inadvertently drives the assessment away from the traditional factual memorization type of assessment that is generally entailed mainly in the ‘remembering’ and ‘understanding’ cognitive realms.

As an illustration, we will use the following learning outcome as a baseline:

“Describe the winemaking process”

A glass of red wine and bunch of grapes in low light.
Image source: “Red Wine” by leguico is licensed under CC BY-NC-ND 2.0

Describe is a verb under the ‘understanding’ cognitive process.  While it is good that students are able to describe the wine-making process, think again about the greater purpose of them being able to describe the wine-making process. Why do they need to be able to describe the winemaking process? Is it so that they can recommend the best process, compare and contrast various processes, evaluate the suitability of a process, etc?

The following are some of the suggested revisions to the above learning outcome that are geared towards the higher-order thinking in Bloom’s and how it impacts the ways students are being assessed.

  1. Recommend a suitable winemaking process to produce a product with industry-accepted specifications.
    • Recommend falls under the ‘evaluating’ cognitive domain. In the assessment, the instructor can give a list of specifications of the final product (e.g., the color, purity, turbidity of the wine) and ask the students to recommend a suitable winemaking process. In the quest of selecting and recommending the suitable process, the students are exercising critical thinking skills and potentially problem-solving skills, especially if they need to suggest certain optimization in the process to produce the product with the right specifications.
  2. Evaluate the feasibility of a certain wine-making process under specified conditions.
    • For the assignment, the instructor can present a case study of company X that wants to do a start-up business in making wines. Given the specified capitals, resources, and expected lead time for the product, the students need to evaluate if the winemaking process in question is feasible. By justifying their yes or no answer, they are practicing the synthesis, reasoning, and argumentative skills which fall under the higher-order thinking process.
  3. Compare and contrast the different winemaking process commonly used in the industry.
    • Compare and contrast are within the ‘analyzing’ and ‘evaluating’ cognitive domains. To measure this learning outcome, the instructor can ask the students to compare and contrast the processes A, B, and C. The instructor can also award points if the group is able to illustrate their explanations with the aid of diagrams. By comparing, contrasting, and illustrating the different winemaking processes, the students are having a more in-depth analysis of each process and how they are being similar or different from one another.

So, the next time you are thinking about the course learning outcomes, you may want to picture them in the context of their entirety and see them in the grand scheme of things; just like how you would have seen the far distance after turning that car’s high-beam on! 

Educators and learning designers must seek to resolve societal shortcomings, including the inequity of education and opportunity; the lack of social justice; policy issues and their implications; implicit bias in terms of race or ability; as well as layers of equity and inclusion. Building community and bridging divides are goals for all education.”

Toward Inclusive Learning Design: Social Justice, Equity, and Community. AECT Research Symposium 2021.
Representation of diversity
Diversity

This was the underlying premise of a research symposium on learning design in which I participated in the summer of 2021. While this premise emphasizes our responsibility for designing learning experiences that are not only inclusive but just, there is an implicit idea that design alone is not a sufficient condition for inclusivity; we must examine the dynamics of teaching practices and how these can evolve to be truly inclusive.

In this blog post, I share the experience of navigating the intricate and complex dynamic between inclusive learning design and teaching while co-facilitating an asynchronous workshop for faculty on inclusive teaching online. I also provide some suggestions for engaging with faculty in conversations about inclusivity that goes beyond the design stage. My experience so far leads me to argue that as an instructional designer (ID), I share the responsibility for inclusive teaching practices implemented in the class. This is a strong position that I have come to embrace as faculty seek suggestions and advice from us not only during the course design process but also during the inclusive teaching workshop.

It is important to understand that as designers we also have boundaries in terms of faculty support. Shared responsibility in teaching online does not mean telling instructors how to teach but helping discover practices to be more effective in their teaching. 

Inclusive Teaching Online Workshop

Oregon State University Ecampus has a strong commitment to supporting the diversity and inclusivity of all members of the university community. In these efforts, instructors are guided not only in designing inclusive online/blended courses but are also supported in exploring and adopting inclusive teaching strategies. To this end, Ecampus developed a four-week asynchronous Inclusive Teaching Online workshop (ITO). This workshop serves as a space to expand the conversations that are already happening across campus about how to support the diversity of our student population. The nature of the workshop is discussion-based with plenty of opportunities for faculty to engage in deeper conversations with colleagues to examine topics including, but not limited to, identity and culture, social and institutional barriers, transparent assignments, and discussion facilitation.

As a co-facilitator of this workshop, I have noticed that our role involves more than just ID services; we have the responsibility to support faculty as they adopt and apply inclusive teaching practices. 

Co-facilitating the ITO Workshop

My interest in inclusive learning design and teaching is rooted in my personal and academic backgrounds. Coming from a diverse cultural and linguistic background (Ecuador) and through my academic experiences, I have realized that the instructor has a critical role in making students feel welcome, part of the class community, and above all seen, heard, and valued for who they are and what they bring into the learning spaces. However, I see the role of an ID as crucial in supporting the faculty’s instructional choices and facilitation strategies to ensure an inclusive learning space is created and sustained. 

My role in ITO is to co-facilitate the weekly activities, lead discussion groups, promote dialogue on inclusive strategies, and guide faculty in developing their inclusive teaching action plan. In co-facilitating this workshop, I recognize the need as an ID to be prepared, gather resources, contribute to the conversions, and even challenge some of the instructor’s perspectives, all with the goal to critically look at diversity and inclusion in its multiple aspects. Particularly for me, co-facilitating the workshop has been challenging yet rewarding. It requires me, among other things, to be more cognizant of the culture and nature of the U.S higher education system, aware of my own identity and its potential influence on my approach in the workshop, and my level of confidence in addressing sensitive topics.

Begin with Design

Gears, notes, stats
Design

As IDs, we collaborate with instructors in several ways. We provide ongoing instructional support to develop new online/blended courses or improve existing courses. We also discuss with faculty the challenges of the course and identify strategies to make the learning experience more engaging, relevant, meaningful and satisfying for students. At the same time, we help faculty identify opportunities to address diversity, equity, and inclusion concerns in the course. 

In preparing to support inclusive teaching practices, we begin at the design stage. For example, we can ask questions such as: 

  • What kind of content would need to be made more accessible (e.g., adding captions/subtitles to videos, describing images more explicitly, use of color). How UDL guidelines can be implemented?
  • What other relevant information/perspective is important to consider to achieve the learning outcomes?
  • How can the course activities promote students as contributors to the course?
  • Would the learning outcomes prepare students to interact and work with people from diverse backgrounds?
  • How do you envision DEI in the design of the course?
  • What resources can we include in the course to support students?

Then, we move to the facilitating stage. However, our role is not to tell faculty how to teach; instead, we help faculty think through inclusive actions that they can consider while teaching their courses. For example, when instructors create introduction forums, we can ask them about their approach to connecting with students, their level of comfort in sharing personal information, and ways to respond to students’ posts in order to make the connections more visible. Oftentimes instructors may not know how or when to establish connections with students beyond the introductions. At this point, we can suggest to faculty that sharing some personal experiences with students when discussing course content or when providing feedback in assignments is another strategy. Instructors don’t have to share many personal aspects upfront; as they teach their course, they can identify areas where it is pertinent to do so. These opportunities would make students notice the insttructors’ intention and action to building community. 

Another strategy to bring into the conversation about inclusive practices is the plan for supporting struggling students. For example, if instructors are concerned about students’ not completing assignments on time or being inactive in the course, they can reach out to these students through email, learning management system internal messages. Instructors can offer ways to support these students by considering flexibility in their assignment submission, providing additional resources, or directing students to student support services. 

It may seem that the preceding ideas relate more to the design stage than the actual facilitation. However, planning these strategies can happen during the design as faculty prepare for teaching in inclusive ways.

Examine Inclusive Teaching

To some extent, IDs also help with planning the facilitation of the course. Some considerations to support the facilitation stage relate to an examination of inclusive practices, social identities, structural barriers, self-awareness, and building connections. In assisting faculty with inclusive teaching approaches, IDs are challenged to see broader and detailed aspects of the learning experience. For one, it is critical for a truly inclusive course that the concepts of diversity, equity, and inclusion (DEI) are created by design. This means that we should not take these concepts as checklists that need to be checked off, plug-ins to be included, or band-aids to “cover” minor or temporary issues. We need to be clear on the definitions first to help instructors address them well in the design to be effective in the facilitation stage. An analogy to what DEI means is that of a dance where everyone is invited, contributes to the music, and has the opportunity to dance. In doing so, we need to examine inclusive teaching at deeper levels, with an understanding that inclusive teaching builds upon inclusive design.

A conversation with instructors about inclusive teaching practices can include the following aspects:

  • Forward-thinking: ask faculty about their teaching experience and what issues they faced that may need to be addressed during the design or facilitation of the course (e.g., flexibility in assignments, late work guidelines, assignment format).
  • Student-support resources: help faculty identify strategies or resources where they can reach out in case of need while taking the course (e.g., support coach, writing center, food and meant health services)
  • Sustaining instructor’s presence: help instructors with ideas about how they will keep their presence and connect with students throughout the course (e.g., discussion boards with personal/family photos, professional academic work, fun things). 
  • Assignment feedback: provide guidelines to instructors about leveraging technology to provide feedback.
  • Curate resources to support the design choices and to provide examples.  
  • Raciolinguistics-awarenes: help faculty identify and be cognizant of the use of language and cultural references that can promote or hinder developing community with students. 

We can also challenge preconceived perspectives on teaching and learning and promote inclusive teaching by engaging faculty in thinking about:

  • Whose voices are brought in the materials? 
  • How would students bring their knowledge, experiences, and contributions? 
  • How would the learning activities impact students’ learning in the class and their life outside the class? 
  • What is the language used in instructions, is it punitive or supportive? 
  • Who do the images in the course represent?
  • What is the language tone used to describe the course content?
  • Are the activities and assessments developed with a student deficit perspective?

Although it is the instructor’s decision to consider the diversification of their curricula, designers have the opportunity to advocate for students to see themselves represented in the course materials, especially those within minority groups.

Connections among people
Identity and community

I acknowledge that engaging in conversations with instructors about inclusive teaching is not an activity that happens easily. IDs should examine their own identities and the role these play in how they approach the design project and the working relationship with faculty. For instance, we could start by taking a step back and asking ourselves what social identities we hold and how these have shaped (or not) our experiences in life and work. In facilitating the ITO workshop, I have found myself constantly navigating through the intersection of these identities because these are complex, and at times, put me in vulnerable positions when working with faculty (e.g., language, gender, age, ethnicity). At the same time, these identities can also help us guide instructors about the best ways to provide support systems for all students. We can help instructors be more aware that students hold social identities too and may face micro- and macro-structural barriers that can impact their online presence and interaction. One aspect that I have encountered with many instructors is that they believe that once their online/hybrid course is developed, they can’t make changes. Here is where the question “can we have a conversation and a plan to support these students?” is critical to help faculty know that if needed, they can make adjustments to their instructional decisions. For example, instructors can consider flexibility and offer students some leeway to complete assignments at a later time.  

Further, I am aware that we don’t work in silos. For instance, at OSU Ecampus, the ID team is growing to incorporate more colleagues from different experiences and backgrounds. In providing support to faculty, it is important to engage with and rely on our colleagues (internal or external) for insights, practices, and resources to respond better to the demands of a course design, especially if there is interest in addressing inclusive excellence. In doing so, we reach out, we connect, we expand our ID toolkits to learn how best to provide ongoing instructional design support. Our course design enterprise becomes stronger when “we learn to professionally grow and design together” in a systematic way that allows us expand our skills and experiences; raise from our failures and cement our successes. 

We know that the instructional design field connects with many other disciplines and as such, we should observe and learn from other disciplines to support the work we do. Several instructors may have different worldviews and experiences about teaching and learning in their disciplines (e.g., STEM) and may be reluctant to consider alternative means of assessments. It may be worth talking with faculty about their guidelines and expectations for discussions and assignments as students from diverse cultural backgrounds may have different experiences that value more cosmovisions than traditional western perspectives. It is worth exploring with instructors how they would approach or address issues related to supporting these students during the course.   

Debrief for Reflection

Paper notes about creativity and reflection
Debrief

A practice that has been beneficial when facilitating the ITO workshop is holding debriefing sessions with the lead workshop facilitator. These sessions help us be on track, talk about any challenging or surprising situations, determine our plan of action for subsequent weeks, and observe the evolution of instructors’ ideas and perspectives on inclusive teaching. In a way, these debriefs promote self-reflection and forward-thinking. While it is not a common practice for many, IDs perhaps can have a midterm check-in with faculty to let them know that we are “with them” supporting their online/hybrid teaching. In addition, it can be beneficial to conduct debriefs after the instructor teaches the course to better understand their design and facilitation experience. Most importantly, it can be beneficial to identify what inclusive teaching practices worked well, how students responded to the inclusive strategies, and what areas need further development. IDs can document these experiences and gather data more intentionally to further enhance efforts for inclusive teaching.    

As a final comment, I would say that the ID role is multifaceted. We not only provide ongoing instructional and technological support but we also promote a student-centered experience where the needs and voices of all our students are considered throughout the design and facilitation of the educational experience. And we can do that by helping raise awareness of the layers of opportunities and barriers that many students face. We share the responsibility of inclusive teaching. 

References

  • American Psychological Association. (n.d.). Inclusive Language Guidelines. https://www.apa.org/about/apa/equity-diversity-inclusion/language-guidelines
  • Chatterjee, R., Juvale, D., & Jaramillo N. (2018). Experiences of Online Instructors through Debriefs: A Multi-Case Study. In AECT Proceedings.
  • Ecampus. (n.d). Mision, Vision and Values. [Website] 
  • Ecampus. (n.d). Online Teaching Workshops and Events. [Website] 
  • Ecampus. (n.d.). Innovate & Integrate: Plan for Inclusive Excellence. [Website]
  • Fiock, H., & Garcia, H. (2019). How to give your students better feedback with technology. [Advice guide]. 
  • CAST. (n.d.) UDL Guidelines. [Website] Robinson, M. (April 9, 2020). Approaches to Instructor Introductions. [Blog]. 
  • The University of Michigan. (n.d.). Defining DEI. [Website] 

Copyright, Creative Commons, Public Domain, Fair Use… what are they and how to use them correctly? You might be a course creator in need of images to use in your materials. Or you could be an author wondering how best to share your work. This post features a brief interactive lesson on these concepts, along with recommended resources that you can explore to learn more.

You can navigate the lesson by answering the prompts or by using the menu. Click on the image below to get started!

The Educator's Guide to Copyright - Begin

Do you have any other resources that you found particularly helpful? Share them with us!