Storytelling is a fundamental part of human culture. With the use of narrative and world building in an educational setting, we can imagine ourselves as one of the characters and better engage with the material at hand. In distance education, these tools can be powerful allies made stronger with a multimedia approach. In a typical lecture scenario, students are presented information in the form of topics and relationships, specific ideas and often jargon. All these things are a necessary part of learning and provide a framework for the course’s content as well as preparing them for the application of the material. But by using storytelling as a tool, student engagement can be brought to higher levels and create memorable experiences.
A great example of the storytelling approach is Rorie Solberg’s PS 110: Governing after the Zombie Apocalypse. The course deals with the rebuilding of government after a fictional zombie apocalypse. Her course might be a bit too relevant to modern society during a pandemic, as it takes a closer look at the effects of a global health crisis. The students of PS 110 have been ‘selected’ as delegates to a constitutional convention. They represent one of the four territories standing in the place of the former United States, and each student faces the challenge of writing a new constitution, under which a new democracy will be built. The duty of the students is to create the outlines of a new government, accounting for the new needs of the people in this post-apocalyptic environment and, should they find it necessary, addressing the shortcomings of previous governments from around the world. The class begins with the first meeting of the delegates and at no point is the fourth wall broken.
Leveraging multiple forms of media can reinforce the verisimilitude of these stories and provide different avenues for student engagement. Rorie’s course is making full use of what Ecampus’ Multimedia Team has to offer with press release designs, audio broadcasts, animation and an interactive voting simulator.
The audio broadcasts, released by “PZA News” after the collapse of mainstream media outlets, are made to sound like the work of amateur Ham Radio operators doing their best to keep their communities informed. With a distinct taste of Orson Wells’ “War of the Worlds” radio play, these broadcasts feature our very own Warren Blyth as not one or two, but all of the eleven different characters and voices featured therein. The broadcasts cover local issues, giving insight to how societies and communities have changed in light of a global disaster. By tackling social issues as well, these fictional news broadcasts provide a more complete context to the decisions these students will eventually make in drafting their constitutions. They must consider any long reaching effects of their specific wordings and how their policies may affect disadvantaged groups, even unintentionally. Rorie’s course goes beyond being placed into a simple setting and focuses on how her fictional characters would interact with each other and their environments.
In addition to audio there are written publications. While reading is typical in any class, written press releases allow students to read more stories taking place in their post-apocalyptic society. Multiple forms of media for news releases reinforces the world building aspect and contributes to a multi-dimensional, fleshed out feel to the course’s setting. An animation, depicting the daily life of the surviving population is also being developed for this course. This is another fun and engaging way to bring the class materials alive. What better way for students to understand their roles than to see for themselves how their constituents live.
Storytelling and world building can be powerful tools for both student engagement and learning that can create memorable experiences. Enriching stories with multimedia creates an immersive experience that entertains as much as it educates. Rorie’s PS 110 is an excellent example of storytelling, world building and leveraging media assets to enhance immersion.
This brief series of tips is meant to be a beginner’s overview for DIY home recording on webcam, with some additional options suggested if you want to take your video production even further.
Since this document may not cover every issue you encounter while acclimating to DIY video recording, we recommend contacting your school tech person for additional troubleshooting.
WHERE TO START
Internet Connection
Wired connection via ethernet cable is best
If wired connection is not possible, having a clear line of sight to wifi router will give the best wireless connection
Disconnect any wifi devices that are not in use or needed.
Computer Check
Determine if your computer meets minimumsystem requirements for streaming software
Close all non-essential programs to free up more computer resources
Disconnect any external monitors if you are on a laptop and it is running slowly
Testing Your Tech
Does your computer have a built in webcam or do you have a 3rd party webcam?
Identify where your microphone is and talk towards it
Test the webcam and audio settings BEFORE your first recording.
Practice practice practice
The last recording will be better than the first
Making sure your voice is clear and easy to understand
Having a microphone helps with this
Smart phone earbuds have a built-in microphone that can help you with voice clarity
Airpods would also work when recording to an iPhone
PRESENCE AND ENVIRONMENT
Be aware of your environment.
Limit any background noise as much as possible.
Clean up your space and be aware of what is in the background of the video.
Rooms with carpets and drapes are best for audio.
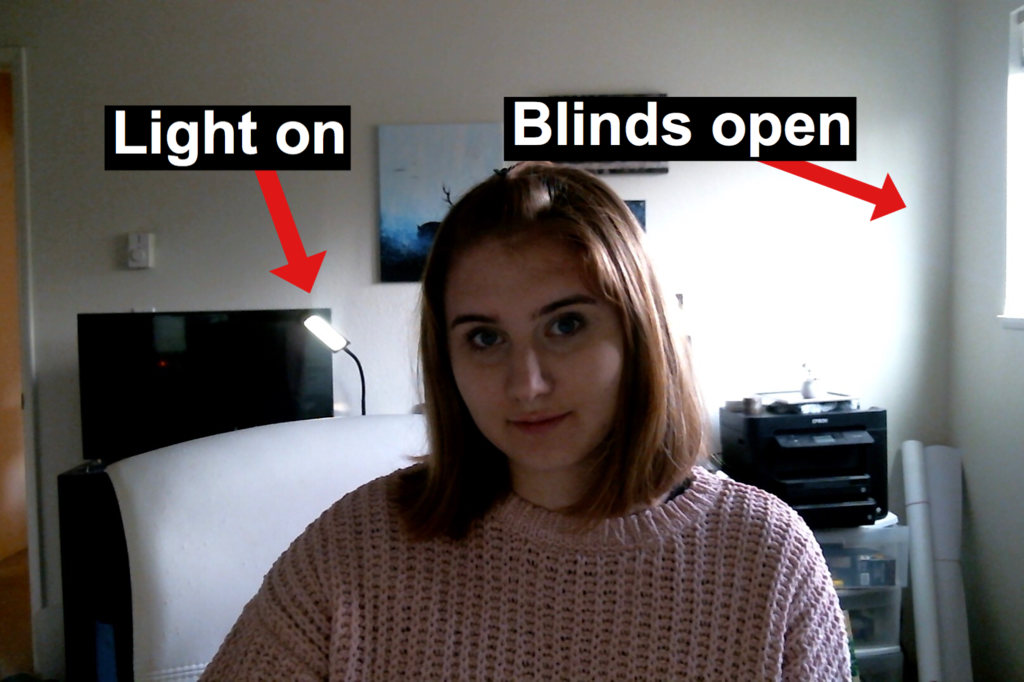
Turn off lights and close windows that are behind you when you are recording.
If possible, turn on a light behind the camera.
Keep experimenting with lighting until you have a set up that works for you.
Try not to bump the desk, computer, camera, or microphone while recording.
Typing should also be avoided.
Do a test lecture and watch it.
See what works and what doesn’t.
If possible, get feedback from others
Practice
The more you practice, the more natural it will feel.
Run through what you want to say before you start recording.
Relax and be natural! Hopefully you are sharing knowledge that you are passionate about and we want that to show. (Remember that we are always our own worst critic, and your teaching team will bethere to help you with constructive feedback on how to help students best enjoy and learn from these videos.)
Have notes in front of you while you’re recording.
It is easy to get distracted or off topic, especially when you are uncomfortable.
Having notes in front of you while you record can help you stay on track.
These notes can be as vague or as detailed as you want, but avoid reading off of them directly and not looking at the camera.
DIGITAL NOTATION
For digital notation, use a handwriting tablet and stylus, or an iPad app works as well
Highly recommended. Audio recorded from your phone’s microphone can be difficult to hear if you aren’t standing near the phone or if the location is noisy.
For when you need to stand farther away from the camera.
Stabilization:
Selfie stick w/built-in tripod and Bluetooth remote – $23.99(heavy duty, 51″ extended), $14.99 (27.6″ extended)
Terrific for self-recording in the field.
Combination hand grip/small tripod/tripod adapter – $8.89
Can be used as a hand grip for filming on-the-go or as a desktop tripod. Phone mount can be removed from the hand grip/tripod legs section, allowing you to mount your phone on most standard tripods.
Pricey, but will greatly increase the quality of your footage if you’re filming something that requires camera movement, such as a walk-and-talk interview or a field trip video.
Creative ways to mount a smart phone with household items:
ADD-ONS / TIPS AND TRICKS
If you would like to have access to a teleprompter as you record video, consider one of the following:
About halfway through earning a master’s in education, I took a summer session class on digital storytelling. It ran over the course of three half-day sessions during which we were required to complete two digital stories. I had no great academic ambitions in my approach to these assignments. I was trying to satisfy a degree requirement in a way that worked with my schedule as a single mother of two teenagers working full time while earning a graduate degree.
My first story was a self-introduction. I loved this assignment. Even though I had one evening to complete it, I spent hours tweaking it. I enjoyed learning the tools. I enjoyed sharing my story with my classmates. Even after it was graded, I kept finding ways to improve it.
After completing the course, I began to study the use of digital stories in education. My personal experience had shown me that in completing my assignment I had to become comfortable with technology as well as practiced my writing, speaking and presentation skills. I also felt a stronger connection to my classmates after sharing my video and watching their videos.
Literature
The research on digital storytelling echoes my own experience. Dr. Bernard Robin, an Associate Professor of Learning, Design, & Technology at the University of Houston, discussed the pedagogical benefits of digital storytelling assignments in a 2016 article,The Power of Digital Storytelling to Support Teaching and Learning. His research found that both student engagement and creativity increased in higher education courses when students were given the opportunity to use multimedia tools to communicate their ideas. Students “develop enhanced communication skills by learning to organize their ideas, ask questions, express opinions, and construct narratives” (Robin, 2016). Bernard’s experience also finds that by sharing their work with peers, students learn to give and accept critique, fostering social learning and emotional intelligence.
Digital Storytelling as Educators
Digital Storytelling in online education shouldn’t be thought of as only a means of creating an engaging student assignment. Educators who are adept at telling stories have a tremendous advantage in capturing their student’s attention. In the following short video, Sir Ian McKellen shares why stories have so much power. Illustrated in the form of a story, he shares that stories are powerful for four reasons. They are a vessel for information, create an emotional connection, display cultural identity, and gives us happiness.
McKellen is a compelling narrator with a great voice. This story is beautifully illustrated. It reminds me of how I want my learners to feel when they are consuming the content I create. Even if for a moment, so engrossed, that they forget that they are learning. Learning becomes effortless. As he points out, a good storyteller can make the listener feel as if they are also living the story.
Digital Storytelling Assignments
There are lots of ways to integrate digital stories across a broad set of academic subjects. Creating personal narratives, historical documentaries, informational and instructional videos or a combination of these styles all have educational benefits. One of the simplest ways to introduce this form of assessment to your course is to start with a single image digital story assignment.
Here’s an example I created using a trial version of one of many digital story making tools available online:
Digital Story Making Process
The process of creating a digital story lends itself well for staged student projects. Here’s an example of some story making stages:
Select a topic
Conduct research
Find resources and content
Create a storyboard
Script the video
Narrate the video
Edit the final project
I created an animated digital story to illustrate the process of creating a digital story using another freely available tool online.
Recommended Resources & Tools
You will find hundreds of tools available for recording media with a simple search. Any recommended tool should be considered for privacy policies, accessibility and cost to students.
Adobe offers a free online video editor which provides easy ways to add text, embed videos, add background music and narration. The resulting videos can be easily shared online via a link or by downloading and reposting somewhere else. While the tool doesn’t offer tremendous flexibility in design, the user interface is very friendly.
Audacity is a free, open-source cross-platform software for recording and editing audio. It has a steeper learning curve than some of the other tools used for multimedia content creation. It will allow you to export your audio file in a format that you can easily add to a digital story.
Padlet allows you to create collaborative web pages. It supports lots of content types. It is a great place to have students submit their video stories. You have a lot of control during setup. You can keep a board private, you can enable comments, and you can choose to moderate content prior to posting. Padlet allows for embedding in other sites – and the free version at the time of writing allows users to create three padlets the site will retain.
Storyboarding Tools
A note first about storyboarding. Storyboarding is an essential step in creating a digital story. It is a visual blueprint of how a video will look and feel. It is time to think about mood, flow and gather feedback.
Students and teachers alike benefit from visualizing how they want a final project to look. It doesn’t have to be fancy. It is much easier to think about how you want a shot to look at this stage than while you are shooting and producing your video. A storyboard is also a good step in a staged, longer-term project in a course to gauge if students are on the right track.
This is a storyboard creation tool. The free account allows for three and six frame stories. In each frame, you can choose from a wide selection of scenes, characters, and props. Each element allows you to customize color, position, and size. Here’s a sample I created:
Start with Matthew Dicks. Dicks is the author of Storyworthy: Engage, Teach, Persuade and Change Your Life through the Power of Storytelling. He is a teacher. He is a five-time winner of the Moth GrandSlam championship.
His book is wonderful, but to just get a taste, start with the podcast he cohosts with his wife. Each week they include a well-vetted and rehearsed story told during a competition. They then highlight the strengths and areas for improvement. You will walk away with ideas and the motivation to become a better storyteller. Here’s the first episode, and one of my favorites.
Conclusion
When pressed for time to develop course content, we tend to over-rely on text-based assignments such as essays and written discussion posts. Students, when working on Digital Storytelling assignments, get the opportunity to experiment, think creatively and practice communication and presentation skills.
For educators, moving away from presenting learning materials in narrated bulleted slides is likely to make classes more engaging and exciting for their students leading to better learning outcomes. Teachers work every day to connect with students and capture their attention. A good story can inspire your students and help them engage with the content.
I was uncomfortable when I received my first digital storytelling assignment. I didn’t really know how to use the tools, wasn’t confident I knew how or what to capture. I was sure it would feel awkward to narrate a video. But These assignments turned out to be engaging, meaningful, and the process is pretty straight forward. Introduce digital storytelling into your courses, even by starting small, and you are sure to feel the same way.
The use of PowerPoint and other similar presentation software, as a visual foundation for recorded narrated lectures for use in online courses is pretty common. These slide-based presentations typically present a series of individual slides that contain titles, visuals, and descriptive text or lists of bullet points with an accompanying voice-over recording. Using this approach to online content presentation seems familiar as it is a technology enabled extension of the traditional slide-based presentations instructors have used in a live classroom lecture. But narrated lecture for online presentation has some structural differences.
Whether transitioning a classroom lecture, or creating a new narrated lecture for online use, instructors at Ecampus are also encouraged to rethink their slide-based presentations. The recommendation is to create highly focused content and keep the duration of an individual narrated lecture presentation to about 10 minutes. This means a typical 50 minute classroom lecture may transition to several online narrated slide presentations as it is distilled down to 2-3 highly focused segments.
Including voice-over with a slide-based presentation builds instructor presence in an online course. Narrated lectures also incorporate best practices in accessibility, copyright, and visual formatting. In essence, this process takes a PowerPoint presentation, incorporates best practice elements, and adds narration. This new instructor narrated presentation becomes a multimedia learning element for their course that is delivered in video format.
Multimedia Learning Theory Redux
On the surface, all the previous work in creating a narrated lecture seems sufficient. However if we incorporate research on multimedia learning we may choose to do more with this staple of the online course; the narrated lecture.
In my previous article on the value of images in online learning I explained how online presentations that combine text, images, and titles are considered multimedia-based learning objects. Using written words with images on a PowerPoint slide with voiceover is also a form of multimedia learning. Given this it may be useful to revisit theory related to multimedia learning to see how it related to narrated lecture design. The model below illustrates how the Cognitive Theory of Multimedia Learning (Clark & Mayer , 2016) informs our understanding of multimedia-based learning.
Figure 1. Model of the Cognitive Theory of Multimedia Learning
The model indicates that people (i.e., learners) have two channels of cognitive processing: 1) for processing visual/pictorial material and 2) one for auditory/verbal material. Additionally, humans can only process a few bits, or pieces, of information in each channel at the same time. Learner engagement with pictorial and verbal information is linked to an individual’s ability to parse information from the multimedia and ultimately integrate it with prior knowledge…creating new learning. That parsing is linked to two things:
How we structure and deliver information during the design of multimedia and
The learner’s ability to engage the information in a way that compliments learning.
Let’s stop here for a moment.
Now think about what you just did in reading the text above and looking at the illustration provided. In this instance you called upon a single information channel, the visual channel of cognitive processing, to interpret the meaning of the text description of the visual model. Was that an easy process for you?
How hard would it be for students to process similar information acquisition through one channel….vision only? With the cognitive theory of multimedia learning in mind ask yourself this…How would adding audio narration impact cognitive processing? How would that impact learning? Let’s explore these ideas in the context of narrated lecture design.
Five Guiding Multimedia Principles
In an article titled Information Design with Teaching and Learning in Mind, Rune Petterson and Maria Avgerinou (2016) identify 12 important principles teachers should take into account when designing multimedia-based learning experiences. I have organized these multimedia-based learning principles into three sections in the table below. As you read through these 12 principles it becomes clear that not all of these apply to narrated lecture design.
Figure 2. Twelve Principles of Multimedia – Based Learning Design
Principles 1-4 address more general, or global, understandings about multimedia design and learning. Principles 5-7 address design factors directly related to combining text and images without narration in multimedia-base learning. The last five principles (i.e., 8-12) address how the spoken word is best integrated into multimedia design to be consistent with the cognitive theory of multimedia learning. Although all the principles are important to multimedia design for learning, the last five guiding multimedia principles are the most salient for narrated lecture design.
From Theory To Practice
Remember, the goal for instructors is to develop narrated lectures that enhance the multimedia-based learning experience. It is not simply to create a replication of the in-class lecture. Let’s look at the five guiding multimedia principles and how the ideas in the principles might shape how you can prepare your narrated lectures as online multimedia learning elements.
Temporal Contiguity Principle
This principle suggests that the most effective designs using narration and graphics place those two elements in temporal proximity. They are seen and heard at the same time. Seems obvious. But you must think through this principle and plan the sequencing and duration ofslides and narration accordingly. You must know what you want to say and when to say it in the context of the visual elements you have on your slides.
Modality Principle
This principle affirms that presenting words as audio narration is more impactful than written text in describing graphics on a slide. They are particularly impactful when paired with animations.
In essence this principle helps guide design that takes advantage of both channels of information processing. This also helps manage cognitive load by freeing learners from trying to interpret written text and images via the visual channel only. If you absolutely have to use text with graphics on your PowerPoint slides keep text in short phrase form to avoid extensive reading and any potential cognitive overload.
Redundancy Principle
This principle proposes addresses presenting narration and written text that says the same thing combined with images. The redundancy principles guides designers to select either narration or written text with the image on a slide for the best learning experience. Choose one method of delivering the word-based description of the image. Don’t use both.
Once again this principle is about managing, through design, the cognitive load of the media element. There are some complex scenarios where text only is a best option…see the Control of Processing definition.
Coherence Principle
This principle simply states that adding interesting, but non-essential, visual or word content can hurt learning. Narrated lecture design should avoid placing funny phrases, decorative images, excess lines, colors and sound effects and music that does not directly relate to the learning at hand of any particular slide.
Instructors should know what they want to say and design to maintain keep cognitive focus on that learning. We sometimes think these extra element keep attention but actually the opposite is true…they clutter and create distracting cognitive load.
Sometimes this principle is not fulfilled through good intentions. It often occurs when instructors wish to have multiple images of something on the same slide. Then they talk about each image individually in narration. It is much better design to put those extra images on a new slide and talk about it when it is the focus of the learning. This avoids visual overload and helps keep the pace of your presentation moving.
Personalization Principle
Creating a social conversation with learners softens the experience of learning via devices. It also helps build instructor presence in a lesson and the course. One of the best ways of achieving this via narration is to use a conversational tone.
Conversational tone in everyday life comes from an interaction that is authentic and casual. That is difficult to achieve in narration. Professional actors train to do this. Faculty at Ecampus are often provided with narration tips to help in this regard. Narrators are encouraged to have notes that guide their presentation but not encouraged to read a script verbatim. Not surprisingly, reading a narration is easily detected by the listener’s ear. You can personalize your narrated lectures by knowing what you want to say, practice it so you know when to say it, then just be yourself and let your personality come through.
Applying the personalization principle in design means thinking through and planning your conversation with the remote audience. Then practicing the delivery so it feels conversational. Learners will benefit from this narration design strategy.
Final Thoughts
Earlier in this article we posited that new learning is predicated upon the structure and delivery method of information to learners as well as the learner being able to engage with the provided information in a way that supports learning. In a very simple way we are saying that good design for learning presents content clearly and does not create barriers to information engagement by leaners.
Instructors are correct that it is good to focus initial narrated lecture design on the slide presentation preparation that reflect best practices in accessibility, visual formatting, copyright, and more. It is also valuable to think through the narrated lecture design in terms of cognitive load, potential barriers to learning, and how to positively impact the learner’s information processing.
The five guiding principles for narrated lectures help instructors identify ways in which they can design and intentionally use audio narration with text and images that compliments an understanding of cognitive learning theory. In doing so they create online narrated lectures that are more effective as multimedia-based learning experiences.
References
Clark, R. C., & Mayer, R. E. (2016). E-learning and the science of instruction : Proven guidelines for consumers and designers of multimedia learning. Retrieved from http://ebookcentral.proquest.com
Rune Pettersson & Maria D. Avgerinou (2016) Information design with teaching and learning in mind, Journal of Visual Literacy, 35:4, 253-267, DOI: 10.1080/1051144X.2016.1278341
The Ecampus multimedia team creates animations to bring your thoughts and words to life. In virtual reality, creating these 3D objects and animations has become incredibly easy and fast.
The old ways … of power tool juggling
Developing “multimedia” often means using small aspects of many different tools. “Media” being a means of communication and the plural of medium: a means of doing something. To create an animation for your class, we quickly run through a long list of media.
Here’s an exhaustive run through of how the process works at the moment (feel free to skip to the next section! This is detailed): You would typically type up and email over a script that I take into Google Drive to edit and comment upon. You’d record audio in one of our sound booths, and I’d take the resulting sound files into Adobe Audition to equalize levels and remove background noise(s). Then I’d grab a pencil and sketch out a quick storyboard for each sentence to suggest visuals that could emphasize your point(s). Photographs of these sketches are edited in Photoshop and injected into another file on Google Drive.
And that is just the easy preparation portion. Depending on the animation style we’re going after, I’d dive deep into obscure programs I’ve learned to use over the past few decades – like Autodesk Maya / Mudbox / MotionBuilder / Meshmixer, Adobe Illustrator / Animate / Character Animator / Fuse / Dimension, Unity3D, the Procreate iPad app, Agisoft Photoscan, MeshLab, Instant Meshes, Mixamo, etc. … Simply trying to list the most commonly used apps is exhausting (much less all the other emerging apps we investigate, or the ones we mastered that went away. I still love you HyperCard, Director, and Flash!). Phew.
However the pieces of animation are generated, we still end up spitting out thousands of images or video files that have to be lined up in Adobe After Effects / Premiere / Media Encoder to assemble the final video that we can upload to YouTube or Kaltura and send to you.
What I’m saying here is: this whole process usually takes weeks or months. Or… we can just do it all in VR in an afternoon.
The new reality… of easy bake dreams
Tvori is an amazing tool to easily puppet objects and characters around in VR. You can record audio in directly, and export 4K videos, 360 videos, or animation data for all those old programs i mentioned above. The main reason I set out to write this blog post: was to promote Tvori. It offers an all-in-one easy pathway to making your own animatons in mere minutes. This amazing program runs about 20 bucks, and unlike the other (free) VR tools I’ll mention below – Tvori isn’t backed by a major corporation (*yet). I expect to be generating much more animation work for instructors with it, and hope to be advising you all on how to use it yourselves as you step into VR through your own office computers.
I’d say Tvori offers a level of animation comparable to an “animatic” – a movie industry term for quick and dirty approximations of what the final multi-million dollar film could look like. There’s a good chance animatics will be good enough for the bulk of concepts we wish to impart to students at the university level, with the added bonus that we can generate many of them in a single term. That said, maybe you’re curious what other creative tools are emerging in VR these days?
1) Whiteboard animations are a common request at Ecampus. Oculus Quill lets us draw and animate in this cartoon style in 3D (so it’s like our current 2D drawing tools, but we can move the camera around freely at any time, zoom-in endlessly,). This free tool for Oculus Rift users was updated last month to add a ton of new useful tricks.
We’ve already made fly-bys of 3D drawings in Google Tiltbrush, but we couldn’t actually animate the drawings directly (we just started recording, and moved our head through space). But both these programs are free and worth looking into.
2) In Oculus Medium, anyone can sculpt objects in the air at high resolution with weightless clay. If you own the Oculus Rift, this is an free and amazing tool for creating 3D objects. Now we can make things extremely fast and bring them into those old programs we’ve used for years.
Google Blocks is a similar free tool to quickly make solid low-resolution objects (it’s like Google Sketchup with VR ease and benefits). Upload them to Google Poly to share with the world (a service very similar to SketchFab or Microsoft’s Remix 3D). With these sculpting tools, and repositories of free creations, it’s a snap to gather the building blocks needed to start complicated animation projects. For example, we can bring any of these sculpted objects right into Tvori…
3) Final thought: you can use Google Earth VR to walk around any location on earth, while scaling up to Godzilla height or even zooming in and out from space. The multimedia team can record what you’re seeing and pointing at, along with your narration. While this isn’t a feature of the software (yet), we have the magic means to do it for you. (And we can also go back into Google Earth Studio to make a more polished and precise version of the path you traveled).
I hope this inspires you to go get a VR headset, come by our offices and try it out, or let us don the gear for you. We look forward to making your imagination a reality for students worldwide!
For this post, I will focus on two simple strategies you can use to improve motivation and engagement in your online course, narrative and world building. These terms are used frequently in games, as well as in literature, film and other domains. They are a powerful tool, easily applied to your existing course material or as you develop new content.
There are two kinds of world building I’d like to talk about; instructor-created narrative and student-created narrative. To set the tone for our thinking about this, I’ll start with a quote from Designing for Motivation.
“… if you increase autonomy then engagement will improve, if you increase competence then motivation will increase, and if you increase relatedness then wellbeing will be enhanced–these needs become the controllers we tweak and adjust to iterate on and improve experience.”
(Peters, D., Calvo, R. A., & Ryan, R. M. (2018) Designing for Motivation, Engagement and Wellbeing in Digital Experience. Frontiers in Psychology, 28 May 2018. DOI: 10.3389/fpsyg.2018.00797)
So how can we use world building to ‘tweak’ these three controllers?
Instructor-Created Narrative
Instructor-created narrative refers to the world or environment created by the course builder and determined by the story they are telling about that world. This world building can be for a particular course activity, but also keep in mind that your entire online course is a learning environment and you, as the course builder, have significant influence over how that world is curated. A colleague recently described how an instructor begins their course with the phrase, “Welcome scholars”. This sets a tone that is a competence-supportive environment with just two words. Tone is a commonly used tool for world building across many domains.
As a simple entry point for world building, I’ll start with a classic type of game, role-playing.
Brainstorm Exercise
Consider setting up a role-playing scenario for one of your existing activities or assignments. What is the outcome you expect students to achieve from this activity? Imagine a situation (or world) where that outcome exists or can be applied. What does that situation look like? Now, imagine you are a student in that situation, what does this world look like? (See what I did there? Role playing!) How will your student interact with that world to achieve your outcome? Take a minute or two to note your answers to these questions. This is a good way to begin sketching out your narrative. Once your sketch is complete, you can begin moving the parameters and rubrics of your existing activity into this world.
The world you create for your scenario can be the ‘real world’ in a particular time period, a hypothetical political situation, a business/client relationship regarding a product, or a hypothetical world to resolve a physics problem. Here are some ways you can frame your thinking as you practice the above exercise:
Take the tools you have provided in the course content (competence) and use them to analyze the following situation (world building). “How would you apply what you learned this week to the following situation?”
Even better, “How will the situation change as a result of your decisions?”
A small change in wording can provide big changes in thinking. In the second bullet point, we have moved from applying the week’s content to a given situation to a personalized critical analysis.
Student-Created Narrative
The other side of the coin is allowing students to build on your narrative, or create their own. This is where you significantly impact autonomy. This is your world, you create the rules. You set the parameters that will focus student thinking toward the outcomes you hope for them to reach. The rules you set will determine the level of autonomy the student experiences.
Brainstorm Exercise
For this exercise, you can continue with the role-playing scenario you built in the previous Brainstorm Exercise or choose another existing activity from a course. Let’s brainstorm some ways you can add autonomy to this activity.
A simple addition to the role-playing scenario we built previously would be to allow students to choose the role they will play. You have built a narrative, now let the student choose the character they will play to build on that narrative. If you need to keep things more focused, it is totally acceptable to restrict the roles to a list of options. Even with restrictions, is it possible for students to choose the gender, race or economic background of their character? What other characteristics can you think of that will help a student take ownership of the role?
For other kinds of activities, consider giving students the creative freedom to choose and build their own narrative. The instructor still defines the rules of the world and sets the outcome and rubrics for the activity. Can you open up the choices a student has to meet these outcomes? Allow students the autonomy to take ownership of how they get to your outcome, using your rubric as a guide.
For example, select a concept that was covered in the course. In your activity, allow students to choose where and how that concept can be applied. Let them build the narrative around the concept. Conversely, select a setting in the world, much like you would for the role-playing scenario. Allow students to choose the course concepts they want to apply in that setting and build a narrative around that. This strategy lends itself well to case studies. Rather than taking on a specific role, students become story creators, while still working with instructional concepts and within the rules defined by the instructor.
Group World Building
As I mentioned in my previous post, group work and community building (as modeled by gaming communities) are great ways to increase relatedness in a course. Community members are able to share their competence and, in turn, feel valued by that community. This is another great support of motivation.
All of the strategies discussed above can be applied to group work. You can set up the same role-playing scenarios, but this time multiple students will take on different roles and interact in those roles within their group community. Relatedness is impacted as decisions and actions taken by one student will affect the world that is being collaboratively built. Here are two examples from a media course I recently helped develop. They both reflect the range of complexity group world building can undertake.
Pitch Game (Group Discussion)
For your Initial Post in this discussion, pitch a new television show. Follow the parameters presented in class; including X+Y claims, audience description, sketch of the show’s audience and the ideal network for the show. For your Peer Response, you will take on the role of media buyer. Choose which network or streaming service you work for. Review all available show pitches. Decide which show you will purchase. Reply to the show you wish to purchase; identify the network you represent and write your reasoning why you want to make the purchase. Use course material to support your decision.
Trial Simulation (Group Project)
To better understand the ways in which civil law shapes the media ecosystem, we will enact a short trial simulation. The court of the Honorable Judge is an appeals court: this means that the FACTS of the case were decided by the TRIAL court. The question that will be litigated in class regards the law and the interpretation of those facts.
One student will take on the role of Plaintiff, another will be Defense and a third member of the group will be the Judge. Over the next two weeks, you will follow the posted schedule to present your arguments and answer questions from the Judge. Before proceeding, review the Debate Rules and Trial Facts documents. You will be expected to cite actual Supreme Courts cases to support your claims.
Hopefully, this blog has provided some simple entry points for using world building to increase autonomy, build competence, and improve relatedness in a course to improve motivation and engagement. I would love to hear what you come up with in the Brainstorm Exercises.
Dice Image: “DSCF5108” by joelogon is licensed under CC BY-SA 2.0 World Building Image: puzzle-ball-1728990_1920 from Pixabay
I am an avid gamer. For some time, I have been thinking about how engaging games are and whether this quality can be leveraged for other purposes; like instruction. Put more simply … What is it about games that makes them so engaging? Is there something about this that we can use as educators? Granted, these are not new questions.
Dr. Meghan Naxer recently posted a primer on Self-Determination Theory (SDT), Self-Determination Theory and Online Education: A Primer. I believe SDT does an excellent job describing much of what makes games so motivating and engaging. Indeed, games provide an excellent model of SDT and can inform us on how the three basic psychological needs (autonomy, competence and relatedness) might be met in learning environments. I hope to build on some of the concepts introduced in Meghan’s post.
This is the first in a series of posts on games as a model for SDT. In part 1, I look at the convergence of Autonomy, Competence and Relatedness in gaming and online learning in relation to building community and intrinsic motivation.
Autonomy: Open Worlds
Games are becoming increasingly complex, particularly in the arena of Open World games where players are allowed to choose their own paths (autonomy). Entire worlds, even universes, exist for you to immerse yourself in, each with their own history and internal logic. You are often thrown into a new world with few instructions.
For example, in the Open World game No Man’s Sky, millions of stars and planets are procedurally generated just for you, unique to your specific game. When this game begins, you appear on an alien planet next to a broken space ship. Your space suit is running out of oxygen. No instructions, just urgent messages from your onboard computer on toxicity and your decreasing oxygen levels.
The complexity of modern open world games is more than can be reasonably covered in a tutorial. Besides, a significant part of what makes the game engaging is the autonomous exploration and discovery. You decide how you will play the game, in what order you will do things and at what pace. Being told how to play the game is far less interesting.
Here is the internal logic of No Man’s Sky:
You’re in an alien environment.
It seems like you are alone.
There are problems to solve.
There is no instruction manual.
You must explore to solve these problems.
Think about that in comparison to your online students when they first enter your course. Online students do have instructions to help them get started. However, at first glance, it can seem like they are thrown in the deep end to figure things out for themselves. In a situation where intrinsic motivation is less clear, this can lead to frustration. That does not have to be the case. For gamers, there is one more bullet-point.
When you get stuck, you can turn to an online community.
If you were to talk to a gamer and describe your experience about how many times you ‘died’ trying to figure a game out, a common reaction would be something like, “Why would you do that? You know there’s a wiki, right?” Playing an online game today is not a solo venture, even if it is a solo game.
Relatedness: Gaming Communities
Online communities spring up around successful games to support players. A majority of large games have an accompanying Wiki, many of which are curated and updated by players. Various online communities exist to discuss specific games in forums and social media. Players discuss technical issues, the internal logic of a game, the lore and history of the game’s world, where to focus their efforts when starting, or the best order to do certain tasks for best success.
The point here is that given the resources, an intrinsically motivated group of people will figure out ways to help each other succeed. This speaks to Relatedness. In an environment where players are given maximum autonomy, they turn toward their community to support that autonomy and gain competence in that environment. Further, when given an opportunity to contribute to supportive communities, to share their competence, players feel valued as members of that community. So, can we create something like this environment in an online course?
Intrinsic Motivation: Sharing Competence
The challenge in my above summary is intrinsic motivation. There is something of an inherent motivation to play a game and get better at it. Though it can be less clear, online students also have intrinsic motivation beyond just ‘passing the course’. Community building can be a way to help students to discover and support these motivations.
Following the gaming example from above,
“Players discuss technical issues … where to focus their efforts when starting, or the best order to do certain tasks for best success.”
This is a good place to start building community. Simply encourage your students to share their success strategies in your course.
Formalize this by setting up a forum-style environment where students share their experiences, the process they used to solve a problem, the biggest stumbling block this week, or simply to ask each other for help. Much of this could also be accomplished through existing discussions or peer reviews by simply adjusting or adding language for students to draw from their own success strategies, “What did you discover this week that would benefit another student?”
Group work is another tool that can be used for helping students discover intrinsic motivation and build community. Challenge students to work together to apply this week’s content to something in their own lives, a subject of their choice. Trust them to find the problem that needs solving. This is similar to participation in a gaming community – sharing and building competence. But in this case, you are allowing students to build the narrative.
By giving students some autonomy in deciding the end product of their work, you are creating an opportunity for them to discover what drives them.
With all of these examples, it is perfectly reasonable to set the ‘internal logic’ of the environment; subject matter to be discussed, the completion goals, length of the project, rubrics for assessment purposes. The idea is to allow students more autonomy in determining how to get to these goals. All that you are really changing, compared to a typical assignment, is control of the narrative.
And that is a nice segue to the topic of my upcoming post, Part 2, Games as a Model for Motivation and Engagement – Narrative and World-Building
Could your online course use a boost? Is it lacking the secret spice that could be the difference between students coming away feeling satisfied rather than feeling like something was missing? Maybe there is a complex topic that students are consistently having a difficult time understanding or perhaps a particular concept that begs for more than a Power Point with some bland images collected from the internet. Well, perhaps the missing ingredient is an animation!
A brief history of animation…
In 1914, cartoonist Windsor McCay wowed audiences with his short animated film. Although not the first animation ever produced, Gertie the Dinosaur broke ground by employing new techniques, such as keyframes, loops, and the use of an appealing character, all of which would become standard practice in the creation of future animations. Interestingly, Gertie the Dinosaur also featured an interactive element where McCay would appear to give commands to Gertie which she would then carry out on screen.
Fast forward to 1928 where upstart Walt Disney Studios released the animated short Steamboat Willy and introduced the world to Mickey Mouse. Steamboat Willy also marked the first use of sound integrated onto film in an animation.
The 1930’s saw a boom in animation with Warner Brothers creating its Merrie Melodies and Looney Tunes cartoons which featured a cast of outrageous characters including Bugs Bunny and Daffy Duck and arguably some of the most enduring pop-culture references ever. I admit, the Looney Tunes were an invaluable supplement to my formal elementary school education!
Disney upped the ante in 1937 with the release of the first feature length animated film Snow White and the Seven Dwarves. With Snow White, the Disney animators ventured into uncharted territory and proved that an animated film could be both visually stunning and a legitimate medium for storytelling. It was also around this time that the Disney animators planted the seeds of what would become the 12 principles of animation, a system of principles and techniques which have endured to this day and serve as the foundation in the creation of animation and motion graphics.
In the 1940’s and 50’s Disney continued to produce classics with films like Bambi and Fantasia while another animator, Ray Harryhausen, perfected his “Dynamation” stop motion technique and brought fantastic monsters to life alongside live actors in films like The 7th Voyage of Sinbad and Jason and the Argonauts. Meanwhile, across the Pacific Ocean the Japanese were busy developing their own unique style of animation known as anime.
In 1960, The Flintstones became the first animated prime time television series and paved the way for animated programs like The Simpsons, the longest running series of all time.
In the 1970’s, animated cartoons dominated Saturday morning television. Although the content was mostly aimed at keeping kids engaged while mom and dad slept in, the power of animation’s potential as a learning tool was being explored in the form of short interludes during the commercial breaks. Most notable, Schoolhouse Rock combined animation and music in a powerfully memorable format to teach kids topics like grammar, history, math, and science. Meanwhile, Sesame Street featured groundbreaking animations aimed at teaching through entertainment.
In the 1980’s, the computer arrived and ultimately revolutionized the way that animation was created as well as the way it looked. It was a clunky start but by 1995, Pixar studios released the first entirely computer animated feature Toy Story and there was no looking back. The omnipresence of the internet added fuel to the fire and allowed anyone with a laptop and a story to tell to publish their ideas to the world.
So, what does all of this have to do with online learning? Well, before the pedagogical red flag goes up and you think that animation is just for kids or that it’s too frivolous to occupy space in the world of higher education, read on.
We need look no further than the media that we consume on a daily basis to see how ubiquitous animation is. From television commercials, to the prevalence of the online “explainer” video, to online apps such as Headspace, which utilizes animations to demystify the practice of mindfulness and meditation, animation is proving to be an effective medium to deliver information and get it to stick. Why wouldn’t we want to implement this powerful and available tool in online learning?
A well-crafted animation is a multi-sensory experience that can take a complex or abstract concept and explain it in a way that is concise, understandable, and engaging to the learner. Combining audio/verbal and visual information to illustrate difficult topics allows learners to associate images with concepts and has been proven to actually increase learner understanding and retention.
Additionally, animation can be used to visualize things that would otherwise be impossible or too cost prohibitive to depict with film, text, or still images. Things such as a biological or chemical processes that are invisible to the naked eye, or the ability to look beneath the earth to witness how a plants’ roots grow and utilize nutrients, can effectively be illustrated with animation. Larger scale events like planetary orbits, the hydrologic cycle, earthquake science, or the Russian Revolution can be represented in ways that are much more effective than using still pictures with arrows and text. Does the topic require a horse, a bug, a whale, a tractor, a piece of DNA? There’s no need to worry about the exorbitant costs and time required to train, catch, dive, drive, or dissect…simply animate it! Animated characters, human, abstract, or animals can also add visual appeal and inject humor into a lesson. Finally, and arguably most important: animations are entertaining! If the student is entertained, they are more likely to be engaged in the subject matter and if they are engaged, they are more likely to retain information.
So what’s the next step? The Ecampus Custom Team is here to help you develop your animation. We’ll start by meeting with you to determine a learning objective and to brainstorm ideas for the project. You can view examples of our work to see if a particular style sparks your interest or, if you have a specific aesthetic in mind, we will work with you to refine it. Once we have pinned down a solid direction for the project, we’ll work with you to create a script. The script will serve as the narration for the animated video and is vital as it is an opportunity to distill the content down to its most potent elements. We prefer to keep the maximum length of the animation under 5 minutes and have found this to be most effective for the learner. When the script is finalized, you will come in to one of our studios to record the voice over narration. At this point, it’s full steam ahead and our team begins production on the animation! We’ll check in with you regularly with samples and progress reports to ensure an amazing final product.
-James Roberts, media team, Oregon State University Ecampus
Have you ever created an online course without using images? No?
That is not surprising as images can convey emotions, ideas, and much more. Their value is often captured in an old adage: A picture is worth a thousand words.
This article will discuss the value of images in online course design and how using visuals to accompany instruction via text or narration might contribute to or detract from an online learning experience. Let’s begin.
Multimedia Learning: Images, Text, and More
Online learning is a modern form of multimedia learning. Richard Mayer (2009) described multimedia learning as that learning that integrates the use of words and pictures. In traditional classrooms these learning resources might be experienced as:
Textbooks:Text and illustrations.
Computer-based lessons: Narration w/animation
Face-to-face slide presentations: Graphics and audio.
In online learning multimedia may also include:
eBooks: Text and digital images
Video: Text, images, animations, coupled with audio.
Interactives: Maps, images, and video.
Digital Visual Representations: Virtual worlds and 3D models.
Screencasts: Software demos, faculty video feedback, and more.
Audio: Enhanced podcasts or narrated lectures.
These two short lists, although not exhaustive, demonstrates the importance of visual elements to multimedia based learning in online courses. There are many reasons why we might include any one of these multimedia learning experiences in an online course. For our purposes we will explore a bit more the instructional value of visuals to online learning.
So, how do words and pictures work together to help shape learning? Given that this is perhaps the most common learning object used in an online course it would seem useful to understand what may be considered this simple interpretation of visual literacy for learning (Aisami, 2015).
Visual Engagement Of A Learning Object
In a recent study of how people acquire knowledge from an instructional web page Ludvik Eger (2018) used eye tracking technology to examine a simple learning object composed of a title (headline), a visual element (i.e., diagram), and a box of written text. With no audio support for the learning object in this study, participants engaged the content via visual engagement alone. Results indicated that the majority of students started their learning process at the headline or the headline and visual element. The box of information, in text form, was the third part of the learning object engaged.
Within this context eye movement analysis indicates a learning process that is dependent upon a consistent visual flow. Purposely connecting the title, visual element and information text of a learning object may best reinforce learning. By doing this the course designer/instructor becomes a sort of cognitive guide either focusing or not-focusing learning via the meaning structure of the various learning object elements. In our case we want to use visual elements to support performance and achievement of learning tasks.
Choosing Visual Elements
In order to explore the choice of visual elements in an online learning experience it is helpful to understand how we process that experience from a cognitive science perspective.
Clark and Mayer (2016) describe that cognitive science suggests knowledge construction is based upon three principles: Dual channels, limited capacity and active processing. Let’s briefly examine what these are.
Dual channels:
People have two channesl of cognitive processing 1) for processing visual/pictorial material and 2) one for auditory/verbal material. See Figure 1. below.
Figure 1.: Model of the Cognitive Theory of Multimedia Learning
Limited capacity:
Humans can only process a few bits of pieces of information in each channel at the same time.
Active processing:
Learning occurs as people engage in cognitive processing during learning. This may include attending to relevant material, organizing that material into a coherent structure, and integrating that material with prior knowledge.
Due to the limits on any learner’s processing capability it is paramount that we select visual images that help manage the learning process. Our goal is to limit excessive processing that clutters the learning experience, build visual support for representing the core learning process, and provide visual support that fosters deeper understanding of the learning at hand. What does this mean in practice?
Managing Processing Via Image Use
Making decisions about image selection and use is a key to managing this learning process. Understanding the meaning of images to select is also key and is really a function of literacy in one’s field and visual literacy in general (Kennedy, 2013).
In practice we can use the following guidelines to make decisions about image use in multimedia-based online learning.
Control Visual Elements – Too many images on a web page or slide may force extraneous cognitive processing that does not support the instructional objective.
Select Visual Elements Carefully – Images difficult to discern are likely to negatively impact learning. Think about good visual quality, emotional and intellectual message of the image, information value, and readability.
Use Focused Visual Elements – Target selection of visual support to those images that represent the core learning material and/or provide access to deeper understanding of that core content.
Other Image Tips
Emotional Tone: Emotional design elements (e.g., visuals) can play important roles in motivating learners and achievement of learning outcomes (Mayer, 2013).
Interest: Decorative images may boost learner interest but do not contribute to higher performance in testing (Mayer, 2013). Use decorative images prudently so they do not contribute to extraneous learning processing (Pettersson & Avgerinou, 2016).
Challenge: Making image selections that contribute to a degree of confusion may challenge learnings to dive more deeply into core learning. This is a tenuous decision in that challenge in sense making may prove to foster excessive processing.
Access: Images must be presented in a format that is viewable to users to be practical. This involves an understanding of technical features of image formats, download capability, mobile use, and universal design techniques.
Final Thoughts
It is valuable to remember that visuals communicate non verbally. They are most effectively used when carefully selected and paired with text or audio narration. Visuals appeal to the sense of sight. They have different classifications and could be pictures, symbols, signs, maps graphs, diagrams, charts, models, and photographs. Knowing their form, meaning, and application is part of being a visually literate course developer or instructional designer.
Aisami, R. S. (2015). Learning Styles and Visual Literacy for Learning and Performance. Procedia – Social and Behavioral Sciences,176, 538-545. doi:10.1016/j.sbspro.2015.01.508
Clark, R. C., & Mayer, R. E. (2016). E-learning and the science of instruction : Proven guidelines for consumers and designers of multimedia learning. Retrieved from http://ebookcentral.proquest.com
Eger, L. (2018). How people acquire knowledge from a web page: An eye tracking study. Knowledge Management & E-Learning: An International Journal 10(3), 350-366.
Kennedy, B. (2013, November 19). What is visual literacy?. [Video file]. Retrieved from https://www.youtube.com/watch?time_continue=1&v=O39niAzuapc
Mayer, R. E. (2009). Multimedia learning (2nd ed.). New York: Cambridge University Press.
Mayer, R. E. (2014). Incorporating motivation into multimedia learning. Learning and Instruction,29, 171-173. doi:10.1016/j.learninstruc.2013.04.003
Rune Pettersson & Maria D. Avgerinou (2016) Information design with teaching and learning in mind, Journal of Visual Literacy, 35:4, 253-267, DOI: 10.1080/1051144X.2016.1278341
Credit: Embedded image by Kelly Sikkema on Unsplash.com
Facial motion capture (Mo-Cap) is a process that uses a camera to map and track points on the user’s face. Software such as Adobe’sCharacter Animator derive data from the camera to animate cartoon characters in real time. This can greatly reduce the amount of time needed to create an animation and breathes subtle life into the character that would be otherwise difficult to achieve. Character Animator harnesses the power of the webcam to map several parts of the face to the respective parts of the character allowing it to record in real time. This includes your eyebrows, eyes, mouth, and head position. It also intakes audio to change mouth shapes to match what the user is speaking. In addition to the webcam, the user can operate their keyboard to trigger additional movements, effects, and walk motions. All these different aspects combine and give the character a personalized feel.
How does it help?
Cartoon animations currently do not have a large presence in online learning. This is mostly because they take a long time to create and not everyone has had the resources to create them. Normally, character animation for cartoons requires drawing each frame or using a pose-to-pose process called key framing. With innovative technology such as Character Animator, it greatly reduces the barrier to create cartoon animations for online learning. Each motion of the face records instantly and gives the character life by adding subtle movements to the face and head. The bulk of the work is completed early on to draw, rig, and add triggers to the character, or in this case, the puppet. Once the puppet is set up to record, it is smooth sailing from there. All movements, audio, and facial expressions are recorded in one take; greatly reducing the amount of time for development. However, Character Animator allows you to choose which aspects you want to record, so you can record the eye movements one time, then the eyebrows another time. This is helpful for the perfectionists out there who cannot seem capture it all at once.
How does it work?
To create an animation using Character Animator, there are a handful of stages to complete. The first step is to draw the character in either Photoshop or Illustrator. Next, Character Animator imports the graphics and they are rigged into puppets to prepare for recording. This means the eyes, nose, mouth, etc. are tagged with their respective labels. Also during this time, you can create keyboard triggers. These are animations such as arm movements, walk motions, and more, that the pressing of certain keys on the keyboard triggers the character to perform. After the puppets are prepared, it is time to record. It does not have to be shot perfectly all at once; you can blend the best bits from different recordings into one masterpiece. The last step is to export the character’s recording and composite it into a story using video software such as Premiere Pro or After Effects. Once you achieve the flow of facial Mo-Cap, you can start cranking out animations faster than ever before.
Click Image to View Video
Below is a quick rundown of what it takes to set up a character and how to record it. At the end of the video, there is a sample of multiple characters in one scene.


 For DIY video production, there are many ways to go about this!


 Instructor-created narrative refers to the world or environment created by the course builder and determined by the story they are telling about that world. This world building can be for a particular course activity, but also keep in mind that your entire online course is a learning environment and you, as the course builder, have significant influence over how that world is curated. A colleague recently described how an instructor begins their course with the phrase, “Welcome scholars”. This sets a tone that is a competence-supportive environment with just two words. Tone is a commonly used tool for world building across many domains.


