By: Julie Jacobs, Jana King, Dana Simionescu, Tianhong Shi
Overview
A recent scenario with our course development team challenged our existing practices with lecture media. Formerly, we had encouraged faculty to include only slides with narration in their lecture videos due to concerns about increasing learners’ cognitive load. Students voiced their hope for more instructor presence in courses, and some instructors started asking about including video of themselves inserted into their lectures. This prompted us to begin thinking about instructor presence in lecture videos more deeply: why were we discouraging faculty from including their faces in lecture videos? While our practices were informed by research-based media theory, we also recognized those theories might be outdated.
We began to explore the latest research with the following question in mind: does visual instructor presence in lecturesincreaseextraneous cognitive load in learners? We use the phrase “visual instructor presence” to refer to lecture videos where an instructor’s moving image is seen giving the lecture, composited together with their slides. This technique is also commonly referred to as “picture-in-picture”, as seen in the image below.
Image 1: Adam Vester, instructor in College of Business, in his lecture design for BA 375 Applied Quantitative Methods.
A task force was created to review recent research on visual instructor presence and cognitive load, specifically in lecture-type videos. Our literature review included a look at leading multimedia learning scholar Richard E. Mayer’s newest group of principles. We also reviewed more than 20 other scholarly articles, many of which were focused on learner perception, motivation & engagement, and emotion.
Findings
According to recent work in multimedia learning, research in this area should focus on three areas, namely learning outcomes (“what works/ what does not work?”), learning characteristics (“when does it work?”), and learning process (“how does it work?”) (Mayer, 2020). Below are our conclusions from the 23 research articles we reviewed regarding instructional videos, attempting to answer the above questions of “what works”, “when does it work”, and “how does it work”.
This review of recent literature shows no evidence that visual instructor presence increases extraneous cognitive load.
Students tend to prefer lectures with visual instructor presence – they report increased satisfaction and better perceived learning, which can boost motivation and engagement.
While some studies find no difference in performance outcomes when visual instructor presence is utilized, others found increased performance outcomes with visual instructor presence. Proposed explanations: embodiment techniques such as gestures, eye contact, and body movement which fosters generative processing (the cognitive processes required for making sense of the material); social cues can help direct the learners’ attention; increased motivation (as per point 2 above) contributes to better learning.
The effects may depend on the specific type of visual instructor presence (e.g., small picture-in-picture, green-screen, or lightboard) and the characteristics of the content (complex/difficult vs simpler/easier).
Recommendations
Based on these findings, our team has decided to remove the default discouragement of instructors wishing to use picture-in-picture in lectures. If an instructor is interested in having their visual presence in the lectures, we encourage them to discuss this option with their Instructional Designer and Lecture Media Coordinator to determine if this style is a good fit for them and their content.
Image 2: Bryony DuPont, associate professor of Mechanical Engineering, utilizing visual instructor presence in her lecture design for ME 382 Introduction to Design.
We recommend considering the following points:
What is their presentation style? Do they tend to spend a lot of time talking over a slide or is there a lot of text or other action (e.g. software demo) happening in the video? If there’s a lot happening on the screen, perhaps it’s better to not put their video on top of it (the instructor video could be placed only at the beginning and/or end instead).
What type of content? Is it simple or more complex? For more visually complex content, a lightboard or digital notation without picture-in-picture may work better, to take advantage of the dynamic drawing principle and the gaze guidance principle.
Is it a foreign language course? If so, it’s likely helpful for the learners to see the instructor’s mouth and body language.
Is the instructor comfortable with being on video? If they’re not comfortable with it, it may not add value. This being said, our multimedia professionals can help make instructors more comfortable in front of the camera and coach them on a high-embodied style of lecturing.
Since implementing these guidelines and working with an increased number of lectures with visual instructor presence, we also noticed that it works best when the instructor does not look and sound like they’re reading. Therefore, for people who like working with a script, we recommend practicing in advance so they can sound more natural and are able to enhance their presentation with embodiment techniques.
We would love to hear about your opinions or experiences with this type of video. Share them in the comments!
For a detailed summary of our findings and full citation list, please see the full Literature Review.
This post is Part I of a two-part series on video selection and use in online courses. Part I provides the reasoning behind understanding course videos selection by course developers as a curatorial process. Part II will explore video curation in practice in course development and provide a course design perspective on video presentation and management issues.
Recent Video Use Trends
In September of 2020 the enterprise video company Kaltura Inc. conducted its seventh annual State of Video in Education 2020 report. The report included responses from across the education system spectrum with higher education institutions making up 53% of all respondents (Figure 1.).
Figure 1. Percentage of respondents to video survey by education sector.
This report described how remote teaching-driven course changes impacted video adoption and use in education. Remote teaching and learning was the most common use of video (83% of respondents). Lecture captured as video was used by 69% of the responding institutions.
The executive summary identified a number of key insights and trends related to changes in video use in education. A select few can be seen below:
Use of video for remote teaching and learning grew by 28% over 2019.
Video use is viewed as positive. Respondents (84%) saw video as having a positive impact on student satisfaction, 73% seeing video increase student achievements and 76% believe it increased instructor satisfaction.
Students as creators of video increased by 13% from 2019 to 2020.
In higher education there was rising video use for remote teaching, lecture capture, and flipping the classroom.
Actual growth in the use of video for remote teaching and learning grew by 28%.
A majority of respondents (68%) want to continue to blend traditional teaching with today’s virtual innovations; such as video.
In some ways this is not surprising. This past year forced many instructors in higher education to convert face-to-face courses to remote instruction. Much of that transition was accomplished with synchronous sessions via ZOOM or some other video conferencing program. Live video conference sessions, if recorded, also served as a support resource for students. In response to the challenges of the past year both live and recorded video were adopted to make remote learning doable. Fully online courses do not have this live element as they are asynchronous and did not have to adapt in this way.
In asynchronous courses at Oregon State University our Ecampus course developers utilize video differently. Video is as a key media element in delivering course content to learners, promoting faculty presence, and to build depth into projects and assignments. Video content may be produced internally by course developers (e.g., instructors) and used in courses via an enterprise video system (e.g., Kaltura). Video content may also be sourced from external video-based social media sites (e.g., YouTube and Vimeo) or educational and commercial collections (e.g., Kanopy or Amazon) and via syndicated video sources (e.g., podcasts and Twitter).
Given the plethora of video available and a trend toward increased video integration into instruction the challenge to course developers is the selecting, managing, and presenting video content to support and compliment course learning outcomes. Ultimately this also becomes a course design challenge for instructional designers who must adapt to manage the integration of increasing levels of video in the course in a way that makes sense from a pedagogical perspective as well as visual design aesthetic.
Course Developers as Media Curators
What is a Curator?
The growing value of video in the experience of a course suggests that course developers (e.g., instructors) consider a new way of thinking about how video is selected, managed and presented. In essence, I am suggesting that for a given course the course developer serves as a curator of video content.
But what is curator? Should a course developer really think like a curator? How might curated media shape course development and instructional design?
In order to explore this notion of course developers as media curators a bit more I would like to share the definition of what a curator is from the American Alliance of Museum (AAM) Curators Committee (2009). The preamble to the curator core competencies of a curator defined the term curator as:
Curators are highly knowledgeable, experienced, or educated
in a disciplinerelevant to the museum’s purpose or mission.
Curators are further described as having nine core competencies and related applied skills. The competencies are:
Collection planning Scholary Research Exhibition Development
Collecting Object Research Education
Collection Care Applied Research Outreach & Advocacy
In Figure 2. we see these same foundational roles expressed by the AAM coupled with a definition of curator and description of the work of a curator.Also included is the domain of the work. Those domains are preservation, research, and communication. The global context of curation is, in this definition, a museum. The more discrete context is the exhibition, or exhibit application. Yet it is all part of a curator’s work.
Figure 2. Definition of the term curator and select context example.
What we see in this definition in Figure 2. is the premise that curators select, gather, care for, and prepare presentations of single items that in aggregate make up a curated collection. That collection becomes a resource and object of education, outreach, advocacy and presentation.
This makes the act of curatorship a scholarly and creative practice that is deeply intentional and based upon the definitional parameters of the organization doing the work.
Course Developers – Curators of Video Collections
Now let us think about what an online course developer is and what they do. At Ecampus course developers collaborate with instructional designers to plan an online course. Instructional designers advise and take content selected by the course developer and build that content into Canvas, our learning management system. The created courses are then shared with students. Course developers are considered content experts much like museum curators are. Let’s look at that a bit more closely.
In Figure 3. below we can see a comparison between the definitional role and duties of a museum curator and course developer. There are striking parallels between these roles. So much so that it would seem reasonable to think about what a course developer does as also a curatorial practice. A practice focused on the learning content, including video, for a given course.
Perhaps the greatest difference between these to two curatorial practices is the context of each. In asynchronous course development it is not uncommon for instructors to perform many of these same functions as museum curators but on a more discrete scale. The scope and context of their focus is obviously different.
In essence a course developer actively gathers and in may cases, creates unique course elements that form the curated media collection for a course. That collection of texts (readings), images, web resources and video is then used for education, research, and perhaps outreach with a constant eye on student access to media. Ultimately a course media collection is intended to permit the course developer to fulfill the purpose of the course and guide students in achieving the course learning outcomes.
The physical design of the course, with its media collection, is the domain of the instructional designer. The collaboration between the course developer and instructional designer are key in preparing the course as an “education exhibition” of sorts that has clear learning outcomes.
Course Video Selection: The Art of Curatorship
We began this discussion with the importance of video in online course development and design. With that in mind it is logical that video curation is an important element of course-wide media collection identification.
Video collection, cataloging, arranging and assembling for display in a course fits quite well within the parameters of curating. Any curation is also about a level of storying, opportunities for engagement, information sharing and perspective sharing (Potter, 2017). In course development these processes as applied to course media, and in particular video, have the potential to create and shape the nature, experience, and associated learning in an online course.
In making decisions about video use in online courses, a course developer would apply their knowledge and expertise to curate the selections. Clear learning outcomes provide a pedagogical and content structure to the video curation process. Once a video collection is established other decisions may come into play that reference an aesthetic for the collection. This is the art of curatorship.
The art of curatorship has been viewed as closely aligned to a design process (Shuey, 2014) and may be guided by an interpretation of the universal visual design principles as conceptual guides to the education exhibition that is the online course. In this sense the curator is not thinking as much about the collection items per se but more about how the collection fits together to provide and support a narrative, flow, or education scaffolding for the course.
Thinking Like A Curator
As an exercise in curatorial thinking let’s take some re-interpreted concepts of visual design and see if they help us think through how we curate not only individual videos but also a video collection. This brief list includes accompanying questions that are informed by the identified principle and may shape the curation of video. In these examples found videos are outside video sources where created videos are those made by the course developer.
Balance: What is the intended balance between: Created and found curated videos? Permanent video and temporary (single-use) video content?
Emphasis: How does found video reinforce or extend created video? Is there a particular focus or intention of video use?
Movement: Is there a scaffolding of curated video that matches the scaffolding of the course progression? How does the video curation contribute to that progression?
Pattern: Is curated content focused, more general in nature, or quite diverse in source, topic or message?
Rhythm: Does video use and viewing support or promote a rhythm of engagement for the course that compliments course objectives?
Repetition: Are curated videos reinforcing similar ideas or concepts? Are videos used consistently for certain aspects of the course (i.e., narrated lectures)?
Proportion: Does the video collection time commitment fit within the time expectations for the course? What is the ideal proportion of video to text, image, and other course media?
Variety: Are curated videos from different content sources and types? What is the ideal balance for the course?
Unity: Does the video collection promote a sense of wholeness to the course? Could the video collection, on its own, communicate identifiable ideas, patterns of ideas, or a range of perspectives on a topic?
Does video accessibility contribute to the overall course accessibility?
In working through this exercise, we begin to move beyond video collecting by subject toward a more complete analysis of video collection selection and use that includes intertwined pedagogic and aesthetic considerations. This helps create a video collection that is intentional in its item selection, organization and use.
Final Thoughts
Recent research by Kaltura Inc. indicates that video use in education is on the rise in the past year. A continued growth of access to video and ability to create video coupled with an interest in integrating video in education efforts suggests course developers have a challenging task regarding media selection and use.
This article presents the idea that course developers, whether obvious or not, are actively engaged in a curatorial process regarding media selection and use. In addition, because of the importance and prevalence of video, its curation is presented as a key element of the larger course media curation effort. Lastly, we have explored how video collections contribute to academic and aesthetic value of a course and provided some key considerations based upon extending classic visual design principles to a curatorial practice.
It is interesting that the term curation has Latin roots in the verb curare; which means to take care of. Course developers conducting intentional video curation contribute to meaningful media curation for a course. This engagement in the practice of a curator is truly a professional act of caring about the quality of course development and the impact on student learning.
In Part II of this series we will address the practice of video curation in the context of an online course and explore instructional design considerations for video use that balance and complement a sample course video collection.
References
American Alliance of Museums. (2009). Curators Committee (CurCom): Curator’s core competencies. https://www.aam-us.org/professional-networks/curators-committee/
Kaltura Inc. (2020) The state of video in education 2020: Insights and trends [seventh edition].
https: //corp.kaltura.com/resources/the-state-of-video-in-education-2020/
Potter, J. (2017). Curation. In K. Peppler (Ed.), The SAGE encyclopedia of out of school learning (pp. 4-6). SAGE Publications Inc., Thousand Oaks, CA.
Shuey, G. (2014, October 21). The art of content curation. RELEVANCE.
https: //www.relevance.com/the-art-of-content-curation/
Wikipedia (n.d.). Definition of term collection.
https://en.wikipedia.org/wiki/Collection_(artwork)
Wikipedia (n.d.). Definition of term curator.
https://en.wikipedia.org/wiki/Curator
This brief series of tips is meant to be a beginner’s overview for DIY home recording on webcam, with some additional options suggested if you want to take your video production even further.
Since this document may not cover every issue you encounter while acclimating to DIY video recording, we recommend contacting your school tech person for additional troubleshooting.
WHERE TO START
Internet Connection
Wired connection via ethernet cable is best
If wired connection is not possible, having a clear line of sight to wifi router will give the best wireless connection
Disconnect any wifi devices that are not in use or needed.
Computer Check
Determine if your computer meets minimumsystem requirements for streaming software
Close all non-essential programs to free up more computer resources
Disconnect any external monitors if you are on a laptop and it is running slowly
Testing Your Tech
Does your computer have a built in webcam or do you have a 3rd party webcam?
Identify where your microphone is and talk towards it
Test the webcam and audio settings BEFORE your first recording.
Practice practice practice
The last recording will be better than the first
Making sure your voice is clear and easy to understand
Having a microphone helps with this
Smart phone earbuds have a built-in microphone that can help you with voice clarity
Airpods would also work when recording to an iPhone
PRESENCE AND ENVIRONMENT
Be aware of your environment.
Limit any background noise as much as possible.
Clean up your space and be aware of what is in the background of the video.
Rooms with carpets and drapes are best for audio.
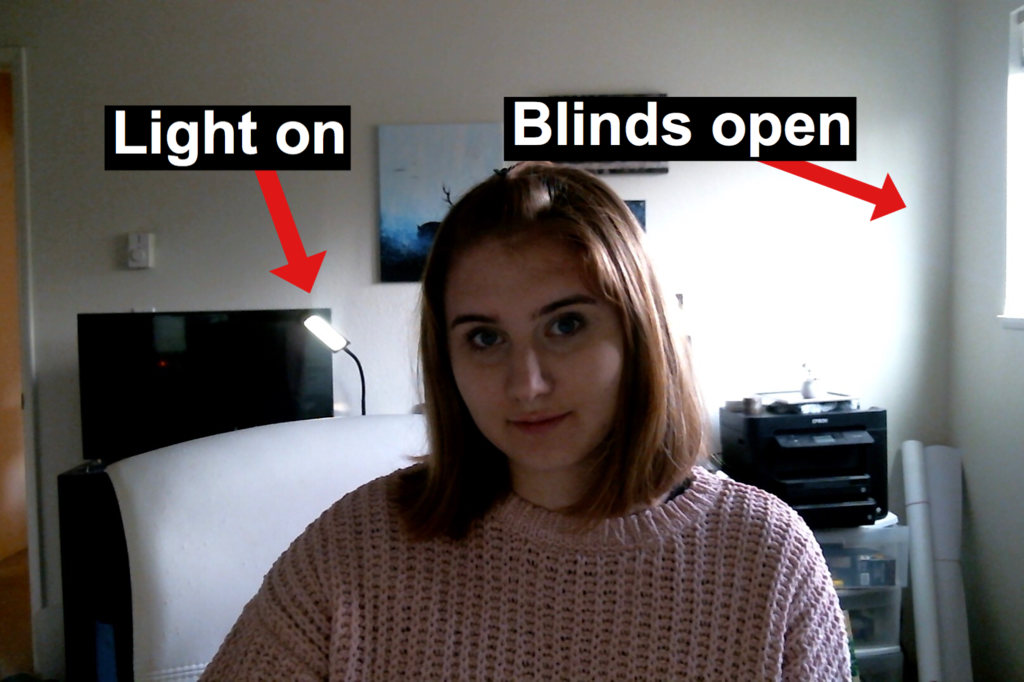
Turn off lights and close windows that are behind you when you are recording.
If possible, turn on a light behind the camera.
Keep experimenting with lighting until you have a set up that works for you.
Try not to bump the desk, computer, camera, or microphone while recording.
Typing should also be avoided.
Do a test lecture and watch it.
See what works and what doesn’t.
If possible, get feedback from others
Practice
The more you practice, the more natural it will feel.
Run through what you want to say before you start recording.
Relax and be natural! Hopefully you are sharing knowledge that you are passionate about and we want that to show. (Remember that we are always our own worst critic, and your teaching team will bethere to help you with constructive feedback on how to help students best enjoy and learn from these videos.)
Have notes in front of you while you’re recording.
It is easy to get distracted or off topic, especially when you are uncomfortable.
Having notes in front of you while you record can help you stay on track.
These notes can be as vague or as detailed as you want, but avoid reading off of them directly and not looking at the camera.
DIGITAL NOTATION
For digital notation, use a handwriting tablet and stylus, or an iPad app works as well
Highly recommended. Audio recorded from your phone’s microphone can be difficult to hear if you aren’t standing near the phone or if the location is noisy.
For when you need to stand farther away from the camera.
Stabilization:
Selfie stick w/built-in tripod and Bluetooth remote – $23.99(heavy duty, 51″ extended), $14.99 (27.6″ extended)
Terrific for self-recording in the field.
Combination hand grip/small tripod/tripod adapter – $8.89
Can be used as a hand grip for filming on-the-go or as a desktop tripod. Phone mount can be removed from the hand grip/tripod legs section, allowing you to mount your phone on most standard tripods.
Pricey, but will greatly increase the quality of your footage if you’re filming something that requires camera movement, such as a walk-and-talk interview or a field trip video.
Creative ways to mount a smart phone with household items:
ADD-ONS / TIPS AND TRICKS
If you would like to have access to a teleprompter as you record video, consider one of the following:
Facial motion capture (Mo-Cap) is a process that uses a camera to map and track points on the user’s face. Software such as Adobe’sCharacter Animator derive data from the camera to animate cartoon characters in real time. This can greatly reduce the amount of time needed to create an animation and breathes subtle life into the character that would be otherwise difficult to achieve. Character Animator harnesses the power of the webcam to map several parts of the face to the respective parts of the character allowing it to record in real time. This includes your eyebrows, eyes, mouth, and head position. It also intakes audio to change mouth shapes to match what the user is speaking. In addition to the webcam, the user can operate their keyboard to trigger additional movements, effects, and walk motions. All these different aspects combine and give the character a personalized feel.
How does it help?
Cartoon animations currently do not have a large presence in online learning. This is mostly because they take a long time to create and not everyone has had the resources to create them. Normally, character animation for cartoons requires drawing each frame or using a pose-to-pose process called key framing. With innovative technology such as Character Animator, it greatly reduces the barrier to create cartoon animations for online learning. Each motion of the face records instantly and gives the character life by adding subtle movements to the face and head. The bulk of the work is completed early on to draw, rig, and add triggers to the character, or in this case, the puppet. Once the puppet is set up to record, it is smooth sailing from there. All movements, audio, and facial expressions are recorded in one take; greatly reducing the amount of time for development. However, Character Animator allows you to choose which aspects you want to record, so you can record the eye movements one time, then the eyebrows another time. This is helpful for the perfectionists out there who cannot seem capture it all at once.
How does it work?
To create an animation using Character Animator, there are a handful of stages to complete. The first step is to draw the character in either Photoshop or Illustrator. Next, Character Animator imports the graphics and they are rigged into puppets to prepare for recording. This means the eyes, nose, mouth, etc. are tagged with their respective labels. Also during this time, you can create keyboard triggers. These are animations such as arm movements, walk motions, and more, that the pressing of certain keys on the keyboard triggers the character to perform. After the puppets are prepared, it is time to record. It does not have to be shot perfectly all at once; you can blend the best bits from different recordings into one masterpiece. The last step is to export the character’s recording and composite it into a story using video software such as Premiere Pro or After Effects. Once you achieve the flow of facial Mo-Cap, you can start cranking out animations faster than ever before.
Click Image to View Video
Below is a quick rundown of what it takes to set up a character and how to record it. At the end of the video, there is a sample of multiple characters in one scene.
When teaching face-to-face, you might break your lectures into weeks because you will only meet with students once or twice a week. You hope to give them all the information they need during your face-to-face sessions for them to successfully complete work independently between classes.
While a typical face-to-face lecture can span 50-90 minutes, there is evidence to suggest shortening the length for your online students may be a better practice. Your online students may be in and out of your course many more times than they would be face-to-face and this gives you the opportunity to think about designing your video lectures differently. Organizing your lectures topically, rather than weekly can be a powerful way to redesign your course.
Students can find what they need, when they need it
Imagine you are taking a course on humor and Week 1 covered the causes of laughter. Midterms are approaching and you realize you understood the causes exaggeration and anticipation, but can’t remember what protection was about. If there was one long lecture on the causes of humor, you would have to re-watch or scroll through the whole lecture to find this one piece of information. But, if your instructor had each of the lectures separated out and named by topic, you could easily review the one topic that was confusing to you. If you have a limited amount of time to study, you can place your focus on studying the content, rather than finding it.
The practice of topic-based videos also makes finding content later much easier for your learners. Consider how much harder it is to find information when you are looking through titles like “Week 2”. By Week 9, when students might be reviewing for their final, is it likely they will remember exactly what you covered in Week 2? However, they could quickly glance at topical titles to jog their memory when deciding what to study.
Speaking from experience, I reviewed videos from a course I had completed to prepare for a job interview. I remembered that the course had the lectures broken out by topic rather than week, so it was easy to refresh myself on concepts that I was sure would come up with the employer.
Students can digest smaller pieces
Topical lectures, perhaps several short ones per week, are easier to digestible than weekly lectures. And, shorter lectures are more likely to be viewed by students.
Imagine a course where the topics might be complex, intimidating or unfamiliar. For me, this could be German. If I bought a German book today, I know it would sit on my shelf collecting dust. But, I might use an app like Duolingo to learn a couple of words each day, which feels much more manageable. Consider that microlearning is advantageous, particularly for adult students that may benefit by breaking their studying into many small, achievable sessions.
It is faster and easier for you to make changes
If you are noticing that students are just “not getting” a certain topic, it is much easier to rerecord a small video on just this one topic than to rerecord a long video on several topics. This is particularly true if many of the topics covered are being understood – why make more work for yourself?
It is also easier to rearrange videos if they are topical. If you realize that one topic belongs in Week 2 and not in Week 7, you can simply move that one part without re-thinking the whole week two video.
Topical videos allow you to add value to other course materials
An effective use of short videos can be to add value to the topic through your experience or expertise as the instructor. You can discuss a case study or scenario that relates to a topic that helps students understand the topic in action. Rather than a long video that includes both the lecture and the example, break these into two parts. If you totally reiterate what students are learning in another part of their course, like a reading, they might wonder why they are doing both activities. But, your examples add a layer of meaning and depth to the other course materials.
People can find almost any information on the internet. Part of their motivation to take courses is to gain access to your knowledge as an expert in the field. Short videos that talk about real-life situations adds both instructor presence and meaning for students.
Short videos load more quickly
No one wants technology to be a barrier for students. Short videos load more quickly, which can be important to students that don’t have consistent access to high-speed internet. You don’t want the student to get frustrated and give up simply because a video is too long, when it can easily be divided into pieces.
Challenge yourself to be focused
By committing to create shorter content, you challenge yourself to be focused and refined in what you share. By setting a goal, like recording videos under 7 minutes per topic, the quality of the content must be top notch. This encourages you to review your content to cut out what is redundant, unclear, or off-topic, which can be very satisfying. And, if you model being on point, precise, and specific – your students will have a clear expectation on the quality of work they are expected to create as well.
Examples
Like some inspiration to get started? Thanks Joanna Abbott for this example that comes in at 4 minutes and 41 seconds: ALS 114 decision making matrix
So you’ve scheduled your first video shoot with Ecampus. Great! We can’t wait to work with you. Here are answers to a few questions we commonly receive from instructors.
How can I prepare for my video shoot?
Rehearse! And this doesn’t have to be a bunch of work, just run through your piece once or twice before the shoot.
If you’d like for the finished video to include any additional graphics, photos or video, please let a member of the video team or your instructional designer know in advance of the shoot so that we can plan accordingly.
Should I write a script?
Maaaaaaaybe. It’s up to you. Some people prefer to work from a teleprompter, others prefer to wing it. We always suggest going with your comfort zone. If you would like to work with a teleprompter, please send your script or bulleted list to ecampus.productions@oregonstate.edu at least one day before your shoot.What should I wear?
Wear clothes that are comfortable and make you feel good about yourself…that’s the priority. Feel free to show off your personality and have fun with it.
Here are a few guidelines:
Avoid wearing plain white. It’s distracting against a black background, and gets lost in a white background.
If you’ll be filming against a black background, you’ll want to avoid wearing black, lest you appear to be a floating head and arms in your video. Also, black or really dark clothing can sometimes cause more shadowing on the face, accentuating wrinkles and aging the subject.
Instead, you might consider a medium-dark blue or gray. Or even better, go for a rich, solid color.
Also, avoid tight lines and patterns. These types of patterns cause a distracting optical effect called moiré where the pattern appears to move. Larger patterns, like plaid, look fine.
Finally, please avoid noisy jewelry and accessories as the microphone may be able to pick up the noise.
Oh gosh! Now that I’m here and I’m on camera, I have no idea what to do with my hands.
Think of the camera as another person. How do you move when you’re talking to somebody? If you tend to gesture when you speak, then please do! The movement will add energy to the video and help to convey your excitement about the topic.
Another option is to hold a prop. Just be sure that your prop is relevant to the video so that you don’t confuse the viewer.
If you prefer to be more still, that’s also great. Just be sure to maintain open body language and avoid crossing your arms in front of you or behind you.
This terrific Wistia article talks about the science behind why your gestures look so awkward on camera and dives into the hand thing a bit more, explains why we feel so awkward on camera, and suggests some ways to feel more comfortable at your video shoot.
That’s A Wrap!
If you have any questions, concerns, or ideas to share, please contact the Ecampus video team at ecampus.productions@oregonstate.edu. Looking forward to working with you!
Having a guest expert video in your Ecampus course provides a number of learning benefits. One important benefit is to introduce a second, collaborative voice to instruction (Last, 2015). In Part I of this two-part article series we address interview planning decisions and their relationship to producing an engaging guest expert video. In Part II we explore the value of instructors collaborating in the post production stage of guest expert interview video editing.
Staging the video capture of an outside expert voice was the focus of the first article on this topic in a previous blog post. Once primary and B-roll video is captured it needs to be compiled and arranged into a coherent presentation for your course. This is where working with an Ecampus video editor comes into play.
Students see an enormous amount of video in their academic experience. Developing video content that is focused, tightly packaged, and presented in an interesting fashion makes your guest expert video worth watching. The ultimate purpose of editing your guest expert video is to ensure it contributes to the learning objectives of your course. This is why faculty, as subject matter experts, become valued collaborators in the editing process.
Editing Is….Editing
Faculty have extensive experience in editing of papers and manuscripts. These familiar skill can translate to video editing. Let’s look at some of the primary roles of a video editor. A video editor…
Uses an mixture of artistic and technical skills to assemble shots into a coherent whole.
Has a strong sense of pace, rhythm, and storytelling.
Works creatively to layer together images, story, dialogue, and music.
Reorders and tweaks content to ensure the logical sequence and smooth running of the final video product.
Determines the quality and delivery of the final product.
Serves as a fresh pair of eyes on shot material. (Wadsworth, 2016)
Instructors are engaged in similar processes when planning lectures or writing manuscripts. They often are making decisions about coherent writing, related pace and rhythm, creative approaches to communicating complex ideas, the logic of a narrative, quality of communication, and have developed a careful eye for the effectiveness of the final product. What faculty may not bring to the video editing process is an understanding of the technical nature of video editing or the language of screen-based video communication.
Instructor as Co-Editor
Once your guest expert interview video clips are recorded Ecampus videographers coordinate the editing process. An Ecampus video editor compiles the final video sequence, optimizes sound, and perhaps music, graphics, and text elements are added. Decisions about these video elements is a creative and interactive exchange of ideas as editors and faculty collaborate through Frame.io. Frame.io is a post production tool that permits precise editing and video annotation at the frame level of a video. A sample of a Frame.io editing session can be seen in the screenshot below.
Using the web-based interface of Frame.io an instructor is invited to contribute comments or edits for specific locations in a video timeline. Ecampus editors then incorporate suggested changes and pose other suggestions. The progression of this collaboration is seen by both participants and the process leverages the skills and knowledge of video editors and content experts. In essence the course instructor becomes a co-editor of the video being edited.
The Final Product
In Part I of this series a course designed by Dr. Hilary Boudet was involved in planning a guest expert video for her course. Dr. Boudet used Frame.io to help Ecampus editors shape the final video presentation for her course. Watch the PPOL 441/541 guest expert video again. Before you do think about the role a video editor plays in creating the final guest expert video. Also consider what Dr. Boudet might bring to the editing process as a subject matter expert. Can you see evidence of this collaboration in the final video product?
In a well planned and edited video production the skill sets of videographer and content expert blend to create a coherent narrative video that presents a focused and quality viewing experience. As course instructors Ecampus faculty are engaged in the planning and staging of a guest expert video. It is in the post production process of video editing that the initial vision of the guest expert video content, as a series of carefully planned video recordings, comes to life and helps fulfill the learning outcomes of a course.
Resources:
Laist, R. (2015). Getting the Most out of Guest Experts Who Speak to Your Class. Faculty Focus | Higher Ed Teaching & Learning. Retrieved from https://www.facultyfocus.com/articles/curriculum-development/getting-the-most-out-of-guest-experts-who-speak-to-your-class/
Wadworth, C. (2016). The editors’s toolkit: A hands-on guide to the craft of film and TV editing. New York: Focal Press – Taylor & Francis Group.(Available in the Valley Library as an ebook)
This article is the first of a two-part series on producing video interviews featuring guest experts for online courses. Part I focuses on planning while Part II will address the faculty role in the video interview production process.
Part I: Planning With A Purpose
Interviews of guest experts are valuable forms of course media because they can serve a number of instructional purposes. Traditionally classroom instructors might consider including guest experts as part of instruction to…
Connect learning with an authority in the field.
Communicate what the practices are in a given field.
Describe the nature of work of a professional in a given field.
Show important work environments or processes.
Introduce a second, collaborative voice to instruction (Laist, 2015).
One of the common ways instructors incorporate the expert’s voice into a course is by inviting a guest speaker into the classroom. Or, class members might travel to a field location where the person being interviewed works. In both cases the experience of the guest expert interview is live and located where the interview occurs. The synchronous live interview, a staple of on-campus courses, is problematic for online instruction.
Online instruction is shaped by the nature of the online environment. Asynchronous class sessions, the remoteness of learners, and limited access to field sites would seem to limit the use of guest experts. Ecampus instructors are moving beyond those limitations by creating carefully planned and professionally produced video interviews of guest experts in order to leverage the instructional benefits of interviews for their online courses. An example of this is a media project produced for Dr. Hilary Boudet’s course PPOL 441/541 Energy and Society, offered by Oregon State University’s School of Public Policy.
Dr. Boudet worked with the Ecampus video team to re-imagine a traditional live field site visit to the O.H. Hinsdale Wave Research Lab at Oregon State University as a series of guest expert video interviews. Dr. Boudet carefully planned the interview process and served as the on-camera host in the video interview series. Three OSU scientists served as the guest experts in the on-site interviews. Because of careful planning, primary interviews and recording were completed in half a day.
The guest expert interview recordings, and subsequent video editing, resulted in the production of four videos ranging in length from ten to twenty minutes each. The interviews represent approximately one hour of video content for the PPOL 441/541 Energy and Society course. You can view the first of the four video interviews by clicking on the image from the video below.
Hilary Boudet interviews guest expert Pedro Lomónaco. Click on image to watch the video.
As the video interview planner, Dr. Boudet made a number of key decisions regarding video interview structure and content. We will highlight these decisions as answers to the 5 W’s of video interviews: Who, What, When, Where, Why and also How.
You may want to think through answers to these questions when you plan a similar project. Let’s take a look at each of these questions in the context of the PPOL 441/551 video.
Why are you doing the video interview?
In the case of PPOL 441/541, Dr. Boudet wanted to capture the instructional value of a field site visit and conversations with scientists related to that site. So being on location was essential. She wanted to show the O.H. Hinsdale Wave Research Lab and use it as a vehicle to discuss how the lab and Oregon State University researchers contribute to the larger social conversation about wave energy and social issues related to its use in coastal communities.
What is the subject of the video interview (s)? Dr. Boudet identified four independent but related topics she wanted to address with the guest experts. The topics are listed below.
Introduction to the O.H. Hinsdale Wave Research Lab
Introduction to Wave Energy Technology
Human Dimensions of Wave Energy
Community Outreach and Engagement
Each of these topics fits well within the learning outcomes for the Energy and Society course. In this instance, Dr. Boudet had a clear story arc in mind when selecting topics. She structured the video segments to address each topic and conducted each interview as its own story that supported the larger learning arc. Having a clear vision for the use of guest expert video interviews helps guide video production on-site and also informs the final video editing process.
Where will the interview be recorded? Prior field visits to the O.H. Hinsdale Wave Research Lab helped Dr. Boudet work with both the guest experts and video production team in thinking through locations for interviews and what needed to appear in the video. Understanding the O.H. Hinsdale Wave Research Lab also helped in deciding what aspects of the lab and props would be ideal to record for each video interview. It is clear What and Where are two closely related planning questions. In general on-site video production requires a large space for staging and a quiet space for recording. The interview recording site must also be relevant to the subject being addressed. If you do not have a recording space available Ecampus has a studio facility that can be used.
Who is to be interviewed? Dr. Boudet had a clear plan to bring expert voices into the video interview. The guests to the class served as scientific experts as well as guides to the facility being visited. In the case of the PPOL 441/541 video interviews, Dr. Boudet chose to have the scientists appear on screen and to also appear herself. This is a key decision that shapes the planning and production process of the video interviews. As you might imagine, the technical demands of having one person on camera is different from having two people. Recording equipment needs and subsequent editing approaches are impacted by the number of people included “on camera” in any interview scenario.
When will the interview occur?
Scheduling interview recording involves coordinating your own schedule with Ecampus video staff and your guest expert(s). In the case of PPOL 441/541, Dr. Boudet arranged to have all interviews recorded at the same facility but in different spaces. Additionally, the interview times were coordinated to facilitate the video production team being present for a large block of time when all guest expert interviews could be recorded. After primary recording, the video production staff returned briefly to the O.H. Hinsdale Wave Research Lab to record b-roll content; shots of the facility without any people. This is a common process in video production.
The last important question to be asked is…
How will you prepare? Part of preparation for a video interview is embedded in the answer to our previous questions. But preparing the content of the actual interview also requires planning. Dr. Boudet prepared a list of questions that she wanted to have addressed as part of the interview. She shared the purpose of the interview and her questions with the guest experts in advance. This collaborative effort contributed to a clear understanding of the intent of learning for all parties.
Sharing your questions with interviewees can be helpful. Asking guest experts not to memorize answers but to prepare with bullet points in mind will help the interview feel spontaneous.
There are obvious types of questions you will want to avoid. For instance, yes or no type questions can stunt an interview. Remember, the idea is get the instructional information you need. Be prepared to ask a question again if it is not answered the first time. Or, ask for clarifications to a response as part of the interview. Also provide opportunities at the end of the interview for experts to add anything they like. Remember you might get some great information and if it is not useful it can be edited out.
Preparing the physical interview space and interviewees is part of what the Ecampus video team does. They can provide tips on how to dress for a given interview, where to stand, where to look, and how to stage the interview space.
Now that we have answered some of the key questions in the video interview planning process watch the sample video posted above again. Can you see or hear the answers to the questions we have addressed?
About Part II:
Planning a guest expert video interview with a clear purpose in mind will shape the relevance, structure, and focus of the final video interview. In Part II of this video interview series, we will address the second half of video interview creation process; faculty collaboration with Ecampus video staff in the final stages of video interview production
References
Laist, R. (2015). Getting the Most out of Guest Experts Who Speak to Your Class. Faculty Focus | Higher Ed Teaching & Learning. Retrieved from https://www.facultyfocus.com/articles/curriculum-development/getting-the-most-out-of-guest-experts-who-speak-to-your-class/
Special thanks to Hilary Boudet, Heather Doherty, Rick Henry, Chris Lindberg, and Drew Olson for their contributions to this article.
In online education courses, providing effective feedback is essential. It’s can be easy to provide students with a number or letter grade on their assignments, but it is the additional feedback where the opportunity for student growth occurs. While there are many forms of effective feedback, there are 5 elements that can help you provide more meaningful and effective feedback regardless of the method of delivery.
Give Timely Feedback
Timely feedback to students sends the message that you are engaged in the course and the student’s work. Having just finished an assignment, the student is also going to be more open to the feedback you provide because their work is still fresh in their mind. They have the opportunity to immediately incorporate your feedback into the next assignment, improving their overall performance going forward. Students in a master’s degree program were more likely to ignore feedback comments on their written work that were not provided promptly. (Draft & Lengel, 1986) Including a statement in the syllabus about your expected time of feedback on assignments, and sticking to it, helps students understand your timeline and will reduce questions to you later on.
Start with a positive message
Creating a feedback sandwich (compliment, suggestions for correction, compliment) for your student pairs together both specific positive feedback and any elements the students should work on. The positive feedback encourages the student and prepares them with a positive outlook when hearing about areas that need improvement. Finishing again with positive feedback such as “I look forward to seeing your next assignment” tells the student that even though they have corrections to make, their work is still valued and that they can improve on future assignments.
Use Rubrics
One of the best tools that can be used are rubrics. A detailed rubric sets clear expectations of the student for that particular assignment. While completing their assignment they can constantly check their work against what you expect to see in their finished work. Another benefit to creating the rubric is that you can use it to analyze their papers with that same criteria. Some instructors have found that by using a rubric, it helps to be more consistent and fair with grading. No matter if it is the first paper, the last paper, or if you might be having a good or bad day, the rubric helps.
Give personal feedback and help the students make the connection between the content and their lives
Connection is key. Providing personal feedback to your students while helping them see the connection between the content and their lives will show that you have taken time to personally respond to them instead of using “canned responses.” Students who don’t feel as if the content in the class will ever relate to their lives now, or in their careers later on, will often lose interest in assignments in general as well as feedback because they don’t see the connection. Getting to know your students at the beginning of the term assists in giving good personal feedback while helping them see the connection between the content and their life.
Consider using alternative formats of feedback
Students are used to getting feedback in written form and while that format can be very effective, using an alternative way to provide feedback can be equally or more effective. They enjoy the personal connections that can be created through audio and/or video feedback. Students appreciate receiving specific feedback relating to the grade, rubric, and overall assessment. In fact, some students say that: “..video encouraged more supportive and conversational communication.” (Borup, West, Thomas, 2015) Give it a try!
By employing these strategies, your students will be appreciative of the feedback you provide and you might just get some fantastic feedback yourself. In one case, an instructor shared a great comment from one of their students comparing past courses to the instructor’s:
“…I never received personal feedback [in some other courses]. Your course however has been wonderful. Thank you for putting so much time into each of your comments on my writing. I can tell you really made personal feedback a priority. You don’t know how nice it was to really know that my professor is reading my work.” The student goes further to say; “Thank you for taking your teaching seriously and caring about your students. It shows.”
Getting personal and effective feedback like this should inspire you to begin or continue that great feedback!
References:
Borup, J., West, R.E., Thomas, R. (2015) The impact of text versus video communication on instructor feedback in blended courses Education Tech Research Dev 63:161-184 doi: 10.1004/s11426-015-9367-8
Draft, R.L. & Lengel, R.H. (1986. Organizational information requirements, media richness and structural design. Management Science, 32(5), 554-571
If you are considering developing an online course with Ecampus, you may be curious how you will translate your lectures to the online format. There are several effective online lecture presentation formats available to faculty. They differ in the type of video recording required and the kind of post-production work required after the initial recording.
Online Lecture Formats: Qualities & Complexity
Each of the presentation formats can be effective, however the more complex types can offer additional advantages for your students. Why should you consider producing the most challenging of the five online lecture formats? To answer that question, we need to understand what exactly an interactive video lesson is. Let’s start by first looking at a sample interactive video lesson used in a fall 2017 course titled The Biology of Horticulture (HORT 301). You can watch a four minute excerpt of the twenty-minute interactive video lesson by selecting the image below:
Dr. Ryan Contreras teaching using an interactive video lesson in the Biology of Horticulture course. Select image to watch the four minute video.
As is seen in this excerpt the interactive video lesson has as its foundation a video recording of a Lightboard presentation. Layered over that recording are interactive elements that control video playback—sometimes pausing, other times auto-advancing to specific clips—or to progress through the lesson, trigger a student’s input of feedback, and, most importantly, increase the amount of student engagement in the lesson. In the case of HORT 301 the interactive element prompts the solving of a temperature indices formula. The base video could have been used by itself. However, it is the melding of the Lightboard presentation with the interactive feature that makes the interactive video lesson a highly engaging presentation for the online environment.
The model below proposes how the elements of personal and mediated communication immediacy are brought together to make an interactive video lesson a compelling experience.
In this project instructional design, in conjunction with visual design, video staging, and interaction design, was focused on solving the issue of how to teach a self-paced formula-drive lesson in the online environment. The result is an interactive video lesson that presents as a unified visual space that fosters an actual “see through” psychological perspective. Although clearly a media production, this approach to online lesson presentation implies an unmediated learning experience.
It is enhanced by the camera literally seeing through the Lightboard glass to the instructor conducting the lesson fostering a sense instructor presence. This type of interactive lesson design is desirable because it presents classroom-like learning in a student-controlled online environment. The result is an interactive video lesson that is new in design format but familiar experientially.
Is Interactive Video For You?
A decision to adopt this approach to lesson design will likely be successful if you have a lesson that is formula driven. Certainly math subjects and many science subjects might benefit from this approach. Is it also applicable to humanities courses? Can you imagine teaching language, music, or poetry with an interactive video lesson? If you can, contact Ecampus. We would be glad to help you adopt this approach to lesson design for use in your online course.


 For DIY video production, there are many ways to go about this!