Welcome to the Webcam and Video Tips guide by Oregon State University Ecampus
This brief series of tips is meant to be a beginner’s overview for DIY home recording on webcam, with some additional options suggested if you want to take your video production even further.
Since this document may not cover every issue you encounter while acclimating to DIY video recording, we recommend contacting your school tech person for additional troubleshooting.

WHERE TO START

  • Internet Connection
    • Wired connection via ethernet cable is best
    • If wired connection is not possible, having a clear line of sight to wifi router will give the best wireless connection
    • Disconnect any wifi devices that are not in use or needed.
  • Computer Check
    • Determine if your computer meets minimum system requirements for streaming software
    • Close all non-essential programs to free up more computer resources
    • Disconnect any external monitors if you are on a laptop and it is running slowly
  • Testing Your Tech
    • Does your computer have a built in webcam or do you have a 3rd party webcam?
    • Identify where your microphone is and talk towards it
    • Test the webcam and audio settings BEFORE your first recording. 
    • Practice practice practice
      • The last recording will be better than the first
  • Making sure your voice is clear and easy to understand
    • Having a microphone helps with this
    • Smart phone earbuds have a built-in microphone that can help you with voice clarity
    • Airpods would also work when recording to an iPhone

PRESENCE AND ENVIRONMENT

  • Be aware of your environment.
    • Limit any background noise as much as possible.
    • Clean up your space and be aware of what is in the background of the video.
    • Rooms with carpets and drapes are best for audio.
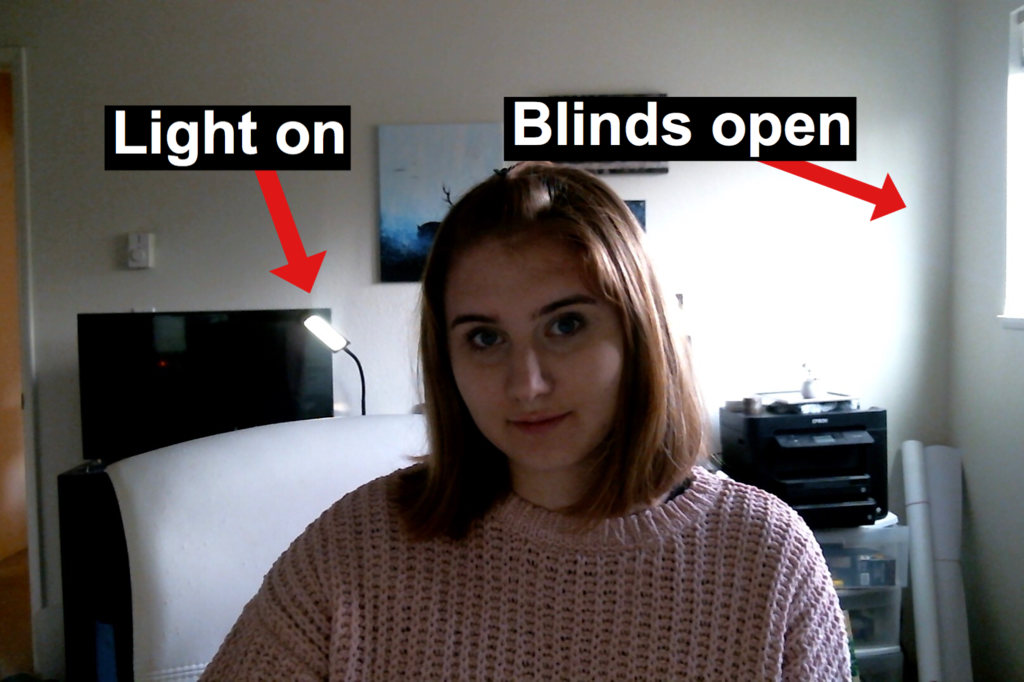
    • Turn off lights and close windows that are behind you when you are recording.
    • If possible, turn on a light behind the camera.
    • Keep experimenting with lighting until you have a set up that works for you.

  • Try not to bump the desk, computer, camera, or microphone while recording.
    • Typing should also be avoided.
  • Do a test lecture and watch it.
    • See what works and what doesn’t.
    • If possible, get feedback from others
  • Practice
    • The more you practice, the more natural it will feel.
    • Run through what you want to say before you start recording.
  • Relax and be natural! Hopefully you are sharing knowledge that you are passionate about and we want that to show. (Remember that we are always our own worst critic, and your teaching team will be there to help you with constructive feedback on how to help students best enjoy and learn from these videos.)
  • Have notes in front of you while you’re recording. 
    • It is easy to get distracted or off topic, especially when you are uncomfortable.
    • Having notes in front of you while you record can help you stay on track.
    • These notes can be as vague or as detailed as you want, but avoid reading off of them directly and not looking at the camera.

DIGITAL NOTATION

GOING FURTHER WITH VIDEO PRODUCTION

  • For DIY video production, there are many ways to go about this!
    • The lowest barrier to recording on your own would be to use a smart phone attached to a tripod or other mount.
    • If you have access to a camcorder or DSLR, get out there and use it!
  • For smart phone video
    • Avoid handheld and invest in a tripod or smart phone / camera mount
    • If you have a decent internet connection for uploads, consider recording 1080p at 30fps
    • Use an external microphone whenever possible

ACCESSORIES TO CONSIDER IF RECORDING WITH A PHONE

Apps:

  • Filmic Pro – $14.99
    • Allows manual control of exposure and white balance, audio monitoring, and other useful features.

Audio:

  • Lavalier microphone – $18.99 
    • Highly recommended. Audio recorded from your phone’s microphone can be difficult to hear if you aren’t standing near the phone or if the location is noisy. 
  • Double lavalier microphone – $25.99
    • For when you have two people on camera. Both mic cable feed into the same phone, removing need to sync two audio sources. 
  • Audio cable extension – 10 ft. $9.95 or 20 ft. $15.95
    • For when you need to stand farther away from the camera.

Stabilization:

  • Selfie stick w/built-in tripod and Bluetooth remote – $23.99 (heavy duty, 51″ extended), $14.99 (27.6″ extended)
    • Terrific for self-recording in the field.
  • Combination hand grip/small tripod/tripod adapter – $8.89
    • Can be used as a hand grip for filming on-the-go or as a desktop tripod. Phone mount can be removed from the hand grip/tripod legs section, allowing you to mount your phone on most standard tripods.
  • Gimbal stabilizer – $94.99
    • Pricey, but will greatly increase the quality of your footage if you’re filming something that requires camera movement, such as a walk-and-talk interview or a field trip video.
  • Creative ways to mount a smart phone with household items:


ADD-ONS / TIPS AND TRICKS

  • If you would like to have access to a teleprompter as you record video, consider one of the following:
  • Here are some sound improvements to consider to reduce echo in your recordings.
    • Add blankets or blinds on walls to reduce echo.
    • Record in the smallest room possible.
    • Avoid rooms with hardwood floors.

Lighting for video

  • Turn a window or glass door into a soft “Key Light” by hanging a cheap, frosted shower curtain over the window. 


Authors: Jason Jones, Drew Olson, and Sammi Lukas, with special thanks to Victor Yee for technical support with the images.

As a stranger give it welcome.” – Shakespeare

Students need tactics for when they encounter strange people or strange ideas. (Wilson, 2018) First-time online students are a perfect example of individuals who are encountering something new, strange, and often uncomfortable, for the first time. Welcoming that strange experience should include a little bit of information gathering. Look for positive and negatives in situations to help decide how you view it and, most of all, have an open mind.

To help potential online students make decisions, when they take their first online course, Marie Fetzner asked unsuccessful online students: “What advice would you give to students who are considering registering for an online course?”

Their top 13 responses:

  1. Stay up with the course activities—don’t get behind
  2. Use good time management skills
  3. Use good organizational skills
  4. Set aside specific times during each week for your online class
  5. Know how to get technical help
  6. A lot of online writing is required
  7. There is a lot of reading in the textbook and in online discussions—be prepared
  8. Regular online communications are needed
  9. Ask the professor if you have questions
  10. Carefully read the course syllabus
  11. Be sure you understand the requirements of the online course discussions
  12. Understand how much each online activity is worth toward your grade
  13. Go to the online student orientation, if possible


These responses raise the question: how can we better help our students? From the advice above, we know students struggle with time management, expectations, communication, etc.  So, what can we do to help foster their success?

  1. Reach out to students who seem to be lagging behind. A quick email is sometimes all it takes to open up that line of communication between you and the student.
  2. Provide approximate times for course materials and activities. Students can use this to better plan for the requirements that week.
  3. Keep your course organized so students can spend more time with the content instead of search for the content.
  4. Remind students about where to access help and support services.
  5. Develop a Q&A discussion board for student questions about the course. Often, more than one student has the same question and often other students might already know the answer. Have this be something you check daily to answer questions quickly so students can continue with their learning.
  6. Use rubrics for grading. By giving the students rubrics, they will know what is expected, you will get responses closer to your expectations, and it makes grading easier!


Welcome these ideas as you would a new experience. Give it a little try, jump right in, confer with colleagues, or chose your own path. Know that as an instructor or developer for an online course, you have the ability to help your students be successful!

References

Fetzner, Marie. (2013). What Do Unsuccessful Online Students Want Us to Know? Journal of Asynchronous Learning Networks, 17(1), 13-27.

Wilson, J. (2018). “As a stranger give it welcome”: Shakespeare’s Advice for First-Year College Students. Change, 50(5), 60.


What is it?

Image of animator’s face in Character Animator program showing the facial data points used for animation creation.

Facial motion capture (Mo-Cap) is a process that uses a camera to map and track points on the user’s face. Software such as Adobe’sCharacter Animator derive data from the camera to animate cartoon characters in real time. This can greatly reduce the amount of time needed to create an animation and breathes subtle life into the character that would be otherwise difficult to achieve. Character Animator harnesses the power of the webcam to map several parts of the face to the respective parts of the character allowing it to record in real time. This includes your eyebrows, eyes, mouth, and head position. It also intakes audio to change mouth shapes to match what the user is speaking. In addition to the webcam, the user can operate their keyboard to trigger additional movements, effects, and walk motions. All these different aspects combine and give the character a personalized feel.

How does it help?

Image of character being rigged into a puppet showing the mesh and body tags.

Cartoon animations currently do not have a large presence in online learning. This is mostly because they take a long time to create and not everyone has had the resources to create them. Normally, character animation for cartoons requires drawing each frame or using a pose-to-pose process called key framing. With innovative technology such as Character Animator, it greatly reduces the barrier to create cartoon animations for online learning. Each motion of the face records instantly and gives the character life by adding subtle movements to the face and head. The bulk of the work is completed early on to draw, rig, and add triggers to the character, or in this case, the puppet. Once the puppet is set up to record, it is smooth sailing from there. All movements, audio, and facial expressions are recorded in one take; greatly reducing the amount of time for development. However, Character Animator allows you to choose which aspects you want to record, so you can record the eye movements one time, then the eyebrows another time. This is helpful for the perfectionists out there who cannot seem capture it all at once.

How does it work?

To create an animation using Character Animator, there are a handful of stages to complete. The first step is to draw the character in either Photoshop or Illustrator. Next, Character Animator imports the graphics and they are rigged into puppets to prepare for recording. This means the eyes, nose, mouth, etc. are tagged with their respective labels. Also during this time, you can create keyboard triggers. These are animations such as arm movements, walk motions, and more, that the pressing of certain keys on the keyboard triggers the character to perform. After the puppets are prepared, it is time to record. It does not have to be shot perfectly all at once; you can blend the best bits from different recordings into one masterpiece. The last step is to export the character’s recording and composite it into a story using video software such as Premiere Pro or After Effects. Once you achieve the flow of facial Mo-Cap, you can start cranking out animations faster than ever before.

Click Image to View Video

Below is a quick rundown of what it takes to set up a character and how to record it. At the end of the video, there is a sample of multiple characters in one scene.

What does the process look like?


Author: Zach Van Stone, Oregon State University Ecampus

So you’ve scheduled your first video shoot with Ecampus. Great! We can’t wait to work with you. Here are answers to a few questions we commonly receive from instructors.

How can I prepare for my video shoot?

Rehearse! And this doesn’t have to be a bunch of work, just run through your piece once or twice before the shoot.

If you’d like for the finished video to include any additional graphics, photos or video, please let a member of the video team or your instructional designer know in advance of the shoot so that we can plan accordingly.

Should I write a script?

Maaaaaaaybe. It’s up to you. Some people prefer to work from a teleprompter, others prefer to wing it. We always suggest going with your comfort zone. If you would like to work with a teleprompter, please send your script or bulleted list to ecampus.productions@oregonstate.edu at least one day before your shoot.What should I wear?

Wear clothes that are comfortable and make you feel good about yourself…that’s the priority. Feel free to show off your personality and have fun with it.

Here are a few guidelines:

  • Avoid wearing plain white. It’s distracting against a black background, and gets lost in a white background.
  • If you’ll be filming against a black background, you’ll want to avoid wearing black, lest you appear to be a floating head and arms in your video. Also, black or really dark clothing can sometimes cause more shadowing on the face, accentuating wrinkles and aging the subject.
  • Instead, you might consider a medium-dark blue or gray. Or even better, go for a rich, solid color.
  • Also, avoid tight lines and patterns. These types of patterns cause a distracting optical effect called moiré where the pattern appears to move. Larger patterns, like plaid, look fine.
  • Finally, please avoid noisy jewelry and accessories as the microphone may be able to pick up the noise.

Oh gosh! Now that I’m here and I’m on camera, I have no idea what to do with my hands.

Think of the camera as another person. How do you move when you’re talking to somebody? If you tend to gesture when you speak, then please do! The movement will add energy to the video and help to convey your excitement about the topic.

Another option is to hold a prop. Just be sure that your prop is relevant to the video so that you don’t confuse the viewer.

If you prefer to be more still, that’s also great. Just be sure to maintain open body language and avoid crossing your arms in front of you or behind you.

This terrific Wistia article talks about the science behind why your gestures look so awkward on camera and dives into the hand thing a bit more, explains why we feel so awkward on camera, and suggests some ways to feel more comfortable at your video shoot.

That’s A Wrap!

If you have any questions, concerns, or ideas to share, please contact the Ecampus video team at ecampus.productions@oregonstate.edu. Looking forward to working with you!


Becoming a Student Again

With excitement and a bit of apprehension I logged in to my first ever online class. Sure, I’ve taught online classes for years, but this was my first time as a student in an online class that I had paid to take and where grades were given.

I reviewed the “Start Here” module and familiarized myself with the structure of the class before I opened the first lecture from my new instructor. The instructor’s voice came through my speakers and as she began to speak I noted the length of the lecture: 44 minutes. “What?!? I don’t have time for this,” I thought as I slammed my laptop shut. It suddenly and powerfully occurred to me that I did not have control over this classroom and my expectations as a student might be vastly different from my instructor’s.

Eventually, I settled in to the rhythm of the class and my instructor’s expectations. As it turns out, that 44 minute lecture was an outlier (the rest were closer to 15 minutes), and I figured out a way to incorporate the lectures into my schedule (I watched them while on the spin bike).

The Needs of the Online Student

As a working parent, trying to balance family, work, and school obligations, I am the target customer for online education, and I certainly felt the “squeeze” of all these obligations competing for my time. Like many of my students, my days are jam-packed and most of the time, I am scheduled to the minute. Uncertainties can throw my well-planned schedule into turmoil… “Wow, that reading took longer than I expected. No, I can’t participate in a live webinar or meet for a group project at 3pm. I have to pick up kids from school. Darn, this link is broken and the instructor hasn’t responded to my questions about it…now I’ve lost my window for working on this project. My dog died today, and while I had to go to work and had to make dinner, I just don’t have it in me to watch a class lecture and take a quiz. I’m too sad…can I have an extension?”

Meeting Our Students Where They Are

I ended up taking several classes from several instructors over the course of a year. Being a student in these classes exposed me to a number of different teaching styles and techniques and strategies, and I was able to experience these things from a student point of view. Based on my experience, here are 4 strategies for instructors that your students might find helpful:

  1. Provide time estimates for weekly activities. Estimated read times and watch times for learning materials are very helpful for a busy student trying to plan the week.
  2. Chunk the material. As an online student, I rarely had long chunks of time to work on my classes, but I could squeeze in smaller chunks of time here and there. And while students can start and stop a task as needed in the online classroom, it’s rewarding to actually finish a task in one sitting.
  3. Make it easy to find class resources. In the online classroom there are many wonderful learning materials we can easily incorporate (e.g., links to blogs, videos, calculators); but when these resources are scattered throughout 10 learning modules, they can be difficult for the student to find. Provide a works cited page (with hyperlinks) or a glossary of key terms to help students locate material, especially when studying for exams.
  4. Anticipate Questions. This might be tough the first time you teach a course, but over time we often see the same questions arising from our students. We can reduce the delay in response time, by anticipating these questions and providing answers and support ahead of time. This could be a Q&A sheet for complex assignments or a guided worksheet with comments from the instructor to help students get through well-known tricky spots.

The flexibility of the online classroom gives busy students around the world access to educational opportunities that have not been available in the past. These students are working hard in every aspect of their lives and with a little support from us, their online instructors, we can help them make the most of the time they have in order to learn and grow.

-Nikki Brown, Instructor, College of Business

I recently attended one of Bryan Alexander’s Future Trend’s Forum webinar session (recording on youtube) on apps educators use in their work and in their life and learned about some very interesting apps.

Anti-app App:

  • ?Forest: an app to monitor time off phone (for personal use or group use, family use, etc.).
  • Flora: (free app) helps you and your friends stay focused on the task together (recommended by my wonderful co-worker Dorothy Loftin)

Apps for teaching and learning:

  • ? Desmos: Graph functions, plot data, evaluate equations, explore transformations, and much more – for free!
  • ➗Algebrabyhand: The most advanced drag and drop algebra tool for the web.
  • ?‍♂️Fabulous is a science-based app, incubated in Duke’s Behavioral Economics Lab, that will help you build healthy rituals into your life, just like an elite athlete.
  • ?Calm: App for meditation and sleep.
  • ?Meet Libby: a ground-breaking ebook reader and a beautiful audiobook player to read any book from your local library.
  • ?‍?Vuforia Chalk: Vuforia Chalk makes it easy when troubleshooting or expert guidance is needed for situations not covered in training or service manuals.
  • ?Lingrotogo: language learning app. LingroToGo is designed to make time devoted to language learning as productive and enjoyable as possible. (The difference between this app and other language learning app is that it is based on educational theory, the developers claim.)
  • ?Newsmeister: stay current with news challenge quizzes.
  • ??‍?Studytree: StudyTree analyzes students’ grades and behavioral patterns to construct customized recommendations to improve their academic performance. Additionally, StudyTree serves advisors and administrators by providing them managerial access to the application, which enables insight to useful statistics and an overview of each student’s individual progress.
  • ?Nearpod: Synchronize and control lessons across all student devices
  • Flipgrid: video for student engagement (recently purchased by Microsoft, not sure if any feature will change soon).

Fun Games:

  • Marcopolo: face-to-face messaging app for one-to-one and group conversations—bringing family and friends closer than ever with genuine conversations and moments shared. It could be used for student mock interviews and direct messaging within a group.
  • goosechase: scavenger hunts for the masses.

Productivity:

  • ?Tripit: find all your travel plans in one place.
  • ?rememberthemilk: the smart to-do app for busy people.
  • wunderlist: the easiest way to get stuff done.
  • ?Stitcher: Podcast aggregator allows you to get the latest episodes of your favorite podcasts wherever and whenever you want.
  • ?inoreader: The content reader for power users who want to save time.
  • ?Overcast: A powerful yet simple podcast player for iPhone, iPad, and Apple Watch, which dynamically shortens silences in talk shows.

Where to keep up with all the new tools and apps?


P.S. Icons come from emojipedia.org

If you have handy apps that make your life easier, feel free to share with us. We’d love to hear from you.

We all need people who will give us feedback. That's how we improve. - Bill Gates
Bill Gates, founder of Microsoft

In online education courses, providing effective feedback is essential. It’s can be easy to provide students with a number or letter grade on their assignments, but it is the additional feedback where the opportunity for student growth occurs. While there are many forms of effective feedback, there are 5 elements that can help you provide more meaningful and effective feedback regardless of the method of delivery.

  1. Give Timely Feedback
    • Timely feedback to students sends the message that you are engaged in the course and the student’s work. Having just finished an assignment, the student is also going to be more open to the feedback you provide because their work is still fresh in their mind. They have the opportunity to immediately incorporate your feedback into the next assignment, improving their overall performance going forward. Students in a master’s degree program were more likely to ignore feedback comments on their written work that were not provided promptly. (Draft & Lengel, 1986) Including a statement in the syllabus about your expected time of feedback on assignments, and sticking to it, helps students understand your timeline and will reduce questions to you later on.
  2. Start with a positive message
    • Creating a feedback sandwich (compliment, suggestions for correction, compliment) for your student pairs together both specific positive feedback and any elements the students should work on. The positive feedback encourages the student and prepares them with a positive outlook when hearing about areas that need improvement. Finishing again with positive feedback such as “I look forward to seeing your next assignment” tells the student that even though they have corrections to make, their work is still valued and that they can improve on future assignments.
  3. Use Rubrics
    • One of the best tools that can be used are rubrics. A detailed rubric sets clear expectations of the student for that particular assignment. While completing their assignment they can constantly check their work against what you expect to see in their finished work. Another benefit to creating the rubric is that you can use it to analyze their papers with that same criteria. Some instructors have found that by using a rubric, it helps to be more consistent and fair with grading. No matter if it is the first paper, the last paper, or if you might be having a good or bad day, the rubric helps.
  4. Give personal feedback and help the students make the connection between the content and their lives
    • Connection is key. Providing personal feedback to your students while helping them see the connection between the content and their lives will show that you have taken time to personally respond to them instead of using “canned responses.” Students who don’t feel as if the content in the class will ever relate to their lives now, or in their careers later on, will often lose interest in  assignments in general as well as feedback because they don’t see the connection. Getting to know your students at the beginning of the term assists in giving good personal feedback while helping them see the connection between the content and their life.
  5. Consider using alternative formats of feedback
    • Students are used to getting feedback in written form and while that format can be very effective, using an alternative way to provide feedback can be equally or more effective. They enjoy the personal connections that can be created through audio and/or video feedback. Students appreciate receiving specific feedback relating to the grade, rubric, and overall assessment. In fact, some students say that: “..video encouraged more supportive and conversational communication.” (Borup, West, Thomas, 2015) Give it a try!

By employing these strategies, your students will be appreciative of the feedback you provide and you might just get some fantastic feedback yourself. In one case, an instructor shared a great comment from one of their students comparing past courses to the instructor’s:

…I never received personal feedback [in some other courses]. Your course however has been wonderful. Thank you for putting so much time into each of your comments on my writing. I can tell you really made personal feedback a priority. You don’t know how nice it was to really know that my professor is reading my work.” The student goes further to say; “Thank you for taking your teaching seriously and caring about your students. It shows.

Getting personal and effective feedback like this should inspire you to begin or continue that great feedback!


References:

Borup, J., West, R.E., Thomas, R. (2015) The impact of text versus video communication on instructor feedback in blended courses Education Tech Research Dev 63:161-184 doi: 10.1004/s11426-015-9367-8

Draft, R.L. & Lengel, R.H. (1986. Organizational information requirements, media richness and structural design. Management Science, 32(5), 554-571

Gaining students’ attention is the first of Gagne’s Nine Events of Instruction. A great way to gain attention is to provide a catchy animated video about the topic you are presenting.

What’s that? You’re not a trained animator? Don’t let that stop you! If you can choose items off a menu and type some dialogue, you can create an animated video for free at www.xtranormal.com. The animation below was created for an upcoming professional development workshop at Ecampus. The whole project took about 10 minutes to create.

Have lots of papers to grade? Lots of student assignments that need your expert, detailed feedback? Instructors and students alike know the value of formative assessments, but instructors know how much time quality, detailed feedback takes to supply. Shortkeys is a helpful program that can help instructors provide detailed feedback and save time in grading by reducing the need to re-type the same passages repeatedly.

Shortkeys is a macro program, which is a program that allows you to set up replacement text for a small number of user-defined keystrokes. If there is anything you type multiple times, this program is for you. There is a limited-use free version, called Shortkeys Lite. The full program costs around $25.
Benefits of using this program:
  • Significantly reduces grading time – a clear benefit for instructors
  • Much more efficient than copying and pasting from Word files
  • Reduces errors due to typos
  • Significantly improves the depth of feedback instructors can provide, given time limitations – a clear benefit for students
  • Useful for URLs, HTML code, phone numbers, email addresses, library card numbers, page references in textbooks, or any other information you find yourself having to look up more than once

How it works:
The user programs each “shortkey” code and types out the replacement text. Once the shortkey is saved, it is ready to be re-used. For instance, for a shortkey that is programmed to explain a comma splice and how to fix one, a user could set the shortkey as “##cs.” As soon as the user types that code, a full explanation about comma splices is placed in the document: This is a type of run-on sentence called a comma splice, which is two complete sentences linked with nothing but a comma. Two complete sentences need more than a comma to separate them. To correct this, change the comma to a semi-colon, add a conjunction, or simply make two separate sentences.

Possible applications:

  • To explain common grammatical and punctuation errors
  • To provide examples to students, such as example thesis statements
  • To refer students to outside resources
  • To demonstrate proper citation styles for various types of sources
  • To include “here’s what I was looking for & here’s how your assignment measured up” notes for student assignments
  • To record summaries and announcements that you re-use in my courses from term to term
  • To remind students of course policies, such as late policies
  • To record HTML code you use frequently in Blackboard

Where to get it:

To order the software or to download a free trial version, visit www.shortkeys.com.

Part of quality online course design is ensuring that students have opportunities to practice with course content in active, engaging ways. Providing students with lectures to read and hear passively is a start, but is generally not enough to help learning happen. To make real learning happen online, it’s important to encourage students to engage with the concepts they are learning actively.

Another best practice of online course design and teaching is providing opportunities for formative assessments, that is, low- or no-stakes practice activities with feedback that lets students know if they are on track for summative assessments, such as final exams.

Yes, but who has the time?

These kinds of practice activities and formative assessments are great, but they can take time to create, facilitate, and respond to, and most of the instructors we know don’t have excesses of time!

Thankfully, there are tools available to help create quality learning activities quickly and easily. StudyMate games are a quick and easy way to include these sorts of activities in your classes. Furthermore, the feedback is built into the game, so once they are created, they don’t require additional time for facilitation. Best of all, students find the games to be enjoyable and effective ways to study course concepts.

StudyMate games are built using one of three types of questions:

  • Single answer (such as a term and its definition)
  • Multiple choice
  • Calculated (math problems)

Instructors provide the questions, and the OSU instructional design team can help create the games. Games include flash cards, matching, crossword puzzles, and a Jeopardy! – like challenge game.

You can even use this software to create a glossary of terms for your class:

Try some StudyMate games used in Charisse Hake’s Math 105 class.

To learn more about StudyMate and to see other sample games, visit the StudyMate Sample Games Page.

To learn how to create StudyMate games for your class, contact instructional design specialist Shannon Riggs at shannon.riggs@oregonstate.edu.