Announcements are among the most basic yet effective ways to communicate with students, whether in person or online. In our Ecampus asynchronous online courses, announcements are often the primary way instructors pass on important information to students and can be a formidable tool for fostering instructor presence. They can be used to welcome and orient students, summarize and reiterate key concepts, and remind students about upcoming assignments, projects, and exams. Some instructors send out weekly announcements that reflect on the prior week and provide general feedback on student performance, while others only use announcements for course related logistics such as schedule changes or instructor unavailability. No matter how you use announcements, the following suggestions can help ensure you are leveraging the power of the announcements feature in Canvas. 

Best Practices

  • Keep announcements concise. Students have a limited amount of cognitive capacity and lengthy announcements may not be read in full.
    • Consider your purpose before composing and resist the urge to rehash what you have written elsewhere. 
    • If you need to remind students of an assignment, consider linking to the instructions rather than rehashing them in the body of the announcement. 
  • Send announcements on a regular schedule. If you plan to send weekly announcements, do so on the same day of the week and general time if possible.
    • Sending out a recap of the prior week and preview of what to expect in the upcoming week is most valuable if sent at the beginning of the week. If you start your course week on Monday, send your announcements on Monday mornings. 
  • Give announcements meaningful titles to reflect the content of the announcement. Labeling announcements as “week X update”, “Important date change for assignment X”, or another such descriptive title will help students find the correct announcement if they need to revisit it.

Canvas Tips

  • Delete old announcements from imported course content. Old announcements from previous courses or instructors copy over when a Canvas course is copied and are visible to students in the announcements tab unless deleted, including your own prior term announcements or those from a previous instructor. This could be very confusing for students as some instructors provide the class with quiz or test answers or information about exams in announcements that may be disadvantageous for current term students to read. 
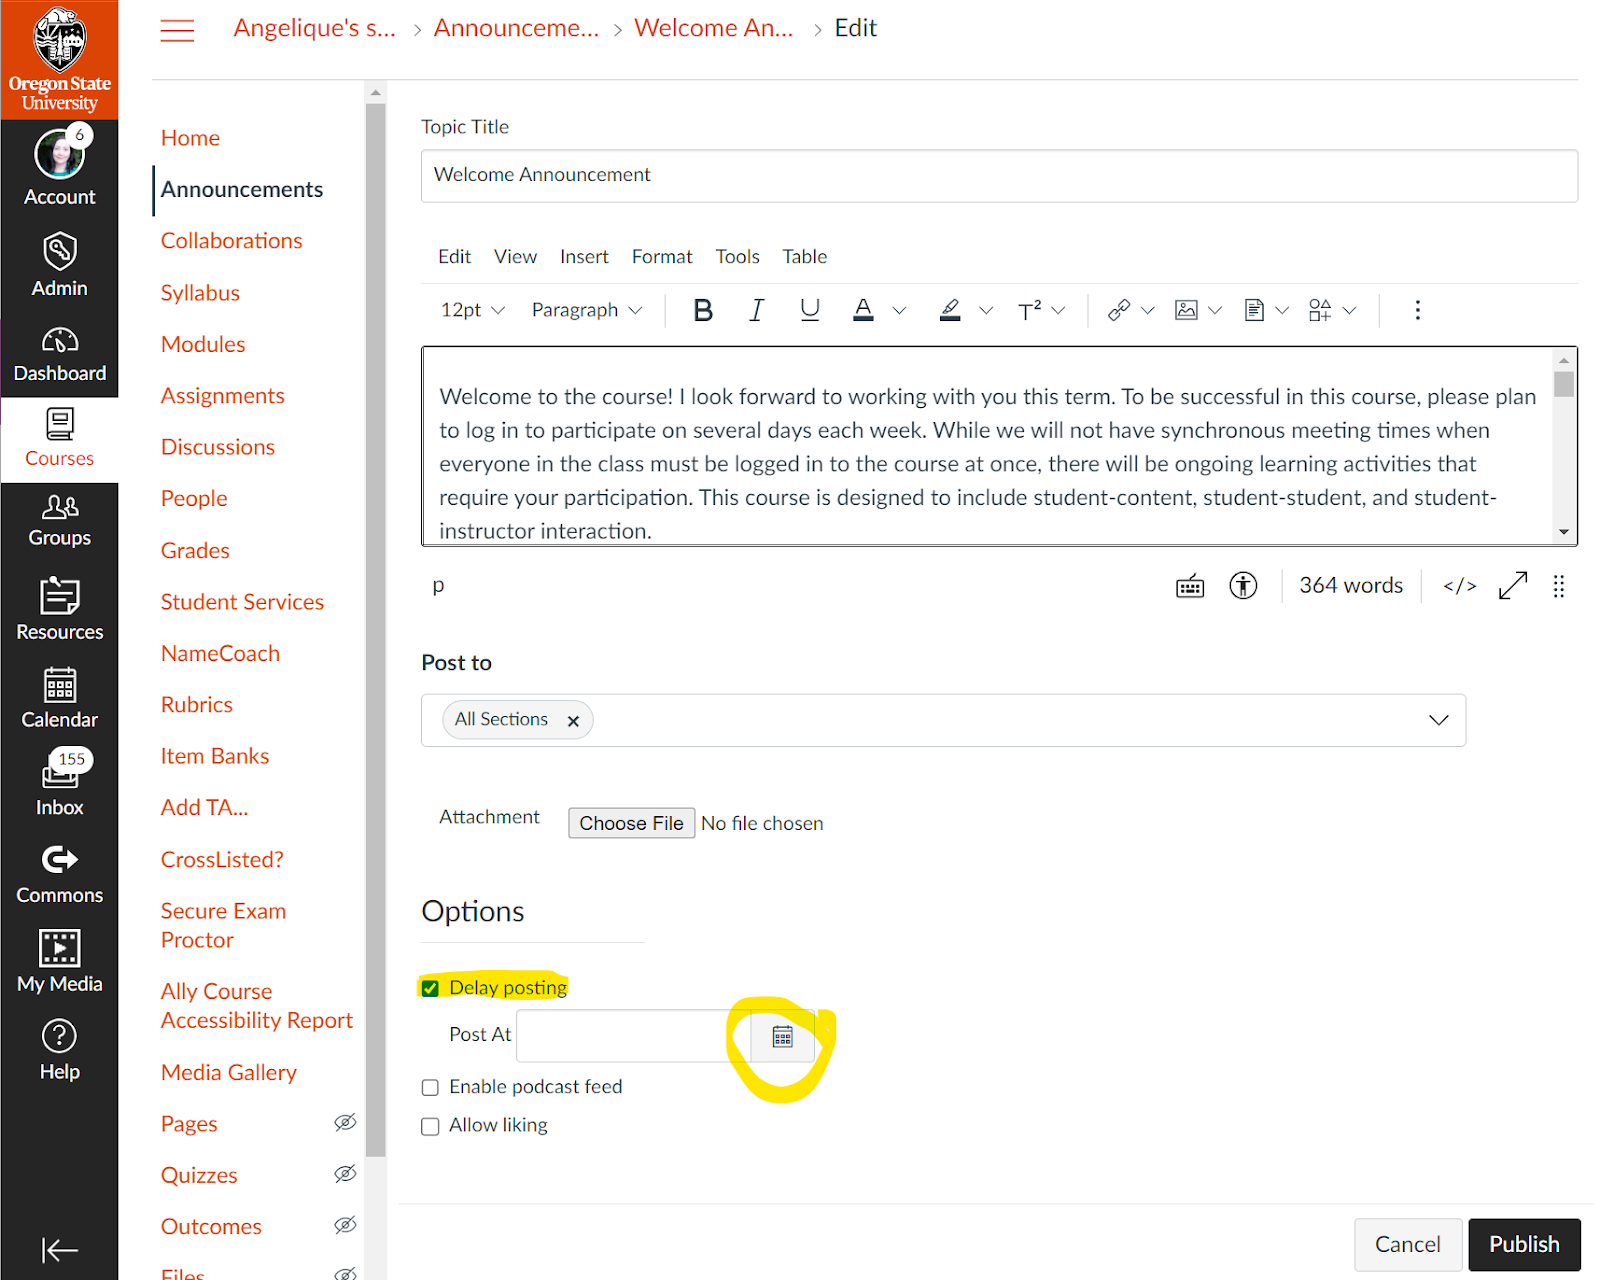
  • Schedule out your announcements in advance using ‘delay posting’ (see image below). If you do want to reuse announcements imported from a previous term, be sure to open each message, edit the content for the current term, and choose when you would like to post each one. New announcements can also be scheduled to post on whatever day and time you choose.

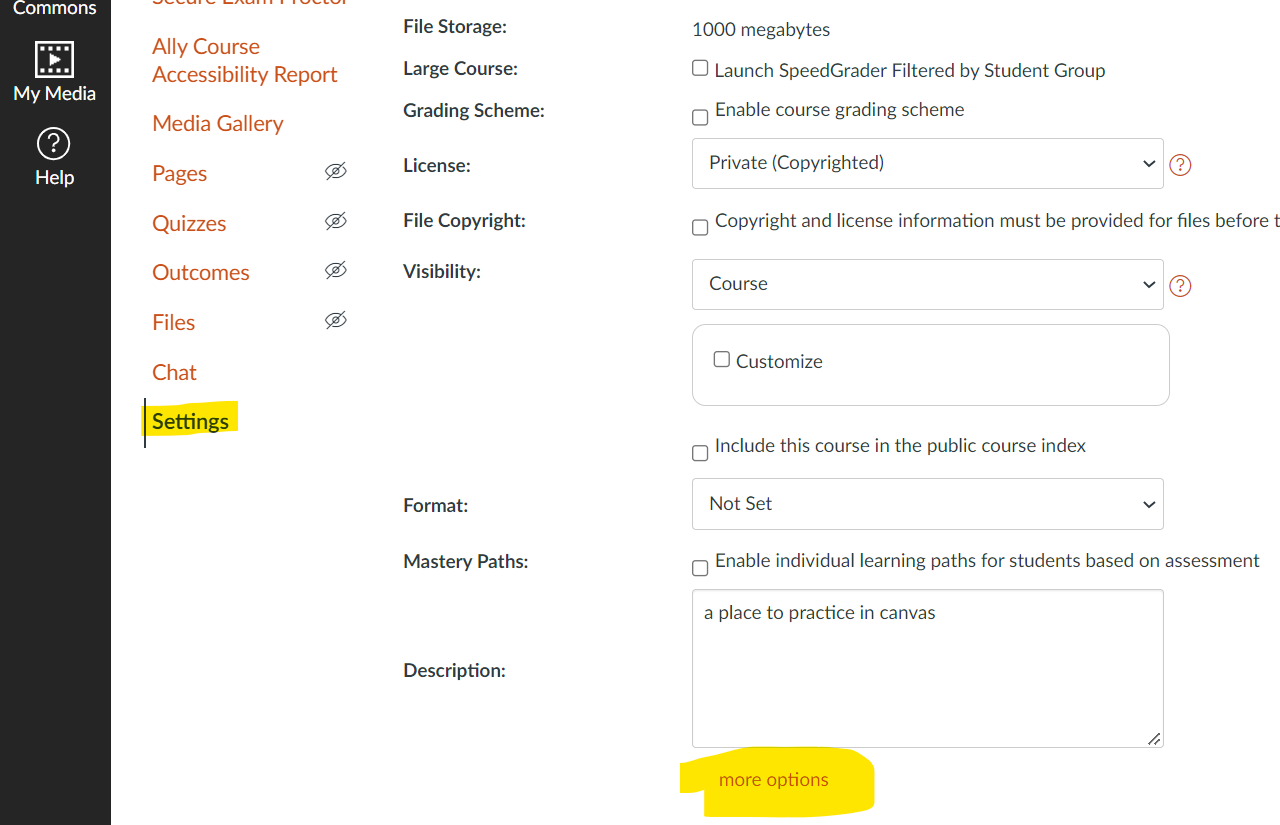
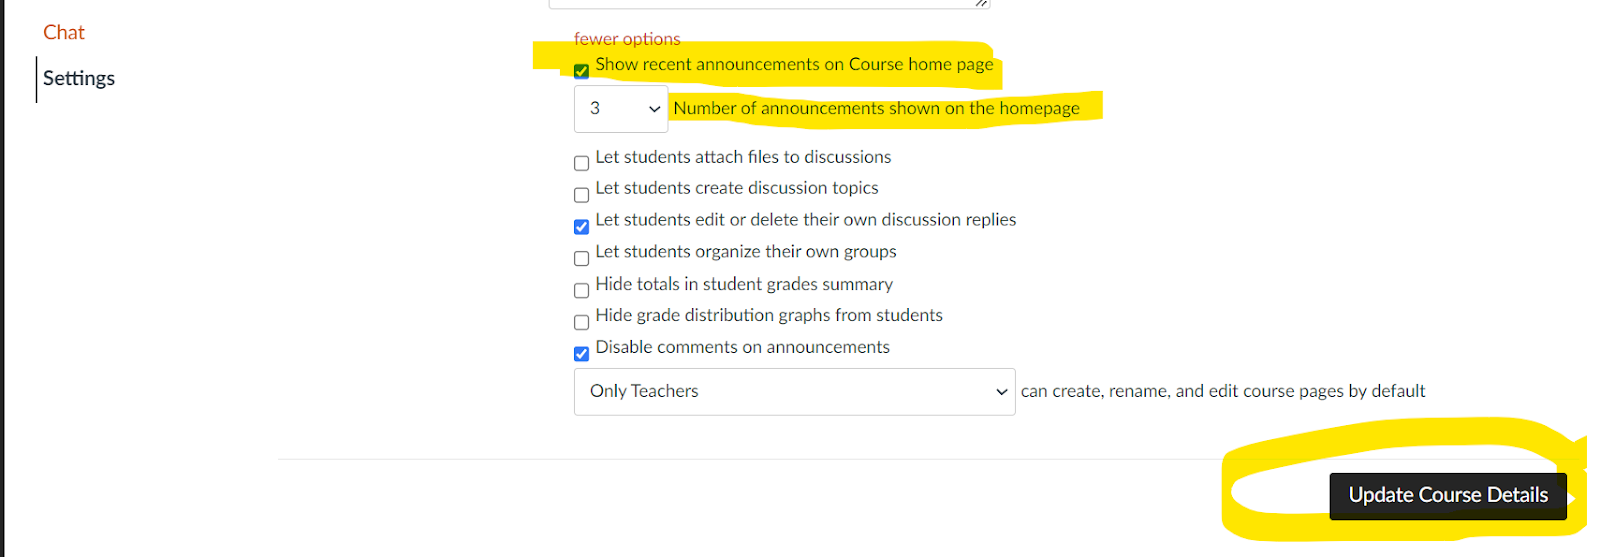
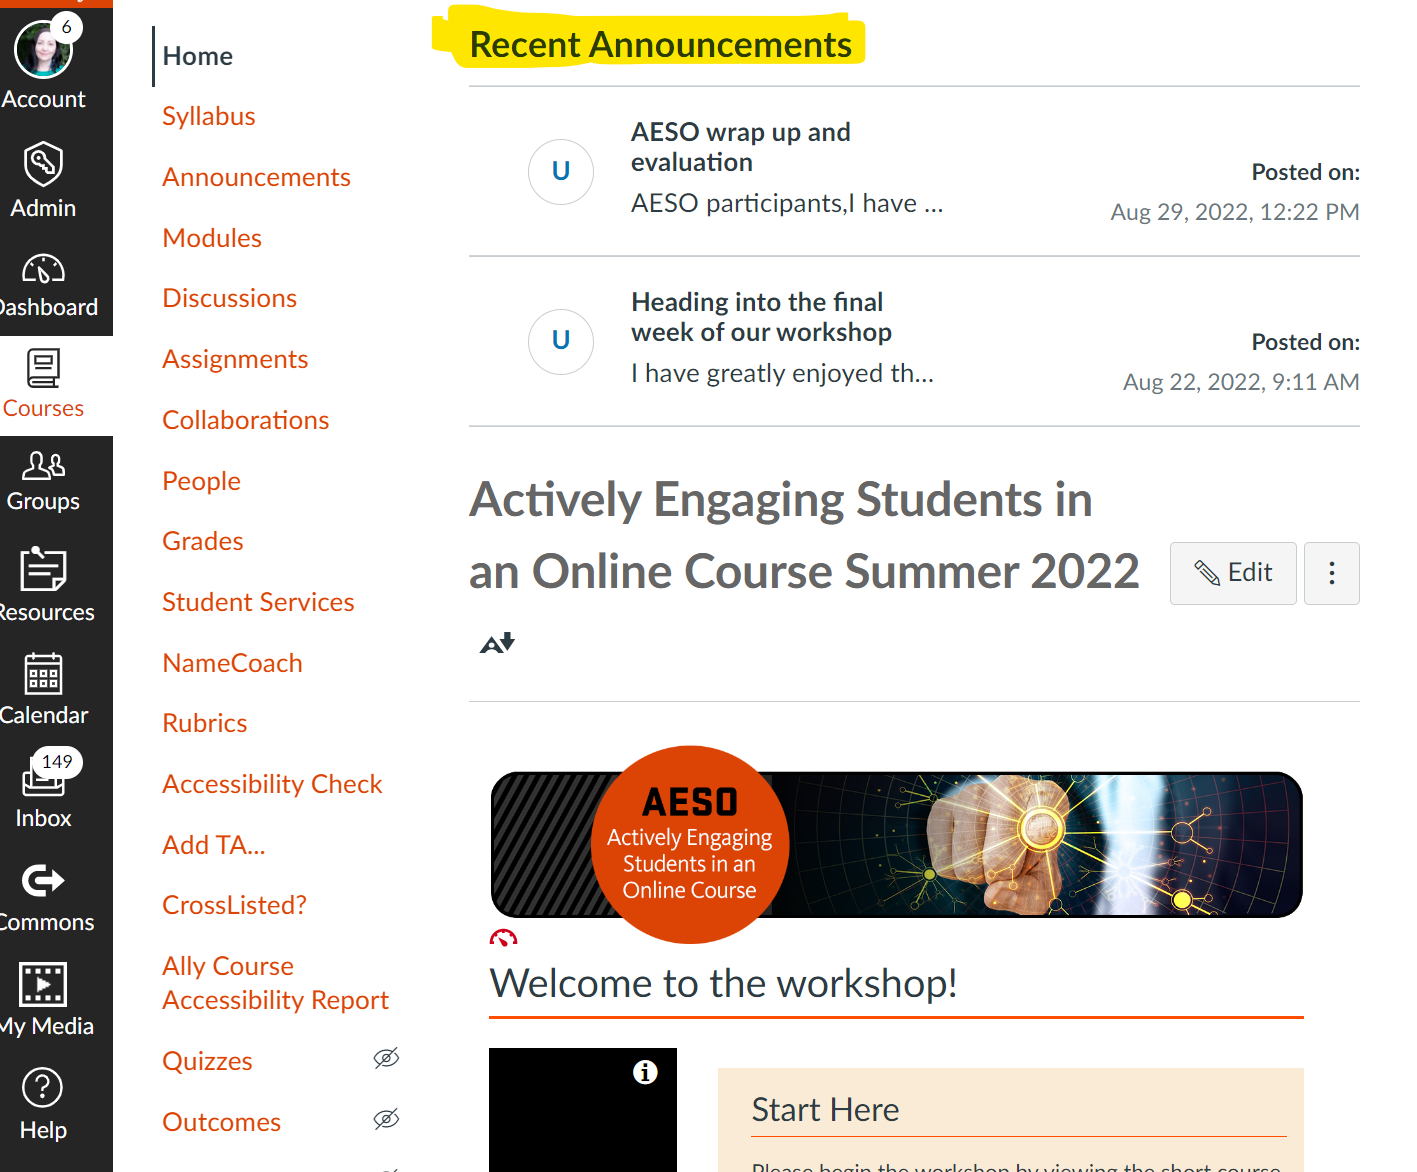
  • You can set up your homepage to show recent announcements at the top of the page, ensuring students see them when logging into the course (see below). Go to the main Settings menu item at the bottom left course menu. From there, scroll down and click the “more options” link at the bottom. You’ll then see further course options- click the box next to “Show recent announcements…” and then choose how many to display. Don’t forget to save your choices by clicking “Update Course Details”.

One of the major advantages of digital learning is that we can ensure our materials are accessible to all students. As such, at Ecampus, we are striving – and encouraging others to strive – for universal design, that is, design that anyone can use comfortably regardless of any impairments. In past posts, we have covered various ways of improving accessibility in a course, including how to fix PowerPoint or Word files. Today I’d like to focus on making Canvas pages accessible and making use of the on-page Accessibility Checker available in the Canvas Rich Content Editor.

Common Issues

Here are the main things you can do to ensure your Canvas pages (including assignments, discussions etc.) are accessible:

  1. Use proper hierarchy of headings and do not skip heading levels. You want to start with Heading 2 (Heading 1 is the title), then subordinate to that will be Heading 3 and so on. This is especially useful for screen reader users because it helps with logical page navigation. Some people choose their headings by the font size – not a good idea! If you want to adjust the size of your text, use the “Font sizes” option in the editor, after designating the correct heading level.
  2. Add an alt text description to any image or mark it as decorative. This is helpful for screen reader users and people for whom the images are not loading.
  3. Make the link names descriptive, rather than just pasting the url. For example, you would write Student Resources instead of https://experience.oregonstate.edu/resources. Also, avoid linking “click here” type of text. This helps screen reader users (which would read a url letter by letter), and it also makes it easier for everyone to scan the page and find the needed information.
  4. Ensure good color contrast. I often see instructors making their text colorful – in particular, red seems to be very popular. Indeed, a touch of color can make the page more visually pleasing and help bring out headings or important information! The danger lies in using colors that don’t have enough contrast with the background. This is especially problematic for people with less-than-optimal eyesight, but good contrast really just makes it easier for all of us to read. Also, a word of caution: Canvas has recently rolled out dark mode for mobile platforms and many people like to use it. Some colored or highlighted text may not look clear in dark mode.
  5. Add caption and header row to tables. These are extremely helpful for screen reader users, and the caption helps everyone to quickly see what the table is about. To add these things, you actually have to rely on the on-page accessibility checker – it will flag the issues and walk you through fixing them. While we’re on the subject of tables, you also want to avoid complex tables with merged cells because they are hard to navigate for a screen reader.
  6. Avoid underlining text. Underlining is normally reserved for links. Try using other means of highlighting information, such as bold, italics or caps.

Find and Fix

Canvas has a very useful tool that can help you find some accessibility issues as you edit your page. At the bottom of the editor, the icon representing a human in a circle will show notification when something is amiss.

Screenshot of bottom of editor showing the accessibility checker icon

When you click on that icon, the checker will open on the right-hand side, explaining each issue and allowing you to fix it right there.

Screenshot of the accessibility checker dialog window

This tool can find:

  • Skipped heading levels/starting with the wrong heading
  • Missing alt text
  • Insufficient color contrast – you can find a suitable color right here
  • Missing table caption and header row

It will NOT flag poorly formatted links or underlined text. So, for these issues, you’ll have to watch out yourself!

For a full list of problems verified by this checker, see this article from Canvas Community.

When you’ve finished building your course, you can also use UDOIT, the global accessibility checker, or Ally, if your institution has installed it. These tools can help you find additional problems, including embedded materials with accessibility issues.

To conclude, following these simple rules can greatly enhance the usability of your Canvas course. The built-in accessibility checker will help you spot and fix some common issues. Once you start paying attention, building instructional content with accessibility in mind will become second nature!

Oregon State University’s Learning Management System (LMS) migrated to Canvas in 2014-2015. The Canvas migration was based not only on the company’s feature alignment with our learning platform needs but also on the outstanding customer service Canvas Instructure has provided to our LMS user community including students, faculty, instructional designers, and administrators. How Canvas provides customer service offers an example we can model to continue to exceed student expectations.

According to Michael Feldstein’s July 8, 2018 report, major players in US LMS market include Blackboard, Canvas, Moodle, Bright Space, Sakai, Schoology, and others (Feldstein, 2018).

LMS Market share in North America

Figure 1: US Primary LMS Systems, July 6th, 2018 (Feldstein, 2018)


Of these major players in the LMS field, Canvas is most noticeable with fastest growth in market share among U.S. and Canadian higher education institutions.

LMS history and Market Share

Figure 2. LMS Market Share for US and Canadian Higher Ed Institutions (Feldstein, 2018)


Different people suggest different criteria when comparing LMSs. Udutu.com provided a list of 7 things to think about before purchasing a LMS:

  1. Be clear on your learning and training objectives;
  2. Don’t be fooled by the high costs of an LMS;
  3. Know the limitations of your internal team and users;
  4. Pay for the features you need, not for what you might need;
  5. The latest new technology is not necessarily the best one;
  6. Customer support is everything; and
  7. Trust demos and trials over reviews, ratings and “industry experts”

(Udutu, 2016).  Noud (2016) suggested the following ten factors to consider when selecting a LMS:

  1. Unwanted Features;
  2. Mobile Support;
  3. Integrations (APIs, SSO);
  4. Customer Support;
  5. Content Support;
  6. Approach to pricing;
  7. Product roadma;
  8. Scalability, Reliability and Security;
  9. Implementation Timeframe; and
  10. Hidden costs.

Christopher Pappas (2017) suggested 9 factors to consider when calculating your LMS budget:

  1. Upfront costs;
  2. LMS training;
  3. Monthly Or Annual Licensing Fees;
  4. Compatible eLearning Authoring Tools;
  5. Pay-per-User/Learner Fee;
  6. Upgrades and Add-Ons;
  7. Learning and Development Team Payroll;
  8. Online Training Development Costs; and
  9. Ongoing Maintenance.

Of all of the above lists, I like Udutu’s list the best because it matches with my personal experiences with LMS migrations.

I first used WebCT between 2005 and 2007, participated in migrating from WebCT Vista to Blackboard in 2008, and Angel to Blackboard migration in 2013-2014.  During my seven years of using Blackboard as instructional designer and faculty support staff, my biggest complaint with Blackboard was its unexpected server outages during peak times such as beginning of the term and final’s weeks. In 2014, I moved to Oregon State University (OSU). The OSU community was looking for a new LMS in 2013 and started piloting Canvas in 2014. At the end of the pilot, instructor and student feedback was mostly positive. Not subject to local server outages, the cloud-based system was stable and had remained available to users throughout the pilot. Of course no LMS is perfect. But after careful comparison and feedback collection, we migrated from Blackboard to Canvas in 2015. So far in my four years of using Canvas, there has not been a single server outage. Canvas has the basic functionality of a LMS.

Canvas wanted to expand their market share by building up positive customer experiences. They were eager to please OSU and they provided us with 24/7 on-call customer service during our first two years of using Canvas, at a relatively reasonable price. The pilot users were all super satisfied with their customer service. Several instructors reported that they contacted Canvas hotline on Thanksgiving or Christmas, and their calls were answered immediately, and their issues were resolved.

Michael Feldstein (2018) summarized that Canvas’ “cloud-based offering, updated user interface, reputation for outstanding customer service and brash, in-you-face branding” have helped its steady rise in the LMS market share. As instructors and instructional designers, we can learn a lot from the CANVAS INSTRUCTURE’s success story and focus on improving the service we provide to our students, such as student success coaching, online recourses, online learning communities, etc. Would you agree with me on this? If you have specific suggestions on how to improve the way we serve our students, feel free to let us know (Tianhong.shi@oregonstate.edu ; @tianhongshi) !


References:

Goldberg, M., Salari, S. & Swoboda, P. (1996) ‘World Wide Web – Course Tool: An Environment for Building WWW-Based Courses’ Computer Networks and ISDN Systems, 28:7-11 pp1219-1231

Feldstein, Michael. (2018). Canvas surpasses Blackboard Learn in US Market Share. E-Literate, July 8, 2018. Retrieved from https://mfeldstein.com/canvas-surpasses-blackboard-learn-in-us-market-share/ on February 2, 2019.

McKenzie, Lindsay. (2018). Canvas catches, and maybe passes, Blackboard. InsideHigherEd. July 10, 2018. Retrieved from https://www.insidehighered.com/digital-learning/article/2018/07/10/canvas-catches-and-maybe-passes-blackboard-top-learning on February 2, 2019.

Moran, Gwen (October 2010). “The Rise of the Virtual Classroom”Entrepreneur Magazine. Irvine, California. Retrieved July 15, 2011.

Noud, Brendan. (February 9, 2016). 10 Things to consider when selecting an LMS. Retrieved from https://www.learnupon.com/blog/top-10-considerations-when-selecting-a-top-lms/ on February 2, 2019.

Pappas, Christopher. (June 13, 2017). Top 9 Factors to consider when calculating Your LMS Budget. Retrieved from https://blog.lambdasolutions.net/top-9-factors-to-consider-when-calculating-your-lms-budget on February 2, 2019.

Udutu. (May 30, 2016). How to choose the best Learning Management System. Retrieved from https://www.udutu.com/blog/lms/ on February 2, 2019.

Wikipedia. (n.d.). WebCT. Retrieved from https://en.wikipedia.org/wiki/WebCT on February 2, 2019.


First, let’s start by considering the characteristics of effective feedback in general. What comes to mind?

sound waves

Perhaps you hear in your head (in the authentically authoritative voice of a past professor) the words timely, frequent, regular, balanced, specific. Perhaps you recall the feedback sandwich–corrective feedback sandwiched between positive feedback. Perhaps you consider rubrics or ample formative feedback to be critical components of effective feedback. You wouldn’t be wrong.

As educators, we understand the main characteristics of effective feedback. But despite this fact, students are often disappointed by the feedback they receive and faculty find the feedback process time consuming, often wondering if the time commitment is worth it. As an instructional designer, I hear from faculty who struggle to get students to pay attention to feedback and make appropriate changes based on feedback. I hear from faculty who struggle to find the time to provide quality feedback, especially in large classes. The struggle is real. I know this because I hear about it all the time.

I’m glad I hear about these concerns. I always want faculty to share their thoughts about what’s working and what’s not working in their classes. About a year or two ago, I also started hearing rave reviews from faculty who decided to try audio feedback in their online courses. They loved it and reported that their students loved it. Naturally, I wanted to know if these reports were outliers or if there’s evidence supporting audio feedback as an effective pedagogical practice.

I started by looking for research on how audio feedback influences student performance, but what I found was research on how students and faculty perceive and experience audio feedback.

What I learned was that, overall, students tend to prefer audio feedback. Faculty perceptions, however, are mixed, especially in terms of the potential for audio feedback to save them time.

While the research was limited and the studies often had contradictory results, there was one consistent takeaway from multiple studies: audio feedback supports social presence, student-faculty connections, and engagement.

While research supports the value of social presence online, audio feedback is not always considered for this purpose. Yet, audio feedback is an excellent opportunity to focus on teaching presence by connecting one-to-one with students.

If you haven’t tried audio feedback in your classes, and you want to, here are some tips to get you started:

  1. Use the Canvas audio tool in Speedgrader. See the “add media comment” section of the Canvas guide to leaving feedback comments. Since this tool is integrated with Canvas, you won’t have to worry about upload and download times for you or your students.
  2. Start slow. You don’t have to jump into the deep end and provide audio comments on all of your students’ assignments. Choose one or two to get started.
  3. Ask your students what they think. Any time you try something new, it’s a good idea to hear from your students. Creating a short survey in your course to solicit student feedback is an excellent way to get informal feedback.
  4. Be flexible. If you have a student with a hearing impairment or another barrier that makes audio feedback a less than optimal option for them, be prepared to provide them with written feedback or another alternative.

Are you ready to try something new? Have you tried using audio feedback in your course? Tell us how it went!

References:

Image by mtmmonline on Pixabay.

Note: This post was based on a presentation given at the STAR Symposium in February 2019. For more information and a full list of references, see the presentation slide deck.


H5P (HTML5 Package) is a free online tool that allows you to create and upload, download, and share HTML5 interactive content using H5P.org or by installing a H5P plugin on Drupal, Moodle, or WordPress.

5 Steps to use H5P.org
 Upload Download Share logo

  1. Go to https://h5p.org
  2. Click on “Create free account” [located in top right corner] and create a free H5P user account.
  3. Login to your H5P account with your username and password.
  4. Navigate to the “Examples & downloads” page and choose one of the H5P Content Types.
    • Use the “clone content” feature to create a new piece of H5P content from one of the examples.
    • Give the cloned content a title and adapt the cloned content to suit your needs.
    • Choose from the list of H5P options to embed and download the newly created content.
    • If there are no copyrights, uncheck the box next to the copyright button.
  5. Save the H5P content to your h5p.org account.

Once saved to your H5P account, you can embed the H5P content on a website, add it to a Canvas course Page or Module, or you can download a packaged h5p file and upload it to a Drupal, Moodle, or WordPress platform with an installed H5P plugin.

What Can You Make with H5P?

31+ HTML5 Interactive Content Types:
Games, Multimedia, Quizzes, etc.
See H5P Examples & Downloads

world wide web iconH5P.org

Want to add an engaging “wow!!” factor to your teaching, on-campus or online? Try using augmented reality (AR). It’s simple, easy, and there is a wide range of educational apps for iOS and Android devices, many for free. Best of all, AR taps into the eager desire many young people express to use technology in innovative ways, including as part of their learning experience.

Per a recent survey from Adobe Education, 93 percent of Gen Z students said that technology in the classroom was essential for their career preparedness, as reported in a 2016 EdTech article. The survey found that “Gen Z students see technology and creativity as important and intersecting aspects of their identities.”

jan17blog_surveygraphic

2017blog_pokemongo

Remember the headlines for Pokemon GO? Maybe you, too, got hooked. If so, you were one of about 21 million users who were playing every day! This is the compelling aspect of AR–it’s fun, engaging, innovative and for some, nearly addictive. The astonishingly realistic and detailed displays of many AR apps, such as those for physiology, add an exciting and engaging dimension to learning. And with AR instantly available in the palm of your student’s hand, there’s no reason not to explore this creative and exciting technology.

(Image by Paintimpact pokemon go)

But AR isn’t just for fun or entertainment. It got serious and life-saving applications as well. AR, and related technologies like virtual reality (VR), are being used in medicine with extraordinary outcomes. In 2015, a baby in Florida was born with only half a heart. Surgeons used a cell phone, 3D imaging software, and a $20 Google Cardboard VR viewer to “peer into the baby’s heart.” The surgeon, Dr. Redmond Burke, said, “I could see the whole heart. I could see the chest wall. I could see all the things I was worried about in creating an operation,” as recounted in How Virtual Reality Could Change the Way Students Experience Education.

Though many AR apps are geared towards a K-12 audience, there are still plenty of ways to effectively include AR in the college classroom. Nearly every discipline has AR apps, including anatomy and physiology, physics, geography, American history, language translation, astronomy, science, geometry, chemistry, marketing and advertising, mechanics and engineering, interior design, architecture, and more! Check out the 32 Augmented Reality Apps for the Classroom from edshelf, or simply do your own internet search for “augmented reality education” and explore.

You might be wondering how to employ AR technology in the online classroom. For apps that make AR targets available online (many do), just provide the URL and have students download and print. Some apps use the natural world as a target; for example, Star Chart uses GPS to calculate the current location of every star, planet, and moon visible from Earth – day or night – and will tell the viewer what they are looking at.

The possibilities are endless! Give it a try yourself. I am willing to bet that you will exclaim, “Wow, that’s so cool!”

You send out announcements but do your students actually get them? You might wonder if you are doing something incorrectly or if they just aren’t reading them, but, you’ll be interested to know that Canvas allows notification preferences to be modified by the individual user.

Notification preferance list in Canvas
Click to enlarge

Each user has the ability to alter their notifications from Canvas and choose how, when, and with what frequency they want to be notified of several different activities. They even have the option to receive the notifications via text or a different email address that they might check more frequently! What these individual settings mean is that if they select that they don’t want any notifications at all, they aren’t getting news of announcement postings, posted grades, due date reminders, or discussion board posts.

In order to encourage your students to receive notifications, you might think about sending a start of term email with an example of the notification preferences you would suggest based upon your class and explain to them why these specific notifications will help them as the term goes on. In that same email, you can also direct them to the Canvas Guides with step-by-step instructions on how to set up notifications in Canvas You send out announcements but do your students actually get them? You might wonder if you are doing something incorrectly or if they just aren’t reading them, but, you’ll be interested to know that Canvas allows notification preferences to be modified by the individual user.

Each user has the ability to alter their notifications from Canvas and choose how, when, and with what frequency they want to be notified of several different activities. They even have the option to receive the notifications via text or a different email address that they might check more frequently! What these individual settings mean is that if they select that they don’t want any notifications at all, they aren’t getting news of announcement postings, posted grades, due date reminders, or discussion board posts.

In order to encourage your students to receive notifications, you might think about sending a start of term email with an example of the notification preferences you would suggest based upon your class and explain to them why these specific notifications will help them as the term goes on. In that same email, you can also direct them to the Canvas Guides with step-by-step instructions on how to set up notifications in Canvas

Analytics in an Ecampus course can be a valuable source of information about students. It can help the instructor quickly “see” student progress through an online course and communicate with students that may be at risk, or look for patterns of behavior that may help guide future course improvements.

Within Canvas there are several different areas in which to review statistics and data to measure the success and activity of students within your course.

1. Course Analytics

From the Home page of a course in Canvas, click on “View Course Analytics”. Course Analytics will display the overall Activity, Assignment status, and Grades within a course across all of the students.

Course Analytics in Canvas

Click on a student name to focus in more detail on one activity and progress within the course.

specific student

2. Last Login

Though an instructor can determine the Last Login date for a student from the Canvas Analytics page, the People tool also allows an instructor to quickly check last activity of students within the course.

Last Activity

3. Detailed Page Views and Participation

The Access Report can also be found under the People tool. It allows an instructor to view detailed student activity such as the number of times each page/tool in the course was accessed by a student and the most recent access date.

Student Access Report

Currently students do not have access to view their own Analytics but hopefully in the future, they also can see how they are participating in the course to ensure they progress steadily towards success!

Resources

Want to find out more about Canvas Analytics? Review the Help guides at Canvas:

With the migration to Canvas comes many new features and methods for facilitating your course.stock-photo-female-tourist-holding-a-map-890139 The Canvas Guides provide a lot of information, but you may be wondering, where do I even start? Here at Ecampus, we’ve put together a few guides to help you become familiar with some of the tools in Canvas.

First, if you’re wondering, “I did this in Blackboard, but I can’t find it in Canvas; how do I…?”, we’ve created a few design options for that. These design options explore how to adapt features that you’ve used in Blackboard to the new Canvas environment.


We’ve also created some more in depth quick references that help explain how to use some of the most popular Canvas features.


The Quick Reference guides and other helpful Canvas-specific information can be found on our Canvas Faculty Resources page. We also have a list of resources for teaching an online course on our Teaching Resources page where you can find our favorite presentation, web-conferencing, and other tools.


Are there other features you’ve discovered or some you’d like to know more about? Leave your feedback in the comments!